OP

You are using an out of date browser. It may not display this or other websites correctly.
You should upgrade or use an alternative browser.
You should upgrade or use an alternative browser.
Projects from The Compound
- Thread starter mistervelocity
- Start date


OP
mistervelocity
Well-known member
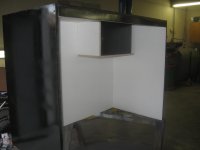
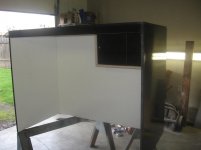
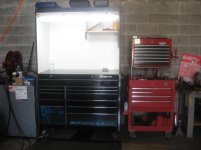
...And I threw together this hutch for my toolbox at work. Nothing fancy, just some melamine and black spray paint. Considering all I had to work with was a 40 year old Skil saw, it turned out okay. I built a cubby in the upper right corner for books and stuff but I'm not sure I'll be keeping the slider doors. Once I get it to work and get moved in, I'll post pics of the whole rig. It's still sitting on sawhorses in my shop. The Portland Swap Meet is next weekend and I've got a couple buddies coming to town so I've been focusing on cleaning up the shop.
Attachments


OP
mistervelocity
Well-known member
Finally got some help moving the homemade hutch to the shop. Spent a couple hours after work last night hanging the bright-*** light and cleaning out the black box and consolidating some of my duplicate tools. Took a couple boxes of random stuff home. Not done yet but I'll chip away at it over the next week and finish moving in. Maybe I'll take some drawer pics later so you guys can see just how few tools I actually get by with  . Check out my sweet new cushy mat.
. Check out my sweet new cushy mat.Attachments
OP
mistervelocity
Well-known member
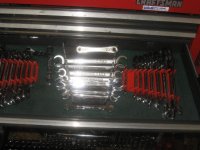
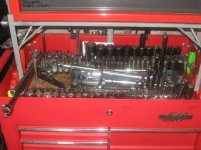
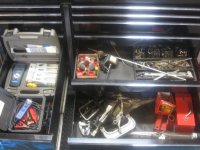
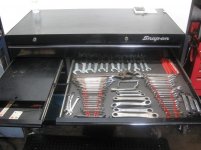
I guess I never got around to posting my box contents here but thought I should just for my own records. Feel free to ask about anything you don't recognize.
The workspace at my day job. Then, some of the drawers in the box on top of the service cart.
The workspace at my day job. Then, some of the drawers in the box on top of the service cart.
Attachments


OP
mistervelocity
Well-known member


OP
mistervelocity
Well-known member
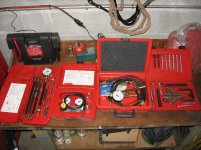
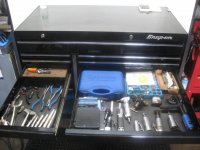
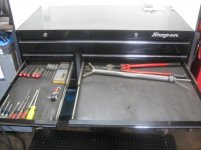
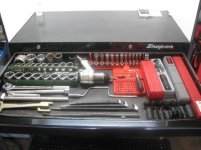
The bigger box...
These were actually taken a few months ago so there have been a few additions. Namely, the empty drawer has been filled with electrical testing equipment, some newly acquired Snap-On crowsfoot sets, Cornwell hole saw set, Blue Point master balancer installer set, maybe a couple small things I'm forgetting.
These were actually taken a few months ago so there have been a few additions. Namely, the empty drawer has been filled with electrical testing equipment, some newly acquired Snap-On crowsfoot sets, Cornwell hole saw set, Blue Point master balancer installer set, maybe a couple small things I'm forgetting.
Attachments

OP
mistervelocity
Well-known member


OP
mistervelocity
Well-known member
The '68 Riv that my dad has been working on for the last few months over at Compound East is finally done and for sale. All new brakes, shocks, balljoints, tires, paint, upholstery, refinished wood, lots of wiring repair, engine reseal...
Attachments

OP
mistervelocity
Well-known member
And the slow progress on my '35: Work has been super busy for the last couple months so not a whole lot has been done. At this point the captured nuts are welded inside, the extra holes are welded up, the boxing plates are tacked in and the crossmembers are set in place to be trimmed and fitted. Nothing has really been done for close to a month.
Attachments
sean Buick 76
Well-known member
As always happens the project looks awesome!
OP
mistervelocity
Well-known member
Thanks for checking in.
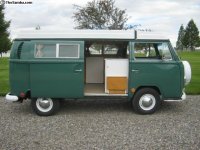
The bus sold yesterday. He's on the hunt for a '30s Ford now.
The bus sold yesterday. He's on the hunt for a '30s Ford now.
madoc1
Well-known member
just finished reading .. you guys are animals, in a good way. wow, how old is your dad? great info. especially on the quad/5 speed. set up. I want the dat 520!.
jim
jim
OP
mistervelocity
Well-known member
Glad you were entertained. The old man just turned 63 and retired about a year ago. Doesn't seem to have any trouble staying busy.
sean Buick 76
Well-known member
We need more pics of the cool car and truck projects!! Pics or it didn't happen LOL!!
OP
mistervelocity
Well-known member
Give me about a week and I should have an update. Been really ******* with work and house projects but plan to start back in on the '35 pickup frame again soon. After my dad sold his latest bus he also sold a boat that he had picked up just for a trip down to Lake Shasta. Now he's on the lookout for either a '35/'36 Ford or possibly a Model A.
OP
mistervelocity
Well-known member
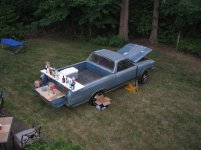
We had my wife's annual white trash birthday gathering last Saturday. Some attendees were in costume, some weren't --- I always am. Sorry guys, that hot piece in the moomoo with the curlers and black eye is all mine. The dude in the cut-off sleeveless coveralls and gold chain is the ever elusive Jerod. The El Camino got put on cinder blocks and served bar duty.
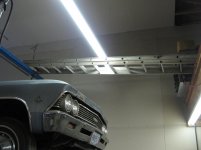
But, before we could play we had to get some work done. When the shop was built 15 years ago we wired it for two 8' lights above the hoist. I've actually had them leaning in a corner all this time and just never got around to installing them. Since Jerod (6'4") would be in town and has probably an extra 10" of reach over me (5'10"), I got him to help hang them. I'm posting some pics with the implied understanding that you guys won't tell OSHA or his wife how we did it.
Here's the basic formula; 18' ceiling, lights hanging from 6' chains, (1) 24' extension ladder, (1) 6' step ladder, (1) El Camino. We were sober.
The front one wasn't too bad. We put the El Camino up on the hoist to act as a net in case **** went sideways and he had to bail. Then he would at least only fall 8' to the hood instead of all the way to the concrete floor. An extension ladder was put between the catwalk and the top of the hoist to walk out and screw the chains to the ceiling.
The light between the roll-up door and the hoist was a bit more complicated. On one side we used a 6' step ladder in the bed and Jerod stood on the 2nd to the top rung to screw it in. On the other side it was just too far out of reach. We ended up building a brace from two 2x4s with V-notches cut in the end to lean a rung of the extension ladder. I would have taken action pics but I was busy holding the ladders.
It was seriously janky but got the job done. Much better lighting for chassis building now. Notice the chimney STILL isn't installed? Maybe next weekend.
Attachments


sean Buick 76
Well-known member
Now that is cool!!! Lets have a picknick and put headers and straight pipes on the camino!
OP
mistervelocity
Well-known member
The frame for the '35 pickup is apart and back in the corner until I finish up a couple other tasks. Then I'll get back to it.
Had 2 dump truck loads of gravel delivered yesterday. The driver laid it out pretty well and my dad was on hand (I had to be at work) to do some tractor work. I spent a few hours this morning with a rake and on the tractor until I was satisfied. Good enough for who it's for.
While I had it here I gave the tractor an oil change. No clue how long it's been since the last one. Safe guess that it's been at least 10 years. Normally it lives at my brother's house about a mile away. Outta sight outta mind, I suppose. Not sure if I've ever posted it before but my great grandfather used to own it in the '50s and '60s. It was sold to a family friend who later gave it a cosmetic restoration then my dad eventually bought it back probably 20 years ago. My nephew is the 5th generation to use it. Kinda cool I guess.
Random pic of an old 327 block that serves as a planter in front of the shop.
And since I was already on the roof I snapped a shot of a construction project across the street from me. Tore down 1 house and took out a bunch of trees. IIRC either 60 or 80 houses will be popping up soon. Largish lots like mine just keep getting more scarce. Fine by me.
Attachments


OP
mistervelocity
Well-known member

madoc1
Well-known member
tractor--a 8n or a 9n? used to have a 9 with a two speed converter. made it a six speed. sold it with the farm.
if I had bigger place I would buy another one. they were unbreakable. jim
if I had bigger place I would buy another one. they were unbreakable. jim
sean Buick 76
Well-known member
I love the 327 planter, i will copy that!
OP
mistervelocity
Well-known member
'49(?) 8N. Considering how little attention it gets it's been great. The pump bleeds by a bit but still works okay.tractor--a 8n or a 9n? used to have a 9 with a two speed converter. made it a six speed. sold it with the farm.
if I had bigger place I would buy another one. they were unbreakable. jim
Feel free. I hold no patents on either side of the border.I love the 327 planter, i will copy that!
OP
mistervelocity
Well-known member
Picked these up Saturday for 1/2 price. They'll get stuck in the corner and I'll clean them up next spring and sell them at the swap meet. I sold 3 this year and they went fast. Planning to take 5 next year. It's a nice little cash infusion during a historically tight time of year.
Attachments
OP
mistervelocity
Well-known member
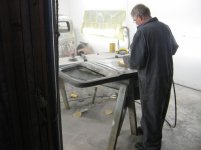
I'll split yesterday's event into two posts. So, here's how it went down...
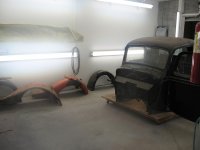
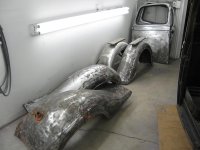
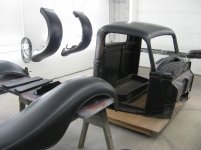
My dad rode into town from Idaho late Sunday night. In the morning we moved the pile of body parts in to the booth and he went to town stripping paint. Removed the driver's door and gutted both doors and the cab. I always knew the passenger door had some filler in it. Had no idea that it was over 1/4" thick. Assholes.
My dad rode into town from Idaho late Sunday night. In the morning we moved the pile of body parts in to the booth and he went to town stripping paint. Removed the driver's door and gutted both doors and the cab. I always knew the passenger door had some filler in it. Had no idea that it was over 1/4" thick. Assholes.
Attachments


OP
mistervelocity
Well-known member
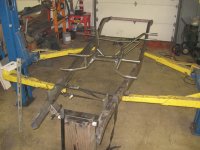
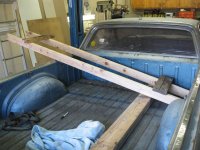
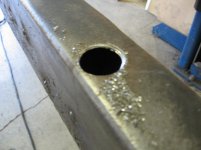
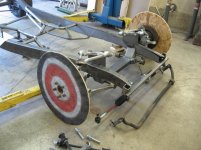
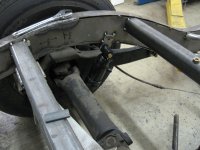
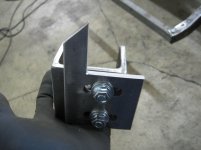
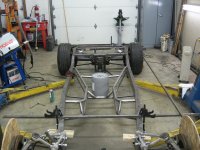
While we was doing that, I was in the other shop setting up the frame. Everything was still in a pile in the corner. Started by making 12 access holes in the bottom of the rails. There are 4 on each side for cab mount bolts, 2 on each side for bed mounts. Next I set the rails right side up and bolted in the rear crossmember. I needed to build a temporary spreader bar that bolts on at the front bumper location to maintain the proper width at the very front. Once the front and rear were tied together I found that the center needed to be spread about 2 inches to maintain proper width so all the cab and bed mounting holes. Porta-power to the rescue. The telescoping aluminum thing is called a tram. It's used to diagonally check holes in the frame which let's you know it's square and not diamond shaped. Also note the braces I have tacked to the bottom to keep it in place once I got it where I wanted it. Once everything was verified square and level it was time to lay the Xrails in position and trim the ends so it fit between the rails. Apparently, when I tacked them together a couple months ago the X was level but racked by about 1/4" so I needed to cut a few tack welds and square it up. Final step was tacking in the front crossmember. Needed to be square, level, and tipped up exactly 1*. The old guy is my wife's grandpa, Rusty.
So, when I quit at about 9pm it'd been about 12 hours in the shop. Measure, adjust, measure, adjust, tack, measure, repeat. At this point everything is firmly tacked in place. It's absolutely square and within 1/8" of level front to rear. Not bad for an 80 year old farm truck. I have to work on Rusty's Sable in the morning but after I get done with it I'll jump back on the chassis. Updates to follow.
So, when I quit at about 9pm it'd been about 12 hours in the shop. Measure, adjust, measure, adjust, tack, measure, repeat. At this point everything is firmly tacked in place. It's absolutely square and within 1/8" of level front to rear. Not bad for an 80 year old farm truck. I have to work on Rusty's Sable in the morning but after I get done with it I'll jump back on the chassis. Updates to follow.
Attachments


OP
mistervelocity
Well-known member
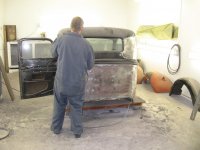
My dad kept slayin it over in the paint shop and got most of the body parts stripped. Found a couple ugly spots along the way. Seems the last guys to do paint prep just filled dents rather than trying to work anything out. My brother definitely has his work cut out for him. While he was doing that I broke down the front clip and pulled the spring from the rear assembly so I could begin the mockup process.
Attachments


OP
mistervelocity
Well-known member
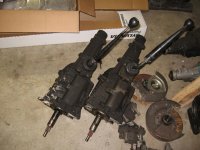
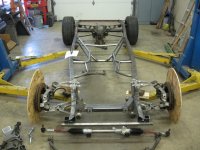
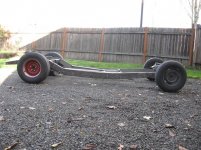
Not a huge update but posting just the same. Bought a gently used rack that the seller claims is a Flaming River quick ratio. Can't absolutely confirm because there are no identifying numbers or marks but it seems to be true. Even if it's an offshore knockoff -- the price was right. Bolted on a set of wheels and tried to set ride height so I could take all my measurements for the crossmember and trailing arm brackets. Since I didn't have any wheels that cleared my bigass front brakes, I has to get creative. Don't laugh...okay, laugh. Starting to kinda look like something...
So, I didn't really do much in the way of fabrication but I DID get a bunch of useful and necessary measuring done. Also did a steel inventory and it looks like I have everything I need on hand. More to come.
So, I didn't really do much in the way of fabrication but I DID get a bunch of useful and necessary measuring done. Also did a steel inventory and it looks like I have everything I need on hand. More to come.
Attachments


OP
mistervelocity
Well-known member
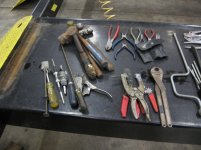
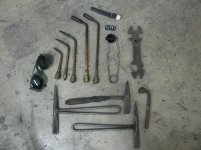
Picked up a lot of old tools a couple weeks ago. Was cruising CL for some large wrenches and stumbled on a poorly written ad. Ended up buying everything in the tub for $100. Mostly old US made tools; Mac, SnapOn, Plomb, S*K, Craftsman, Proto, Williams, Powr-Kraft, Cornwell, Matco, Bon-E-Con, New Brittain, Cresent, Vice Grip. Maybe only 6-8 Taiwanese pieces in the whole pile. According to my rep, some of the Cornwell sets date back to the late '20s and early '30s. All I really wanted was the large wrenches in the 3rd pic. They stayed at work and most of the rest came home. Some just got tossed. I'm hoping I can sell the 3/4" and 1/2" socket sets to offset the cost.
Attachments


OP
mistervelocity
Well-known member
A few updates...
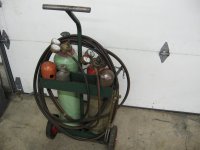
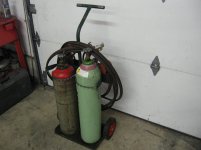
Picked up a nice little torch set from the same guy I got the sand blaster from. Old Victor rig with full tanks. The regulator on the Acetylene tank leaks a bit but still works fine. Still feels like a good buy at $100.
Picked up a nice little torch set from the same guy I got the sand blaster from. Old Victor rig with full tanks. The regulator on the Acetylene tank leaks a bit but still works fine. Still feels like a good buy at $100.
Attachments
OP
mistervelocity
Well-known member
OP
mistervelocity
Well-known member


OP
mistervelocity
Well-known member
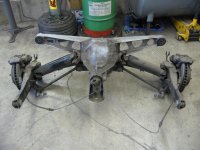
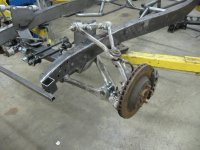
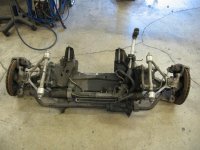
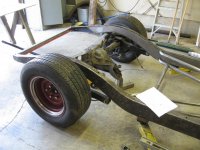
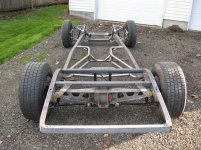
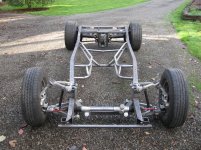
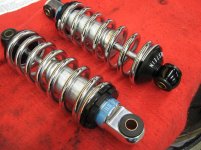
The rearend is done and basically aligned. The front suspension is done but I'm not quite finished with steering. Next step is to set the body on to check how the wheels fit the fender openings before I finish weld all of it in to place. Hopefully I won't need to move anything. You'll probably notice that the rear spring and the front coilovers are AWOL. The chassis is set at ride height right now and those parts will be installed once the weight of the drivetrain and engine are added.
Attachments

Madhatter10-6
Well-known member
Love the old Z's. I have always wanted to build a 240 from the ground up.
sean Buick 76
Well-known member
That truck is turning out really nice! What color paint are you planning to use?
OP
mistervelocity
Well-known member
Thanks, guys.
The color I have in mind is a very, very dark green -- almost black. Actually, think black with a green pearl. I don't have a paint code in mind specifically and it may end up being a custom blend. Still lots of body work before we get to that point.
The color I have in mind is a very, very dark green -- almost black. Actually, think black with a green pearl. I don't have a paint code in mind specifically and it may end up being a custom blend. Still lots of body work before we get to that point.
OP
mistervelocity
Well-known member
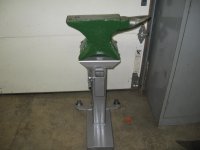
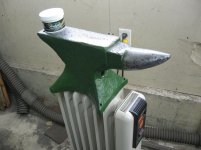
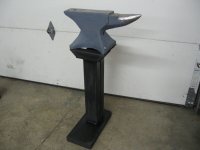
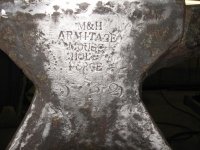
Almost forgot, I made an anvil stand. Turns out this old anvil that's been kicking around here for decades is at least 100 years older than I am. Anyway, I threw together a stand from scrap metal I had then added a receiver for a vise mount. The base has wheels on the back and is filled with concrete mix.
Attachments


OP
mistervelocity
Well-known member
11-13-14
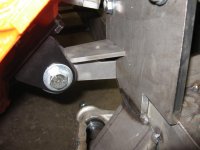
A couple positives and a negative to update. No pics yet though. The good news is that I got my tie rod ends figured out. '89 T-bird solved the problem of how to connect an aftermarket manual rack to C4 spindles in an early Ford frame. I'll take that as a win. Then I rolled the frame over to the paint shop where we set the cab on the frame -- no problems. Then we set the bed on the frame -- slight interference with one of the cross braces. Not really a problem since I'll be ordering a new bed anyway. Then we mocked up the rear fender. Wheels fit the opening PERFECTLY -- no problem. Set the running board in place -- slight clearance issue with trailing arm bracket but easily fixed so, no problem. The last piece to test fit was the front fender and that's where things got disappointing. First, the wheel appears to be a bit forward in the opening. Maybe 1/2" to 3/4" and it actually looks okay like that but I was shooting for centered. The really bad thing is that the front of the upper control arm hits the inner edge of the fender. NO BUENO! So what I think I might do is move the front cross member down and back around 1/2". Before I don anything I need to call the kit manufacturer and see what he says.
To sum up, everything from the firewall back looks good. The front needs some adjustment. Glad I only tacked it in place. Kind of ironic that the front "kit" that came pre-fabbed and with detailed install instructions complete with exact measurements is being problematic while my homemade rearend install seems to be dead-on.
11-15-14
Observing a moment of silence.
4:57 11-15-99.
Fifteen years ago I beat the reaper.
Attachments

OP
mistervelocity
Well-known member
11-16-14
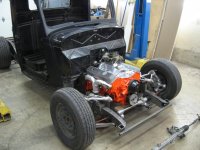
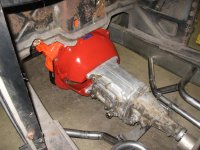
I put in about 8 hours yesterday but don't feel like I got much done. Like I posted earlier, we test fit the body and found that the crossmember needs to be slightly relocated. That hasn't been done yet. Since the cab was still sitting there I wanted to test fit the drivetrain. Bench tested the pile-o-distributors. Did a bunch of painting parts and temporary assembly of the engine/transmission. Then I slid it into place. Trimmed the frame side of the motor mounts and for a friction fit and blocked up the front of the pan. Then I trimmed the transmission mount and tacked it in place. I kept it on the low side since I can always space it up but can't really drop it down. Dropped it on the ground and rolled it outside to settle the suspension. Looks like I'll be raising the engine about an inch from where it presently sits. At that point I was just tired of it so I poured a drink and spent some time cleaning up the shop.
I put in about 8 hours yesterday but don't feel like I got much done. Like I posted earlier, we test fit the body and found that the crossmember needs to be slightly relocated. That hasn't been done yet. Since the cab was still sitting there I wanted to test fit the drivetrain. Bench tested the pile-o-distributors. Did a bunch of painting parts and temporary assembly of the engine/transmission. Then I slid it into place. Trimmed the frame side of the motor mounts and for a friction fit and blocked up the front of the pan. Then I trimmed the transmission mount and tacked it in place. I kept it on the low side since I can always space it up but can't really drop it down. Dropped it on the ground and rolled it outside to settle the suspension. Looks like I'll be raising the engine about an inch from where it presently sits. At that point I was just tired of it so I poured a drink and spent some time cleaning up the shop.
Attachments
sean Buick 76
Well-known member
Very cool progress!
What is the story behind "beating the reaper"?
I like all the fab work, it is a super cool project!
What is the story behind "beating the reaper"?
I like all the fab work, it is a super cool project!