Spent most of the day today working on a new driveline tunnel. The Bitchin Products floor pan had a wide shallow tunnel that just didn't work for this application. It was too wide and not deep enough. It's a bit hard to see in the pictures but there was only about 1/4" of clearance on the floor pan, I wasn't comfortable leaving it like that. I opted for 1-1/2" of clearance all around instead. Probably more than I needed, but it still leaves me a lot more room inside. This first piece of CADboard ends where the frame recess would normally be on a '32. I discovered I could eliminate the recess completely when I implemented next- level FEA (F*ckup Expectational Avoidance) and mocked it up. I will have to do some kind of removable panel in the event I ever need to remove the starter. Only have about 3/8"-1/2"" of clearance between the CADboard and the starter.

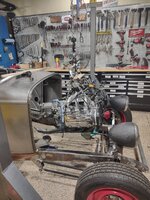
One benefit this Honda engine gave me is the opportunity to do a completely flat firewall, with more legroom, and a lot more width in the driver's side footwell- if I reworked the tunnel.

I dug out a piece of 18 gauge steel, and started bending a cone out of it, using a piece of pipe, brute force, and ignorance. I know I could have looked up how to layout a cone frustrum, spent an hour with a piece of butcher paper making a pattern, etc... but the shape wasn't that critical so I opted to just dive in.


When I got it close to the final dimensions I needed and it looked like it might actually fit, I bent the flanges on my little homemade sheet metal brake, then took the plunge and drilled out the spot welds on the floorpan. Didn't have a spot weld cutter so I use a 1/8" pilot drill and then a sharp 1/4" cobalt bit to drill out the spot welds. Surprisingly, it came apart really easy. .

The new tunnel only needed to be 4.5" wide, so this is opening up up a ton of room in a 90+ year old car that is notoriously tight in this area.

Here's the original tunnel and the new one side by side for comparison. They both protrude about the same length into the car. l built the new one to bridge the gap whereas the Bitchin Products floor pan/tunnel stops about 4" short of where my flat firewall ended up- I don't need the 4" recess with the Honda engine.
I built the new tunnel in three pieces- the slight conical transition off the firewall, the steeper main tunnel and the rounded end cap. It took a lot of tack welds and a lot of grinding to get it where I wanted- but I am happy with how this turned out. The welds you see on the mounting flange were all done from the inside- I didn't want to warp the flange by pouring a lot of heat into the joint. I did these in stages and let them cool in between.

I did **** joints on the three cone sections, welded both sides for strength and to give me enough thickness to blend the weld transitions. They cleaned up well, used a combination of 4.5" 40- grit flap discs, 2" 36 grit sanding discs, and a 2" scotchbrite surface conditioning disc to smooth out my welds on the top side. My little Milwaukee M12 right angle die grinder got a real workout on this project. No way I am showing the underside....but everyone probably already knows what a hundred+ tack welds look like, anyway.

Next step is to fill in the void left by removing the wider tunnel. It has an offset flange at the top for the lap joint that ties into the firewall. I'll have to fab filler pieces for both sides of the tunnel as well- and then figure out how I am going to secure the flat firewall to the cowl... and make the assembly removable...