andyvh1959
Well-known member
Lots of impressive work.
I like the "Connizona" plate right near the center of the flag.
I like the "Connizona" plate right near the center of the flag.

What else do you have hiding in there?
The deuce was the first thing put inside the shop. It’s also the only thing he ain’t touched in two years.Love the deuce.

Actually Cam is right. (Sounds unusual doesn’t it)?Love the deuce.


 Decided to just let these weather naturally.
Thanks, Tony. The view out the back of the house pales in comparison to the view of the Superstition Mountains out the front.


Damn Scott, You have a great eye! these are all awesome projects! What else do you have hiding in there? That is one awesome view out of your garage door
 We don’t get a lot of snow here but do see this about every other year or so

 Handles were a fun project, I had 2 little pieces of leftover 5/8 ornamental iron baluster stock in my scrap bucket so I clamped them in my big outdoor vise, heated cherry red with the oxy/propane torch and gave each piece a couple of twists with a pair of 12” Crescent wrenches. Re heated and bent the ends to 90 around the vise jaws (because it was right there, the size looked about right and I didn’t have to measure anything.) Trimmed the ends, welded on a 1-1/4” square piece of 3/16” flat bar, then ground the welds smooth and blended them into the handles. Final step was to drill and blind tap for 1/4 bolts to hold them on. Hit the high spots with a 120 grit flapper wheel, then clear coated them with 3 coats of spray lacquer.
  I put four 1/4 thick by 1-1/2” diameter non- slip feet on the bottom for it to sit on. Then, just for insurance because I didn’t like the way the glue joints were parallel to the handles I added a couple of 1/4” x 3/4” hard maple cleats. Screwed the center down tight, elongated the screw holes on the ends a little bit to allow for the wood to expand and contract without breaking a glue joint. They are invisible in use.
When we moved from AZ to the Olympic Peninsula people used to ask what we did in the summer. I would tell them that if it happened to fall on a Sunday we’d have a picnic.Good to see other having to speed up the rust process. bet you don't miss that part of WA.
It’s at our cabin up in the White Mountains.
So where did the flag end up?


Cool, That cemetery few minutes from my place.With the almost-rolling workbench done for now it was time to move on to another project- a memorial bench for my Father in Law for our side yard landscaping project. First step was the base for the legs.We were working on a large remodel in our big vacant gravel side yard, wanted a fitting memorial for him, and a place for my wife to visit him here- so we sprinkeld a few of his ashes around the tree we planted behind this bench, the rest are interred with my MIL at the National Cemetery in CaveCreek, AZ.

Wife has been wanting me to build something with address on it since we moved in. Just over 10yrs ago now!Since these are in no particular order, here’s the address marker I made for the house. We’re in a small gated community of 45 homes on ~acre lots; most of the neighbors have their addresses on boulders or flagstone. I’m more of a metal guy, so I decided to integrate both.
The previous owner had a nice thick piece of flagstone and some ceramic tile numbers she was going to use for her address marker. I liked the flagstone, so I kept it and sent the tiles to a local thrift shop.
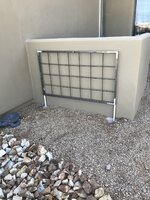
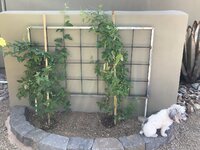
Wanted something that reflected the mining heritage of the Superstition Mountains and incorporate the rusted iron design elements we already had going on the property.
Had a bunch of 3/8” rebar and 1x1 tubing left over from the trellises I built for the courtyard and golf course so I used that. First step was to build a rebar cage for the Palo Verde stone we already had in the landscape drainage.After the cage was complete I scrounged up enough sheet metal to built the bulwarks. Outside wall were cut from 16 gage steel purlin stock, the inside walls were cut out of a couple of old 2’ recessed light troffers. (did mention I am a bit of a scrounger, didn’t I?)The tops were new 20 gauge that were just hand bent and tacked into place. After A couple of hundred tack welds the corners were ground smooth and blended.
Next step was to hit all the flats with a flap wheel to remove all the paint and prepare for the patina.
Best way I have found to put an instant rust patina on steel is to spray it with a mixture of vinegar, salt, and hydrogen peroxide. It will foam up as it works, don’t try to wipe it off- just let it go, it will disappear as it ages.Formed and poured a little pad to bolt this to. Used it as an opportunity to get rid of more pieces of scrap rebar, etc.-tacked together a little reinforcing cage, then poured three bags of ready mix. Added a bottle of buff concrete color let the slab blend into the landscape gravel.
Ready to install the marker, just put in a couple of Tapcons to keep in in place, then filled the rebar cage with 4”+ Palo Verde stone. Top bolts on with four 1/4” bolts, nuts were welded into the frame and ground flush during fabrication.
I actually tried to copper plate the steel numbers with copper sulfate using instructions I found online but it didn’t really work. I wanted them to weather out naturally to a copper verdigris finish, but that might be a project for a later date. The numbers were bandsawed out of 3/16” plate with 1/4” bolts welded to the back as stand offs. They’re just friction fit into 1/4” holes in the flagstone so I can just pop them out and get them plated if I decide to go that route.
Maybe after I retire I will have time to organize stuff. I want to restore a lot of my tools to NEW condition also. The ones bought back in the 70's are looking pretty rough like my cherry picker it has spent 75% or more of it's life outside in the elements. It's now got a broken wheel. Seen better days.Finally getting stuff organized.
I bought a bunch of gym lockers for garage storage when we first bought this place. Paid $5/door for them. Used all the 12” square lockers with my 46” Husky roller cabinets, completely filled one side wall of the garage. Tony (Bearsfan) had posted pics of his bench with some galvanized diamond plate pegboard behind it. I really liked the look so I ordered 12 pieces from Home Depot. (Out of stock now)
 I was too lazy to tear apart the finished bench so I spent twice as much time making up this mount instead. Time will tell if it’s going to be strong enough.
 It’s attached with lag bolts and 1/4” self drilling teks.
  Should be strong enough if I don’t get too carried away.
 Only change to the mount was that I drilled and tapped the rearmost hole instead of using a through bolt, it was covered by the receiver tube. It was a 10mm x1.5 hole.
  Nothing worth saving here, straight to the trash.
 After the top of the column was squared up I attached the receiver I cut out of the old hitch. I left the short section of cross member to give me a little more height and have a place to insert a bar if I need to keep the stand from rotating if and when I need more leverage.
  Ground everything smooth, wire brushed the drum and then hit it with a coat of rust converter. Two coats of hammer tone gray and it’s ready to use.
  To be continued… weekend isn’t over yet.
 Test fitted it, then took the CAD to the next level and utilized FEA (f*ckup expectational avoidance) to cut the shape out of masonite to re-verify the fit. That way I could use also the saw to cut the heavy aluminum plate.
 Had to do a little file work on the threaded bosses where the table mounts to the saw to get the table perpendicular to the blade; happy with the result.
 Time to fab the mount for the saw.
 The saw is attached with just the one bolt, the tabs are a tight friction fit for support and to prevent lateral movement. It’s really solid during use.
  Here’s a couple of shots of it in place. It’s lightweight, easy to move and store and doesn’t take up bench space like the SWAG design I originally planned on building.
 I had purchased a Kreg switch to turn it on and off (trigger is Zip-tied down) but it was too bulky and the mounting tabs were in the wrong position. So I just mounted a heavy duty power strip on the end of the bench, will use the on/off switch on it.
  Thats a lot handier than the big Kreg switch and will give me power there for other things.
 Since the saw is fully supported independent of the table, blade changes are actually easier, no wrestling with saw and blade on the bench.
 Last welding project of the weekend was to weld my little bench top English Wheel to a piece of receiver tube. Trimmed the protruding vise mount off the back side first. This was a impulse purchase, I think around $75 delivered, came with a full set of dies. Box was destroyed when it arrived but all the parts were there. I figured the dies were worth $75 if I need to build a different or stronger frame. Haven’t used it yet, will report how and if it works when I try it out on a little project I have in mind for the 32.
Beautiful job on the portaband mount PugetSince I had hitch fever I decided to tackle the Milwaukee portaband mount I have been putting off for too long. Originally this was going to be a SWAG-inspired table but one thing I learned from the simple DeWalt portaband vise mount I cobbled up ten years ago is that it generates a LOT of swarf; too much to have on top of a table where I am working. So I decided to use one of the lightweight tube mounts I made up and put together a little weldment to hold the bandsaw off the edge of the bench where 90% of the swarf can just drop into a trash can. Cleanup should be a lot easier.
I had a nice piece of aluminum plate I had been saving for the table; so I utilized my CAD (cardboard aided design) skills to layout the table.
I used a piece of 1-1/4” heavy perforated channel that was left over from the trailer jack mount to replace the portaband handle, used the existing socket head cap screw to attach it. A piece of 1-1/2” square tube was the same width as the handle, so I used it as the riser. Two little tabs hold the handle securely in place. These were the tips off a couple of Stanley heavy strap hinges I cut off who knows when. Knew they would come in handy some day, perfect for this since I was able to use an existing hole to plug weld them on.
I debated whether to slot the table in front of the blade or behind it. Benefit to the slot in the front is you don’t have to remove the table to replace the blade., Ended up slotting it behind, it makes the front of the table where you’re cutting a lot stronger. Takes less than a minute to remove the table, two 10-24 screws with a stubby P2 screwdriver.
 I really like this antique typesetting table as a welding table, it’s really heavy and dead flat- just wish it was bigger.
 When I built the first cart, I sized it to fit my Bosch jobsite saw and Ryobi oscillating spindle sander. It’s lower to give me a comfortable working height with either one. Didn’t take progress photos on that one, but the design is the same, the second one is just taller and narrower.
  These roll on 4” locking swivel casters I bought on AmazonWarehouse. I just plug welded them to the bottom frame through the mounting bolt holes. I get a kick out of your humor, like the glove next to the cut off top from the old school stand.
 Top is a 36” x 80 “ solid core exterior door. It was really too big, so I cut it down to 60” long. Size is better, it’s really
 This one is ready for paint.
 14” Evolution cutoff saw goes on top of this one; probably put the Thermal Dynamics plasma cutter on the bottom. It got bumped off the weld cart when my wife bought me a Miller Diversion TIG for my birthday..
 Looks like I will have room for a drawer or two under there….
 I was on my own on this move, my buddy Ron was working and my wife was back East visiting grandkids. The drop deck trailer made this an easy job.
  A few boards made a shallow ramp, but I did tie the mill to the jack to ensure it didn’t tip when it rolled down off the trailer.
  Put some cribbing where I wanted the mill, and rocked/walked it off the pallet.
 In place, just need leveling feet.
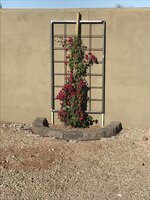


 I'm drooling pretty hard at this. I want to do this for machine tools. Just got set aside some fun money for it.
 those are some pretty good welds on the new cart