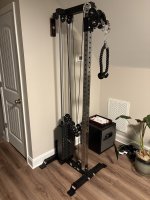
To avoid these ads, REGISTER NOW!

quadrcr87's garage projects

OP
Q

quadrcr87

Well-known member
Joined
Jul 5, 2013
Messages
1,042
Location
Travelers Rest, SC
I have taken a break from woodworking over the past couple of weeks and focused on a couple of small projects. You know the ones where you buy the supplies, and they sit around for a while.

I treated myself to a new MTB in late fall and I haven’t given it a permanent home in the garage. I never pictured myself owning this many bikes but this hobby has been keeping me in shape for the past few years and I’ve really enjoyed it.

The bike is an Ibis Ripley with 130mm of rear travel. It’s my first carbon frame and it fits in nicely between my hardtail and my 150mm travel Ibis Ripmo. The Ripley is about 5lbs lighter than the Ripmo, which is appreciated on the big climbs around the WNC area.

IMG_9453.jpeg

In order to get it up on the wall, I bought another Steadyrack about 3 months ago. The delay was deciding on where to install it. If I put it in the middle I wouldn’t be able to swing the bikes far enough to clear the BOSS’ Jeep. I figured out I could swing down part of my hitch rack to add space.

IMG_9948.jpeg

To make it work, I shifted the right rack to the next stud over and raised it about 8”. This allowed me to center the new rack and stagger it down 4”. With this layout, all 3 bikes are able to swing to the wall with the handlebars fitting between the frame and tire. Next was on to drywall patching around both garages and inside the house.

IMG_9951.jpeg

I’m thinking about painting this wall a different color but haven’t decided, maybe grey or green? The flat white paint blemishes way too easily, especially with bike tires.

Thanks for following along!
 
Last edited:
To avoid these ads, REGISTER NOW!

fouckhest

Well-known member
Joined
Jul 24, 2013
Messages
1,928
Location
Greer, SC
Those bike mounts look awesome, as do the bikes! You are giving me an internal guilt trip, its been way too long since I've been on my bike, the last time was the day after thanksgiving, I went up to Dupont with a buddy....that day hurt! LOL

Oh, I think a dark(er) color on that wall would be very cool, but I'm not in O & D, just execution!
 
OP
Q

quadrcr87

Well-known member
Joined
Jul 5, 2013
Messages
1,042
Location
Travelers Rest, SC
fouckhest, we need to meet up for a ride this year or even just a beer. Have you ridden Pleasant Ridge? It's my favorite local when I don't have time to make it up to Dupont or Pisgah.

As for the color, I am leaning towards a darker green. It's up to the BOSS, after all it is "her" garage.
 

fouckhest

Well-known member
Joined
Jul 24, 2013
Messages
1,928
Location
Greer, SC
fouckhest, we need to meet up for a ride this year or even just a beer. Have you ridden Pleasant Ridge? It's my favorite local when I don't have time to make it up to Dupont or Pisgah.

As for the color, I am leaning towards a darker green. It's up to the BOSS, after all it is "her" garage.

I used to ride Pleasant Ridge a lot when I lived over near Paris Mtn, Paris got rough and then they really cracked down on the "no dogs off leash" up there, so I started going to Pleasant Ridge. Its been years since I've been up there.

We should absolutely meeting up at some point, I am probably more in for a beer at this point! LOL But lets make it happen, its always fun to meet another GJ'er, especially when local. 🍻
 

Bodj Built

Well-known member
Joined
Feb 3, 2016
Messages
1,167
Location
Moorpark, CA
I have taken a break from woodworking over the past couple of weeks and focused on a couple of small projects. You know the ones where you buy the supplies, and they sit around for a while.

I treated myself to a new MTB in late fall and I haven’t given it a permanent home in the garage. I never pictured myself owning this many bikes but this hobby has been keeping me in shape for the past few years and I’ve really enjoyed it.

The bike is an Ibis Ripley with 130mm of rear travel. It’s my first carbon frame and it fits in nicely between my hardtail and my 150mm travel Ibis Ripmo. The Ripley is about 5lbs lighter than the Ripmo, which is appreciated on the big climbs around the WNC area.

IMG_9453.jpeg

In order to get it up on the wall, I bought another Steadyrack about 3 months ago. The delay was deciding on where to install it. If I put it in the middle I wouldn’t be able to swing the bikes far enough to clear the BOSS’ Jeep. I figured out I could swing down part of my hitch rack to add space.

IMG_9948.jpeg

To make it work, I shifted the right rack to the next stud over and raised it about 8”. This allowed me to center the new rack and stagger it down 4”. With this layout, all 3 bikes are able to swing to the wall with the handlebars fitting between the frame and tire. Next was on to drywall patching around both garages and inside the house.

IMG_9951.jpeg

I’m thinking about painting this wall a different color but haven’t decided, maybe grey or green? The flat white paint blemishes way too easily, especially with bike tires.

Thanks for following along!

Looks good! I have a '23 Ripmo and love it. Dropping 5lbs would be much welcomed where I ride out here.
 
To avoid these ads, REGISTER NOW!
OP
Q

quadrcr87

Well-known member
Joined
Jul 5, 2013
Messages
1,042
Location
Travelers Rest, SC
Reviving this thread from a 6-month slumber. Life has been busy and garage time & projects have been limited. Our Bordie Collie Ash passed away at the start of the year, so we have taken some time to travel which was hard with a 14yr old dog.

Now that the temperatures are cooling off a little, I am motivated to get back in the garage. This past week, I pulled out the grinder and welder to finish a project that has been in my mind for a while.

We bought a BowFlex barbell system for our home gym about 4 years ago and use it weekly. The problem is that it's been sitting on the floor which is not very convenient. I didn't like the stand they offered and procrastinated making my own for way too long.

I started with some sophisticated CAD design work. I replicated the angles of the BowFlex frame and did some mockup to determine the right finished height.
IMG_0649.jpeg

IMG_0650.jpeg

With the design finalized I cut up some 1x2" rectangular tubing with my evolution saw.
IMG_0648.jpeg

It has been quite a while since I have MIG welded and it took a little while to get comfortable. I will only share my best welds.

IMG_0655.jpeg

I capped off the end of the legs with some plate and ground flush. There is always something satisfying about this process to me making a tube look solid.

IMG_0653.jpeg


IMG_0665.jpeg

Test fit in the space so the BOSS could try it out for a couple of days. I have learned the importance of getting her feedback before paint.

IMG_0684.jpeg

After some cleanup and blending, I sprayed it with a coat of self-etching primer and a VHT Roll Bar satin black topcoat. It's about $15/can but it has been very durable in the past.

IMG_0687.jpeg

After final assembly I am very happy with it. I am hoping this will motivate me to work out more often.

IMG_0688.jpeg

The last little detail was some rubber mat for the lower bar hangers.

IMG_0689.jpeg

Thanks for following along!
 
Last edited:
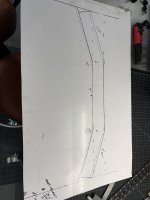
aka Larry

Well-known member
Joined
May 2, 2012
Messages
8,140
Location
Eastern, NC
Reviving this thread from a 6-month slumber. Life has been busy and garage time & projects have been limited. Our Bordie Collie Ash passed away at the start of the year, so we have taken some time to travel which was hard with a 14yr old dog.

Now that the temperatures are cooling off a little, I am motivated to get back in the garage. This past week, I pulled out the grinder and welder to finish a project that has been in my mind for a while.

We bought a BowFlex barbell system for our home gym about 4 years ago and use it weekly. The problem is that its been sitting on the floor which is not very convenient. I didn't like the stand they offered and procrastinated making my own for way too long.

I started with some sophisticated CAD design work. I replicated the angles of the Bowflex frame and did some mockup to determine the right finished height.
IMG_0649.jpeg

IMG_0650.jpeg

With the design finalized I cut up some 1x2" rectangular tubing with my evolution saw.
IMG_0648.jpeg

It has been quite a while since I have MIG welded and it took a little while to get comfortable. I will only share my best welds.

IMG_0655.jpeg

Capped off the end of the legs with some plate and ground flush. There is always something satisfying about this process to me making it look solid.

IMG_0653.jpeg


IMG_0665.jpeg

Test fit in the space so the BOSS could test it out for a couple of days.

IMG_0684.jpeg

After some cleanup and blending I sprayed it with a coat of self-etching primer and a VHT Roll Bar satin black topcoat. It's about $15/can but it has been very durable in the past.

IMG_0687.jpeg

After final assembly I am very happy with it. I am hoping it will also motivate me to work out more often.

IMG_0688.jpeg

The last little detail was some rubber mat for the lower bar hangers.

IMG_0689.jpeg

Thanks for following along!

Nice work!
 
OP
Q

quadrcr87

Well-known member
Joined
Jul 5, 2013
Messages
1,042
Location
Travelers Rest, SC
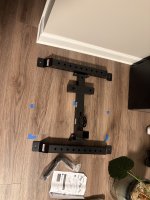
To my surprise, my wife asked for a cable machine for her birthday. They aren’t cheap so I told her we will combine it with my bday which is also in August.

This led me to spend several hours researching machines. I find there is a fine line between cost and quality with home gym equipment. I know we don’t need a commercial grade machine but it needed to be smooth and solid. Too much plastic and a weak design makes them fall apart quick.

IMG_0703.jpeg

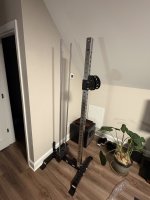
My research led me to Bells of Steel and I’m pretty impressed. Aluminum pulleys, steel weight stack, 2.3” steel frame and decent quality hardware.

IMG_0704.jpeg

It has a small footprint and the 80” height cleared our slanted ceiling which was key for our crowded upstairs room.

IMG_0707.jpeg

I opted for the wall mounted machine without a rear support. This required me to center on a stud but I didn’t have to anchor into the floor.

IMG_0708.jpeg

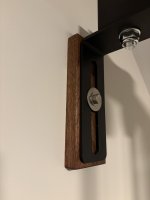
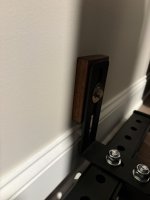
I had to space it off the wall .75” to clear the baseboard. I had a scrap piece of walnut that worked perfect. It was a good excuse to mix in some wood working this weekend. I added an 1/8” round over, sanded and finished with Rubio pure.

IMG_0710.jpeg

3/8” SS lag bolt top and bottom.

IMG_0714.jpeg

IMG_0715.jpeg

I’m a sucker for black & polished aluminum.

IMG_0713.jpeg

The machine is ready to go and stands as another motivator to get me back into a routine. When I tested it out, it was clear that the 210lb weight stack was optimistic. I could have saved some money with the small stack with my weak arms. Let’s hope I grow into it. :ROFLMAO:

I already have a couple more small projects in mind to finish out the space including a wall organizer for all the attachments.

IMG_0711.jpeg

Thanks for following along!
 

Mark_17

Well-known member
Joined
Jun 27, 2018
Messages
758
Location
NJ
I have the bells of steel buzz saw bench with leg curl/extension attachment. I'm very happy with it.

Their cable machine looks like a nice unit too
 
OP
Q

quadrcr87

Well-known member
Joined
Jul 5, 2013
Messages
1,042
Location
Travelers Rest, SC
That bench and leg curt attachment look like a nice setup. We have a fixed bench which works well but I wish it was adjustable. I also don't have any plates, but it would be nice add in the future.
 
To avoid these ads, REGISTER NOW!
Top Bottom