To avoid these ads, REGISTER NOW!

quadrcr87's garage projects

OP
Q

quadrcr87

Well-known member
Joined
Jul 5, 2013
Messages
1,036
Location
Travelers Rest, SC
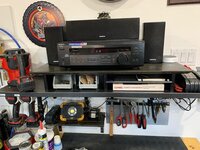
I got back into the garage this weekend to finish up a project that has been on my to do list for months...the Walnut monitor stand!

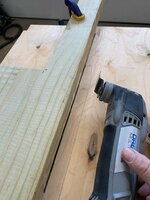
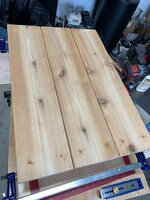
I’ll spare you all of the details as it is identical to V1 I built from poplar earlier. This time I started with the dowels after the boards were cut to size. I found this was a lot easier to layout before the edged were routered (is that a word?...It should be).
36b2d73992ddfa5eb56f7507b6cc7f39.jpg

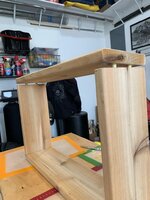
To support the shelf I routed in a dado with an 1/8” up cut bit and an edge guide. I was able to make the pieces easier to clamp by connecting them with the dowel pins.
fb5e2961be6ddc8d10e92681b290a874.jpg

I then machined the 45* bevel and 1/8” round overs.
7898879eaed17fdada7a6e13fcd40d45.jpg

I need more clamps.
c65ef1807ada607fb856c8ee68d5925b.jpg

For the shelf I rounded the corners of the 1/8” aluminum and polished the edges and back. I sanded the top before bonding the felt with spray adhesive.
39bd0cbd9d13f9da4dc3b23cc9180224.jpg

Ready for install.
130f535058bc41db43ceb35127a659bc.jpg

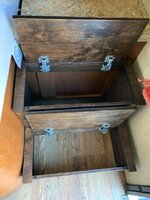
A couple coats of wipe on poly to keep it more natural. I have been told by multiple people not to ruin the beauty of walnut with dark stain.
18d51069435965e0edbc85e0f94a39bc.jpg

I am really happy with how this turned out. I spent so long planning and collecting tools it feels good to have it done.
f497a82157519d39bb6244234e4bce6a.jpg

My favorite part is the shelf detail. There is just something about the combination of walnut, aluminum and felt that works for me.
f37fb070cede390eacfdc8809cb34944.jpg


Sent from my iPhone using Tapatalk
 

Attachments

  • 18d51069435965e0edbc85e0f94a39bc.jpg
    18d51069435965e0edbc85e0f94a39bc.jpg
    102.8 KB · Views: 7
  • 130f535058bc41db43ceb35127a659bc.jpg
    130f535058bc41db43ceb35127a659bc.jpg
    141.3 KB · Views: 2
  • 39bd0cbd9d13f9da4dc3b23cc9180224.jpg
    39bd0cbd9d13f9da4dc3b23cc9180224.jpg
    136 KB · Views: 0
  • c65ef1807ada607fb856c8ee68d5925b.jpg
    c65ef1807ada607fb856c8ee68d5925b.jpg
    102.8 KB · Views: 1
  • 7898879eaed17fdada7a6e13fcd40d45.jpg
    7898879eaed17fdada7a6e13fcd40d45.jpg
    81.8 KB · Views: 1
  • fb5e2961be6ddc8d10e92681b290a874.jpg
    fb5e2961be6ddc8d10e92681b290a874.jpg
    135.7 KB · Views: 2
  • 36b2d73992ddfa5eb56f7507b6cc7f39.jpg
    36b2d73992ddfa5eb56f7507b6cc7f39.jpg
    80.8 KB · Views: 2
  • f497a82157519d39bb6244234e4bce6a.jpg
    f497a82157519d39bb6244234e4bce6a.jpg
    198.1 KB · Views: 3
  • f37fb070cede390eacfdc8809cb34944.jpg
    f37fb070cede390eacfdc8809cb34944.jpg
    172.6 KB · Views: 7
Last edited:
To avoid these ads, REGISTER NOW!
OP
Q

quadrcr87

Well-known member
Joined
Jul 5, 2013
Messages
1,036
Location
Travelers Rest, SC
V1 of the monitor stand found a new home, and it matches the shelf. But now I need to move the clock and plaques because this imbalance will not stand, man.

ff6130b9288a1aff8f1e4fa9b2bbb485.jpg

The little bit of extra storage should help keep the workbench clear of receipts and paperwork.
d38ac248e03c2eb78f9376c018961c68.jpg


Sent from my iPhone using Tapatalk
 

Attachments

  • d38ac248e03c2eb78f9376c018961c68.jpg
    d38ac248e03c2eb78f9376c018961c68.jpg
    115.2 KB · Views: 2
  • ff6130b9288a1aff8f1e4fa9b2bbb485.jpg
    ff6130b9288a1aff8f1e4fa9b2bbb485.jpg
    118.3 KB · Views: 3
Last edited:
OP
Q

quadrcr87

Well-known member
Joined
Jul 5, 2013
Messages
1,036
Location
Travelers Rest, SC
I hope everyone had a great Easter. We stayed home this year and enjoyed a quiet 3 day weekend. I was able to get out on the MTB and spend some quality time in the garage as well. We also watched a movie while enjoying a bonfire. I am so glad that spring has arrived.
ff6abc5f013c5c70386adb6b402c2143.jpg


Just as I was catching up on projects another one got added to the list. When the BOSS saw how well the dog steps turned out, she commissioned another set. This time for the toy hauler. I can’t complain because this will make her time spent at the motocross track more enjoyable.

The jump up to the bed was just too much for Ash and his back issues. The solution was a 2 step staircase that fills the shoe storage area between the door and the bed. We couldn’t afford to loose the shoe storage, so I designed the steps to open with a hinged access.
bb35cd870c438559f231e955b2fe3fe8.jpg

I went with 1/2” Baltic Birch I had leftover from some other projects. Step one (no pun intended) was to cut the profile with my jig saw and verify the size in the toy hauler.
d7877febae23054f6ce4647a706884f7.jpg

It’s no track saw but it gets the job done!
b2df6adf4d4a69639e3ff2c11bd0164c.jpg

I skipped the fancy joinery and used glue and Kreg pocket screws.
5240a1a1ec42dc4948f6e045463b14a6.jpg

In order to make the step hinge, I had to cut out a section of the treads. I cut the sides with a jig saw and used a multi tool for the back cut.
690569cefd53edd6d9a1b2e633a338fd.jpg

Using a 2x4 as a guide worked ok. Not perfect.
df6f1a71a9cf2da8491c9a0b058a3566.jpg

82562732668d2f69fbc968356a157df9.jpg

b42edd1d992ea836cf0c372e58415a54.jpg

Once I had the hinges adjusted, I cut the ends with the circular saw to leave an even 1/2" overhang.
5253b9e6e3ae5c41e60ce99a08770c23.jpg

The BOSS applied a coat of Kona colored stain before I applied 2 coats of satin poly.
b995d57426d5777b18e410607998e72f.jpg

Once the felt was glued to the treads we installed it into the camper.
b1c57897896ee6c752be33bdf9539c08.jpg

Just enough storage for a pair of shoes and a pair of boots.
9a58b2fe6e3a4a0ef8a0a9f0b87a3d04.jpg

Happy wife, happy life. Thanks for following along.


Sent from my iPhone using Tapatalk
 

Attachments

  • bb35cd870c438559f231e955b2fe3fe8.jpg
    bb35cd870c438559f231e955b2fe3fe8.jpg
    15.7 KB · Views: 2
  • b2df6adf4d4a69639e3ff2c11bd0164c.jpg
    b2df6adf4d4a69639e3ff2c11bd0164c.jpg
    104.5 KB · Views: 0
  • 5240a1a1ec42dc4948f6e045463b14a6.jpg
    5240a1a1ec42dc4948f6e045463b14a6.jpg
    99.5 KB · Views: 0
  • df6f1a71a9cf2da8491c9a0b058a3566.jpg
    df6f1a71a9cf2da8491c9a0b058a3566.jpg
    90.7 KB · Views: 0
  • 82562732668d2f69fbc968356a157df9.jpg
    82562732668d2f69fbc968356a157df9.jpg
    82 KB · Views: 0
  • b42edd1d992ea836cf0c372e58415a54.jpg
    b42edd1d992ea836cf0c372e58415a54.jpg
    86.6 KB · Views: 0
  • ff6abc5f013c5c70386adb6b402c2143.jpg
    ff6abc5f013c5c70386adb6b402c2143.jpg
    122.8 KB · Views: 0
  • d7877febae23054f6ce4647a706884f7.jpg
    d7877febae23054f6ce4647a706884f7.jpg
    86.9 KB · Views: 0
  • 690569cefd53edd6d9a1b2e633a338fd.jpg
    690569cefd53edd6d9a1b2e633a338fd.jpg
    75.8 KB · Views: 0
  • 5253b9e6e3ae5c41e60ce99a08770c23.jpg
    5253b9e6e3ae5c41e60ce99a08770c23.jpg
    112.5 KB · Views: 0
  • b995d57426d5777b18e410607998e72f.jpg
    b995d57426d5777b18e410607998e72f.jpg
    104.1 KB · Views: 0
  • b1c57897896ee6c752be33bdf9539c08.jpg
    b1c57897896ee6c752be33bdf9539c08.jpg
    115 KB · Views: 0
  • 9a58b2fe6e3a4a0ef8a0a9f0b87a3d04.jpg
    9a58b2fe6e3a4a0ef8a0a9f0b87a3d04.jpg
    121 KB · Views: 0
Last edited:
OP
Q

quadrcr87

Well-known member
Joined
Jul 5, 2013
Messages
1,036
Location
Travelers Rest, SC
It is spring and time to do some garage cleaning and uncover the toys. I am taking a break from woodworking to focus on riding on both the dirt and the pavement.

I started with my scrap pile that was piled on the motorcycle lift. I was able to fit all but the large sheets next to the softener. The welder also found a new home below the saw and PPE storage.
7cb105269fc5fd4be1ffd9297c1792cd.jpg

I don’t consider the cardboard boxes to be a permanent solution but they will give me an idea of how I want to build my scrap storage cart in the future.
2beea63dceb5c4e5dfd50db1b7c35e53.jpg

I took the Harley out on Sunday and it felt good to be back in the wind. I have a couple maintenance items to take care of including a new front tire and throttle cables. Overall it ran very well and remained surprisingly clean under the cover.
3da74499d9ac6d28d7fea7caaf3f6cb5.jpg

The rest of the garage got cleared out as well. I am glad to be back into mountain bike season. I got out yesterday and let’s just say I have some training to do. I about puked on a large climb in the middle of my 8 mile ride. I signed up for a 30 mile race in November so I better keep at it. ef19effc40cdbde1300a7573257a9d83.jpg

The HF lift doesn’t work very well for a wide atv but I knew that when I got it. I have my eye on a Handy with wing extensions. I can make it work stacking up some camper levelers and then sliding the lift under the machine.
d730dd2ae26ede33f922d213d10ba16b.jpg

Then I lift it with my screw jack high enough to clear the foot controls.
23fae435c75801d44cd28ab23b705301.jpg

It’s been a lot harder to get parts this year with COVID. Lots of backorders and shipping delays. Luckily most of my sponsors got me what I needed. Still waiting on some new fenders and graphics. I am about a month behind where I want to be.
ded9903c72ab41510942b91ad8291ff6.jpg

Teardown has begun. This pile will get much larger before I am done.
c4d6d25b29a640e43cd1f7357f571096.jpg

I’m glad I pulled all the plastics to inspect the frame and suspension because I’ve already found a cracked frame and bent front spindle. Turns out cartwheeling a couple times is not good for it.
16ac91d2078b07b00695432d8156f613.jpg

No bueno. Ill have to clean up and weld the crack and add some gussets. This area of the frame saw a lot of stress when the subframe bent last season. It is also near the rear upper shock mount.
e45c50acf3476422733883577e2ff4bc.jpg

Hard to see in the picture but it was pretty obvious something wasn’t right with the amount of camber I suddenly had. I think it happened at the dunes when I landed so hard on this corner that the tire blew off the bead (broken rib).
6aa473eafbf11f52d22defa28fe5a3b3.jpg

Working on getting this thing ready in the next few days. I would really like to hit the practice track this weekend. Wish me luck and thanks for following along!


Sent from my iPhone using Tapatalk
 

Attachments

  • 23fae435c75801d44cd28ab23b705301.jpg
    23fae435c75801d44cd28ab23b705301.jpg
    130.3 KB · Views: 0
  • 3da74499d9ac6d28d7fea7caaf3f6cb5.jpg
    3da74499d9ac6d28d7fea7caaf3f6cb5.jpg
    130.8 KB · Views: 0
  • ef19effc40cdbde1300a7573257a9d83.jpg
    ef19effc40cdbde1300a7573257a9d83.jpg
    143.9 KB · Views: 0
  • e45c50acf3476422733883577e2ff4bc.jpg
    e45c50acf3476422733883577e2ff4bc.jpg
    71 KB · Views: 0
  • ded9903c72ab41510942b91ad8291ff6.jpg
    ded9903c72ab41510942b91ad8291ff6.jpg
    140.4 KB · Views: 0
  • c4d6d25b29a640e43cd1f7357f571096.jpg
    c4d6d25b29a640e43cd1f7357f571096.jpg
    156.8 KB · Views: 0
  • 16ac91d2078b07b00695432d8156f613.jpg
    16ac91d2078b07b00695432d8156f613.jpg
    142.9 KB · Views: 0
  • 6aa473eafbf11f52d22defa28fe5a3b3.jpg
    6aa473eafbf11f52d22defa28fe5a3b3.jpg
    80.4 KB · Views: 0
  • 7cb105269fc5fd4be1ffd9297c1792cd.jpg
    7cb105269fc5fd4be1ffd9297c1792cd.jpg
    121.5 KB · Views: 0
  • 2beea63dceb5c4e5dfd50db1b7c35e53.jpg
    2beea63dceb5c4e5dfd50db1b7c35e53.jpg
    105 KB · Views: 0
  • d730dd2ae26ede33f922d213d10ba16b.jpg
    d730dd2ae26ede33f922d213d10ba16b.jpg
    132.5 KB · Views: 1
Last edited:
OP
Q

quadrcr87

Well-known member
Joined
Jul 5, 2013
Messages
1,036
Location
Travelers Rest, SC
The pile of parts is getting bigger and I am ready to prep the frame for welding. I got the front end all buttoned up after rebuilding the brakes and replacing the bent spindle. Now it’s time to focus on getting the rear serviced and installed after the frame repair. I would have already had this thing done if I wasn’t dealing with this pesky thing called work.

4b926599c9c3da441b5f366b16c44448.jpg

187ab52b7ed09c115c1188fe78882787.jpg


Sent from my iPhone using Tapatalk
 

Attachments

  • 4b926599c9c3da441b5f366b16c44448.jpg
    4b926599c9c3da441b5f366b16c44448.jpg
    141.7 KB · Views: 0
  • 187ab52b7ed09c115c1188fe78882787.jpg
    187ab52b7ed09c115c1188fe78882787.jpg
    163 KB · Views: 0

rattle_snake

Well-known member
Joined
Jun 25, 2015
Messages
5,175
Location
Chandler, AZ
Good thing you take the time to inspect and care for your machines. Most people are lazy and ride till they break, which results in a useless machine far from home and/or an injury.
 
OP
Q

quadrcr87

Well-known member
Joined
Jul 5, 2013
Messages
1,036
Location
Travelers Rest, SC
Good thing you take the time to inspect and care for your machines. Most people are lazy and ride till they break, which results in a useless machine far from home and/or an injury.

With the recent crash, I went in with the assumption that something was on the verge of breaking. It only has 15 hrs on it since the frame up rebuild but they were 15 hard hours. Being a 17 year old machine some it is also just fatigue over time.
 
OP
Q

quadrcr87

Well-known member
Joined
Jul 5, 2013
Messages
1,036
Location
Travelers Rest, SC
Made some big progress last night. I was able to finish up the frame repair so I can focus on assembly tonight. There is still hope that I will make it to the track tomorrow!

The back half of the machine is gone. It not only provided access for the repair but it also was necessary for greasing the swing arm and all linkage bearings.
01e2ee7614a830183b07ec13a45f6344.jpg

After the powder coat was removed I could clearly see the crack. I drilled holes at the ends to hopefully stop it from spreading and then ground it out slightly.
ff6064406699e8c3b69a52ba62855898.jpg

I am getting pretty good at this CAD thing.
265bb78e18d01e8256e56bd769aabe25.jpg

I ran a few practice beads on similar thickness 14 ga plates.
c5d5bb7fc7f40a959ebf46778ca393ad.jpg

Not the prettiest welds but they work for me.
cfab8f50ef1203a9d42768c63277a2ff.jpg

Adding gussets to the left side before it cracks.
c9ff5f1745289bbcb29cbc18879cf46c.jpg

All burned in.
6c21f4640853c1912c399d76a2144c7a.jpg

That odd weld going from the upper to the lower brackets was from the factory. I guess it was easier for the robot to connect the two passes instead of starting and stopping.
8499eac3cffef19418ad691a1f8b3ae0.jpg

A couple coats of spray paint and the repair should blend in.
61f0344b57dd7f7cafb3e5b7cefce3f2.jpg

If anyone has tips or tricks to make these types of repairs better I am open to them. Just keep in mind it’s too late for me to go back and change it now.

Thanks for following along!


Sent from my iPhone using Tapatalk
 

Attachments

  • 8499eac3cffef19418ad691a1f8b3ae0.jpg
    8499eac3cffef19418ad691a1f8b3ae0.jpg
    113.6 KB · Views: 0
  • 61f0344b57dd7f7cafb3e5b7cefce3f2.jpg
    61f0344b57dd7f7cafb3e5b7cefce3f2.jpg
    152.9 KB · Views: 0
  • 6c21f4640853c1912c399d76a2144c7a.jpg
    6c21f4640853c1912c399d76a2144c7a.jpg
    127.4 KB · Views: 0
  • c5d5bb7fc7f40a959ebf46778ca393ad.jpg
    c5d5bb7fc7f40a959ebf46778ca393ad.jpg
    145.1 KB · Views: 0
  • cfab8f50ef1203a9d42768c63277a2ff.jpg
    cfab8f50ef1203a9d42768c63277a2ff.jpg
    83 KB · Views: 0
  • c9ff5f1745289bbcb29cbc18879cf46c.jpg
    c9ff5f1745289bbcb29cbc18879cf46c.jpg
    113.5 KB · Views: 0
  • 01e2ee7614a830183b07ec13a45f6344.jpg
    01e2ee7614a830183b07ec13a45f6344.jpg
    130.9 KB · Views: 0
  • ff6064406699e8c3b69a52ba62855898.jpg
    ff6064406699e8c3b69a52ba62855898.jpg
    73.1 KB · Views: 0
  • 265bb78e18d01e8256e56bd769aabe25.jpg
    265bb78e18d01e8256e56bd769aabe25.jpg
    94.7 KB · Views: 0
OP
Q

quadrcr87

Well-known member
Joined
Jul 5, 2013
Messages
1,036
Location
Travelers Rest, SC
It was a mad dash but I did in fact make it to the track on Saturday. Unfortunately I only got in a couple of motos before I was rained out. It seems every time I get the machine clean and freshened up the first ride is a mudder.

Before assembly I replaced a few needle bearings with my motion pro tool. It’s not much more than a threaded rod with various size drivers but it works great without a press.
0814e8736d3da85b4f3283f0b43d1881.jpg

6fcae18b01beb6f56fe5c09805f82724.jpg

Once the new subframe was on I was able to see how much the braces had bent. I decided the quickest and easiest repair was to cut off the end and realign.
16debcc736bde5bb3b469f83c9ae1fd9.jpg

A small but fillable gap.
4b6c8bead38ada3891098772fc4db280.jpg

I also cut off the brake reservoir mount because I used too thin of material on V1. I remade it from 14 ga. and put it in a better position.
465c5c18b4c72f674be59d1eac251769.jpg

After tacking on the machine, I finish welded on the table.

5707b2f74dac556cfbee498cf0dabb29.jpg

A little paint and they were good as new. The bolt holes lined up perfectly and the subframe is now level with the rest of the frame!
caf9a770dfa16dbacfb127a41f96f56e.jpg

Making some progress on assembly. These photos were about 12am on Saturday morning.
926ff3970dac9b602319c986cfbf15e5.jpg

c9c4d2c544e659fcb73839817db244b3.jpg
Sorry no pictures out at the track. I was in a rush just to get some laps in. Here is some proof that I got some dirt on the tires and the garage was still a mess before cleaning up Saturday night.
cba94a3945c823bf78e61cae6ce4f1c9.jpg

A nice Sunday morning bath.
bc9ddcec79ed7aaeb0af7c5af8034931.jpg

If anyone is still reading this, thanks for following along!


Sent from my iPhone using Tapatalk
 

Attachments

  • 0814e8736d3da85b4f3283f0b43d1881.jpg
    0814e8736d3da85b4f3283f0b43d1881.jpg
    92.2 KB · Views: 1
  • 6fcae18b01beb6f56fe5c09805f82724.jpg
    6fcae18b01beb6f56fe5c09805f82724.jpg
    129.7 KB · Views: 0
  • 16debcc736bde5bb3b469f83c9ae1fd9.jpg
    16debcc736bde5bb3b469f83c9ae1fd9.jpg
    129.5 KB · Views: 0
  • 4b6c8bead38ada3891098772fc4db280.jpg
    4b6c8bead38ada3891098772fc4db280.jpg
    85.3 KB · Views: 0
  • 465c5c18b4c72f674be59d1eac251769.jpg
    465c5c18b4c72f674be59d1eac251769.jpg
    117.3 KB · Views: 0
  • 5707b2f74dac556cfbee498cf0dabb29.jpg
    5707b2f74dac556cfbee498cf0dabb29.jpg
    101.8 KB · Views: 0
  • caf9a770dfa16dbacfb127a41f96f56e.jpg
    caf9a770dfa16dbacfb127a41f96f56e.jpg
    97.1 KB · Views: 0
  • 926ff3970dac9b602319c986cfbf15e5.jpg
    926ff3970dac9b602319c986cfbf15e5.jpg
    124.4 KB · Views: 0
  • c9c4d2c544e659fcb73839817db244b3.jpg
    c9c4d2c544e659fcb73839817db244b3.jpg
    142 KB · Views: 0
  • cba94a3945c823bf78e61cae6ce4f1c9.jpg
    cba94a3945c823bf78e61cae6ce4f1c9.jpg
    142.4 KB · Views: 0
  • bc9ddcec79ed7aaeb0af7c5af8034931.jpg
    bc9ddcec79ed7aaeb0af7c5af8034931.jpg
    176.6 KB · Views: 0
OP
Q

quadrcr87

Well-known member
Joined
Jul 5, 2013
Messages
1,036
Location
Travelers Rest, SC
I also managed to build step #4 for my buddy Ash this weekend. Yes you read that right. Four dog steps in less than a month. This one also works pretty well for humans so that’s a nice little bonus.

As an outside step for the camper, this one was pretty simple compared to the others. I picked up a 12’ piece of cedar from Menards and chopped it up to make a 24”x16.5”x6.5” step. I made the cuts outside to keep the dust out of the garage.
088c31865e215272bceedcee5ece82b6.jpg

I added a couple of 3/8
dowels on each corner.
aaa0c833072cd8c4a064b927ce01fc64.jpg

de9f8c03b6888b9395950055820cfe1b.jpg

I was going to pocket screw from the inside but I didn’t have the right coated Kreg screws on hand. I decided to just go with some wood glue and deck screws.
c6e45ad9e21b880f9ed45cbe4e7006c3.jpg

After a split screwing the base together I switched to pre drilling.
af451d697d64d940d6674364f9da6325.jpg

A coat of BLO should help this thing last for many years. It will really only be out when we are setup camping.
5716249fed1ffaf1ff74616fb1fcdd99.jpg

Now there is ~7” rise in each step. With the the 1” overhangs it is very easy to lift up and store inside.
c0b9680ca4421757b1a9246a6d67b9df.jpg

Let’s all hope that this is the last step and I can take a brake from wood projects for a while. I would much rather spend my summer focused on racing, camping and riding the Harley.


Sent from my iPhone using Tapatalk
 

Attachments

  • c6e45ad9e21b880f9ed45cbe4e7006c3.jpg
    c6e45ad9e21b880f9ed45cbe4e7006c3.jpg
    97.6 KB · Views: 0
  • af451d697d64d940d6674364f9da6325.jpg
    af451d697d64d940d6674364f9da6325.jpg
    109.3 KB · Views: 0
  • 5716249fed1ffaf1ff74616fb1fcdd99.jpg
    5716249fed1ffaf1ff74616fb1fcdd99.jpg
    105.4 KB · Views: 0
  • c0b9680ca4421757b1a9246a6d67b9df.jpg
    c0b9680ca4421757b1a9246a6d67b9df.jpg
    121 KB · Views: 0
  • de9f8c03b6888b9395950055820cfe1b.jpg
    de9f8c03b6888b9395950055820cfe1b.jpg
    88.4 KB · Views: 0
  • aaa0c833072cd8c4a064b927ce01fc64.jpg
    aaa0c833072cd8c4a064b927ce01fc64.jpg
    103.2 KB · Views: 0
  • 088c31865e215272bceedcee5ece82b6.jpg
    088c31865e215272bceedcee5ece82b6.jpg
    154.5 KB · Views: 0
OP
Q

quadrcr87

Well-known member
Joined
Jul 5, 2013
Messages
1,036
Location
Travelers Rest, SC
Made it back out to the track last night after work to get some laps in. This was my last chance to ride before I race at Redbud MX on April 24th. Machine ran great. I feel like I’m getting more comfortable every lap but my fitness isn’t there yet.

My Boss/wife/pit crew/camera women came out to watch and capture some pictures for you guys with her phone.

873876a254c0f595bc2862671e57f689.jpg

bf92832dd2f03b41806ec1784793192d.jpg

d203dc41ffeed2664580ec5c9cc05b5f.jpg

She learned that wearing a white jacket to the track was a bad idea just after this shot was taken. Oops
bf452680715f90546537f4bf28ab080e.jpg

fff09fb0537b4c2ffe062f7c706a3529.jpg


Sent from my iPhone using Tapatalk
 

Attachments

  • 873876a254c0f595bc2862671e57f689.jpg
    873876a254c0f595bc2862671e57f689.jpg
    65.8 KB · Views: 0
  • bf92832dd2f03b41806ec1784793192d.jpg
    bf92832dd2f03b41806ec1784793192d.jpg
    82.7 KB · Views: 0
  • d203dc41ffeed2664580ec5c9cc05b5f.jpg
    d203dc41ffeed2664580ec5c9cc05b5f.jpg
    66.1 KB · Views: 0
  • bf452680715f90546537f4bf28ab080e.jpg
    bf452680715f90546537f4bf28ab080e.jpg
    84 KB · Views: 0
  • fff09fb0537b4c2ffe062f7c706a3529.jpg
    fff09fb0537b4c2ffe062f7c706a3529.jpg
    130.5 KB · Views: 0

Bigblue&Goldie

Well-known member
Joined
Mar 12, 2009
Messages
10,672
Location
AZ
Mixed emotions today. I dug out my TRX450r, peeled off the old race numbers, cleaned it up and sent it off to its new owner. Your thread always reminds me of how much I loved riding ATV's, but it's been over a decade, so I'm happy someone else will get some good use out of it. Keep the updates and pics coming!
 
OP
Q

quadrcr87

Well-known member
Joined
Jul 5, 2013
Messages
1,036
Location
Travelers Rest, SC
I am sure it was tough Bigblue&Goldie, it’s always hard for me to sell a toy. I felt the same way when I sold my RZR turbo last year. Sometimes it’s just good to move on and focus on something else. I’ve been feeling like it’s time to upgrade to an EFI YFZ450R but I can’t bring myself to sell this one that I’ve had since 2004. My better half thinks I’m crazy to keep it and buy another. Even after it sat with little use for several years during and after college, I couldn’t bring myself to do it.
 
OP
Q

quadrcr87

Well-known member
Joined
Jul 5, 2013
Messages
1,036
Location
Travelers Rest, SC
Just got home from a long weekend at my in-laws helping them with their kitchen remodel. We ripped out the 30 year old cabinets and tile and borrowed my brothers dump trailer to haul them off. After a day of prep which included re framing, hanging drywall, moving electrical and hours of floor leveling we were ready for tile.

22a6cd30a427b5c2017380921a136634.jpg

82052c8b92ecde91bf936c2a0573f9fd.jpg

This is by far the largest tile project I have laid on my own. I was stiff and sore but glad to have it done after a day and a half.
8ef9d6f2268b657dd78d40eca360c890.jpg

I was glad when my wife and her mom jumped in to grout. I’ll be revisiting this project once the cabinets and counters are installed. I will likely be doing the backsplash and trim.
984f6c09fa1c30f583e92f111b37f83c.jpg

Thanks for following along!


Sent from my iPhone using Tapatalk
 

Attachments

  • 22a6cd30a427b5c2017380921a136634.jpg
    22a6cd30a427b5c2017380921a136634.jpg
    82.4 KB · Views: 0
  • 82052c8b92ecde91bf936c2a0573f9fd.jpg
    82052c8b92ecde91bf936c2a0573f9fd.jpg
    88.9 KB · Views: 0
  • 8ef9d6f2268b657dd78d40eca360c890.jpg
    8ef9d6f2268b657dd78d40eca360c890.jpg
    90.2 KB · Views: 0
  • 984f6c09fa1c30f583e92f111b37f83c.jpg
    984f6c09fa1c30f583e92f111b37f83c.jpg
    82.7 KB · Views: 0
Last edited:
OP
Q

quadrcr87

Well-known member
Joined
Jul 5, 2013
Messages
1,036
Location
Travelers Rest, SC
Spring is always a very busy time for me and this year has been no different. A lot had happened in the past month so I decided to take some time and catch you guys up.

First up is the ditch project. This area has bothered me since I moved in in 2017 so I decided it was finally time to fix it. This is the secondary driveway into our side yard and provides access to the spot I store my toy hauler. As you can see in the pictures, the walls are collapsing and filling in the culvert pipe.
b5326694e23ec1260b3c6e8f13cd5695.jpg

We have very sandy soil and it appears the previous owner did not bring in any black dirt or gravel when this was installed. Step one was to dig out both sides to access the connection.
b49ad35147474ee5eef6e977e9a3009f.jpg

I was able to source a 10’ section of 12” pipe for $100 that matched the existing. I cut it in half to add 6’ to the house side and 4’ near the property line.

9a45e813cd62f2f6821aeb07e9737045.jpg

Ready for dirt.
a343a6aaaf09017f6e1ca08f71c4c992.jpg

I picked up this mini track loader at the local True Value to make it a little easier to move 10 yards of black dirt. The Boss was happy she didn’t need to grab a shovel.
4a8114a85339db48969f8a90f08071d2.jpg

I didn’t take it all the way into the ditch but I was still able to pack the banks pretty well with it and finish with a tamper.
aa46de3051b92d8fbb621773655efa88.jpg

And finally some seed and straw to finish it up.

f78d65b54d5dfee8e95397106f94f45b.jpg

I spread a little dirt in the sandy/ low spots in the yard while I was at it. Being able to drive into a 60” gate and not tear up the grass made this a perfect machine for the job.
5acfdec80ae4a62af7cc2452a0e2f7a3.jpg

We have had some cold temps but I am hoping I start to see some grass soon. It’s been 8 days with some rain and watering.


Sent from my iPhone using Tapatalk
 

Attachments

  • b5326694e23ec1260b3c6e8f13cd5695.jpg
    b5326694e23ec1260b3c6e8f13cd5695.jpg
    258.6 KB · Views: 0
  • b49ad35147474ee5eef6e977e9a3009f.jpg
    b49ad35147474ee5eef6e977e9a3009f.jpg
    248 KB · Views: 0
  • 9a45e813cd62f2f6821aeb07e9737045.jpg
    9a45e813cd62f2f6821aeb07e9737045.jpg
    236.4 KB · Views: 0
  • a343a6aaaf09017f6e1ca08f71c4c992.jpg
    a343a6aaaf09017f6e1ca08f71c4c992.jpg
    281 KB · Views: 0
  • 4a8114a85339db48969f8a90f08071d2.jpg
    4a8114a85339db48969f8a90f08071d2.jpg
    210 KB · Views: 0
  • aa46de3051b92d8fbb621773655efa88.jpg
    aa46de3051b92d8fbb621773655efa88.jpg
    160.7 KB · Views: 0
  • f78d65b54d5dfee8e95397106f94f45b.jpg
    f78d65b54d5dfee8e95397106f94f45b.jpg
    210.9 KB · Views: 0
  • 5acfdec80ae4a62af7cc2452a0e2f7a3.jpg
    5acfdec80ae4a62af7cc2452a0e2f7a3.jpg
    212.2 KB · Views: 0
OP
Q

quadrcr87

Well-known member
Joined
Jul 5, 2013
Messages
1,036
Location
Travelers Rest, SC
The real fun of Spring is the start of riding season. I have spent some late nights in the garage getting all of the machines ready.

I have been getting out on the MTB 2-3 times a week. With that comes broken parts and maintenance. The bike shops are so busy I have been learning to do everything myself. Let’s be honest, I prefer it that way.

New tire sealant and some tools for trail side repairs.
da840b16dd6220c80f737138b7e2cdb8.jpg

Hydraulic brake bleeding kit.
d040d716eaf99e05942b17c749258e58.jpg

New pads and stem cap.
457ee7481cbe474232296eda1e4ff853.jpg

The Shimano bleed process is a little different because you push the mineral oil from the bottom.

Remove the pads and install the bleed block.
67a624e57aad0e07322699aec963d380.jpg

Hook up a syringe to the bleed port.
2e4297f4ad2be1e9be22fc14672e847a.jpg

Screw the funnel to the master cyl and push the fluid up until it’s clean. They give you a little plug to install in the funnel before you unthread it. Very well thought out design.
a58f6c307c17a1b1c79c4110df15b625.jpg

It even fits a quart jug perfect to drain.
f868637683cc07f260d61099abbd6491.jpg

One of my lines needed to be cut and resealed due to a tree strike last season. It still worked but I didn’t trust it.
fc2e9bc3fa23356fe9ca10202cb4eeb1.jpg

9beb0719f00cbb823f65a3a9d666cd27.jpg

After I cut the line I installed a new olive and sleeve.
09e66558c6a647aee73b51381cca4a89.jpg

584d6a341dc8aaebea394495052ff8f2.jpg

While out testing the brakes on my local trail I decided it was a good idea to smash my derailleur on a log when I slipped off an obstacle. I tried to adjust the cable but it kept skipping gears.

It was a good time to upgrade from SRAM NX to GX Eagle components. Much less plastic parts on the upgrade.

fc5f66167f9232022c9de5f069b770cf.jpg

8dd8527c91124871a631ea8aa1b6a7c3.jpg

The swap was pretty straight forward. The most time was spent setting the travel limits and adjusting the cable slack. SRAM included the white tool used to set the B screw that adjusts the distance from the cassette.
99ccc456b89d42abf08547563a55c28c.jpg

It shifts like butter with the new shifter, derailleur and chain.
95133d97cba79287c2c982dff199bd45.jpg

The last step was a new Wolf Tooth dropper post lever and matching stem cap. This lever has ball bearings that removed the sloppy vague feel I had before. The cap just looks better and is a little lower profile.

a4576cbe9046d36db4071a489ec81365.jpg


9bc243e96fbc045056aa56d211ee5ba2.jpg

Ready to hit the trails. Thanks for following along.


Sent from my iPhone using Tapatalk
 

Attachments

  • 584d6a341dc8aaebea394495052ff8f2.jpg
    584d6a341dc8aaebea394495052ff8f2.jpg
    76.1 KB · Views: 0
  • 09e66558c6a647aee73b51381cca4a89.jpg
    09e66558c6a647aee73b51381cca4a89.jpg
    105.2 KB · Views: 0
  • fc2e9bc3fa23356fe9ca10202cb4eeb1.jpg
    fc2e9bc3fa23356fe9ca10202cb4eeb1.jpg
    47.5 KB · Views: 0
  • 9beb0719f00cbb823f65a3a9d666cd27.jpg
    9beb0719f00cbb823f65a3a9d666cd27.jpg
    86.7 KB · Views: 0
  • f868637683cc07f260d61099abbd6491.jpg
    f868637683cc07f260d61099abbd6491.jpg
    45.2 KB · Views: 0
  • da840b16dd6220c80f737138b7e2cdb8.jpg
    da840b16dd6220c80f737138b7e2cdb8.jpg
    133.2 KB · Views: 0
  • d040d716eaf99e05942b17c749258e58.jpg
    d040d716eaf99e05942b17c749258e58.jpg
    126.5 KB · Views: 0
  • 457ee7481cbe474232296eda1e4ff853.jpg
    457ee7481cbe474232296eda1e4ff853.jpg
    148.7 KB · Views: 0
  • 67a624e57aad0e07322699aec963d380.jpg
    67a624e57aad0e07322699aec963d380.jpg
    75.2 KB · Views: 0
  • 2e4297f4ad2be1e9be22fc14672e847a.jpg
    2e4297f4ad2be1e9be22fc14672e847a.jpg
    94.1 KB · Views: 0
  • a58f6c307c17a1b1c79c4110df15b625.jpg
    a58f6c307c17a1b1c79c4110df15b625.jpg
    64.9 KB · Views: 0
  • fc5f66167f9232022c9de5f069b770cf.jpg
    fc5f66167f9232022c9de5f069b770cf.jpg
    68 KB · Views: 0
  • 8dd8527c91124871a631ea8aa1b6a7c3.jpg
    8dd8527c91124871a631ea8aa1b6a7c3.jpg
    116.7 KB · Views: 0
  • 99ccc456b89d42abf08547563a55c28c.jpg
    99ccc456b89d42abf08547563a55c28c.jpg
    98.5 KB · Views: 0
  • 95133d97cba79287c2c982dff199bd45.jpg
    95133d97cba79287c2c982dff199bd45.jpg
    155.5 KB · Views: 0
  • a4576cbe9046d36db4071a489ec81365.jpg
    a4576cbe9046d36db4071a489ec81365.jpg
    80.9 KB · Views: 0
  • 9bc243e96fbc045056aa56d211ee5ba2.jpg
    9bc243e96fbc045056aa56d211ee5ba2.jpg
    77.2 KB · Views: 0
Last edited:
OP
Q

quadrcr87

Well-known member
Joined
Jul 5, 2013
Messages
1,036
Location
Travelers Rest, SC
With a new racing season comes a fresh set of graphics for the quad. I even decided to add a little color this year. Having a black frame and plastics provided a blank canvas so I had a lot of freedom in design. After sending off some suggestions and a sponsor list to SSI decals I review a few renderings and finalize the design.

e894a4f1570c7ec4af0ab859a343107f.jpg


The install went smooth and their templates were near perfect. It just took a lot of cleaning, patience and a little help from the heat gun to add some flexibility. Eventually I was able to wrap around all of the curves and angles with only a few small bubbles. I know some people suggest using soapy water but I prefer to keep it dry and work it on slowly.

6f437fd2f83e33be9add41bd486d93d9.jpg


165a1b31fa196643be47e94b651f2800.jpg

a9158a4784f9808a924cf77d57c4d37e.jpg

I decided to make a change to a horizontal number plate in the rear. This should prevent the plate from hitting the ground when I stand the machine up on the grab bar for cleaning. The only issue was that my grab bar mounts were too narrow for the new plate. I have seen many people trim/notch the plate to fit but I preferred not to.

084bce3ac501b7933ac7c9364bd85ac6.jpg

My solution was to fabricate an aluminum drop bracket. I started with an 1/8” thick x 2” wide scrap I had on hand.
2f8f4550ee4c3f613afaa51c8829aa52.jpg

Once I drilled and tested the fit the bracket, I drew out a simple design and cut it out with a jig saw. After some sanding and polishing I mounted it up.

If it looks a little off, that’s because it is. Something in the rear is still a little bent and not level with the main frame. I decided it was better to level the plate and not follow the slight angle of the grab bar.
3ac7d2fb3a95e46e2deab92fef2c5668.jpg

Take a good look because this is the last time it will be this clean for a while. The first National I am racing this year is June 19-20. The plan is to get to the local tracks for practice at least 4 times in the next month. Between that and mountain biking I should be ready to go.

51addc8cf2a3952d4fee0b79f590bef9.jpg


7199fe4d92760b47d1a147ec08b7e8f1.jpg

3b5b5604d6129135aa6432c506ef7aa0.jpg

9230a9e47d695d1827ce5d75b6873aa2.jpg

0fec85e294e381cd96447ea5f55be156.jpg


Sent from my iPhone using Tapatalk
 

Attachments

  • e894a4f1570c7ec4af0ab859a343107f.jpg
    e894a4f1570c7ec4af0ab859a343107f.jpg
    157.1 KB · Views: 0
  • 6f437fd2f83e33be9add41bd486d93d9.jpg
    6f437fd2f83e33be9add41bd486d93d9.jpg
    164 KB · Views: 0
  • 165a1b31fa196643be47e94b651f2800.jpg
    165a1b31fa196643be47e94b651f2800.jpg
    156.6 KB · Views: 0
  • a9158a4784f9808a924cf77d57c4d37e.jpg
    a9158a4784f9808a924cf77d57c4d37e.jpg
    141.4 KB · Views: 0
  • 084bce3ac501b7933ac7c9364bd85ac6.jpg
    084bce3ac501b7933ac7c9364bd85ac6.jpg
    98.4 KB · Views: 0
  • 2f8f4550ee4c3f613afaa51c8829aa52.jpg
    2f8f4550ee4c3f613afaa51c8829aa52.jpg
    110.6 KB · Views: 0
  • 3ac7d2fb3a95e46e2deab92fef2c5668.jpg
    3ac7d2fb3a95e46e2deab92fef2c5668.jpg
    95.3 KB · Views: 0
  • 51addc8cf2a3952d4fee0b79f590bef9.jpg
    51addc8cf2a3952d4fee0b79f590bef9.jpg
    200.3 KB · Views: 0
  • 7199fe4d92760b47d1a147ec08b7e8f1.jpg
    7199fe4d92760b47d1a147ec08b7e8f1.jpg
    194.6 KB · Views: 0
  • 3b5b5604d6129135aa6432c506ef7aa0.jpg
    3b5b5604d6129135aa6432c506ef7aa0.jpg
    184 KB · Views: 0
  • 9230a9e47d695d1827ce5d75b6873aa2.jpg
    9230a9e47d695d1827ce5d75b6873aa2.jpg
    183.3 KB · Views: 0
  • 0fec85e294e381cd96447ea5f55be156.jpg
    0fec85e294e381cd96447ea5f55be156.jpg
    183.8 KB · Views: 0
Last edited:
OP
Q

quadrcr87

Well-known member
Joined
Jul 5, 2013
Messages
1,036
Location
Travelers Rest, SC
This picture pretty well captures my garage in summer mode. Each machine spends some time in the work bay for maintenance and upgrades.
DA4AB3F9-0A22-4636-A901-6C0A60A501C5.jpeg

This year the Harley was due for some wheel bearings, brakes and a front tire. The HF lift makes this job a lot easier but the front tire cradle is a pain in the **** when it comes time for tire removal. i end up jacking the bike up and then unbolting the whole cradle and sliding it out. I am wondering if it makes sense to install a tire clamp like a handy lift or to just sell this lift and upgrade.
743B78A6-DDDC-4943-A3BB-2C426F809F35.jpeg

This was my first time installing Harley wheel bearings and I’m glad I bought the special tool for driving the races in and out. Way easier than the socket and drift pin method I have used on trailer bearings in the past. I found a lot of sand and grit in on the bearing spacer. These wheels came from an online chrome exchange in 2012 where I sent my stock wheels as cores. I don’t think they did a great job cleaning out the sand after sandblasting.

D3B838D2-D416-48E5-A63D-187D6EA55BEC.jpeg

3E9A1BC9-2477-4D94-B5BE-5AC2CFE8B370.jpeg

CD947BD1-9CD4-4898-B533-D3D09D9DFDDA.jpeg
They also installed the bearings without the shims or the OEM shim washer.Backlash was very tight. I ended up shortening the spacer to give me a little space to reinstall a washer and shim stack. With the new bearings I set the backlash at spec which is .002-.006”. First time using my generic Summit Racing dial indicator and it was a piece of ****. Very sloppy magnetic base but I made it work. I think this thing was under $50 so it was worth a try. I know you can spend hundreds on these but does anyone have a recommendation for an entry level indicator that doesn't ****? I don's use if often but need something that has a stronger base and is a little more precise.

F578983F-25E7-429E-A80E-9D462CCE494E.jpeg

0850F502-1F7B-4A59-8708-AF60F1F7F481.jpeg

Hopefully the pictures upload correctly. I got rid of the tapatalk app after Ryan posted about his privacy concerns. I am trying the GJ site on my phone now and it's a little harder to get the pics in the right order.

More Harley maintenance on the way....
 
Last edited:
To avoid these ads, REGISTER NOW!
OP
Q

quadrcr87

Well-known member
Joined
Jul 5, 2013
Messages
1,036
Location
Travelers Rest, SC
After I had the front end reassembled with new pads, I flushed the brake line with fresh DOT 5 and moved onto the rear.

I decided to was time to replace the 24 year old rear brake line and I am glad I did. I just didn’t trust it anymore and the rubber portion was built into the hard line. It was replaced with a braided stainless line from the master all the way to the caliper.
DA9BBD2E-266B-48AC-BB92-C5F6F664E929.jpeg

It has been a few years since I bleed the rear brake but I was shocked with how dirty the fluid was. It appeared to have black sediment in it. It may have just been the rubber line deteriorating. I thought about rebuilding the master cylinder and caliper but they seem to be working so I flushed them out and left them alone.

B48D2A8C-39E4-4FCB-94DE-B9B2045A9936.jpeg

27B30CBC-9BAD-4468-BACC-9F2B9A3BA51B.jpeg

With the new line, pads and fluid the rear brake feels very solid. The pads don’t seem to bite as hard as the old ones but I think they need some time to break in. I only got about 10 miles on them on a test ride.
13193D2A-EFAC-4100-96C3-90F68165F1CE.jpeg

I can't help but polish all of the chrome every time this thing is on the lift. It beats laying on the ground doing it on the driveway.
773F0A03-324D-4537-A956-8047B8FE8653.jpeg

Thanks for following along!
 

Attachments

  • 3ABE96B7-542E-4994-A74A-DE0492C149AD.jpeg
    3ABE96B7-542E-4994-A74A-DE0492C149AD.jpeg
    488.6 KB · Views: 3
Last edited:
OP
Q

quadrcr87

Well-known member
Joined
Jul 5, 2013
Messages
1,036
Location
Travelers Rest, SC
It has been a very busy 2 weeks with summer activities in full swing. We did manage to get out camping after the dunes after taking care of some camper maintenance that was due.

Before our upcoming travel season I wanted to get a look at the trailer brakes and bearings as it it had been a few years. Thankfully the brakes and bearings were in great shape. All they required was a little cleaning and some fresh grease.
9598B373-159A-4BDC-A009-11B7C6659A5A.jpeg

CD555C28-8567-4C15-9A62-080E5A66AC5D.jpeg
Then the Boss came out and helped me give the whole camper a good wash. This started with a roof wash and inspection. Only a few small areas needed resealing. I have been pretty religious about resealing every few months to prevent leaks. Washing the awning always *****. Scrubbing off all of the dirt and leaf stains while water runs down my armpit!
DAA3419E-09A3-4E45-8317-A2BFCBF5E83E.jpeg

The YZ450 needed a little love before the trip as well. I haven’t really touched it since I broke my ribs on the last trip back in October.
I installed a new chain and sprockets as the last set had about 4 seasons on them and they were a budget set. I made the switch from a steel rear sprocket to aluminum and the weight difference is massive.
5CA9E7E0-DB53-45E0-AD01-54BE578B31F4.jpeg

199ED984-4EBF-44D2-8830-783965FD9F4C.jpeg

0DF6D757-CAEA-422E-B211-505C6FA298E7.jpeg
I love these little Japanese Circlip Pliers
6A4C8200-1ABC-4640-97E8-389C2D0E17CE.jpeg
CEB206F1-25CE-463D-A004-A24B49C67475.jpeg
I finished it up with a brake bleed and a fresh air filter. These air filter skins really help keep the sand out. I can swap out the skins a few times between filter cleanings.
B52FBE40-3807-45B6-BB5F-7C80C9B1D8F4.jpeg

5E4DC5CE-D7A3-4B04-A503-073A0370BE58.jpeg

We had a great time at the Silver Lake dunes with family. Amazingly I stayed on 2 wheels the whole weekend which was about 3 hours of riding. This was a good opportunity to condition for my upcoming MX races. I timed myself to ride hard for 20-30 intervals and felt pretty strong. Hoping I feel that good at this weekend's ATV National.
 
Last edited:
OP
Q

quadrcr87

Well-known member
Joined
Jul 5, 2013
Messages
1,036
Location
Travelers Rest, SC
Finally made it out to my first race of the season in Walnut, IL for the Sunset Ridge ATV National. As always there was a lot of prep needed to get ready.

A couple weeks before the race my exhaust cracked unexpectedly while riding at my local practice track. All of a sudden the quad sounded like a dragster so I knew something was off. Thankfully my sponsor rushed a replacement mid pipe out to me and covered the cost. The exhaust only had about 10hrs on it and appears to have been due to a brittle weld.
AE7DB91A-629F-41D9-BF4A-80F1FEED13DC.jpeg

6CD371E0-44B4-4F7A-B1B3-1DD76F1FE3A1.jpeg

Once the exhaust was repaired I moved on to some maintenance items. First up was a new set of clutch fibers and plates. This clutch pack had about 20 hrs. on it and showed signs of slipping with discoloration on the plates.
2AF2F718-7A86-47CF-BE27-DE8D29BC8CC7.jpeg
42E52110-9845-4CDF-A4CD-8539FA71F6E3.jpeg

It was also a good time to throw on a fresh chain and sprockets. The chain was still in pretty good shape and will serve as my spare for the season. I see multiple people breaking chains at the track so I replace mine every season as cheap insurance. A broken chain can lead to a hole in the engine case and even worse result in a crash. I saw a guy flip over the bars on Sunday when his chain broke going through the whoops. When that forward momentum stops suddenly, bad things happen.
84DF98AE-3600-4635-AC5D-33B7379E7FED.jpeg

58D80799-A6AC-491C-A665-6AC4E1A9A9FF.jpeg

We made it out to the track on Thursday night after a short 2.5 hr. drive. It is always a relief when I get the trailer parked and setup my pit area.
30134BAB-2C32-45AC-8AAE-FB426EBABAA7.jpeg
Rain and storms were threatening all weekend but we ended up with a near perfect track. They alternate the race schedule at each round and this weekend I drew the short straw and ended up as race 35 out of 36. This made for a very rough and beat up track. It's always tough for me to have a perfect track in morning practice and then race on a brutal track with deep ruts and sharp braking bumps.

C8C0C118-DC81-45BC-A76E-E2EDF5D9550D.jpeg

I definitely struggled this weekend in the races. I finished in 6th in both motos for 7th overall. I had a bad start in moto 1 and got stuck in a corner behind a stalled rider. I also got arm pump so bad I could barely hold on by the end.

In moto 2 I had a decent start in 4th and passed to 3rd in the first lap. I was making up time on 2nd place when I braked too late coming into a turn on the last lap and went over the handlebars. Fortunately I landed ok and was able to remount and ride back to 6th. According to my wife I flew about 10 feet and landed flat on my back. I guess it looked worse than it felt.

No trophies this week but I did come home with this nice shot over the finish line jump during Friday practice.
E9895BDF-2EC8-496B-987D-77B9695D2024.jpeg

The next race is at the end of July at Redbud, my favorite track in the country. Time to go run some more practice laps.

Thanks for following along!
 
Last edited:
OP
Q

quadrcr87

Well-known member
Joined
Jul 5, 2013
Messages
1,036
Location
Travelers Rest, SC
Big news on the garage front.... Looks like there is a good chance I am making a job change and moving to South Carolina in the coming months. The thought of finding a house right now with a 3+ garage in this crazy market is stressing me out a bit.

I won't go back to an undersized 2 car.. I just won't do it.
 
OP
Q

quadrcr87

Well-known member
Joined
Jul 5, 2013
Messages
1,036
Location
Travelers Rest, SC
3+ w/ RV gate...
Yes in a perfect world I would have a solid RV parking spot with hookups for my trailer. My parents are enjoying their retirement with a Class A and it would be really nice to have a hook up for them to spend a few weeks in the winter too.

I have already done the whole storage unit + camper storage offsite and it is so inconvenient. It turns the packing and unpacking from a trip into a 4 day ordeal.
 
OP
Q

quadrcr87

Well-known member
Joined
Jul 5, 2013
Messages
1,036
Location
Travelers Rest, SC
I accepted the job in Greenville, SC and have been pretty consumed planning the move. We listed our house last Friday morning and had multiple offers by lunch time. Closing is set for August 24th.

We had some success on our house hunting trip last week and went under contract this morning. It is a beautiful 4 car garage with a house attached. It is split 2 and 2 both attached with 10’ ceilings and 8’ doors. The shop side is 26’ deep and should fit my truck if I keep it organized well. The only downside is the lack of trailer parking. The driveway is long enough to fit the truck and trailer attached but I found a trailer storage site 1 mile away so it’s pretty convenient.

Front View
AE265593-DA01-413A-83C0-C838B9BD400D.jpeg

The garages... The left side is inline with the driveway and is 26’ deep. It should make a decent shop for me. On the right, I plan to keep it as the clean side and maintain a parking spot for my wife.
96381016-E2E6-43F7-93AD-D2017672AD79.jpeg

The left side. There will be privacy windows in the garage door but no additional natural light. I may switch to a window door on the man door as it looks to the back yard/ deck.
1B585206-2E4A-49B7-A22B-1A7986CAE4BF.jpeg

The right side. The doors on the left lead to the house and the water heater.
9750C752-D395-4231-9CFE-2A58B566AA59.jpeg

A look at the rest of the neighborhood. Only 3 out of 21 home remaining in construction. That includes ours. 6738B8C8-6482-43DC-9FF3-6CD44940CD58.jpeg
B5AB2BE5-C8BC-4C8F-936C-89D60600BBFD.jpeg
 
Last edited:

zmotorsports

ALLIANCE MEMBER
Joined
Oct 20, 2009
Messages
21,348
Location
Northern Utah
Looks like a nice place. Good luck with the move. I don't envy you there. Been there done that and pray I never have to do it again. :bounce:
 
OP
Q

quadrcr87

Well-known member
Joined
Jul 5, 2013
Messages
1,036
Location
Travelers Rest, SC
Looks like a nice place. Good luck with the move. I don't envy you there. Been there done that and pray I never have to do it again. :bounce:
Thanks Mike. I think it is a healthy process for me every few years to force me to purge. I always find a pile of spare parts for vehicles I no longer own!
 
OP
Q

quadrcr87

Well-known member
Joined
Jul 5, 2013
Messages
1,036
Location
Travelers Rest, SC
The tool gods smiled down upon me this weekend. My wife’s grandfather has finally decided it is time to start cleaning out the barn at 85 years old. I was able to purchase a craftsman drill press and block grinder for a very reasonable price. I got the first look before they have a tool sale. I would have went for his table saw as well, but it’s too big right now considering my move.

If anyone has any info on these to share, please do. I haven’t really researched yet but they are both operational and run very smooth. The vice is made by GRIP (Grand Rapids Industrial Products) and moves on the X and Y axis.
 

Attachments

  • D3B91084-9D83-417C-AF0D-A257E2B1BB3B.jpeg
    D3B91084-9D83-417C-AF0D-A257E2B1BB3B.jpeg
    508.6 KB · Views: 28
  • 2394C12E-577A-4BB2-899B-8CA43350E634.jpeg
    2394C12E-577A-4BB2-899B-8CA43350E634.jpeg
    356.8 KB · Views: 28
  • 26AD4CD4-D4B8-42CD-8FA6-CFD84CC6144C.jpeg
    26AD4CD4-D4B8-42CD-8FA6-CFD84CC6144C.jpeg
    320.6 KB · Views: 24
  • 137A0A56-C321-4231-BB8C-49DD91F9A695.jpeg
    137A0A56-C321-4231-BB8C-49DD91F9A695.jpeg
    326.6 KB · Views: 22
  • 9CBE6B95-7BC5-40F9-A63B-BC2A31998F01.jpeg
    9CBE6B95-7BC5-40F9-A63B-BC2A31998F01.jpeg
    373.6 KB · Views: 22
  • 98AFC632-21F9-4AA8-BED2-19626DA35D44.jpeg
    98AFC632-21F9-4AA8-BED2-19626DA35D44.jpeg
    379.1 KB · Views: 22
Last edited:
OP
Q

quadrcr87

Well-known member
Joined
Jul 5, 2013
Messages
1,036
Location
Travelers Rest, SC
It has been a very busy month and I’ve been a little less organized than normal so my updates are going to be brief and in random order for a while. Even with a pending move and a new job, the garage projects must continue!

The first up is my MTB. With inflated prices and limited inventory, I’m holding off on upgrading to a full suspension bike this year. With my move to one of the top MTB areas in the country, I wanted to address one of the weaknesses of my Trek Roscoe hardtail. The 120mm front fork has been functional but it lacked in adjustability and plushness. It didn’t make sense to me to put a $1000+ fork on this bike but I was looking for some improvement. I decided to upgrade to a mid grade Rockshox Yari with 130mm of travel and a plush debonair air damper. It also has a much stiffer chassis with 35mm stanchions vs. the 30mm on my old Judy. The reduced flex is noticeable in braking and cornering.

5FA58B9A-2D69-49A4-ADE4-E9FE5E21D085.jpeg
Removing the fork was a little awkward as I don’t currently have a bike stand. Ibike using my storage pulleys.
EDD4AD59-36DE-4C0C-A80F-9C28A4CFC6A9.jpeg

As is the case with all new forks, the steer tube needed to be cut down. This is an important thing to watch for when getting a used fork as well, because if it’s too short, it’s unusable.
F2A3AA92-F5AE-4DBD-9953-0A6CB3CD76E7.jpeg
In my case I was able to base my cut length off of my old fork as my spacers and stem were remaining the same.
E4F35095-AD3C-4A2E-BF04-AE80B7CE3153.jpeg

After a quick cut with a rigid pipe cutter, I cleaned up the burr and hammered in the star nut (PITA). I must have been too excited at this point to remember to take any finished photos. I tested the new fork out on a couple mild trails on a camping trip last weekend and it feels really good. I need to hit my regular rougher trails soon to get a real ride comparison.

Thanks for following along!
 
Last edited:

Bigblue&Goldie

Well-known member
Joined
Mar 12, 2009
Messages
10,672
Location
AZ
You'll like that fork; I have an older Pike I put a Debonair spring in, which is very similar to your Yari, and it works well. The foam rings in the legs dry up quickly as Rockshox uses a rather thin oil compared to Fox, but it's an easy service. I pretty much do mine twice a year.

If you remember before your ride, turn the bike upside down for a while to let the oil saturate the rings; this will make it a little bit more supple. I tend to run mine with the compression wide open at a higher PSI and just play with rebound. These new forks are hard to bottom out compared to older models. This threw my buddy off as he was convinced he wasn't getting full travel out of his Yari.
 
OP
Q

quadrcr87

Well-known member
Joined
Jul 5, 2013
Messages
1,036
Location
Travelers Rest, SC
You'll like that fork; I have an older Pike I put a Debonair spring in, which is very similar to your Yari, and it works well. The foam rings in the legs dry up quickly as Rockshox uses a rather thin oil compared to Fox, but it's an easy service. I pretty much do mine twice a year.
I am glad to hear you are liking the Debonair spring. I have heard the rings like to dry out. I'll plan to do a lower leg service at least once per year.
 
OP
Q

quadrcr87

Well-known member
Joined
Jul 5, 2013
Messages
1,036
Location
Travelers Rest, SC
It’s time to blow the dust off this thread since it’s been in storage for over 2 years! The move happened in September 2021 and I have had a very busy but also had a very fun time in South Carolina. First a picture of the finished house to start us off. I thought we escaped the snow moving south but I was wrong, we got 8” in January ‘22.B50BCE63-66DC-4529-80EA-1D51843A7FCD.jpeg
 
Last edited:
OP
Q

quadrcr87

Well-known member
Joined
Jul 5, 2013
Messages
1,036
Location
Travelers Rest, SC
As you can imagine the move was a lot of work and a stressful week of preparation. The house sold within 5 days of listing which was great but it also meant that I needed a temporary home quickly. My company was flying me back and forth July & August as I transitioned to the new role which was a little draining. I was able to quickly find a short term furnished apartment as I was making the move solo until the house was finished. My wife and our dog moved into my in-laws in MI for a couple months. It wasn't ideal but it was a good decision. It allowed me to focus on work and my wife to help out her parents.

Moving Day
71BF3E46-BCF5-4085-98C0-E2F6621C78F1.jpeg

I spent alot of time removing everything from the garage walls and packing some of my tools and parts to make the load up go a little smoother. Turns out nothing I packed was damaged but most of what United packed was.
C25649DC-78CF-488C-927E-CCD46E41F66C.jpeg

The moving company pulled up and cleared it right out in 1 day. It was headed to storage until we were ready to move in.
797D3B3C-7EAE-441B-8F4A-0D09D63B839D.jpeg
A sad empty shell that was once the host of so much fun and learning.
A477B0D9-E275-467C-917F-52717C8CAF2B.jpeg

There were a few things I did not trust with the movers including my quad, Harley, lawn mower, bike, guns, plants, etc. And then there were the items they would not take like chemicals. All of that travelled down to SC with me in the toy hauler and went into a small storage unit or stayed in the trailer. It was a real bummer being with a shop space for 2 months.
1E31D6CE-73D8-4D5F-96DE-3B0132AE3223.jpeg

Stay tuned for the planning of the new garage and exploring my new home. This was state number 6 in a 10 year span, what an adventure.
 
Last edited:
OP
Q

quadrcr87

Well-known member
Joined
Jul 5, 2013
Messages
1,036
Location
Travelers Rest, SC
Although it was hard to leave the old garage behind it was exciting to plan the next one. I had already drawn my 3 car garage to scale so it was a pretty easy exercise to draw the new garage and copy and paste everything over in Sketchup. I also had the advantage of traveling back and forth between both before we sold the IN home.

I like to have at least a base plan so the movers set the large items in place. You will see later that this first iteration did not end up as the final. It did still confirm that I was going to have plenty of room to be organized with my current tools, cabinets and vehicles.


4A3E6442-C957-4EEE-A794-270F5226EDCD.jpeg
 
Last edited:
To avoid these ads, REGISTER NOW!
Top Bottom