BoutTime64
Member
About 8 months ago, I applied Quikrete epoxy floor covering in my garage. It is comprable to what the epoxy version of Rustoleum is i suppose. The Lowes in town is the only place that carried it, as well as Rustoleum, but the guy at the store recommended it because it stood up to the hot tire test, where it wont peel after being under a hot tire.
Well I picked up 4 Kits, enought to cover my 24 x 36 pad. Each kit had the a gallon can of base, a pint of activator, floor prep (acid) stir stick, and floor speckles. It came in grey or tan. I got grey. It also came with a dvd that showed you evrey thing to do. Very informational.
Since my garage floor was a bit on the rough side, i decide to rent a floor grinder from my local contractor type rental place. Its a heavy sob and hard to move around but it did a good job of taking down the high spots and giving me a real nice surface to work with.
Before grinding
View media item 812
During grinding
View media item 814
After Grinding
View media item 813
I followed the instructions to a T. Although, when using more than one kit, things get a little tricky. Before you use the epoxy, you must mix the 2 parts and let it set for 30 min, ( i think), then while you are applying you need to keep a wet edge. You also have a narrow working time 2 or 3 hours i think. (It was 8 months ago) So you need to make sure you can forcast when you are going to need a new batch 30 min ahead so you can have it ready to go. My first batch didnt go to hot. I started with a brush around the edges. But by the time i was ready to use the roller on the far corner, it was starting to set up. That, and i had a flimsy roller. The thickness of the epoxy bent it all out of shape. So quick run to the hardware store, I got a heavy duty roller, rubber gloves, and extra rollers. This worked much better. After a few hours you need to change the roller since the epoxy in it will start to set up. And the gloves are good since the stuff gets everywhere and its super hard to get off.
It probably took 6 hours in total and it looks awesome. If there was a tiny pebble that got in the epoxy it would break off eventually and leave a tiny bare spot but that could have been avoided.
It is pretty slick when its wet. They sell a packet of special sand to give it some grit, but i passed.
You apply the color flakes if you like, when its wet, and it really makes the floor pop.
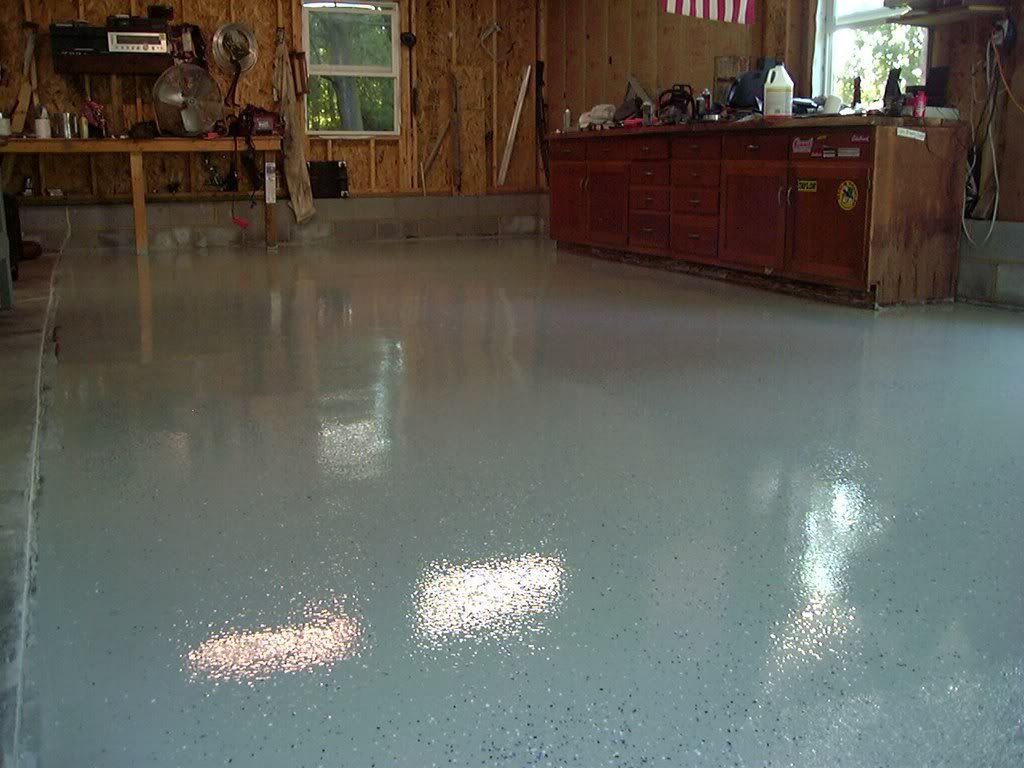
Corner that had the oil
View media item 815
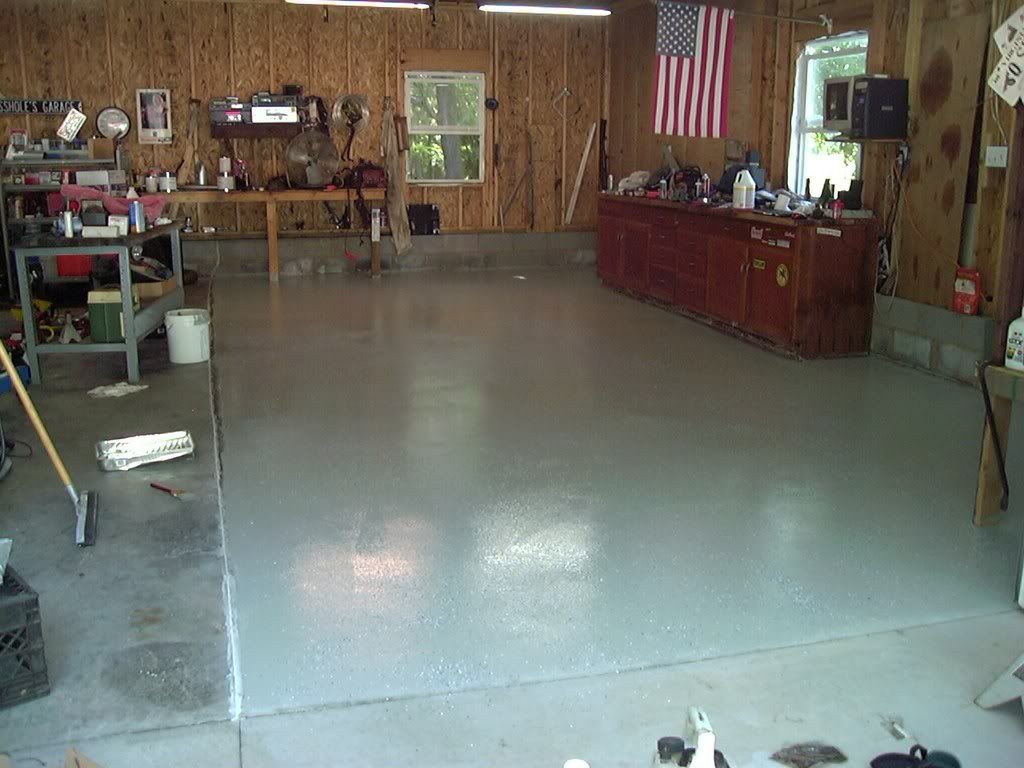
Looks awesome, rough spots are from crappy cement, dont really notice unless the light comes in like that
View media item 816
Like i said, its been 8 months, ive dropped hammers off ladders, parked cars, dropped lumber and it holds up strong. If anything, the place where the car drives is the best looking from being rubbed clean all the time. Its really easy to clean too, i had overspray (from a can of rustoleum ironicly) and i scrubbed it with denatured alcohol, the paint came right off but the epoxy didnt care at all.
Its about the same price as the rustoleum brand but this brand seemed to appeal to me more. It seemed less flashy, and more business.
As described in the the pictures, the rough areas in the finish are from the rough concrete, the smooth concrete really show the true finish. There was a patch of concrete soaked in oil that i could not get out, I treated it with the acid, and washed it really well, and painted over it. No problems.
2 thumbs up dude.
Well I picked up 4 Kits, enought to cover my 24 x 36 pad. Each kit had the a gallon can of base, a pint of activator, floor prep (acid) stir stick, and floor speckles. It came in grey or tan. I got grey. It also came with a dvd that showed you evrey thing to do. Very informational.
Since my garage floor was a bit on the rough side, i decide to rent a floor grinder from my local contractor type rental place. Its a heavy sob and hard to move around but it did a good job of taking down the high spots and giving me a real nice surface to work with.
Before grinding
View media item 812
During grinding
View media item 814
After Grinding
View media item 813
I followed the instructions to a T. Although, when using more than one kit, things get a little tricky. Before you use the epoxy, you must mix the 2 parts and let it set for 30 min, ( i think), then while you are applying you need to keep a wet edge. You also have a narrow working time 2 or 3 hours i think. (It was 8 months ago) So you need to make sure you can forcast when you are going to need a new batch 30 min ahead so you can have it ready to go. My first batch didnt go to hot. I started with a brush around the edges. But by the time i was ready to use the roller on the far corner, it was starting to set up. That, and i had a flimsy roller. The thickness of the epoxy bent it all out of shape. So quick run to the hardware store, I got a heavy duty roller, rubber gloves, and extra rollers. This worked much better. After a few hours you need to change the roller since the epoxy in it will start to set up. And the gloves are good since the stuff gets everywhere and its super hard to get off.
It probably took 6 hours in total and it looks awesome. If there was a tiny pebble that got in the epoxy it would break off eventually and leave a tiny bare spot but that could have been avoided.
It is pretty slick when its wet. They sell a packet of special sand to give it some grit, but i passed.
You apply the color flakes if you like, when its wet, and it really makes the floor pop.
Corner that had the oil
View media item 815
Looks awesome, rough spots are from crappy cement, dont really notice unless the light comes in like that
View media item 816
Like i said, its been 8 months, ive dropped hammers off ladders, parked cars, dropped lumber and it holds up strong. If anything, the place where the car drives is the best looking from being rubbed clean all the time. Its really easy to clean too, i had overspray (from a can of rustoleum ironicly) and i scrubbed it with denatured alcohol, the paint came right off but the epoxy didnt care at all.
Its about the same price as the rustoleum brand but this brand seemed to appeal to me more. It seemed less flashy, and more business.
As described in the the pictures, the rough areas in the finish are from the rough concrete, the smooth concrete really show the true finish. There was a patch of concrete soaked in oil that i could not get out, I treated it with the acid, and washed it really well, and painted over it. No problems.
2 thumbs up dude.