To avoid these ads, REGISTER NOW!

Racedeck freeflow edges along walls

fr0sty

Member
Joined
Nov 6, 2022
Messages
16
Location
Boston
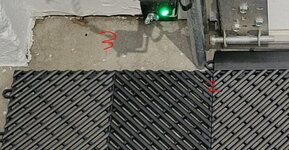
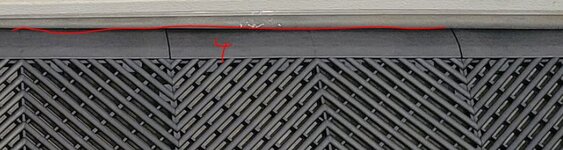
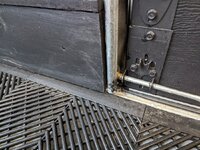
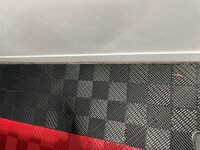
I just installed some racedeck freeflow tiles as they were without any cutting. The original plan was to cut the tiles on both the right and left edges so the design was centered, but that was a considerable amount of effort for what seemed relatively minor results.

Any thoughts on filing in the sides (~2"), especially the in the back (entrance to the house) where the gap is a bit bigger (~4")? I was thinking maybe to just leave the sides and then on the back, add in edge pieces? I think there's 3" ones? Also, I read that freeflow tiles can go up to the edges and don't need gaps in the sides for expansion/contraction?

Should I just change the design so there's less cutting involved? Eg, make it primarily Grey with a dark Grey stripe or 2 down the middle?20230508_111126.jpg20230508_111141.jpg20230508_111152.jpg
 
To avoid these ads, REGISTER NOW!

DirtyV

Well-known member
Joined
Jun 1, 2016
Messages
57
I encountered a similar situation along the back edge and right side of my garage. The right side gap was a bit wider than yours, but not by much. For the sake of symmetry (and my OCD), I cut tiles to fill that space, though it felt wasteful since I was burning up an entire tile for each cut. Along the back edge, since that area is under a workbench and mostly out of sight, I used edging. Depending on how off centered shifting the tiles would be, I would recommend shifting tiles to one side and cutting tiles to fit the gap on the other side. Alternatively, you could use edging on both sides and I think that would look fine.... you could even shave off a bit of the outside edge of the edges if they are too wide to fit into the left and right gaps. That would be the cheaper / less wasteful option.
 
OP
F

fr0sty

Member
Joined
Nov 6, 2022
Messages
16
Location
Boston
Yeah, those OCD tendencies...

I just checked, looks like adding edging pieces on both sides would work. Much better than wasting ~80% of each tile along each side.

@RaceDeck1 - do you guys still have the 3" or bigger edging pieces? Or any recommendations on on filling the larger gap towards the entrance of the house (last pic)?
 

Garage Flooring

ALLIANCE MEMBER
Joined
May 21, 2011
Messages
5,288
Location
Grand Junction, CO
I just installed some racedeck freeflow tiles as they were without any cutting. The original plan was to cut the tiles on both the right and left edges so the design was centered, but that was a considerable amount of effort for what seemed relatively minor results.

Any thoughts on filing in the sides (~2"), especially the in the back (entrance to the house) where the gap is a bit bigger (~4")? I was thinking maybe to just leave the sides and then on the back, add in edge pieces? I think there's 3" ones? Also, I read that freeflow tiles can go up to the edges and don't need gaps in the sides for expansion/contraction?

Should I just change the design so there's less cutting involved? Eg, make it primarily Grey with a dark Grey stripe or 2 down the middle?20230508_111126.jpg20230508_111141.jpg20230508_111152.jpg
1.JPG2-3.JPG4.JPG5.JPG

See the numbers above for easy reference.

#1 How high is the piece of wood? If it 1/2", just leave your expansion gap
#2 Make sure you are a full 1/2" from all obstacles, including the frame. In many cases, you can trim that frame and have tile go under it.
#3 I would use tile in this area and maintain your gaps. Perhaps connect to #2 by trimming the frame
#4 If there is no lip or step up make sure this sits 1/2" back. If there is a lip or step up you need to be 2-3" back
#5 I have done several floors. edges look terrible butted to the wall. Either piece it in or slide it over and and have a larger piece on one side.

I cant say enough about using siding trim to cover the gap. It works incredibly well. 16' lengths means minimal seams. Please it is slightly high over the tile but not enough to see and nail it up. Suggest painting firs.
 
OP
F

fr0sty

Member
Joined
Nov 6, 2022
Messages
16
Location
Boston
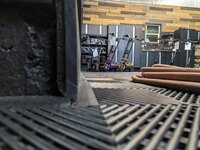
For #1, see picture below. The wood is part of a step/ledge, so doesn't impact the tiles.

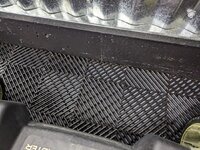
For #2, I did see that the metal track could be cut if needed. Provided a picture to show where the current wheels go to.

#3, I have no issue in continuing the tiles as there's not a ton of cuts leaving only 20% of the tile.

#4, there's no lip and it's flat. It touches up currently against a soft pad that seals the garage door closed. If it's required to pull it back 1/2", that could be better for the gap towards the entrance of the house.

#5, oy, was hoping that not to be the case. If i had to shift the pattern to one side, it wouldn't be centered anymore... to keep it centered would need a row of tiles for each side cut with 80% off the tile thrown away...

can you provide more info on what siding trim is? Links or pictures would be helpful. I'm not sure what it is.
20230508_150827.jpg20230508_150809.jpg
 

Garage Flooring

ALLIANCE MEMBER
Joined
May 21, 2011
Messages
5,288
Location
Grand Junction, CO
For #1, see picture below. The wood is part of a step/ledge, so doesn't impact the tiles.

For #2, I did see that the metal track could be cut if needed. Provided a picture to show where the current wheels go to.

#3, I have no issue in continuing the tiles as there's not a ton of cuts leaving only 20% of the tile.

#4, there's no lip and it's flat. It touches up currently against a soft pad that seals the garage door closed. If it's required to pull it back 1/2", that could be better for the gap towards the entrance of the house.

#5, oy, was hoping that not to be the case. If i had to shift the pattern to one side, it wouldn't be centered anymore... to keep it centered would need a row of tiles for each side cut with 80% off the tile thrown away...

can you provide more info on what siding trim is? Links or pictures would be helpful. I'm not sure what it is.
#2 no problem, just letting you know
#3 cool
#4 I am not sure where you purchased the flooring, for our customers we always suggest 1/2" from the threshold when there is no lip
#5 The other option is more cutting, but you can likely get both sides from a single tile (I cant promise that)

There are dozens of variations of width, height and length. Brand does not matter and as long as its wider than your gap the width does not matter. This is just an example https://www.homedepot.com/p/LP-Smar...ksK2yAtxVBwgmfkhPkQaAv3UEALw_wcB&gclsrc=aw.ds
 
OP
F

fr0sty

Member
Joined
Nov 6, 2022
Messages
16
Location
Boston
#4, I got the tiles from racedeck directly, but was reading online that the contraction/expansion with freeflow tiles were negligible versus the solid tiles.

#5, good point! Didn't realize that as an option and now that it is, much more reasonable.

Regarding the siding, you just glue them onto the concrete wall, similar to floor trim that you would have inside a house? Any pictures of finished tiles with the siding installed?
 

Garage Flooring

ALLIANCE MEMBER
Joined
May 21, 2011
Messages
5,288
Location
Grand Junction, CO
#4, I got the tiles from racedeck directly, but was reading online that the contraction/expansion with freeflow tiles were negligible versus the solid tiles.

#5, good point! Didn't realize that as an option and now that it is, much more reasonable.

Regarding the siding, you just glue them onto the concrete wall, similar to floor trim that you would have inside a house? Any pictures of finished tiles with the siding installed?
I don't have any pics that I can share of the trim. Concrete will make the installation more challenging. A construction adhesive would work if you can get it to stay while it cures
 

CSRPenFab

Well-known member
Joined
Oct 27, 2015
Messages
5,148
Location
Meridian Idaho
Here's a pic of my RD FreeFlow where it meets my door tracks. With a grinder or a good pair of tin snips, you can trim a bit off the rail to slide the tile underneath. Since this picture, I have added another transition piece to the right to fill in that gap.

Race Deck 2.jpg
 

RaceDeck1

Well-known member
Joined
Oct 8, 2007
Messages
3,001
Location
Salt Lake City , Utah
Here's a pic of my RD FreeFlow where it meets my door tracks. With a grinder or a good pair of tin snips, you can trim a bit off the rail to slide the tile underneath. Since this picture, I have added another transition piece to the right to fill in that gap.

Race Deck 2.jpg
thats a very clean install.. nice work!
 
OP
F

fr0sty

Member
Joined
Nov 6, 2022
Messages
16
Location
Boston
Here's a pic of my RD FreeFlow where it meets my door tracks. With a grinder or a good pair of tin snips, you can trim a bit off the rail to slide the tile underneath. Since this picture, I have added another transition piece to the right to fill in that gap.

Race Deck 2.jpg
Any pics of where the tiles meet up against the walls? Any trim as suggested above to cover the gap?
 

DirtyV

Well-known member
Joined
Jun 1, 2016
Messages
57
I like the trim idea.. I glued and screwed some pine into the concrete stem wall to create a ledge and left enough room for the tiles to fit underneath it. Same applies to the garage door rail. I also included a pic of where I cut the tiles along the wall... I think I only "wasted" about 20% of the tile along that wall, so not as bad. Still felt kind of bad though :p
 

Attachments

  • PXL_20230509_043224382.jpg
    PXL_20230509_043224382.jpg
    320.7 KB · Views: 81
  • PXL_20230509_043210443.jpg
    PXL_20230509_043210443.jpg
    167.1 KB · Views: 80
  • PXL_20230509_043141751.jpg
    PXL_20230509_043141751.jpg
    237.5 KB · Views: 81
  • PXL_20230509_043137837.jpg
    PXL_20230509_043137837.jpg
    285.2 KB · Views: 82

larry4406

Well-known member
Joined
Jan 27, 2006
Messages
19,565
Location
Northern Virginia
I have an upcoming RaceDeck install as well.

The width of the garage is such that I will need to cut tiles. If I center then left/right on the width, then I will have gaps like the OP shows in his first pictures on each side. My thoughts are that by carefully cutting a tile, I can get the left side filler piece, the right side filler piece, and waste only a portion of the middle of the tile.

Or I can just say screw it, use a full tile on the left, and only have rips on the right side.

Not sure where I will end up, few other projects ahead of this one.
 
Last edited:
OP
F

fr0sty

Member
Joined
Nov 6, 2022
Messages
16
Location
Boston
Haha, you're in the same boat as me! Do you have a similar design that needs to be centered as well?
 

CSRPenFab

Well-known member
Joined
Oct 27, 2015
Messages
5,148
Location
Meridian Idaho
Any pics of where the tiles meet up against the walls? Any trim as suggested above to cover the gap?
See below for both side walls. On the wall where I started my install, I used a full tile and kept the recommended 3/8" expansion gap. On the opposite side where I finished, I did have to cut tiles to get a 3" strip. Yes, it results in some wasted materials, but it's better than a huge 3" gap.

My garage is a double deep 3-bay with 1,000 sq. ft., so I didn't get too hung up on having my pattern perfectly centered. I'm happy with how it turned out, and the exposed 3/8" gap on both sides does not bother me. The builder installed base trim is up a few inches above the concrete footer. I could have installed second piece of base attached to that if I was worried about the exposed 3/8" gap.

Side with full tile:
RD edge 1.jpg

Other side where I had to cut down a tile:
rd edge 2.jpg

Finished install. You won't notice the slightly offset pattern unless you have full on OCD:
Freeflow floor.jpg
 

larry4406

Well-known member
Joined
Jan 27, 2006
Messages
19,565
Location
Northern Virginia
Haha, you're in the same boat as me! Do you have a similar design that needs to be centered as well?
I think I’m going to work from my 16’ door so the tiles are centered there and run wild to the left/right edges. I think this will work best with the edging/ramps I bought.

This will let me determine my left and right trim cut fillers before start.

🤔
 
To avoid these ads, REGISTER NOW!
OP
F

fr0sty

Member
Joined
Nov 6, 2022
Messages
16
Location
Boston
I like the trim idea.. I glued and screwed some pine into the concrete stem wall to create a ledge and left enough room for the tiles to fit underneath it. Same applies to the garage door rail. I also included a pic of where I cut the tiles along the wall... I think I only "wasted" about 20% of the tile along that wall, so not as bad. Still felt kind of bad though :p
Looks like you used edging pieces to bridge the gap to the wall? Any zoomed out shots? Going that route would reduce the need to get a table saw and measuring and cutting.
 

CSRPenFab

Well-known member
Joined
Oct 27, 2015
Messages
5,148
Location
Meridian Idaho
Keep in mind the actual use of your garage once all your stuff is back in place. The one long wall where I made my cuts (3/8" gap) is now covered by a few large roller tool boxes and a cabinet. Sure, I could go full **** retentive and add a trim strip, but you'll never see it!
 

RaceDeck1

Well-known member
Joined
Oct 8, 2007
Messages
3,001
Location
Salt Lake City , Utah
I like the trim idea.. I glued and screwed some pine into the concrete stem wall to create a ledge and left enough room for the tiles to fit underneath it. Same applies to the garage door rail. I also included a pic of where I cut the tiles along the wall... I think I only "wasted" about 20% of the tile along that wall, so not as bad. Still felt kind of bad though :p
Clean install!!!!
 
OP
F

fr0sty

Member
Joined
Nov 6, 2022
Messages
16
Location
Boston
Keep in mind the actual use of your garage once all your stuff is back in place. The one long wall where I made my cuts (3/8" gap) is now covered by a few large roller tool boxes and a cabinet. Sure, I could go full **** retentive and add a trim strip, but you'll never see it!
Yeah, only one corner is gonna have a stand up freezer though. It's a one car garage so not much floor space for storage. Have to leave to clear to be able to get in and around the car. So pretty much all the sides will be easily visible.
 

DirtyV

Well-known member
Joined
Jun 1, 2016
Messages
57
Looks like you used edging pieces to bridge the gap to the wall? Any zoomed out shots? Going that route would reduce the need to get a table saw and measuring and cutting.
here ya go
 

Attachments

  • PXL_20230514_182852277.jpg
    PXL_20230514_182852277.jpg
    224.4 KB · Views: 83

CSRPenFab

Well-known member
Joined
Oct 27, 2015
Messages
5,148
Location
Meridian Idaho
How do you cut the tiles? Tin snips? Sounds like a lot of work.
Several ways to cut them. On my prior 3 installs, I had a table saw available and that makes quick work of ripping them down to size (face side down). On my latest install, the table saw was not around, so I used a jigsaw and just freehanded the cuts. If I was doing a huge floor again, I'd get my hands on one of their guillotine cutters for quick and perfect cuts. After doing a 1,000 sq. ft. floor of FreeFlow tiles, I should have bought the cutter, used it, and then sold it to recoup some of the costs...

1684341283020.png
 
OP
F

fr0sty

Member
Joined
Nov 6, 2022
Messages
16
Location
Boston
I used a "table saw" for the cuts. I used quotes because it was a worx table saw which is essentially a fixed upside down jig saw. It had a guide that I could lock to make straight cuts.
 

DirtyV

Well-known member
Joined
Jun 1, 2016
Messages
57
Yep, table saw, jig saw, Dremel (for tight spaces). Just be prepared to be absolutely covered in tiny (hot) plastic bits :D
 

SL3VEN

New member
Joined
May 14, 2021
Messages
3
Location
Lincoln, NE
I just installed my FreeFlow Racedeck and I was able to rent a "flooring and siding cutter" from my local Home Depot for less than $30 for 4 hours and got all my cuts knocked out. Worked really well. May be an option in your area.
 

Attachments

  • Capture.PNG
    Capture.PNG
    118.8 KB · Views: 41

gatorfast

Member
Joined
Aug 3, 2020
Messages
21
Location
FL
^ I did the same exact thing and it was perfect. Rented the cutter from Home Depot for a day and knocked it all out.
 
To avoid these ads, REGISTER NOW!
Top Bottom