To avoid these ads, REGISTER NOW!

RaceDeck FreeFlow parking/drain pad

Denwood

Well-known member
Joined
Sep 22, 2014
Messages
4,184
Location
Thunder Bay, Ontario, Canada
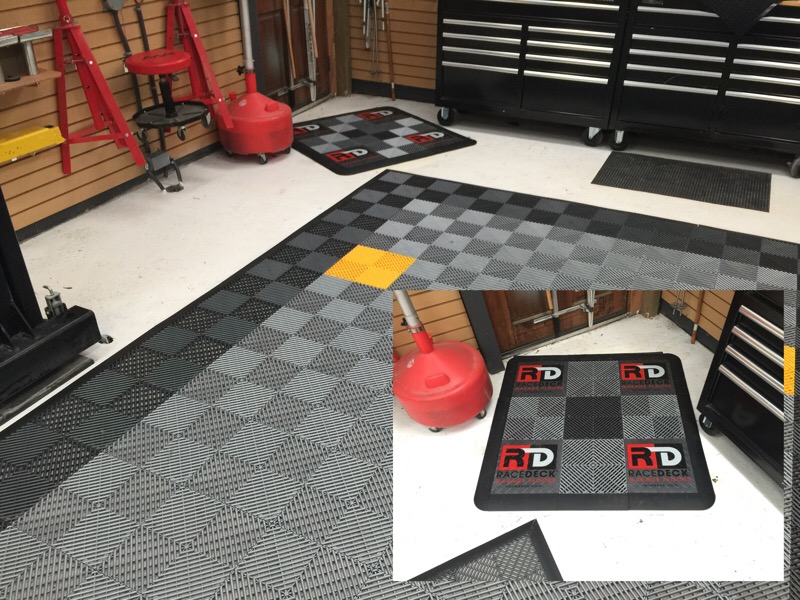
RaceDeck FreeFlow parking and drain pad

Here's a roll up of the journey to address drainage and snow melt managment in a shop that:

1. Slopes 1" to the side wall.
2. Is only heated when in use.
3. Where outside temps can drop below -35C.

The problem became obvious the first time my wife parked in the remodeled shop after a snow fall. This video says it all :)


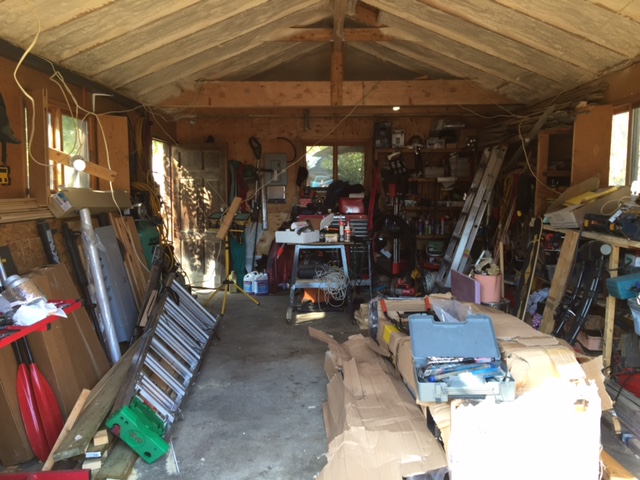
So the shop looked nice after its transformation, but was not so useful for cold weather parking.

October 2014:
mess.jpg


February 2015:
final2.jpg


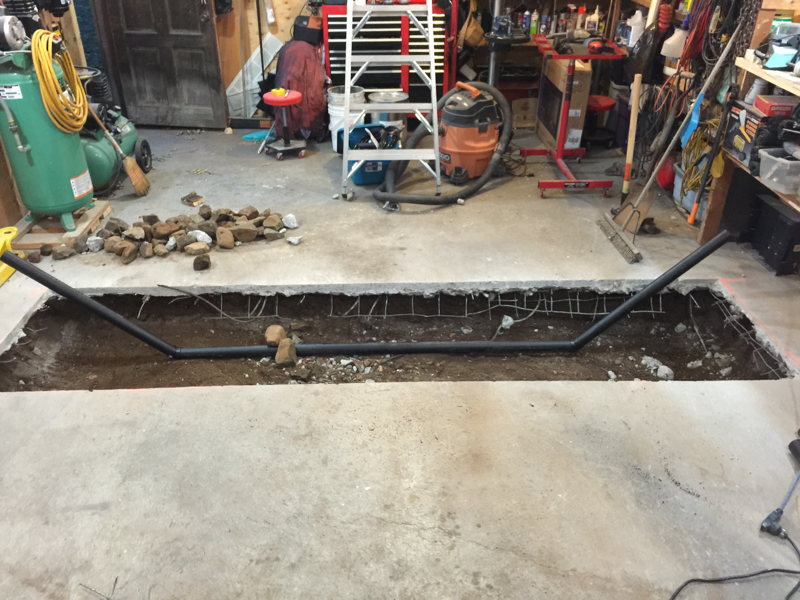
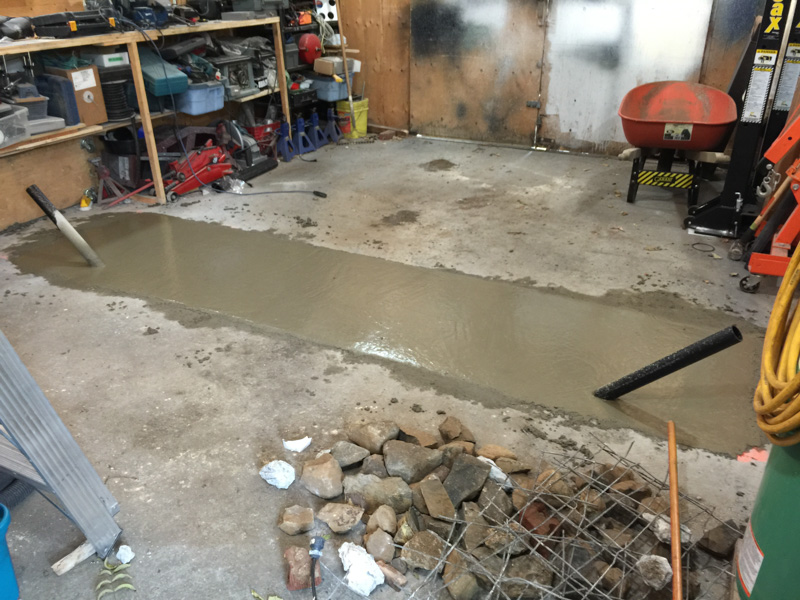
I decided to use FreeFlow RaceDeck after requesting some samples, and comparing them to solutions like those sold by HomeDepot. The decision to spend a bit more on the RaceDeck was predicated by two factors: The obvious difference in quality, and Jorgen's active presence here. Before laying down a parking/drainage pad though, I needed a drain that would not freeze. Enter the drain project.
 
Last edited:
To avoid these ads, REGISTER NOW!
OP
D

Denwood

Well-known member
Joined
Sep 22, 2014
Messages
4,184
Location
Thunder Bay, Ontario, Canada
To create a drain for the RaceDeck FreeFlow parking pad, I needed to open up the slab, install the drain, sort out heat trace, and dig a dry well outside the shop, at least 5 ft below grade.

Concrete saw and demolition hammer!
drainhole.jpg


Keeping the drain from freezing (the shop is only heated when in use) was the next challenge.

I was intrigued by the self regulating heat trace products out there (my solution for keeping the drain working at -20C) as there weren't too many posts about how it works in practice. There are two conductors in the cable separated by a conductive polymer. As the polymer heats up it becomes less conductive so in essence the entire heat trace can adjust itself to varying temps. This heat trace is rated at 5 watts per foot, with a temp of 85C max. After taping the trace to the drain in two pieces, I covered the 3" ABS with 4" weeping tile, and injected it with closed cell foam. This should protect the heat trace cable, and insulate the pipe.

Before burying the drain pipe assembly (missing the downpipe here) I ran a quick test to look at power consumption and make sure my connections were ok. The trace is 12ft long, so at 5 watts/ft I predicted 60 watts "cold". You can see after about 10 minutes the trace had heated up and consumption had dropped to 38 watts.

heatrace1.jpg


heatrace2.jpg


heatrace3.jpg


heatrace4.jpg


So once the heat trace was installed and insulated, the next step was bury, backfill and concrete.

20151004_1


Finally, I wired in a new GFCI to power the circuit and installed a simple line level thermostat that only powers the self regulating heat trace when temps fall below the set point. I've set it at 32F so above those temps, zero power consumption.

htwire1.jpg


htwire2.jpg


Finally, I powered up the system and checked it with a FLIR ONE thermal imager attached to my iPhone.

htwire3.jpg


Looking down the wall drain/clean out.

htwire4.jpg


The floor drain..can be driven over.

htwire5.jpg
 
Last edited:
OP
D

Denwood

Well-known member
Joined
Sep 22, 2014
Messages
4,184
Location
Thunder Bay, Ontario, Canada
With a drain in place, the final step was the RaceDeck FreeFlow "parking pad". The edges of the Racedeck pad need to be sealed to the floor, so snow melt and wash water goes to the drain rather than flooding the right side of the shop. Sealing the edges to floor would result in potential issues with expansion/contraction, so I elected to use 60mil EPDM white roofing material under the pad. I'm either going to seal the RaceDeck edge to the EPDM with urethane sealant (which is flexible and will allow expansion) or use a separate vinyl ramp edge.

Dubber was kind enough to post this pic of the underside of the Racedeck 3" ramp edge from his immaculate garage.

qwm5x0.jpg


I added in the four yellow tiles to help centering vehicles on the hoist...and assist the missus with parking too. You can see where the new floor drain fits into the pad. I just trimmed the EPDM and used the screw-in drain grate (which can be driven over) to secure it in place.

Installation of the RaceDeck was almost ridiculously easy..and the most fun part of the project. The combination of EPDM and FreeFlow tiles is actually very nice to walk on. I've got a 5.1 audio system (with subwoofer) in the shop so an unexpected benefit of the floor is that it actually sounds better in there. Taking a hard concrete surface and adding softening/scattering elements makes for noticeably better listening environment.

rd1.jpg


rd2.jpg


rd3.jpg


rd4.jpg


Obligatory pano shots:

rd5.jpg


rd7.jpg


I'm very impressed with the quality of the tiles. There were zero quality issues with any of the tiles, and the snap/wedge fit is about perfect. The extra half inch in height will be welcome as my A3 TDI is fairly low for the MaxJax lift pads. Now we'll see how my wife enjoys tucking her vehicle into a warmer home for those -35C nights :) We pretty much never wash the vehicles in these very cold temps, but having a drain pad now means we can wash at the nearest wash bay, and bring the vehicle inside to dry out without the inevitable melt/salt/gravel mess from the underside of the vehicle.
 
Last edited:

Shea

Well-known member
Joined
Sep 19, 2012
Messages
2,866
Location
California
Outstanding Dennis! Your ingenuity never ceases to amaze. I've been following your garage project and like the way you work through the issues without simple solutions. I remember you saying you were trying to figure out how to create a better containment system for the winter nasties. Looks like you got it done. :beer:
 
OP
D

Denwood

Well-known member
Joined
Sep 22, 2014
Messages
4,184
Location
Thunder Bay, Ontario, Canada
Shea, kind words indeed :) The folks at RD are sourcing some solid 4" ramp edge. That will the final "containment" solution. I figure there's a market out there for a system that has in integrated drainage solution but no floor drain requirement.
 
Last edited:

Garage Flooring

ALLIANCE MEMBER
Joined
May 21, 2011
Messages
5,288
Location
Grand Junction, CO
In all seriousness DIY instructions for how to build a DIY containment system using garage tiles would be priceless. On an unrelated note, the larger pics, did you use a GoPro or Smart Phone Panoramic shots?
 
OP
D

Denwood

Well-known member
Joined
Sep 22, 2014
Messages
4,184
Location
Thunder Bay, Ontario, Canada
Justin, thanks for checking in :) My workflow for garage shots is all iOS. Rather than fitting a wide angle lens, I've been using the pan photo function on my iPhone 6+ as a short cut. It's a bit of a mess at times with horizontal lines...but for garage pics, just fine :)

Given that we have a few Canon 5Ds and nice glass in the inventory, I really have been a bit lazy on the stills.
 

BaMaDuDe87

Well-known member
Joined
Mar 4, 2013
Messages
500
Location
AL
Forgive my dense thinking here, but how would water from say the back of the car make its way to the drain if the floor slopes 1" to the side wall and not side/front wall?
 
OP
D

Denwood

Well-known member
Joined
Sep 22, 2014
Messages
4,184
Location
Thunder Bay, Ontario, Canada
Thanks Jorgen. As a manufacturer myself (and we do injection molded parts as well) I completely appreciate how difficult it is to get a seemingly simple part like a tile "right". The subtlety of a snap fit that also wedges tiles together and comes apart non-destructively...kudos!

Ba, good question. The floor slopes one inch to the side of the shop, and very slightly back to the drain. So the drain is at the low point of the pad. If you look carefully you'll see a second drain by the heat trace. That's the shop low point, and will take care of any water that might leave the pad during bucket washing etc.
 

drivesitfar

Well-known member
Joined
Oct 23, 2013
Messages
36,006
Location
Pacific Northwest
Woody: I just saw your thread and this is actually the first post I've made or read in flooring section. WELL DONE and your floor looks great.

Was the white membrane hard to cut to fit? Maybe you said but hard for me to scroll and post on my ipad.

I bet the girls and the boss like it too?
 
Last edited:
OP
D

Denwood

Well-known member
Joined
Sep 22, 2014
Messages
4,184
Location
Thunder Bay, Ontario, Canada
Thanks D :) I finished it late last night so the girls haven't even seen the floor yet. I did make sure the disco lights show up nicely on the new floor though :). EPDM is pretty tough stuff, but no problem to cut with a razor knife.
 

BaMaDuDe87

Well-known member
Joined
Mar 4, 2013
Messages
500
Location
AL
Ba, good question. The floor slopes one inch to the side of the shop, and very slightly back to the drain. So the drain is at the low point of the pad. If you look carefully you'll see a second drain by the heat trace. That's the shop low point, and will take care of any water that might leave the pad during bucket washing etc.

Got it. Figured I was missing something easy:thumbup:
 
OP
D

Denwood

Well-known member
Joined
Sep 22, 2014
Messages
4,184
Location
Thunder Bay, Ontario, Canada
Nitro, I'd agree EPDM is not going to be so great with solvents. Leaky cars won't be allowed :)

Bama, no worries. Our first snow fall is imminent so we'll be testing things out sooner than later.

Dub, thanks again for taking those shots.

Nso, glad you like it. I was a bit sketchy on the color scheme (not my forte) however I think it works ok.
 
OP
D

Denwood

Well-known member
Joined
Sep 22, 2014
Messages
4,184
Location
Thunder Bay, Ontario, Canada
A few more shots from tonight's winter tire swap. The yellow "alignment" tiles made line up for the lift a snap.

Lined up and ready to go.
rd8.jpg


First lift on the new floor. Loving it.
rd9.jpg


Winters on and ready to go.
rd11.jpg
 
OP
D

Denwood

Well-known member
Joined
Sep 22, 2014
Messages
4,184
Location
Thunder Bay, Ontario, Canada
Thanks Jorgen :)

I posted this is my build thread, dropping it here for future reference.

Here is the standard Racedeck ramp edge vs the solid 12' length ramp edge. Not sure if it's listed on the RD site, but I can tell you that it's a hard to find profile..and their (RD) price is good.

The standard ramp edge (thanks Dubber :)

qwm5x0.jpg


The solid ramp edge, suitable for containing water. I found a reference to it by Jorgen in an old post here on the journal, sent him a pm... and Melanie at RaceDeck was able to fix me up.

raceramp.jpg


My assumption is that any protruding loops from the border tiles will have to be trimmed off. More next week...
 
To avoid these ads, REGISTER NOW!
OP
D

Denwood

Well-known member
Joined
Sep 22, 2014
Messages
4,184
Location
Thunder Bay, Ontario, Canada
Reposted from my build thread...

With the solid profile edge trim from RaceDeck in hand, tonight's project was completion of the sealed edge for the parking pad tonight.

Any loops on the outside border tiles had to be trimmed off:
rdtrim1.jpg


rdtrim2.jpg


The 12ft edge ramps needed to be cut/mitered to fit:
rdtrim3.jpg


Tuck tape was perfect to hold the edge ramp in place for dry fitting:
rdtrim4.jpg


A diamond cup for last minute concrete profiling, and WaterTite sealant was used to seal/glue the edge ramps to the EPDM underlay. This way the RaceDeck can be lifted out easily for cleaning. Tuck tape worked perfectly to hold the trim in place after running a bead of sealant under. I'll pull the tape tomorrow :)
rdtrim5.jpg
 
OP
D

Denwood

Well-known member
Joined
Sep 22, 2014
Messages
4,184
Location
Thunder Bay, Ontario, Canada
Thanks Chris. My daughter and I ran the bucket test last night to check for leaks, and found one low spot that needed attention.

Doing this again, I would lay down the EPDM first, raise up the low side edge an inch or so, and dump a few buckets on it to determine the best drain location. The nice thing about using an EPDM underlay, is that I was able to slide a rubber mat (cut to fit) under the low spot at the right front corner. Problem solved.

I actually missed a great opportunity to integrate a drain during my hoist slab retrofit. The old slab could have been carefully profiled to a center drain while I was in the midst of it. I wasn't thinking about drainage at all during that task..and should have. Lesson learned :)


This pic was in the beginning month of the shop retrofit. My slab was too thin to safely bolt the hoist down. The drain could have gone on the left (low side) of this hole. Of course at that point, I was not thinking at all about a parking pad. Ironically, I was using ABS drain pipe to create a conduit for the MaxJax hydraulic lines to run under the slab...

pit5.jpg


Hard to believe what a disaster the shop was at the start!

newslab1.jpg


The drain I added after the fact is at the rear left of the pad.

rd_drain4.jpg
 
Last edited:
OP
D

Denwood

Well-known member
Joined
Sep 22, 2014
Messages
4,184
Location
Thunder Bay, Ontario, Canada
Thanks Jorgen :) I should mention that the small RD pad has a black rubber/carpet entrance mat underneath, cut to fit. That catches snow off the boots, and keeps the small RD mat from slipping around as well.

For our next NAB trade show in Vegas, we're going with the FreeFlow floor. I showed a few pics to my media/marketing man Dan and he loved it. It's actually more cost effective than renting/carpet...and we'll keep it for subsequent shows. This is our typical booth aesthetic. I'm hanging with my buddy Bill Frakes here ... one of Nikon's star shooters, formerly of Sports Illustrated fame.

dennisbill.jpg
 
OP
D

Denwood

Well-known member
Joined
Sep 22, 2014
Messages
4,184
Location
Thunder Bay, Ontario, Canada
3 weeks later a little update. We've had snow, rain and mud in the shop. There were no leaks, and the floor is working exactly as described.

I've run a vacuum and mop over it once after doing some wood work in the shop (my kids use the shop as a dance floor when friends are over) but otherwise will leave any major clean until spring.
 
OP
D

Denwood

Well-known member
Joined
Sep 22, 2014
Messages
4,184
Location
Thunder Bay, Ontario, Canada
Tone, Jorgen, Sace, thanks for the kind words.

The leafs are apparently still staring at their new logo...sheesh.

We're well into winter here and the pad is working well. My only wish is that from the get-go, the floor was sloped more aggressively to the drain as sitting water raises humidity in the garage. That said, the shop has been entirely unheated for the last month, so hovers around -2C as night temps dip to -18C. The drain has not frozen, nor has the heat trace run at all so far.

I purchased a small 4 gallon Rigid wet/dry vac which is used exclusively to clean up gravel/melt when it piles up.
attachment.php

The floor has completely controlled snow melt as was intended :)
 
Last edited:

jasondavidmann

Well-known member
Joined
Aug 16, 2009
Messages
162
Location
Manitoba, Canada
Good idea to use EPDM, and the RaceDeck looks great!


Do you think that EPDM could be used as a containment mat mat without any other flooring on top of it? I do not have a floor drain and am thinking of a simple containment mat with raised edges that I would need to vacuum/squeegee often.

Thanks for your advice.
 

BeachBoy

Well-known member
Joined
Dec 28, 2010
Messages
540
awesome garage and neat looking floors!

go leafs!


(hell no )
Pete what is your username on MR?

And leafs are bad, but this year the Habs are not good either...

Sent from my Nexus 6 using Tapatalk
 
OP
D

Denwood

Well-known member
Joined
Sep 22, 2014
Messages
4,184
Location
Thunder Bay, Ontario, Canada
Jason, at least one company out there sells EPDM mats as you describe: http://matsforsplats.com/index.html

The only downside I can see is if you turn your wheels on any mat, it will bunch up the fabric, and/or accelerate wear if you have sand/gravel in your treads. If you combine EPDM with a plastic garage drain tile, you have a few advantages:

1. You can crank your tires all you want with no concerns over wear.
2. The garage tiles don't slip. On my sealed floor with nothing underneath, the plastic tiles moved way too easily. A few folks with plastic tiles have had the entire tile floor move when entering/leaving their garage.
3. Drainage is contained by the EPDM quite nicely.

To keep costs down, you could likely try just doing two strips of drain tiles instead of doing the whole pad. That would keep your tires 100% off the EPDM.

The small wet dry vac is about perfect for removing excess water/gravel etc.
 
OP
D

Denwood

Well-known member
Joined
Sep 22, 2014
Messages
4,184
Location
Thunder Bay, Ontario, Canada
This is a good look at the floor after a few months of winter. Temps last week dipped below -25C. The floor has seen a lot of snow/salt/sand. Except for days like today working in the shop, heat has been off.

a366k.jpg
 
OP
D

Denwood

Well-known member
Joined
Sep 22, 2014
Messages
4,184
Location
Thunder Bay, Ontario, Canada
Here's the floor clean process, post winter. Our back lane access to the shop is not paved, and winters here see very cold temps, snow, salt and sand. This is about as bad is a floor could get after a cold winter. Pretty much a mop, squeegee, and wet/dry vac took care of things.

rdclean1.jpg


rdclean2.jpg


rdclean3.jpg
 
OP
D

Denwood

Well-known member
Joined
Sep 22, 2014
Messages
4,184
Location
Thunder Bay, Ontario, Canada
JohnnieMo asked for an update, so here you go :) We've had zero issues with the floor, and no leaks through the EPDM "tray" parking on it daily. The only issue really is that the floor needs to be profiled more to the drain, a sloped drainage trough cut to the existing drain..or a drain added to the front corner as water sits there.

If water sits, I notice the shuttered windows develop some frost. This goes away quickly with heat on, however it highlights the fact that you don't want sitting water anywhere. Ideally you want it to drain off the pad right away. When I notice water in the front corner, I use the 4 gallon rigid shop vac to take care of it. Eventually I'll use either self leveling cement to "profile the pad to the drain, or tile it to same effect.
 
To avoid these ads, REGISTER NOW!
Top Bottom