To avoid these ads, REGISTER NOW!

"Raised Rancher" Attached RV Garage/Workshop

Kevin_b_c

Well-known member
Joined
Oct 25, 2012
Messages
91
Location
Langley, BC
2 Years after my introduction post, I finally decided on the plans for my Garage.
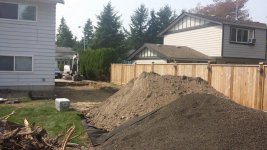
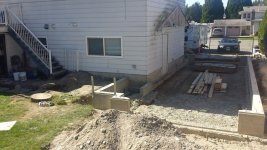
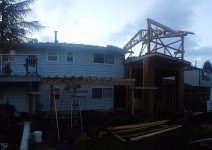
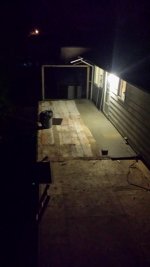
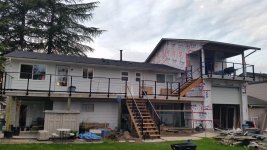
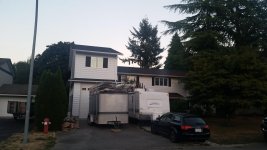
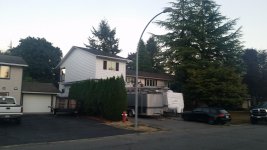
Here is the attached carport & location of the new attached garage.
attachment.php


After almost 3 years of kicking around different ideas/designs for a Garage, I finally settled on a design that I think will work the best for it's intended usage.
My original plan was to go detached, but I'm on septic, and re-doing our prefectly fine septic system was going take a huge chunk of our budget.
attachment.php


The Plan:
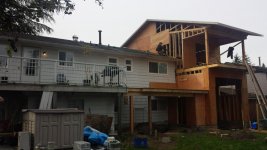
Here's what I've decided on!
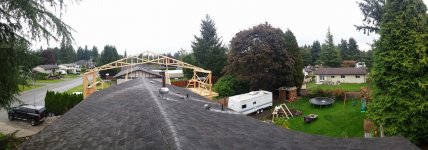
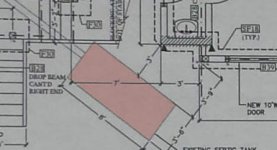
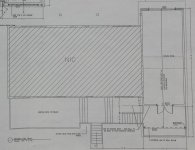
The plan is to build it to the setback limits of my city's bylaws. As far forward as I could build (23' to front lot line), as close to the fence/side lot line as I could build (5'). In the back, as close as possible to the septic line and tank (3').
Keeping within these restraints, I ended up with a 14' 2" wide by 40' long garage.
Seeing as it was going to be so narrow, and I didn't want to block the drive thru design of the garage, I decided to add a second floor for my workshop space.
attachment.php


Bottom Floor: (It's a pic of the plans, so ignore the wavy walls :p
attachment.php


Top Floor:
attachment.php
 

Attachments

  • Bottom-Floor.jpg
    Bottom-Floor.jpg
    138.5 KB · Views: 1,503
  • Top-Floor.jpg
    Top-Floor.jpg
    130.5 KB · Views: 1,504
Last edited:
To avoid these ads, REGISTER NOW!
OP
K

Kevin_b_c

Well-known member
Joined
Oct 25, 2012
Messages
91
Location
Langley, BC
Next to go was the large Fir tree that was behind the carport. I got it cut down in sections and made it into firewood. Even built a little firewood shed to start seasoning. I repurposed the roof from a shed i took down that was behind the carport. It's temporary...
attachment.php


The remaining stump was ground down and chunks of it had to be removed while we prepared the site for footings.
attachment.php
 

Attachments

  • 10616130_10154528671560254_6812218769593926089_n.jpg
    10616130_10154528671560254_6812218769593926089_n.jpg
    113 KB · Views: 1,507
OP
K

Kevin_b_c

Well-known member
Joined
Oct 25, 2012
Messages
91
Location
Langley, BC
September 2014, ready for footing & foundation forms.
Where the piles of dirt and road base are sitting is going to be the RV pad for behind the garage. There will be 10'w x 12'h garage doors on the front and back of the attached garage to allow me to back our trailer through and park it in our backyard in the winters.
There'll also be the option of parking it inside the attached garage if I need to do any work to it, or store it out of the weather.
attachment.php


Forms complete!
attachment.php

attachment.php


That grey electrical box in the back corner of our house is a 60amp service. I had it added while I was upgrading the electrical service to the house.
It should be sufficient for my needs.
 

Attachments

  • 10574209_10154529203310254_203518709224867964_n.jpg
    10574209_10154529203310254_203518709224867964_n.jpg
    108.8 KB · Views: 1,492
  • 20140904_072948.jpg
    20140904_072948.jpg
    149.6 KB · Views: 1,494
  • 20140904_174904.jpg
    20140904_174904.jpg
    147.4 KB · Views: 1,498
Last edited:
OP
K

Kevin_b_c

Well-known member
Joined
Oct 25, 2012
Messages
91
Location
Langley, BC
Concrete for the footings and foundation wall has arrived!
September 2014
attachment.php
 

Attachments

  • 10653468_10154603167915254_6275027496489018112_n.jpg
    10653468_10154603167915254_6275027496489018112_n.jpg
    75.1 KB · Views: 1,469
OP
K

Kevin_b_c

Well-known member
Joined
Oct 25, 2012
Messages
91
Location
Langley, BC
Forms removed. I can finally see the footprint of the addition.
You can see the bump out for the new washroom, that wraps around the side of the back of the house.

Late September 2014
attachment.php


The stump you see in the ground is actually covering the septic tank hatch. I'll eventually put a riser with a manhole on the top to make pumping it out easier.
 

Attachments

  • 10414917_10154649369510254_2611410738564128482_n.jpg
    10414917_10154649369510254_2611410738564128482_n.jpg
    118.7 KB · Views: 1,449
OP
K

Kevin_b_c

Well-known member
Joined
Oct 25, 2012
Messages
91
Location
Langley, BC
Late September 2014

Forms backfiled.
attachment.php


Time for some framing!
The interior height of the garage is 13' 6".
I went with 4, 60" x 30" windows down the side to let light in. The bottoms of them start at 8', so they'll be hard to look into from the outside.
attachment.php


attachment.php


Here you can see the upper 10' x 14' back deck taking shape.
attachment.php
 

Attachments

  • 10712944_10154649434690254_7843890804899539360_n.jpg
    10712944_10154649434690254_7843890804899539360_n.jpg
    82.8 KB · Views: 1,427
  • 10153636_10154649437345254_1829864496396765226_n.jpg
    10153636_10154649437345254_1829864496396765226_n.jpg
    63.6 KB · Views: 1,428
  • 10710899_10154747256630254_1615202045067211725_n.jpg
    10710899_10154747256630254_1615202045067211725_n.jpg
    73.9 KB · Views: 1,419
  • 10610841_10154747256705254_6384877804983370110_n.jpg
    10610841_10154747256705254_6384877804983370110_n.jpg
    42.1 KB · Views: 1,154
Last edited:

3bay

Well-known member
Joined
Dec 29, 2007
Messages
157
Location
Indiana
Looking good so far, will be a tight squeeze getting your RV in looks like.
 

3bay

Well-known member
Joined
Dec 29, 2007
Messages
157
Location
Indiana
My middle door is 10'x14' and I get a 8' 9 1/2" RV in it, I have to remove the mirrors however, what I wouldn't give for a 12'x14' door, hind sight is for sure 20/20! LOL
 

Bib Overalls

Well-known member
Joined
Dec 4, 2006
Messages
3,318
Location
Jonesboro, Arkansas
Hopefully the septic pumper truck will be able to back through your garage when your tank needs to be refreshed. Looks like you have a difficult site to work with. I like your plan.
 
OP
K

Kevin_b_c

Well-known member
Joined
Oct 25, 2012
Messages
91
Location
Langley, BC
attachment.php


Early October 2014.
They finished the front second story wall, and the posts and beam on the back patio and got the Trusses up. I went with sissored trusses to give me extra height in the upper workshop.
Trailer is now parked in the backyard for the winter.
attachment.php

attachment.php
 

Attachments

  • 1964805_10154747257050254_2838534549212400339_n.jpg
    1964805_10154747257050254_2838534549212400339_n.jpg
    100.6 KB · Views: 1,353
  • 10481434_10154747256960254_8877860600202211645_n.jpg
    10481434_10154747256960254_8877860600202211645_n.jpg
    61.2 KB · Views: 1,352
  • 10731208_10154747257180254_3643860946263710013_n.jpg
    10731208_10154747257180254_3643860946263710013_n.jpg
    74.7 KB · Views: 1,355
OP
K

Kevin_b_c

Well-known member
Joined
Oct 25, 2012
Messages
91
Location
Langley, BC
Hopefully the septic pumper truck will be able to back through your garage when your tank needs to be refreshed. Looks like you have a difficult site to work with. I like your plan.
The last guy I had pump out the tank had enough hose to reach all the way to the back when parked in my driveway, so that shouldn't be an issue. No way I'm letting them drive that heavy truck through the garage. Haha.
 
OP
K

Kevin_b_c

Well-known member
Joined
Oct 25, 2012
Messages
91
Location
Langley, BC
We had to change the plans for the back patio. The old plans called for a multi-level deck.
attachment.php


We simplified the design by continuing our existing deck all the way across to the new addition..
attachment.php
 

Attachments

  • 10702026_10154747257380254_2220165631658885310_n.jpg
    10702026_10154747257380254_2220165631658885310_n.jpg
    62.8 KB · Views: 1,332
OP
K

Kevin_b_c

Well-known member
Joined
Oct 25, 2012
Messages
91
Location
Langley, BC
The new addition towers over the existing roof by approx 6'. With the scissored trusses, it gives me a maximum height inside my upper workshop of just over 11'.

Upstairs.
attachment.php


Here's a pano from the top of the roof.
attachment.php
 

Attachments

  • 1780193_10154747257310254_3077397104266350676_o.jpg
    1780193_10154747257310254_3077397104266350676_o.jpg
    107.7 KB · Views: 1,326
  • 20141013_151550.jpg
    20141013_151550.jpg
    143 KB · Views: 1,320
Last edited:

Onewolf

Well-known member
Joined
Mar 15, 2012
Messages
371
Location
East Central Florida
Is the only entry to the upstairs workshop from the exterior stairs from the 2nd floor deck? You'll be getting a lot of exercise if you're working on something in the workshop and need something from the garage (or vice-versa). :)
 
OP
K

Kevin_b_c

Well-known member
Joined
Oct 25, 2012
Messages
91
Location
Langley, BC
Is the only entry to the upstairs workshop from the exterior stairs from the 2nd floor deck? You'll be getting a lot of exercise if you're working on something in the workshop and need something from the garage (or vice-versa). :)
Yes, unfortunately, that was the main drawback of going with this design. I am going to have all my automotive tools downstairs, and woodworking stuff will be upstairs.
 

Cummins01

Well-known member
Joined
Dec 12, 2014
Messages
98
Location
Oregon
looking good so far! I too had the issue of a septic system limiting what I could and couldn't do for a shop so I went attached as well. I like the drive through feature that you have though.
 

Onewolf

Well-known member
Joined
Mar 15, 2012
Messages
371
Location
East Central Florida
Yes, unfortunately, that was the main drawback of going with this design. I am going to have all my automotive tools downstairs, and woodworking stuff will be upstairs.

Given the space limitations I think you've done a great job. :thumbup:

Edit: 2 words -- Fire Pole :D

It took me 10 years to come up with a design for the detached garage/workshop we are currently building that met all my requirements.
 
Last edited:
To avoid these ads, REGISTER NOW!
OP
K

Kevin_b_c

Well-known member
Joined
Oct 25, 2012
Messages
91
Location
Langley, BC
I missed a few pictures of the upper side walls being built.
attachment.php


Plywood sheeting is now up.

Late October:
attachment.php

attachment.php
 

Attachments

  • 20141024_142748.jpg
    20141024_142748.jpg
    150 KB · Views: 913
  • 20141024_142241.jpg
    20141024_142241.jpg
    143.4 KB · Views: 910
  • 20141019_173415.jpg
    20141019_173415.jpg
    143.3 KB · Views: 797
Last edited:

volleyball

Well-known member
Joined
Aug 29, 2011
Messages
4,127
Location
NY, not NYC
Looks good. With that septic, I'd make sure I kept it cleaned out. You won't be able to easily replace it. Is the deck now going to be over the tank?
 
OP
K

Kevin_b_c

Well-known member
Joined
Oct 25, 2012
Messages
91
Location
Langley, BC
Looks awesome!! Nice work!
Thanks!


Looks good. With that septic, I'd make sure I kept it cleaned out. You won't be able to easily replace it. Is the deck now going to be over the tank?
Thanks, the new deck does stick over the corner of the existing tank as you can see in the drawing below. It's actually about a foot more than the drawing shows.
attachment.php

If it ever needs replacing, they usually put a new tank in a different location, then deactivate the old tank by breaking it up in place.
Going to keep pumping it every 3 years whether it needs it or not.:thumbup:
 

Attachments

  • septic-tank-location.jpg
    septic-tank-location.jpg
    19.1 KB · Views: 785
OP
K

Kevin_b_c

Well-known member
Joined
Oct 25, 2012
Messages
91
Location
Langley, BC
If you can't go out, go UP! Looks good!
Yea, that was the thought. haha. Thanks.

Early December:
Stripping the old vinyl off the original deck and old railing removed.
attachment.php


Early December:
New Vinyl decking complete on both decks.
attachment.php
 

Attachments

  • 20141118_183219_LLS.jpg
    20141118_183219_LLS.jpg
    126 KB · Views: 780
  • 20141209_232854.jpg
    20141209_232854.jpg
    142.7 KB · Views: 776
OP
K

Kevin_b_c

Well-known member
Joined
Oct 25, 2012
Messages
91
Location
Langley, BC
Completed the rough-in drain plumbing for the new bathroom. It's tied into the septic line that goes from my house to the tank. In this photo, the house is on the left, and the tank is on the right. You can see the new foundation wall at the top of the photo. Sorry, it's taken on a wierd angle.

Early January 2015:
attachment.php
 

Attachments

  • 20150107_094632.jpg
    20150107_094632.jpg
    160 KB · Views: 774
OP
K

Kevin_b_c

Well-known member
Joined
Oct 25, 2012
Messages
91
Location
Langley, BC
I'm installing the railing on the deck. I decided to go with facia mount railing, so that I didn't have to make holes in the new vinyl decking.
I'm about halfway done at the moment.
attachment.php


attachment.php


attachment.php


Windows also showed up last Friday, so they'll be going up ASAP also and I then I need to finish up the Tyvek.
 

Attachments

  • 20150227_162928.jpg
    20150227_162928.jpg
    150.2 KB · Views: 594
  • 20150228_132201.jpg
    20150228_132201.jpg
    146.1 KB · Views: 593
  • 20150301_155408.jpg
    20150301_155408.jpg
    149 KB · Views: 596

ADSR

Well-known member
Joined
Jan 12, 2013
Messages
10,713
Looks great. We had good weather today, but we're going to get 3 days of wet coming up.
 
OP
K

Kevin_b_c

Well-known member
Joined
Oct 25, 2012
Messages
91
Location
Langley, BC
It's been a long time since last update. I'll try to bring this up to current.

Here are photos of concrete floor, front and rear aprons were completed January 16th, 2015. Note the trench drains at the doorways.
attachment.php


Back Apron:
attachment.php


Front Apron:
attachment.php

attachment.php


Floor:
attachment.php


Bathroom Area:
attachment.php
 

Attachments

  • 20150116_164039.jpg
    20150116_164039.jpg
    82 KB · Views: 330
  • 20150116_081259.jpg
    20150116_081259.jpg
    143.6 KB · Views: 332
  • 20150116_130907.jpg
    20150116_130907.jpg
    149.6 KB · Views: 329
  • 10927668_10155113578515254_389668245_o.jpg
    10927668_10155113578515254_389668245_o.jpg
    98.5 KB · Views: 330
  • 10942074_10155113584405254_968527504_o.jpg
    10942074_10155113584405254_968527504_o.jpg
    102 KB · Views: 331
  • 20150116_080828.jpg
    20150116_080828.jpg
    145.4 KB · Views: 327
Last edited:
OP
K

Kevin_b_c

Well-known member
Joined
Oct 25, 2012
Messages
91
Location
Langley, BC
I finished up the railings & glass on the decks near the end on March 2015.

attachment.php

attachment.php

attachment.php
 

Attachments

  • 20150330_191213.jpg
    20150330_191213.jpg
    152.9 KB · Views: 329
  • 20150315_172202.jpg
    20150315_172202.jpg
    153.1 KB · Views: 327
  • 20150330_192236.jpg
    20150330_192236.jpg
    153.7 KB · Views: 326
OP
K

Kevin_b_c

Well-known member
Joined
Oct 25, 2012
Messages
91
Location
Langley, BC
I finished the rough-in electrical in May 2015.
I previously ran a 60A curcuit to the back corner of the house. It came out of the house on the wrong wall, so I relocated it to the proper wall (luckily I had left some extra cable in the wall) and connected it into a new subpanel.
attachment.php


For electrical the upstairs;
I ran 4 separate 20A 120V circuits for outlets. 2 circuits feeding 5 outlets inside running down each long wall and one outlet outside on either side of the french door.
A separate 15A 120V curcuit for lighting & fans upstairs and also one 20A 240V circuit for the baseboard heating.
attachment.php

attachment.php


For electrical downstairs in the garage;
I ran 2 separate 20A 120V circuits down the new garage wall feeding 6 outlets.
One dedicated 15A 120V circuit for the garage doors & lights that came with the openers.
One for the front outside lighting, plug and Christmas light plugs that I added to each soffit overhang at the front of the house.
One 15A 120V circuit for the back outside lights, plug & Bathroom light & Fan.
The 20A 240V circuit also feeds the bathroom heater.
attachment.php


Here's a picture of the side clearance of my trailer. It's tight, but it's been easy to pull through the garage. Just need to stay as straight as possible!
attachment.php

attachment.php

attachment.php
 

Attachments

  • 20150511_220034.jpg
    20150511_220034.jpg
    145.3 KB · Views: 324
  • 20150531_215456.jpg
    20150531_215456.jpg
    150.6 KB · Views: 324
  • 20150531_215628.jpg
    20150531_215628.jpg
    151.9 KB · Views: 321
  • 20150629_192655.jpg
    20150629_192655.jpg
    137.6 KB · Views: 305
  • 20150629_192718.jpg
    20150629_192718.jpg
    130.9 KB · Views: 306
  • 20150621_160225_2.jpg
    20150621_160225_2.jpg
    68.8 KB · Views: 306
  • 20150629_192725_2.jpg
    20150629_192725_2.jpg
    135.8 KB · Views: 305
Last edited:
OP
K

Kevin_b_c

Well-known member
Joined
Oct 25, 2012
Messages
91
Location
Langley, BC
I found an almost exact match to our existing house aluminum siding that was installed in 1978.
attachment.php


Now, finding a company to do the aluminum siding to match the siding on the house was a bit of a pain. It seems no one installs aluminum siding anymore!
attachment.php

attachment.php

attachment.php


Soffits were done with white aluminum also.
 

Attachments

  • Siding-Comparison.jpg
    Siding-Comparison.jpg
    128.8 KB · Views: 315
  • 20150821_201032.jpg
    20150821_201032.jpg
    144.6 KB · Views: 315
  • 20150813_192750.jpg
    20150813_192750.jpg
    137.9 KB · Views: 317
  • 20150821_201049.jpg
    20150821_201049.jpg
    144 KB · Views: 312

C_F

ALLIANCE MEMBER
Joined
Jan 21, 2005
Messages
9,675
Location
Utah...SNOW BLOWS!
It makes your neighbor's garage look like a shoe box. :lol_hitti

So, in the shot of the trailer in the doorway, I noticed long 2x4's along the left wall that appeared to be bracing the upper floor. Are they, or are they merely leaning there?
And in the upper workshop, the area of the wall where it meets the attic of the house appears to be partially open. Are you going to open up a portion of that for storage room?

Thanks for updating your build thread, it looks great!
 
To avoid these ads, REGISTER NOW!
Top Bottom