To avoid these ads, REGISTER NOW!

rattle_snake's random shop projects v0.1

OP
R

rattle_snake

Well-known member
Joined
Jun 25, 2015
Messages
5,207
Location
Chandler, AZ
Yes most all non-OEM electronics don't have the reliability requirements to adhere to. 0.0% defect rate. Same for aftermarket EFI, lighting and so on.

But in general MSD boxes are installed on play toys and don't get driven 100s of k-miles.
 
To avoid these ads, REGISTER NOW!

OutlawDrifter

Well-known member
Joined
Jan 20, 2015
Messages
3,876
Location
KS
Justin, we run HEI style distributors in all of our dirt track cars. Everything from 302/347/351/408s. They idle great(for the cam size) and throttle response is fantastic.

We've had good luck when running them 6500-7500rpm all night. My wife started with a 306 with a roller cam that twisted 7500 on the big end...Chevy guys couldn't figure out why she was running them down on the end of the 1/4mi straights. The Motocraft 2bl carb flowed A LOT, and that roller cam was well over 600 lift, oh...and some badass heads. All passed visual tech, figured we had to give her every advantage possible giving up 50ci.
 
OP
R

rattle_snake

Well-known member
Joined
Jun 25, 2015
Messages
5,207
Location
Chandler, AZ
Do you use a specific brand? The market is flooded with cheap HEIs with quality all over the place.

Personally, I can't get over the look on a Ford engine. My boat has a HEI setup on the 7.4 MPI.
 
OP
R

rattle_snake

Well-known member
Joined
Jun 25, 2015
Messages
5,207
Location
Chandler, AZ
CDI box arrived so started off by cutting it up. 1st fix is the coil driver. Weatherpacks are OK, I use them, but not for high current or high voltage. They are rated for 16-24 V, not 600 V that the coil is driven at. Connectors would probably arc and oxidize. The pins will melt at over 10A (fuel pump).
2L1blceOalpsHVmGiPe8Q=w683-h911-s-no-gm?authuser=1.jpg

The coil wiring is short so no need for a connector. Cut it out and splice. The 3rd pin on that connector is the Ing/enable wire, move that over to the other connector as there is one or two empty places in distributor wiring (can only use one type or the other). So remove the white wire and put the red one in it's place.
0b1WSomkrV3EnHKGTYRw=w1215-h911-s-no-gm?authuser=1.jpg

The coil wired switch a square wave at 600 V. This makes a lot of noise, and all the associated harmonics. (a square wave is an infinite number of sine waves superimposed on one another). So to combat that, shield the wire pair with a metal sleeve. Ground one end of the shield, or it becomes the transmit antenna.
CqzOfWk6VCKVnRfnmjDQ=w1215-h911-s-no-gm?authuser=1.jpg

Some changes needed to the wire harnesses. I chose to leave the OEM harness alone and add a 2nd for everything else. Tach signal now comes from box not the coil, and need to run the mag pickup twisted pair from box to the engine harness. For power since battery is not underhood, I chose to use the breaker that the main harness is on. This will contaminate the rest of the system with noise because the battery is not there to sink the noise energy. Not ideal, will see if there are issues. There is also no major GND, so I did some improvements there as well. I swapped out the old corroded cab-to-inner fender braided wire for a 10 ga wire and move fender connection point to the existing GND lug. Now everything is grounded to one point. Still not ideal, could add yet another ground wire from that spot to the frame/engine. Another option is a light weight battery mounted back in original location. ($$$$).
Km_yuI0_p3hK-cS46Ayw=w1215-h911-s-no-gm?authuser=1.jpg

Last step is to gut the DSII wiring. The ignition related wiring goes from the DSII box into the cab and back out the firewall on right side. So cut them all off, heatshrink, and wrap.
bmJ8r_uNjmLqv1V3OlIQ=w1215-h911-s-no-gm?authuser=1.jpg

No more coil cluttering the engine itself.
4WZHTNqsZeggM2uwRbew=w1215-h911-s-no-gm?authuser=1.jpg
 
OP
R

rattle_snake

Well-known member
Joined
Jun 25, 2015
Messages
5,207
Location
Chandler, AZ
Next modification is yet another exhaust system. This time 3" SS. Why 3" SS? Same price as the rest. Instead of going up and over the cross member, I flipped it over to make room for the pipes. Added a simple piece of 2.5 sq tube as the mount.
OK54NFE6PU-UnKacxr1w=w1215-h911-s-no-gm?authuser=1.jpg

But that was a bit too tall so next day I cut it out and lowered the chunk of tube to keep the drivetrain angles the same as before.
e7JFiZXty4QKezVqHK2Q=w1215-h911-s-no-gm?authuser=1.jpg

Flow monster 3" SS mufflers, $34 Actual 3" inner construction.
coH-9ldgV52fqMtWAneQ=w1215-h911-s-no-gm?authuser=1.jpg

The tubing was about 6" short to reuse the hangers, so needed and extension.
VxMEi6aUODADzgjk6Evwg=w683-h911-s-no-gm?authuser=1.jpg

O2 bung in one side for wideband
MkoebWmnGWUVWMLjDnfQ=w1215-h911-s-no-gm?authuser=1.jpg

Header collectors are 3", so no reduction needed.
TIkOsZZOO8f7ZW69sV4g=w1215-h911-s-no-gm?authuser=1.jpg

Made some turn downs out of straight sections.
OvUHmZ7b3q0SO9X_3oJQ=w1215-h911-s-no-gm?authuser=1.jpg

Waiting on some clamps to secure the tips.
67Te1X2RDcEKqB6_3flA=w1215-h911-s-no-gm?authuser=1.jpg

How does it sound? It's loud and obnoxious as expected, like the previous. It's a little sloppy with heavy throttle. Hopefully the turndowns help with a reflection. Idle tone is deeper than the other system without any packing. May have to do a tip resonator or something.
 

WoodsTruck

Well-known member
Joined
Jan 12, 2013
Messages
1,023
I had an F250 4x4 with the 7.5EFI/ZF5.
The cat fell out one day so I straight piped it to a Flowmaster. I had to do some work to get the factory tailpipe to the bumper installed so I had to drive it for the week where it just dumped out the back of the muffler. Obnoxiuos would have been fine, but this was rattle the windows at 1500 rpm loud. I was working north of a small touristy town so I had to idle through town in 4th to keep the rpm''s low enough to not draw too much attention. Having the longer pipe behind the muffler really helped things out on the legal front.
 

OutlawDrifter

Well-known member
Joined
Jan 20, 2015
Messages
3,876
Location
KS
Do you use a specific brand? The market is flooded with cheap HEIs with quality all over the place.

Personally, I can't get over the look on a Ford engine. My boat has a HEI setup on the 7.4 MPI.

Davis Unified Ignition / Performance Distributors has the best reputation that I know of.
https://performancedistributors.com/

Skip White used to be the supplier for us, but looks like they may not have the SBF versions anymore. We would get them and rebuild them with AC Delco pickups and modules.

DUI is definitely good stuff!

I think they are all offshore lower billet pieces for the most part, the electronics, cap/rotor, and coil might need to be upgraded if buying an eBay or parts house special.

This is the seller I bought the new distributor for my Vortec 7.4l in the Suburban, quality was very good. They have both large cap and small cap applications for Fords.

https://ebay.us/m/VEzraa
 

MrPink

Well-known member
Joined
Feb 16, 2021
Messages
1,178
Location
Bridgeport,MI
Next modification is yet another exhaust system. This time 3" SS. Why 3" SS? Same price as the rest. Instead of going up and over the cross member, I flipped it over to make room for the pipes. Added a simple piece of 2.5 sq tube as the mount.
OK54NFE6PU-UnKacxr1w=w1215-h911-s-no-gm?authuser=1.jpg

But that was a bit too tall so next day I cut it out and lowered the chunk of tube to keep the drivetrain angles the same as before.
e7JFiZXty4QKezVqHK2Q=w1215-h911-s-no-gm?authuser=1.jpg

Flow monster 3" SS mufflers, $34 Actual 3" inner construction.
coH-9ldgV52fqMtWAneQ=w1215-h911-s-no-gm?authuser=1.jpg

The tubing was about 6" short to reuse the hangers, so needed and extension.
VxMEi6aUODADzgjk6Evwg=w683-h911-s-no-gm?authuser=1.jpg

O2 bung in one side for wideband
MkoebWmnGWUVWMLjDnfQ=w1215-h911-s-no-gm?authuser=1.jpg

Header collectors are 3", so no reduction needed.
TIkOsZZOO8f7ZW69sV4g=w1215-h911-s-no-gm?authuser=1.jpg

Made some turn downs out of straight sections.
OvUHmZ7b3q0SO9X_3oJQ=w1215-h911-s-no-gm?authuser=1.jpg

Waiting on some clamps to secure the tips.
67Te1X2RDcEKqB6_3flA=w1215-h911-s-no-gm?authuser=1.jpg

How does it sound? It's loud and obnoxious as expected, like the previous. It's a little sloppy with heavy throttle. Hopefully the turndowns help with a reflection. Idle tone is deeper than the other system without any packing. May have to do a tip resonator or something.

I run this same muffler on my car and it sounds just as good as the Magnaflow that it is modeled off
 

SMOKEYBEAR

Well-known member
Joined
Jan 3, 2016
Messages
453
I'm enjoying all the older Ford stuff, lots of work covered in a few posts and the pictures. A bit misconceiving on how many hours of work it takes to get to where you are with your project. Thanks for sharing.

I'm asking for the group, when it's ready...cold start? idle ? short pull? Vid
 
OP
R

rattle_snake

Well-known member
Joined
Jun 25, 2015
Messages
5,207
Location
Chandler, AZ
How is the in-cab drone with no x-over?
Not sure yet, haven't really driven it much. In carb tuning stage.
Skip White used to be the supplier for us, but looks like they may not have the SBF versions anymore. We would get them and rebuild them with AC Delco pickups and modules.

DUI is definitely good stuff!

I think they are all offshore lower billet pieces for the most part, the electronics, cap/rotor, and coil might need to be upgraded if buying an eBay or parts house special.

This is the seller I bought the new distributor for my Vortec 7.4l in the Suburban, quality was very good. They have both large cap and small cap applications for Fords.

https://ebay.us/m/VEzraa
Thanks Marc. The HEI are popular swap/upgrade on the older Ford FE motors. A certain percentage are flaky out of the box and can add to confusion. A huge improvement over points.
I run this same muffler on my car and it sounds just as good as the Magnaflow that it is modeled off
Yes several MF clones available. I like the Jones brand clone better because made in USA, but hard to beat the sale price on these. Some of the straight through style mufflers have a reduced inner core. The spec don't detail that usually, have to troll the reviews. Many are 2.5 inside.
I'm enjoying all the older Ford stuff, lots of work covered in a few posts and the pictures. A bit misconceiving on how many hours of work it takes to get to where you are with your project. Thanks for sharing.

I'm asking for the group, when it's ready...cold start? idle ? short pull? Vid
Yes a lot of hours, thanks. Could be a lot less, but I'm enjoying making things how I want even if it takes more than one try. Not in a hurry. The extra effort to build a scalable/modular approach puts more time up front, but pays off in the end.
 
OP
R

rattle_snake

Well-known member
Joined
Jun 25, 2015
Messages
5,207
Location
Chandler, AZ
The addition of the turndowns did seem to improve the overall sounds of the exhaust system. I used some band clamps to secure instead of welding. Found that there are 'lap joint' type to do exactly what I need, 3" to 3-1/8" Should have done that on the pipe-to-muffler connection instead of welding so things can be changed more easily. I like V-bands but they are 2x the cost and cannot be reused, better for a permanent system.

Overall the system is OK, part throttle is a bit sloppy. Idle is loud. WOT is mean and nasty.

In ideal world I would swap out for a longer case muffler for free. Band clamps could leave the muffler untouched, except for a bit of soot, for return. In reality the longer case muffler are much more expensive as they are less popular. So going to experiment.

On the 72 F250 I originally used a long case 2-into-1 straight through Jones muffler. It was to sloppy so I added a 3" chambered bullet muffler (also Jones) and it really helped. But it was 8 cylinders of gas going through two mufflers, so for improved flow I went dual 2.5 piping, now 4 cylinders through one muffler.

Plan at this point is to rob the perforated inner pipe from the previous cut up round mufflers and weld that into the center of the turn downs. Easy to add/remove.
 
OP
R

rattle_snake

Well-known member
Joined
Jun 25, 2015
Messages
5,207
Location
Chandler, AZ
Made some progress on carb tuning. Tip in is lean. Seem this before, so step one is bigger primary jet. All I have are 76s, so swapped those in instead of 72s. This helped considerably, so on to WOT testing.

I had been having issues with wideband resetting when going WOT. The cigar plug adapter was a bit janky. The sensor has a heater so it pulls some current, 4A. Fuse blew, swapped another, still not stable. I think brown-out. Found some shorty 15A fuses and replace the spring with a solid piece of rod just the right length. Now it is good.

Finally got to try WOT from a stop. It sets me back in the seat deep. I think the tires spin slightly. Shifts are crisp. Exhaust screams. The AFR is in the high 11s low 12s which is too rich. Need jets in between, but can't get locally/quickly so plan to re-drill the 68s (now 72) to 73-74. Then revisit power valve and idle.

I was wondering if I should have gone with a higher stall converter, but the combo pull hard down low, without nitrous.

Once tuned traction bar is next. Materials are expensive. Thinking of trying a hack to the spring pack. Bundle the rear half of the leaves tight.
 

ntsqd

Well-known member
Joined
Jan 22, 2005
Messages
974
Location
Lower left coast
Suggest cloning the "CalTracs" design for traction bar in this use. With the plasma table can make everything except for the SRE's. I'd buy the tubing with an ID that can be threaded directly, no bungs required.
Caltracs-Truck-labelled.jpg

Might also do it how Toyota did on the earier 4WDs where the overload leaf has a long 'keeper' at the rear tip of the O/L leaf. When the spring tries to wind-up the cross tube of the keeper is pulled down into contact with the top of the main leaf. Make the length of the 'keeper' adjustable to tune when it comes in?
 
Last edited:
OP
R

rattle_snake

Well-known member
Joined
Jun 25, 2015
Messages
5,207
Location
Chandler, AZ
Can't do caltracks or anything like that because I flipped the forward hangers.

Going to try the Toyota method, that takes a way to secure the keeper to the pack. but quick, easy and free.

Can you weld spring steel? Yes, I have a few times. Should you? Depends. Considering welding keeper to the end of the overload.
Other option is to drill a hole and use a bolt. If it breaks off no big deal.
 

ntsqd

Well-known member
Joined
Jan 22, 2005
Messages
974
Location
Lower left coast
Use a rotary hammer drill and carbide masonry drill bit to drill a hole in the tip of the O/L leaf. According to the friend who pioneered it that's the fastest and easiest way to drill a leaf. I've not yet had need to do this, but he said that the drill bit just motored thru the leaf when everything else he'd tried was terribly slow and killing drill bits at a high rate. Having used a piece of broken OTR leaf spring to make a remote oil filter adapter for a 455 Pontiac I know just how much of a PITA that type of metal is to drill (but it's flat and doesn't leak!).
I'd make the keeper to go under the O/L so that there's no tensile loading on the bolt. Then tuning when it comes in is just a matter of some shim washers.
If you put the O/L in upside down then it's not affecting the working spring rate until you've really got it compressed. Like this:
i-vzgqCpR-M.jpg
 
OP
R

rattle_snake

Well-known member
Joined
Jun 25, 2015
Messages
5,207
Location
Chandler, AZ
The overloads are basically flat, and are mostly in contact with the main leaf at ride height. The axle has little up travel after lowering so the OL doesn't do much. Hoping that banding them won't change the ride much. It may screw up the pinion angle.
 
To avoid these ads, REGISTER NOW!

VOH

Well-known member
Joined
Jan 2, 2009
Messages
102
Location
New Braunfels, TX
Cam break-in is stressful. There are many way to argue about. I do it this way:
  • Make sure no leaks. Coolant, oil, trans fluid. Distilled water in cooling system, because murphy's law.
  • Use real break in oil, driven BR30. Same price as other hot rod oils.
  • Set idle screw in to prevent idle on fire up.
  • Disable vac advance on distributor, plug hose.
  • Pre-wire timing light, paint marks on balancer.
  • Pre-lube oil system right before startup. Minimal amount. Get air out of the system, verify pressure. Don't want to wash the assembly lube off the cam. I use an old Dizzy modified for the purpose.
  • Set crankshaft at 12*TDC compression, and place dizzy rotor just CW of Plug #1 on cap.
  • Prime fuel system and put a few shots down the carb. Have fire extinguisher (and/or beer) handy. And hearing protection.
Then fire, set engine speed 2-2.5k, timing to 20-30*. Enjoy the anxiety and piss off the neighborhood for 20 min. What can go wrong?

Then idle down and set base timing, plug in vac advance, reset idle speed and get to hear the new idle.

All went well as far as I can tell. All 8 primary header tubes were slightly glowing red. Hood on roof so didn't drive it, just a burnout. Sound is louder, sharper. Throttle crack is holy **** now.

Next step is to address the items needed for road test, seat rings. Then tune the carb with wideband.
What distributor are you running?
 

plain2car

Well-known member
Joined
Nov 27, 2008
Messages
513
Location
Gilbert, Arizona
nice job Justin... your engineering thoughts on things are always a learning for me. I was wondering, are you able to TIG alum pipe? I could sure use a helping hand on doing my air intake piping for the '86 C10 ;)... you don't mind working on chevys do you? :ROFLMAO:

....also with school in session now do you feel bad scaring the kids when you fire that up!! .... :rocker::ROFLMAO:
 
OP
R

rattle_snake

Well-known member
Joined
Jun 25, 2015
Messages
5,207
Location
Chandler, AZ
What distributor are you running?
I have a Duraspark II custom curved from Parkland Performance and Machine in WA. Now it triggers the CDI box, cut connector off and instead the MSD two pin type.
nice job Justin... your engineering thoughts on things are always a learning for me. I was wondering, are you able to TIG alum pipe? I could sure use a helping hand on doing my air intake piping for the '86 C10 ;)... you don't mind working on chevys do you? :ROFLMAO:

....also with school in session now do you feel bad scaring the kids when you fire that up!! .... :rocker::ROFLMAO:
I no longer have a TIG machine. I use a spool gun for Aluminum work which is more crude but sticks things together.

No I don't feel bad. The big green F250 gets more frightened faces in the crosswalks.
 
OP
R

rattle_snake

Well-known member
Joined
Jun 25, 2015
Messages
5,207
Location
Chandler, AZ
Tested the 72 jet (#47 at 0.078) and it was way lean. Drilled again to 0.080 (#46 that measures -0.001) and still lean. Drilled again to 0.081 (#45 that measures -0.001) and magic. Set idle to 12.8-12.9. Tip in is crisp. Cruise at mid 14s. WOT is still mid 11s which is rich so need to go down in secondary that is a 70 now. I think the increased VE is pulling more air through secondaries being a vac sec type of carb. Primary is tuned well, 74 it is. Good because next # drill is #44 at 0.086 which is above the too big 76 jet (0.084).

Amazing how 0.001" make all the difference in the world.

Ordered a no name 60-69 jet set for $30 so that will get WOT dialed in. I'll skip drilling this round, hard to go backwards.
 

ntsqd

Well-known member
Joined
Jan 22, 2005
Messages
974
Location
Lower left coast
The overloads are basically flat, and are mostly in contact with the main leaf at ride height. The axle has little up travel after lowering so the OL doesn't do much. Hoping that banding them won't change the ride much. It may screw up the pinion angle.
Are they flat on both sides? Not uncommon for O/L's to vary in thickness.
Glad drilling wasn't a headache, and a little concerned at the same time.
By chance have a side-on pic of the rear springs with the tire off?
 

ntsqd

Well-known member
Joined
Jan 22, 2005
Messages
974
Location
Lower left coast
FWIW I have triggered an HEI module with a D-S II inductive pick-up assembly. Can run a Ford distributor with an HEI module (it's likely the best mostly OEM parts combo) , don't have to run that huge, ugly cap of an HEI distributor.
There is also a small Ford dist. cap with the HEI/D-S II type spark-plug wire terminals, don't have to run that larger D-S II cap & rotor just to get those better terminals on the cap.
 

plain2car

Well-known member
Joined
Nov 27, 2008
Messages
513
Location
Gilbert, Arizona
ok.. ok.. I give up.. please school me on the reasons/advantages for the clamps??... launch control??? :ROFLMAO:

ohh & thanks for the reply.... yes the green monster does look menacing! ;)
 

ntsqd

Well-known member
Joined
Jan 22, 2005
Messages
974
Location
Lower left coast
When the axle tries to wind up it twists the leaf springs into a 'S' shape. The keeper at the rear of the overload leaf will be pulled down into contact with the top of the main leaf. Now the force trying to twist the spring is redirected to trying to lift the front of the truck. They're a simple traction bar that doesn't affect normal suspension cycling like the old school traction bars do.

Never heard them make noise on Patch, but with a whopping 100HP 22R under the hood it might have been a little lacking in the power required to do that.
 
OP
R

rattle_snake

Well-known member
Joined
Jun 25, 2015
Messages
5,207
Location
Chandler, AZ
Sure, the typical pack clamps are to keep the rear part of the pack together under acceleration/droop. The force of the tires rotates the axle housing the opposite way. Pulls the front of a leaf pack up and the rear of the pack down and apart, into a 'S' shape. When traction is gone the pack springs to the opposite shape. Then oscillates, wheel hop.

What I did is apply that concept but also using the overload leaf. The OL leaf is thick and won't deflect (for sake of explanation). The OL is basically a torque arm for the axle housing. So I'm using the rear half of the spring pack to hold the OL and axle housing from rotating. The OL being mechanically coupled also help stabilize the rest of the pack during hard acceleration on uneven surface.

Downsides are:
-reduced axle down travel, but don't care in this application.
-The pack would have to bend over the lower spacer if bed was loaded with enough weight to need the overloads.
 
OP
R

rattle_snake

Well-known member
Joined
Jun 25, 2015
Messages
5,207
Location
Chandler, AZ
Well I have tried two sets of smaller jets in the secondary and it is still way rich at WOT, 11s.
70 -> 68 -> 65
Not really sure where to go from here.

The truck runs well and is making good power. It will drift in 1st gear nicely so the spring clamps appear to be working.
😁
But 11s AFR is leaving power on the table. Should be high 12s or low 13s for N/A. Once I sort that out I can see if it wants more than 30* total timing.
 

ntsqd

Well-known member
Joined
Jan 22, 2005
Messages
974
Location
Lower left coast
I'm unclear on why the spacer is where it is. I was thinking that a spacer between the OL and the limiter strap would allow for vertical tuning of the height of the cross-bolt relative to the top of the main leaf. Tuning that height would change where/when the 'traction bar' started to work.

Power valve causing the over-rich condition? No PV in the secondary metering block, right? Fuel splash from the bowl vents would only explain a very short term rich condition.

SBF, I'd expect it to want 32°-34° total timing with ~12° being initial.
 
OP
R

rattle_snake

Well-known member
Joined
Jun 25, 2015
Messages
5,207
Location
Chandler, AZ
The aluminum spacer is there to take up the slack in a wheel hop/oscillation situation. Under accel it does nothing, but when traction breaks the OL can slap the spring pack due to the stored energy in the deflected spring. Then when tires grip again it opens the gap, cycle repeats. If there is no gap/slack then things stay more stable. Or at least in my mind.

As for carb tuning, it has been frustrating. Chasing my dinosaur tail. Reducing secondary jet size does nothing to AFR results. Shouldn't be in the 60s sizes anyhow. So instead of trying more jets, stop, think. Pull carb and break it down.

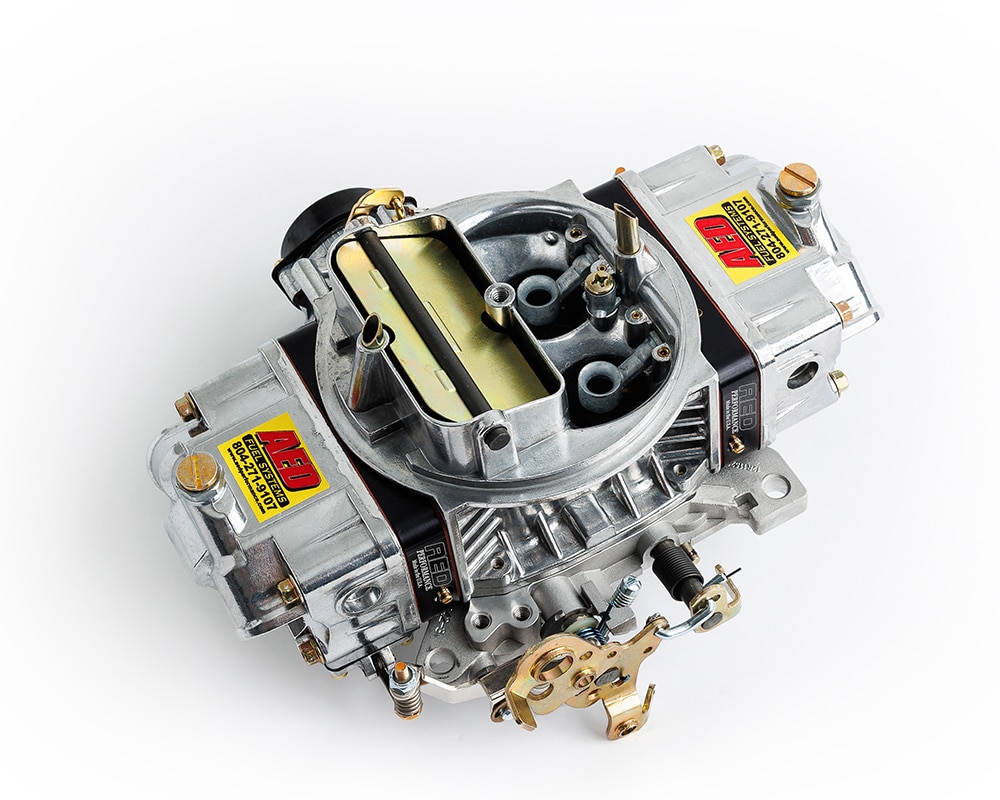
Ok fine I'll have to fully understand how a Holley 4150 works, then I can make intelligent decisions with the questionable data I have.
Stone simple, when it works. This carb has no adjustable bleeds or any of that. Secondary has no idle circuit, it's plugged at the idle air bleeds and adjuster screws, so can ignore that. PV is blocked, ignore. So there is only the high speed air bleed, the jet, and the mixture chamber that feeds the booster. Everything is clean and clear.
kszrlRSBTAgFKsTh6cuw=w1215-h911-s-no-gm?authuser=1.jpg

This carb is a 750 CFM and is a 'square' design in that all four venturi are the same size, 172
BOEoljDXj8OBByvIr6YmQ=w683-h911-s-no-gm?authuser=1.jpg

Found that 3 of 4 annular boosters are loose in the carb body. That can't be good. One slightly loose and one fairly loose in primary, and one slightly loose in secondary.
mFUR4rdgWn3_5lzxGFT2w=w683-h911-s-no-gm?authuser=1.jpg

Swedging is cracked, leaking.
eQSdMyg9H3z9pReQhIWw=w1215-h911-s-no-gm?authuser=1.jpg

Can see the evidence of leak at the joint. So it's pulling mixture through the crack and not all out of the booster.
uy6SogJDBFqjI1H6h4WqQ=w683-h911-s-no-gm?authuser=1.jpg

So I made a crude punch on the lathe to re-swedge the boosters.
0vlgF2tWZQ-FFLkDMiFgQ=w683-h911-s-no-gm?authuser=1.jpg

Support the booster in the venturi and give it a whack with a hammer.
4ERwkWUbXwx0FJnExiUQw=w683-h911-s-no-gm?authuser=1.jpg

I left the same jets in as before to not add another variable, to see if fixing the boosters help. should be lean? Yup it's lean.
Tried 3 rounds of jet changes, lean, lean and lean. Jets have no effect on AFR, just in the other direction. Aghhh!

Also didn't help that I ran the truck out of gas a few streets away from shop. So lean, yes....
How? I guess dumping the fuel out of the bowls enough times to empty the tank.
 
Last edited:
OP
R

rattle_snake

Well-known member
Joined
Jun 25, 2015
Messages
5,207
Location
Chandler, AZ
Having the nitrous fuel supply tangled in the carb plumbing makes it more involved to remove the carb. The AN nut on the solenoid itself hard to access. Turn out that the rubber cap on the PCV ****** had split from the wrench banging into it. So yes that would make things lean. So cut off the tube and thread for a plug, or a fitting in the future.
03DVBT9ca6gn2nbI-S2A=w1215-h911-s-no-gm?authuser=1.jpg

While the base is off, I welded a SHCS as a stud for the throttle return spring.
IjIdw_NXjzLl0zjSge1w=w1215-h911-s-no-gm?authuser=1.jpg

And the ground wire broke off the idle stop, so I broke down the bracket assembly and removed any paint that would interfere with electrical conduction. That seemed to work OK.

Now AFR is too rich. So back to leaning it out, again. Started at 76/77.5 -> 74.5/77.5 -> 73.5/76 -> 71.5/74.5. Tip-in and transition are OK and any smaller primary jet will not be good. But it's still rich at part throttle, cruise and WOT. So stop, think, work on something else.
 
Last edited:

ntsqd

Well-known member
Joined
Jan 22, 2005
Messages
974
Location
Lower left coast
The Throw Money at it Solution?

FWIW I've had good results from using J-B Weld to seal up leaking swaged carb passages. Has to be clean of any varnish and a little dremel work to give the JB some tooth to hang onto is a good thing.
 

Mark_17

Well-known member
Joined
Jun 27, 2018
Messages
746
Location
NJ
With truck exhaust, I always have the most luck moving the exit further back.

I had my "touring" exhaust for my truck, which was a straight thru glass pack style muffler hanging off the tip, moving the exit 20" further back. When measured it was ~1 DB quieter but inside the cab it was much quieter.
 
To avoid these ads, REGISTER NOW!
Top Bottom