To avoid these ads, REGISTER NOW!

rattle_snake's random shop projects v0.1

To avoid these ads, REGISTER NOW!

Ohmthis

Well-known member
Joined
Jan 20, 2013
Messages
3,009
Location
Outside of Louisville KY
I tried using Google for an image to post up but also came up with nothing.

I'll try to look in my NHRA chassis rulebook if I get time because that is where I first read about it and started using this procedure of internal sleeving. The biggest difference with NHRA is that the joint must be cut at a 60-degree angle and the internal sleeve much extend 1.5 times the diameter of the tubing to each side of the joint seam and utilize the same material thickness as the parent chassis tubing. The Rosette welds must also be welded in a fashion that joins the internal sleeve to the outer parent material YET the very center of the weld must NOT encroach into the middle. Basically the very center of the Rosette weld must allow complete visual of the internal sleeve so the weld must appear as though a lap joint joining the internal sleeve to the parent tube allowing the sleeve to remain visible. Also the Rosette welds must be made within 1/2" of the end of the internal sleeve to prove that the sleeve in fact extends out as far as required.

For round and square tubing this is sometimes easier because you can obtain and/or fine tune an internal sleeve from a smaller piece of tubing. However, with rectangular and even odd size tubing this becomes more problematic and so with rectangular tubing I will use plate on all four sides of the tubing and extend the splice joint in the same fashion as described above.

Again, hard to explain but if I had a picture it would be easy to see what I'm talking about.

Perfect explanation Mike! I can visualize exactly what you are saying. I have to admit, I have never heard such a thing, but when you stop and think about it, it makes perfect sense. By having each tube welded to the plate, it is less likely to pull the tubes away from the plate. Thus, harder to pull the tubes from each other. Thanks!
 

smokeysevin

Well-known member
Joined
Aug 17, 2013
Messages
131
Location
Houston
Its less about pulling away more about keeping it from kinking or pinching at the joint. The plate keeps the open section from crushing on the cut lines.

Sean

Sent from my LM-G710 using Tapatalk
 
OP
R

rattle_snake

Well-known member
Joined
Jun 25, 2015
Messages
5,195
Location
Chandler, AZ
Very sanitary work. John
Thanks, trying to take my time, have fun and do a nice job.

Ah, I see now.
My interpretation: add a cross-section shaped piece in the plane of the miter joint.

I didn't go that route, but have it stored away for next time. I did add some little fishplates that look a lot like band-aids, and a 2nd pass weld on the long sides. Note that none of this addresses the kink/pinch/crush issue, but it is questionably more robust.
4zT0n7En4IQDjszTwtLN9dTjIvZBEVngixyBbBp2yrFQ_5sTXYsG8gUsDEliH7N_2_lPP9aewOJaRmbSF0jgn6nxKyPtLF6Vu0k-saNHJBs2MG9JjU_JRbFepEudQY7RSUqew_BOMoVbIoa_xq1jLm2Vsso7yqgKlh7h_3Yd__51BBZQrLf09Eq13_e9PeQmLRpusXNnNvnJHzW8CWH2GrFSz0SJdw4On0ctxjpTjNSNv75moks0DflT8HwUiZ3d9IJ6Kvx8Ni5DJ4KshibnzsYydNk4JT593xVWUoofDMTGBGsEXqVuUaBb0vGmwkV2VRND99oJCfEuq5TlSJ939mzFQGqQRwhMslOaCTSGnKCi6tzF_GuB9LKg2ZNkJG8yEgxZkNJaRcxVOl-2iukJxt41CniHTRmf-cfuzHj7ZrpQib_nf7bNPfmMrnDwyg9xQmLTSnhjShz_RWkFq7nAVP6V-wePXAUjHydk3W4QwE5nDh2_ThhF9qoohjQmw4J6R-jKiUBnrBVbZup8C6ob2CQLKsjlemBbdd0JZtWPy60PDI_NsooMM2zfU2tp-fjg_Suh5OaN5ugziyMnuHp5qc_KE5JfZ2XS29V9fVwi-add6XumtMceApPM6GtfC18auPpA3RsBlwCEgfwIsUHTMVqCYP9dhKvv4migrxrfuFVnjniCBLImq-sJ1SDi3VyD99m1WH8JrU7_NySwtCttbcngrxjEqY1ENechq0TT-kb4Row=w1142-h856-no


Moved on to the link bars. My HF pipe kinker is not up for bending 2" 0.25 wall DOM.
kwXbG2oBOsAo0y9Tq3AkHKqVFaKRM1FZ0dywq1q_TLEOKA_r1miy-_if0CbpAPvth_A42zHXRbJ-TGNIM0BKljg2Hqcg2LG_-Yr-AfmBkrxwxRkhYRKGzHrFFTR8T9f2WPhV3kKeySOO_0wGqtO-K2jYH4xw4xUlGraZKd2F6p0nHelhitmxJLAWrQPZYulN-w8QD2pzR41LbByYkFam6DqFJqPMC5H5q_NlfhQScExP_F4LSaLr8RQ9zeggfTF6Yy6IdHNKrjKFppeElQhpk9N6XtemX2ryEJJ_xu5b9B72TXDlHzBFdIuAObZ-RYVe6Fnx_Ma1nql0wI5hj0MBaj6ITWNUMmKzcHvtOBiYOOt2IbVz4Ga-HeHzt4hamdNfAz84WPuaWbxD7KmiJIfqEI1OnohB-lmLqKpVS6hR88GGUfcZ3mfU-QCjSEbcF9xlPj-zEAZjb7K-JIof834hc0dxUJH0GsdAk0GbIT8yfSYfddcXNQT7AJioFqAmo1LFizs6kFd0HPpU1AV9538TLUy-YDLn91ZbZNsimLp1WJBi_Cm3a6xzerMCaDHByAef2Bs1XneWgZ_V0TmtdYq2UUvK9S4gHce2fOQrm8J-TNzIO0N6RbgEMr7ZomCcC4r7EspEicxWrraREP6oWn_CZ1rUABw65R7qyUkGT0yvX0Kbdmve_6OrNgJnCJipWcoVSgRITioJ7KkAZcltmpBsmqwWllOGNMZj_QErIsqLFh0Sh7Y=w1142-h856-no
 
Last edited:

Bigblue&Goldie

Well-known member
Joined
Mar 12, 2009
Messages
10,678
Location
AZ
I can help with the links. Hit me up and we can find a time to do it. Shouldn't take long if you know the angle you want. I haven't "calibrated" my 2" die, but that won't effect anything if you have enough tube to work with.
 
OP
R

rattle_snake

Well-known member
Joined
Jun 25, 2015
Messages
5,195
Location
Chandler, AZ
Removed drivetrain to finish out front half of chassis
SJ5JjSP3CvSfp2u8gmvV34P0jLgLfEs7QjTxV5gPlKePtcHNBuTGKxQDaWOrGoEwDcF7M0Dcnnw0vccbKqHHsGjseGwjIVSkAnKvzPsx25BRqP8Ax-nX5olOK1wuq1ujBi3yPQUS6jUEomsdRvRboG5p6853V8aBbYgJP6pp1h3FV6NH2sdOsSLwEhnIw6F2L7fyr1pIxclIct7PwK4E9TAva8pE8polBgEa4m5_7pKRsV-IXdTnXAHHXVBNuxz14EA2YzLVbBWNj4gzZRsz7G-ksHnlxXYOpa3Cv9uj6oHg7ClIvPcXFIoqJxeK7Qaz977QWBiqhelYU1KygGGxjG47hjP5wj75AERwVnLNnmSjFu3UXb2xxZcriNF0GK6lsl8-uvbEAmFtgfQQ8n9AjL8L9gt8mDkcrRyIIiAZAf-4Tx-fTpuGjKUu_77cn3Oy7btc1gno8i0xRvUMXk6Rmj1yEkfxRBAFscDwIyxPLnoC29bXL_H07qG9cPGc4PIbNSh85qLG6dKwI2RvHWDrjiIUQDd9WDX298FgZ5ekumxZjC_SeBASm6PcSAl3EJquO9rxtKvjC66ytLZ8XIeb5CM0TS621b26ZgKQZES7VZOXeo6gyVrBzBPVLu0_ql5Akc-R_xlvOLuTdS6GTeJgBPfEGTEnDMGr_ki6tI7ziuA2mFdzq2vyIU9T1pZnfZsvFUvqBP8R0yX1wXhrCJ_KniHIJAUjmNxpzYIYL9SyuLaznfA=w1138-h853-no


Mounted steering box and sleeved the holes.
6GhkdYZvM1zQEEHQbUH2ZaNKMHmEGzedsssG0j4KyygScMtT80XtkXOKA2jugPZb4sy3rGwUXsmv2rL31xy2hV_fQnNm7eOcShawKJt3eUZXK4mxs6t2yf-ypRdP41r6CwSkYk5-F9sSojNjvMpPRitrrV8l_VdzfSfPyhk4RsBuEpp6d8plRtENGkRzo_5sH9phDSTwp9m0aHrKathE1xRgL-IUsVhd7j84HjVGN7EHpFJyCw1wwVY_TFE_HUpkwzqiPatkQwL-5LjhAxyGgqrGhdbFgiL8lAuwI-igRD186qftboQcQ1OoWXRn0DHy6vStNWqf5n--_-X1gewhbI5WE8R3DBc7zu02uRO9mRN_pCIbpbRkD5WIT7tBdYRqaHLNLOJJPVaba1j5p71P9pzSsD0Nl_l_hmnN2acECVEo9WQFu98Od0pZUzPLyn_vwr5PsLLbBm1C8wp8sOkIW6qGuXdATamVcSm-XoQ-dAb5Lkop382rQQCj-KmIM4L6Fojt7sY4fPTJNsoCq1xZBG-b1DtOX6LKo6Hz7PKfv-cnLv6QKTIHIonrSrXMSgXoI52ekNs5CzkOoOaf6BHcshkcU-ChLzjG0EPYy3Br1amg6LJuRMbOqGhXQkMdT48HEJpKYvuNWbbCx-_rtPisUZTb_wADVyd2v9a2if5LXGzZcQKUx_39e2icAPP1QOmWr7L1fOSALyEHB8spAv0562m2Yq12lsnLAUfh7d_GGkmDgLc=w640-h853-no


Next steps are bumpstop mounts and finish weld the track bar. Then paint the frame. Still need to do brake lines and such but front half of chassis will be mostly complete.
 
Last edited:
OP
R

rattle_snake

Well-known member
Joined
Jun 25, 2015
Messages
5,195
Location
Chandler, AZ
Finished up the front half of the chassis welding and painted. I'm sure there will be more mods, so rattle can paint job is a good fit. I placed the axle under the chassis and did some preliminary measurement and test fitting.
YaSNabwjdnYfiWv7sHTR0-meQaHnYDXkoJTQwhXBZHqq0qrwkHoyCalyWgetzYa-I9Sk_i_xBuH2KqZdeP3TQ-HM1sS3CRQtcBu_FJI-S90R3vQ0ROI4axQiBrPU3jlGuxUP7pcmgr0Bbby-cd5q3cBVfx58cUBCaW4QHH8L326WMMyRLXBq2JpsXwpKRpv-tnZDDn_0Q8ffJyW6p3URnhjzcKdfWKf2wO5WccUPPHQZPyJN6WRM27TymW-FDQIcFuXnPk_Q7rwKkFbtYvwmg1tMZVZ4cvyEvM4vv4U0wgJfPn7GRbgtjxSj6zQmld6_kdJTfOxb96YlMFFkfySzkjaqin5OvxMG1zdnO-i5bwVeOfgfVASleCJHlPufJKDHzZdNXjCgi2Y2wH07hsGYUSr72YYuVEPeONHhVZ-BzOxHvo1PKBq-JWwd1t-ybgSiSVtdu2aILIULIVR8VKpw5MV1-kiEaw5NbLJfRj5YCOrYiQx2IKUhi6vZdElfiVKN8klk45oAYkbk2xXBQnWqJg7Df6Um21G-9NS_X3NZ_t91T7Zyse--CezzNZIGAGpxcxIC_STaRHoD5qfdQy4lAeezk_yNs08rUpG3DJxeMBDicwgtv-ECdMsHZmIO7UK2yHdeiRHO4kjnNYjlznhKsbAUPtKjvJuhmnx5zeInT6b6hfSAOLlpl7FugPD14ADLXgyzf7YbwFKGWpLBDB5SKlbl6cisdylnbTPRn70PiE5LFxk=w1138-h853-no

The axle/track bar and steering box are a very tight fit with axle forward 2". Given our favorite trig functions, the axle moves forward another 0.75" at full compression, which simply would't work. Had to settle at 1.5" forward.
_S4tR4sIpyjkPaZfS636N5YX9tScByTkurKqvbPIVS7B7-tUsZDsMzwG23JU_pGnOHFaOCjPnnuk8XGGQwEsT6ml9eHkmlcGvUncK99DNDo-gUmdn-j9uBSQr8K19oDVcshF_tPzSPfHmHf9X3VhoHNqLGk7Rjv64e54EhsrXQyijNce7rAYm7KJ4t08JehVSEh5tAevjIdJl8dsyDGTxScaoronQpAWKWr-0ZGkCh-kVeb9EIB1a0whMlkUwYNySyOHg4eNUdWBx8CPaiUCGlXsKJYxCmELSJxK6jMA_KVYjEgKoQU-r3PKs_6DSQVk44UgOSDCsPEJXJqfmbr2oV-O3f_kG2RIQOPIBY6PtV4RoxBCs6cIDrL_Cgc8spkOvh1DqWww78mBf0Jevc3Y6M-I6WY-SIYsoltjcy0I0qE1dywKJZ2YxsQlzbwADF0qcbLjxmhpTID4nwe0NN35Hm7q-6UCfmfzkw8x8kr0RKELCJa6R-BamcNqFnt2D5_V1Lg5fOR-YuOKt4bRRjzzKYbRIQfrV4_PDxo68_Fue1zDvxEyuG85JJqsmM-4KfW1QsL8EaistFII0F3oOBYyGzT2FdHk8RluxFsjyqiGjjfYZ0qDRppeJ8kw33utJu5bWTEhaKRzWszKGjqaZWyDOJW3aRJBYdVSITCaBZ4D0loii683KSKFbGBSC2WWomBKdtIisdyrwY6SQYRR1mYhbGumvOHbottD3cn1W75LF8Tzntw=w640-h853-no
 
OP
R

rattle_snake

Well-known member
Joined
Jun 25, 2015
Messages
5,195
Location
Chandler, AZ
Big thanks to Ryan (Bigblue&Goldie) for helping me bend the link bars. He has the hydraulic version of the JD2 M32 on a nice cart with a full set of tube dies. Sweet setup. We got the 3 pieces bent perfectly, he did all the work, I watched
I used my Evo chop to rough notch the bushing ends. I set it to about 30* and make 2 cuts in line with axis. In this case the tube intersection is about 75* so one cut is much deeper. The chop can cut a sliver of the end so can creep up on the final cut. An abrasive can't do this.
OowglQIWuSfCiyo9s5nHwtcT5Vad9JWx-n2W22xaahgCqj4pT6BhGfTk_VkFSV8u6jeZTxxGVZc_9MCm_hT55HPOFEZocmYee76-vOah9QIUVgmELhLx_GYUi1rLBayF5PAQYI7HoafcBwjdnUMcMx31JRsrJGhKu2ah-can8HZxwpmqIQz5iGiFOpNGs92gV_6CT8BKeSvdNPTRgK69PU_iIBfh4dgRGzX7doiBMVgezOhR64HnDP6qBgeOdXAC0u5w2tbruQyf-p1JL7D0zYkmO9MED6bZAzwVusccJREtWFfsokmbUPm9beBm17_zY50bb5A3YvbcMDY4eVZBFep7BNGYz64dC3fJKQzsoQGeSOFUQdetkmh72kolQqhfe8DnUvMhgm1oG0qlWaydLZlsp4BgHrLo61iuN0EJJOFARPcpnZNnrYFesdviaigVY52VfZ1ShH-zbJ77eUsh6U2wyGisQq6MDlV0dKjDxEiWZNZNHGXa5SxQXHBU_WCLiaO72p71wV_AbWJzNyeO_mhsG4hFdFcAJBt40a5QIFE8ZsX6ffaFQ1JPh9l5ZsVqByssMHm-Nnqti7vhZUtqBWQxqLuZS1VhgiQbtcBAQ8OwGWCqv9gYNBLb7XUrd2Hx6ZnLK8lLGzmL3WBaRMfL0cwjQ5YZQDlr-3s4tkr5TG_0eOsGpj92ybOMG3eQ7bBRBHFjkURhvKuQW10EMKRo3KTTDQLUGLgERt5sixpQ7m0W0Us=w1138-h853-no


I fitted and built the lower link bars in place from the heim forward, which wasn't the easiest way. Had to sneak up on the notch which is not the same angle as the bend. Once close I tacked on welding table, then tested fitment until it the bolt slid in nicely. The upper link I did the other way, notched then cut heim end to length as it is adjustable. I left enough threads to give -5* of caster change to net -10 if needed.
-74Y_cPbkllntlKgLyPXTdstRw_M0sr3jBH8qV9j4zLd4D7tVw6F4Ue0a7iMNL3Sfhenk2vHQ9uNvq_6ptE6eLmqoWOotOXSSBzFQY6skRineD_3ree60Ylm1P2ejHOT8hIEwq_2BDC4YBr5vaq0CdCuhidF3-tf1AqGmYB9CiC-McEG7EwEEjfAlCL7QMI0f-H20WwUSRyU-kBQ8ILxnlIeThy_t8Ef29_5F4-273rhG5UFxXVSQTzXcvQvTUj9OIXPAEwuY41Ax4vQBt_97VoIHq7wju_HQANwf6D-ftpB9qu63na047xVHnNe6L3AiSGM-gnEmZZPVdIdSr1x8jrkNA3en1KXRK1KiJbbFHGDgUAGgXknSXpAtJZkKl93-DmvY4h6rRXIb6v6IT2iNnidPvKXbZDdpvPqEc-xobacKgt6HWUlZ-FgXVzyVp37_zrcSgtRY2hJhWmC28wZNQWsCHM-9zLDAysIwh0invnbDD-h5T7iIQxDEquMlkBltSD9ELBT7Z6cJlyYKgSGFsPCIGs2nVfctiZO5YoGWJp4Uyr202Wdloe66oDpfFwjq1WBVAMa45BW-VlmnV27ZrJuVb02d45UPwsjz-G-a4wMZRAun6LozgHRXJnDcBxSIu2gheKYT7i3bv-WUylxxOXIlKBfMk3sflVpvsO6paR8UqUpGEPywVRnHTM66AbVS9ykm-HpqjkiD79_4LenqSdTx5aY5Eo29xLkVNfYD76dNus=w1138-h853-no


The bends are done to allow more steering angle with big tires. This has drawbacks including twisting force on the bushings, but should be worth the improvement in turning radius in high-pucker situations. This is not a short wheel base vehicle...
I put the upper link bracket over the bend and leaned it in to help clear bolt head.
0EsZHvyn9C-FDoZ6_d29VKYEjON7Ad3Zz8gRcqypo7OHiaJi0UFvSxjSv_IkW9wXfaDhenOiYIct-PzG6NLzSz-tIOfm1qtrdLt02pWut5NOic5_DpjzIbLKByAq5nRTyO2nJg3O0k6L2pn3minbmDJ_zU9yMD53PMVa3vfXHc7eoW6-X-XyrUS-uBi0AZhsW1_Z2SJk7uzK8OXKPB8lS4Ux4Vwte9LL9kd5MTkTE8_954N4a-HSllZlX8u19bAOdic6naWdWNmgV1jGGkEpVB195-l17d-HZ03ojQl-l4BLtNPHwCJmwuVdhPij8U127XVa_xoN8XxcrobWW0_a447ipfKbWNlMAHKB4vRwR-HIt672VApauefExnuyFZync3__4LZGFxo9d_jfXLIj5nOq9XZUIPQwL8mE2RF5HR6j8jfASmbLfH6BbNibKROgcSeECqH9tdNZFhY2PWP6YVHj2ZgVu-rTRMC4Z6SbsnEa__kJyH805nI68u8GjPZV4pKaUIPV_h_4QvutgKA7aY0S71TippjYXEnQPSud_rCFXRFOLOW-YWNHE7fQnRSbGapf2VN_OTLTB1Ltchx6ecXLouhtNzIdVRjwGqJShsA5QkF6D2JyY0qGfHTo7xae81EeLsUuTHYL1aUeq5_yUBAxWMnEfOp6Zg0GLrjszZ7_8CSZoxfXufKacqsRtOaDQzevQKt2LMWJgxEQNKueN8OW24aBtBGdaPXsQg3NvrFgX9I=w1138-h853-no


Both sides in with out screwing them up. A small miracle for me, as I have no extra tubing or a bender.
JvKznjzCH03p5K1wvYqNXTJXzfhL-Ys1REyK1cGb-9WOBuDgAxyWi6szBYyRjil4sPnItRZWrtOo36MNo5ExqE5T1OYi5JJptIosfOWEbkqBD6urvNJkvXXFg84utwldD9pNCMvf9Vu7V0QD44Kpg7j6PSNAVM0osFNFruJWJAhNsgQFxqYVnOU50uNIwe51P769ex_ITgfzZcqMRoU6ZE0Rpuxoir4PEHmg4YwPUAfLv0D2TET3yVKlogy5L7vKS0hhY0FteCIFFyTSWbUodoimlGQ5nHCqGcw0xHpCYJAXAHwtIEi5Wuv9WSVRTZiaOarhgcaw_u3dt8G3022l1rWB2BU6Vu5iwPdwE2yGJf6CagWq8MdJPYVOVE2lHJfzGTPmOQSow_w_ekTU0xT5xWmyyI_5bdbeEf5uc1juuNMkkHrZthxcw-3HTMdbf5WVYkEbeBjXTUcBJOsmcbhKXb0OZd1Z9Xt152MnqnbTnvW5HJeEqwOyh2bWrU65kvBEGidPfXWU1zAZqtrhPhsxcLqJQTfdXVDDcqxFSq4vsruzXQzd_MDLGMi8QEVE7ys2mEXOaCS-mD7g5GwpBB32sSkzeWnC_E9HokeeQSIfSFSkwJ_a5CLiItIeNewo_LwFClRJRyevNoOGAd-ZM6hGICxDwmbJsphIsFnVBNLCQ4qVE-sXWaT7aYxrvxlWqSbMkd8iq-N1v7aC3SWPIkyy_knUiL0yrvtdB4rLc9x2wLd8pqU=w1138-h853-no


I did lots of math for bump steer try to determine the best set of holes to use for the track bar. Cycling the suspension I determined that the tie rod and drag link needed to be in the same spot at full compression, so can't put the tie rod on top of the knuckle. ****. So did calcs for the tie rod under case with options for attaching the lower (right) end of the drag link on top of the knuckle, or to a 'y' tie rod end. These 2 options need quite different track bar hole locations, so in the end I determined that it was not possible to know what was best set of holes for bar length. So I picked the middle/middle case.
qYfeAOk2aF4JekQw1HCe-FHcZJVqaNsRxqQ1BOWzSyL6Tjowy2jlZQoOzi8OZomkybK3OJIgtqdEbOycBMLAPgjfbbT39_kDlXL2BnCsTMoTfgohvhjU-cqfPIZ13OTBityWUrvsE4CbZXqo08Pfdp25Odiek-saPY-0lWe2zxoL_8zXUV5teoWMnkz4PRdRVa3LNTG6t-6iz70clpOevwnowV9z1_lO6ROi6z_7uBqATZz1lyq-8fYxMi3uBQmwcU92S-B8mOEfzlsKdmjMiNloPHhHpahMuvbA1FRtg4N5i73gMKHp9ffVqcJqB0cqK4rfB9DZHZsV3Z0LeMTvRrg4_HevwirG1AeLqp7RGRSpfohNK8KTTeLHMWnuTc2TQyl6erhNfY487J9bheoXTduEcTSScM48qX6fto926UiCsErI7TqgRhXUWMEIppvvP6ZP4hYgfoYfq84J2__5cKdrgKKYCWOa__7u9Qm8WC65-AvjZuo2nF4nkkIPw_YHz32jRJ_Bxbbut_PI70pzlsbRw3Lf7X7F4K2KF3YkJ61SUM2pmpPKFop2WYHJygf03ZA9o0nBRWENpueOwLTkHXOMeS8ODgvCPN7ExJf1ejy4mE_o29JAF3StY7vdkm1EtoAqJ2iRsYWARF0N_h315aP1Q77LeZN_tzjzptwzJSNQUr7YAg8ozlrVxp29vx29YYlhgVEoPUJo8KR4nyrL5oMq55vzLSAP0fLdFVy-b92ebe0=w1138-h853-no


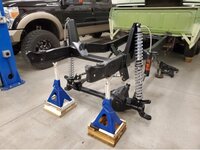
Once all the bars were installed I cycle the suspension and found that the track bar hits the diff cover when at full compression, and a little worse as the right side is lowered. It needs to be bent further to clear, which will shorten the overall length somewhat. I can also lengthen the bump stop extensions to reduce up travel for the time being.
 
Last edited:
OP
R

rattle_snake

Well-known member
Joined
Jun 25, 2015
Messages
5,195
Location
Chandler, AZ
I installed the coilovers at full droop just to see how it would look.
LPHO8EYKknKkVHaPgLvUrdknKtP6SUuzy_EqgsBCdF1B-LCJMX19VqnkWqE6h2kGEgHP5qt3vpMOD9wYP0DeZ-xNmNqsmxEiJEOtjFqOylnhYWHHxVUSXK_x0bAh2-MUTU7T6nh1Y-gGmMcc01jqQ5B9yud3SOuiEJHZld_RAdBvEhqb50C3WWZSmZiFLt73W-7MS8MrFT8ZSW4m-UsG7_FYjfQ1jTYCDYwppT6LhkxyccQIc_K0_pdviNgGtoBSVtSUOXvIL7oQmXj9x4NQVIsLurV60q0Go7G4jc92GQvHwOJYLCqMMvXq_rIuOym6LLyKt_ut5LeeKFze2yszGvUJtakqFjw9EIkc-_iX3GFLxgo5v-yeAbzOJmFHvPrOnAlNqLXAVmj5lr3_xMTCCot2_p1OIADuj1s9qM9Phojjg6OjVqAEDqHULSLUhls-qkC4vdU3m0cJ57VJMz3PA3JzzqfZn04PImepF6SuZQR2no0yPGe2c6I-qamyA7rHiu_-O1vcXGPLMW1vRUc0mxMs0G8PtNYSg02q_exB_HGGKhF0z6C9mZtE7Sn4l3KnKtAErla9fa9sB_DDnkpOs5X74y7VsWePhfYMxSZYwDN-zs0hujJx2Mtss-xUQr9bJukBMQ1iLEsvD6d9efo4dFzRicrnWvKix37CQg5feIPIdwem3okUaNvguBxHhMZQxZZ8tluNXsDX5aBBnKhumAf4_snbxiW5bejnTvt6RHuTJik=w1138-h853-no

The front driveshaft will be shorter than I assumed and has to make a steep angle at full droop. Might have to notch the trans cross member depending on the trans mount shim needed to clear the cab.
Ar6N82fzzh1Jr3Fpdld-NZO7ArOF352xsXF37Slp6odBDjP_tV1_uFxKAzfJdu0B0tR37zXeuhDeZ5Bp0BvDH-U7JaRqOoa8S-sKCMVXC3ZgWj8kDC1D7HgReue7ZNu_XJ5ZC6Co7usQ39iJ1fUzPBLHMrU7DYFyGGzdLZPW_ENFXxSlh2P-9Y3W-_QT7Mkl0dMi9hezZLdD4P0HeGEcdlar5N7n_kH0ueCjwUTMgQq3EYWc9rUgQYbebgBNmzIo7jOoEygqyinUYVibLzJJHKfY-z0AvpXOZLIfhFyMOzPCqLlm3meQT9ktAMVaMfZDLORTnbfcOG4-RrYgoDnoLEuSeHuWdyatviKO9J4dnfZf8g5zb0PSEy_jByxDO6d9qpQRNexy-KcAMEmLxfNDW4svAwz2Iz3vpp7b6XeyvQ0FBgZ7hR3C6-0c3briY5R5oFDbtqUeOf_Nhu99SlSb4Acd4LrviUYOR0fRHdD8qQDQ7vyr_v9uO42zeO--gdAtVNBsqc3T2toCBca_VHr38TQ5PCQCkwQhFHTSpZXeetyQ5WV_OjysHwSDpzT_ofw3mfbHVXOq9LNZDIaBvy2z7e-1vCoOmMm8IPZ50AVva4mYqet7jurHJaZhxxNvFCalZwzK8kjQEZu2Xv_tZs9XLtsWPZGzzyHSmoSemBtfrJGU02RnyopEner9tSLUFZF1BptfYLsEKlGa93eeYwzOdF4RMR3Ah0WBAmqbF9fqUDgzO8A=w1138-h853-no


Overall there is still hope that it will all work out alright. Long way to go.
 

OutlawDrifter

Well-known member
Joined
Jan 20, 2015
Messages
3,876
Location
KS
This rig will be amazing when done! Now stop trying to drag me over to a lifted 4WD build!
 
OP
R

rattle_snake

Well-known member
Joined
Jun 25, 2015
Messages
5,195
Location
Chandler, AZ
Looking fantastic Justin.:beer:

Thanks Mike. I hope it functions as well too, without to much trouble. Going to be some issues when changing so much at once.

This rig will be amazing when done! Now stop trying to drag me over to a lifted 4WD build!

I dream of the day it will be at least drivable.

I take no responsibility in suggesting what you should build, however your '49 would look good as a lifted 4x4. But given you already swapped in a newer fame and suspension, you're better off starting with another vehicle and leaving the 49 alone. Perhaps a square body...
 

Bigblue&Goldie

Well-known member
Joined
Mar 12, 2009
Messages
10,678
Location
AZ
I have to quit watching this thread; this is one of my dream builds and you're doing it right!
 
OP
R

rattle_snake

Well-known member
Joined
Jun 25, 2015
Messages
5,195
Location
Chandler, AZ
Think it looks great. What length shocks are those?
The shocks are Fox 2.0-7/8", 14" travel. A little overkill for the application, but consistent with the rest of the build I guess.:headscrat

They were same price as the 12" travel and shorter towers, and yield 1" more down travel, if more lift is needed. Plan is to set the rings/bumps/straps at 6" up/6" down, getting 12 out of the 14. The radius arms won't allow it flex that well, but that's not really the goal. Curious to see how the 250/350# springs and custom valving ride, some day....

You can probably appreciate the headaches that go along with moving front axle forward. Good times.
 
OP
R

rattle_snake

Well-known member
Joined
Jun 25, 2015
Messages
5,195
Location
Chandler, AZ
I have to quit watching this thread; this is one of my dream builds and you're doing it right!

Sorry it's long and painfully drawn out. When it rolls I'll stop by so you can take it for a drive.
:)

I guess it's one of my dream builds too. After selling my 77 bronco I though I would want another, but the bump speaks to me in a different way.
 

lilscorpion

Well-known member
Joined
Mar 15, 2010
Messages
3,600
Location
Colorado
The shocks are Fox 2.0-7/8", 14" travel. A little overkill for the application, but consistent with the rest of the build I guess.:headscrat


They were same price as the 12" travel and shorter towers, and yield 1" more down travel, if more lift is needed. Plan is to set the rings/bumps/straps at 6" up/6" down, getting 12 out of the 14. The radius arms won't allow it flex that well, but that's not really the goal. Curious to see how the 250/350# springs and custom valving ride, some day....


You can probably appreciate the headaches that go along with moving front axle forward. Good times.


Good setup. Like the taller shock mounts, that’s a style I tend to like...gonna be sweet.

Totally get you on the radius arms. They’re not really ideal for mad flex, mine max out at the top of 11” travel and put the bushings in mad bind. The factory Jeep bushings are a little more pliable than polyurethane so they allow a little more (maybe). Still, flex in the front isn’t where the magic is, the front is just the enabler of the rear suspension and leads the way. Drama link/trac bar is more so straining than the radius arm. If you can get 12-14” in the rear and a triangulated 4-link, you’ll be grinning ear to ear with flex when the front and rear start working together.

What I don’t get is Ford?! [emoji6]
 
Last edited:
OP
R

rattle_snake

Well-known member
Joined
Jun 25, 2015
Messages
5,195
Location
Chandler, AZ
haha well it's hard for the rest of us to understand your 'Jeep thing'. :)
I have a thread over on Pirate in the Ford section with some background on use, goals, and what not. Short version is this is not a trail truck and will be more of a camp/hunt/tow-haul/general shenanigans, grandpa-looking truck on big tires. I want to be able to drive to the trail and cruze ****** roads at slow/medium speeds in comfort. I planned cheby 63 leafs in the rear for simplicity, but linking is relatively cheap and easy... Trying not to hack up the bed for shock mounts, probably put a camper on it to sleep in the back. Maybe bob the back end a foot or so down the road. So many ideas and dreams for it, but 1st step is get it running and driving, then upgrade one thing at a time.
 
To avoid these ads, REGISTER NOW!
OP
R

rattle_snake

Well-known member
Joined
Jun 25, 2015
Messages
5,195
Location
Chandler, AZ
OCD kicked in so had to re-paint the trans. Trans builder painted it all black, but too boring for me. Guess I'm somewhat of a fastener ***** too.
IY5sGj7Qx-RYktesTjrCLAmZyqvQct2mEJhs8=w640-h853-no.jpg
 
Last edited:

lilscorpion

Well-known member
Joined
Mar 15, 2010
Messages
3,600
Location
Colorado
haha well it's hard for the rest of us to understand your 'Jeep thing'. :)
I have a thread over on Pirate in the Ford section with some background on use, goals, and what not. Short version is this is not a trail truck and will be more of a camp/hunt/tow-haul/general shenanigans, grandpa-looking truck on big tires. I want to be able to drive to the trail and cruze ****** roads at slow/medium speeds in comfort. I planned cheby 63 leafs in the rear for simplicity, but linking is relatively cheap and easy... Trying not to hack up the bed for shock mounts, probably put a camper on it to sleep in the back. Maybe bob the back end a foot or so down the road. So many ideas and dreams for it, but 1st step is get it running and driving, then upgrade one thing at a time.


Sounds sweet. Wasn’t hackin’ on ya, i dig Fords just find the rivalry entertaining. I’m not locked into any make.

Dog the plan, I don’t do the smash and bash style wheeling anymore, prefer the same thing. Post up the link to your pirate thread or PM me, I’d like to check it out.
 
OP
R

rattle_snake

Well-known member
Joined
Jun 25, 2015
Messages
5,195
Location
Chandler, AZ
Sounds sweet. Wasn’t hackin’ on ya, i dig Fords just find the rivalry entertaining. I’m not locked into any make.

Dog the plan, I don’t do the smash and bash style wheeling anymore, prefer the same thing. Post up the link to your pirate thread or PM me, I’d like to check it out.

I hear ya, have to poke back to keep the entertainment going.... I do the same to others. :)

Here's the link, obviously the same pics and stuff as posted here already, but some more detail and all in one place.
https://www.pirate4x4.com/forum/ford/2679042-72-f250-2wd-4wd-build.html
 
OP
R

rattle_snake

Well-known member
Joined
Jun 25, 2015
Messages
5,195
Location
Chandler, AZ
Thanks Mike. The OEM bracket wasn't ideal in position, weight, or looks so I simplified it. Used a different set of holes in the bock instead of the head/h20 pump.

Want to do the same for the steering pump, the OEM bracket puts it way up and out. Since this is a van motor, it came with a saginaw, which is better than the typical ford pump. The sagy can be easily modded/shimmed for more pressure for big tires. Long term plan is ram assist.
 
OP
R

rattle_snake

Well-known member
Joined
Jun 25, 2015
Messages
5,195
Location
Chandler, AZ
haha ya some of the ford pumps make a lot of 'cool' noises. That's how you know the engine is running. I guess I didn't know it was a feature instead of a problem.

Installed a spartan locker in the front Dana 60. Just couldn't leave the open diff in there. Open diffs **** for desert wheeling.
At some point I will get both axles re-geared to 4.88s and put a real locker in the rear.
wVj_WZUYR8V3qpJt89i4fMQf8mzaTmI4GGgA=w1138-h853-no.jpg
Torqued the caps and checked the contact pattern on both sides.
6kPvrkyXJodpBqw9VTu1_l2uKBNaOrM2jZd0=w1138-h853-no.jpg
 
Last edited:
OP
R

rattle_snake

Well-known member
Joined
Jun 25, 2015
Messages
5,195
Location
Chandler, AZ
pics should be fixed. at least for now.

Kids Tao Tao quad took some damage on last camping trip. Seems like I'm always working on this little turd. The bearing sleeve tabs broke, which I guess is common.
Rh4G1tnoPjtoqwBsgNB8f7MHdU_vKZ1W7hri4=w640-h853-no.jpg
Further inspection showed that 3 of 4 were broken, so blew it apart and decided it was time to re-gear. These 125cc quads have 3 main issues;
1) no front suspension. It looks like suspension, just with zero movement.
2) factory carb *****
3) gearing is too high
I already fixed one and two so hopefully this is last mod.

The rear of the swing arm has no triangulation to prevent twist when one tire hits a bump. I boxed the upper area as it was easy. The chain tension system is sad a best, so I modified with a horizontal reinforcement on the bottom to keep them from folding/deflecting when tightening.
t0Z4K39uS7DSJpKMMlLrtmMYFIx8-vajkegw=w1138-h853-no.jpg

Found a suitable rear sprocket in a 49t. stock is 13t/41t, so -20% ratio change. Needed a longer chain so got a higher quality one in gold.
:pimpflash
The stock cheap chain really stretched a lot.
8R4leU11uBW_Xl6eoRoV2JKmdzSwlkrXicFI=w1138-h853-no.jpg

The larger sprocket wouldn't clear the guard so had to cut it off and reposition. Took it out for a test ride. Acceleration and hill climbing is improved as expected. In stock form the machine can't hardly climb any grade, engine pops, dies then it rolls backwards. Not good for kids or inexperienced riders. The upgraded carb help this scenario too.
Top end is cut 20%, but typical usage is puttering, <10 mph so not a big deal. I also bought a 12t front sprocket, which I will try out. It need to have the retainer hardware modified. This will yield another -9%, for a total of -29%, which should be plenty for slow, rocky trails and hills.
JpCBm1m2fr-sZStEt5DcgCUedtRZILOQP1KY=w1138-h853-no.jpg
 
Last edited:

nsula_country

Well-known member
Joined
May 23, 2013
Messages
1,534
Location
Northwestern Louisiana
haha ya some of the ford pumps make a lot of 'cool' noises. That's how you know the engine is running. I guess I didn't know it was a feature instead of a problem.

Installed a spartan locker in the front Dana 60. Just couldn't leave the open diff in there. Open diffs **** for desert wheeling.
At some point I will get both axles re-geared to 4.88s and put a real locker in the rear.
Y1AWDFjaHDsVK3BL7erZEPkEDl-QiKzv_YrfmIGe7comb2NRStGFfrr-sq8obLSxBbrJEIuim9fi-Xzy1ezxO1ZM3wp2KlacezD4D71CWjTRz9qNX9K6dE7HcbhM3I9tyTjKYRI8aAiChGRT5TwfQUkmM3U3u1aO-JtSofLWyy-hc32JtQXxS3b69jI_PZ_6U6umZS1_CTkOX2DI6qfUQo8QbwPiYmkRn8ylrqUtD559NQX0xQwwfU8DfQfcYobOqo0y2knMLj0-wRnCwMzeHdi3VwdfENziYLs1R0662tc4Qa76BxkAGoVstHuNNk0Re-o-BrA2QeTDWST2mewU4ipf6EIPaJeCVKP9kSvAejIu0OEyzGvs0HQHZDak7hXswL9SoqXYVfV9PIL81w6zUJw7NIYuMpZ1snD0cEjcYeyqwEgmuxzEvZJc9OYyhDYIMynLU9mGeR7w8Dxn4CEF7vc52e-lbKHvXRxsyu6JNGwEdtCKZ1bhrhVViIXm2tdumk9mUzOXcDPstbc-V2Ns0Zq9UvHdt9tb4L5v6GtcfCiNPo2RzP8J-cJtDBMCEwi1R3uE_uCCJxkKoLiBsj_IF3vNg9qAwcZ0r8OrTVoctCx01SlmLO5d6eEkqMq15aTRjEtYQY9rqwbQe-bSt6EyExk4IEdk0ldzDrT54Nk1n7PHPewjr6QcLJCy158js8gf0Ji9qnhuslTwVj_WZUYR8V3qpJt89i4fMQf8mzaTmI4GGgA=w1138-h853-no

Torqued the caps and checked the contact pattern on both sides.
F04gS5E4SJ0EWGt9duOuetUiaclvfzKnWsr5kumH225duiA6-GEbDnRTJhR59mhpNcI9fu_A3t0-nz98PvI1ECVK4RMeg1tsjkjZJm03uaBE9rzZT9cFz3kvKwSLeLDlNK1H2DYs3sZn9FopMyHPmQxyycaHyjE4sm50qLuHzdczvq0104R5FFSJUTxmxOx1ZuY90u1jm3djf1lIjSfaoOIa08hyjulzjcU60qs0Q9GQti2c9M9FYkqb8Yh07QZfyIbx3zdXZmUQr7beIdr_1cAk_PFMgw4ysz988lFB2SS_HqCw-JQDn7NNo5ikSRueuIWk4xdWMDfJ55w26kHEXMiLpO6MBHRhnCDqx1SvUSJY91RtDtu0u_2YEigmyKaiAEv7PPKYvj_ZJID1S-gMn742jz6aP696JP0K_ie79qDUzemQyjPulsk9KCwN-_5sXqgTCHx2PuL4rdh1Liu09agepYFMTxSgIhx_UP0i1MisWVQwaRVgm3YPgFSwJJ3N0lmeAzR_y3CJZ6PxUgnvZ_F1YQE056fEc89PgJr6SpG-wgPSvt0RnLe5r-gdAFXErEPHLIZqVr0iHrZVZHcLfg_w_8fxIAhPiZFtV7t-tW-JeXb00u95ujXR4dY32G_7H9CBkOxRMfpgvc7kuYUgdfXPUCM0VlE0AvPqig5zdDsfZH5vT-ArcXZXZm62vNSCVLPsgoK7-FD6kPvrkyXJodpBqw9VTu1_l2uKBNaOrM2jZd0=w1138-h853-no

You are doing BEAUTIFUL work on the bump. Sadly I haven't done much more than get the dent running and replaced wheels/tires.

Not trying to hijack, but to get edumcated on lockers...

Is this locker what they call a "lunch box" locker?

If so, was it easy to set up? Could it be done on the vehicle? Does it just replace the spider gears and leave the ring/pinion alone?

I'd like to have a locker in the D60 (or 61?) of the dent. It's 2wd (think 3.31) 29" tall General Grabber UHP 255/55r16 and 1 legged burnouts are getting boring.

How do you tell without a data tag if its a 60 or a 61?

CT
 
Last edited:
OP
R

rattle_snake

Well-known member
Joined
Jun 25, 2015
Messages
5,195
Location
Chandler, AZ
Thanks Curt. yes the Spartan and other spider gear replacement lockers are called 'lunchbox lockers'.
Install is very easy, just remove spiders and put in the pucks. You can do it in the vehicle as long as you can remove the cross pin. In some cases the ring gear blocks the pin and has to come out/off. Either way the ring and pinion are left alone so no shim or re-setup needed.

The 61 was made for tall (low numerical) gears, and has the pinion offset in the housing farther away from the ring, to allow for a big pinion gear. The carriers are a different too. Not sure about the spiders, but likely the same and 60 lunchbox locker should work... I would call ECGS, Randy's or some of the other diff parts vendors to verify.
 
Last edited:
OP
R

rattle_snake

Well-known member
Joined
Jun 25, 2015
Messages
5,195
Location
Chandler, AZ
Latest impulse buy. Tired of hammering things that should be pressed.
qD3oCU4VJa-iS06HX19nfErE-P3j4_HuMh1-nFo9PRIUtBXWHyQAPRg1H0mfD3yjlyzffC-BAqW3hnoYRKpGFZOSDGBAs6A-pyOAIWyT6z2roFFF8AhHxFc17abVdpruK9Q9EMb0ivkp8rZdINPGi8X5TTas54HLloLb6AUwRXwMY9uyTxKmLx90M1sITqvwxYN74CUlVqbQgMjMR5vvT54M_TqUvCItPd28z7S6rRUHfRq2alSvrV_zmdh4jcpNcNmEOP_5Rh99e4gESrbbWTrQAuZws2_7FN42nXD4-UHKtv5jrCKHsKQePmfk5TohBxy04ocT8XHmMIsmkFbnB8MQ5SUkPZH7RsjTDnFx1Zh6O2KqbhPQlo2KWcRydLdPD2FChYF2WAUfe7JT_fKTLLRMlSes4qS0sj8e9-OKn_z0VPoXM4oOvlRFjMwbdCh8QVbdC9_6L7V6vMQUm3PpkPUC1IL8t-vasWF5X2g5QkXRIGTAg_9v7JrURiOCjQ39ntqlUQ9hkVBZXfJSkOVIXBkhLGtgtqrbhL1E9vkZevjRdHXHRAAen2a8rHhFIUwqbRucP2sA_rfkfvp7t85-_f_gG_c3YgGOmB0ak3f7OgFa0OwAU8XJSA983pX9FxN47Jtjhzec5w9zHJbQZ45wZ97mJsXdD-8DKsb_Nn7rLRnI_S8ls4IpGjHZSGq-LSsJpN4VeF-JIYu3AN4kihzxRSVaKubf86UcbN3EqLOIAKS9cTk=w640-h853-no

Like a typical HF, most of the build quality is OK, but with a few 'outliers'. Plan to build a rolling base/shelf and some hooks/posts for tooling and such. At least I don't have to paint it something other than orange!
 
OP
R

rattle_snake

Well-known member
Joined
Jun 25, 2015
Messages
5,195
Location
Chandler, AZ
Finally got pushrods for the 460. Used a adjustable one to determine the needed length. With hydraulic lifters and non-adjustable pedestal rockers the process is a little different. Block is decked so they are a little shorter than stock. Lengths were all good, didn't need to shim anything. So for once on this project, something went right. :)
xaM_Xa_ihhKzGc1KuE5HYNN9hy1o9wX8io2KpLkZcek2uTirCEQaSOJ3_68ghhtz_XvF8AH5H3YSwqgrZyViwPC2ZKtvByKqVEnkcPJML3W-QYpdZKkujTybPss1iq4gc8NoDbSL2XZoezgnHMfgG9kuM7YamjUr045g7BOZddxCOxHMpyvCzrPhJpNLQ6upfhITviWZ2Duw5F3hqezZmMeQQWGzIo6_faaifn8YHVc8fUXHaN7XWomzzhDkBGjjJyS8N5AV29QylUQHzTXqAVq7rbobl9w0PuVGdh6cxgfLsWvvSOeS3-VFRRHPz58bZRFwZ4MYi7b3ZPP20OmD3E8QtCoMDxoaBk3eP7j3T2cxxri8sUGjd3u6Iygj1RAYiOlU_xPXFiQmzVpiqbKKOYaOB_CLySj5sFl0-KL1w67-JbYVrxbnOsqKFhfBPhYQFg5D2hkHJZqm-8DHHYTTUKMARE57lAIrauFpoTZPeVibaPawFKxOX2Kr2m-gkviDYvM7i_H07j2qlCePcKQZ7TLJjy4w3aHyHcoD1bFvegnnNyLdx6kK-OCNNB-wyWG-85idC1RlPxIai1yMuOGDKvdxvaZQCrDjUMt1MrwuIdf2ECvWIGd5IhbSh4iro4L2E-7FDFb7VdFCuMdO2tdzhiQpiY9b0HR4eherOsOdi_h7qWNPLjFwX6Hnlrh1ZiRiqgOeaUT7fjx3dBjdk19o51a--KNHWoCeI1YAdN1Pv-Kl3YY=w1138-h853-no

I also painted the few areas were there was bare metal. Since I like to do things the hard way, I painted all the pieces before assembly.
 

nsula_country

Well-known member
Joined
May 23, 2013
Messages
1,534
Location
Northwestern Louisiana
I NEED a press. I have several HF 20% off coupons. Just haven't bought a press yet.

Feel the need for one... Think it will be my next purchase. Instead of buying a press, I built a .50 Beowulf AR-15. Priorities right?

CT
 
OP
R

rattle_snake

Well-known member
Joined
Jun 25, 2015
Messages
5,195
Location
Chandler, AZ
The exclusions on the 20% off coupons are broad enough that they can't be used on most larger items. But the unit will go on sale again at some point.

Don't feel bad. A rifle is an important tool as well. It puts food on the table, and the money saved on groceries can be used on another rifle. Or a press.
 
To avoid these ads, REGISTER NOW!
Top Bottom