To avoid these ads, REGISTER NOW!

rattle_snake's random shop projects v0.1

OP
R

rattle_snake

Well-known member
Joined
Jun 25, 2015
Messages
5,344
Location
Chandler, AZ
Last guy that worked on these headers threw a tantrum and beat the **** out of one of the primary tubes with a large hammer. With steering box gone, no need for that.
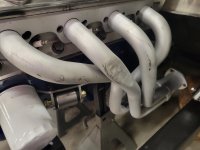
qB8mzuoU9RM8rUNWNHGw=w1214-h911-s-no-gm?authuser=1.jpg

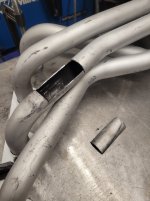
Don't have a torch hot enough to try to heat/cool the dents out, so cut out part of the offending section of metal for repair.
_AYkfGSnXj7IID3wIM__w=w683-h911-s-no-gm?authuser=1.jpg

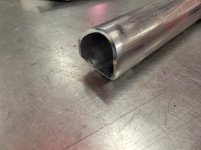
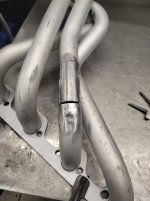
Used a piece of pipe with OD just under the tube ID to hammer the tubing back into shape. Pounded the piece up into the bend and got most of the dent out. The piece I cut out was the perfect scab, so I worked it back into a round shape with a hammer and right sized pipe.
0ROf_0DKEA-odpYixv55Q=w683-h911-s-no-gm?authuser=1.jpg

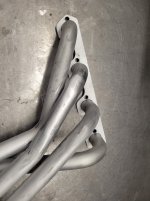
Welded it up and slicked it out. Not too shabby.
rGyM7Bcw0ZJrsI-V6I9Uw=w683-h911-s-no-gm?authuser=1.jpg

Sent it out for coating, good enough.
83Z0mgzbuTPCnGQ5pcEw=w1214-h911-s-no-gm?authuser=1.jpg
 
To avoid these ads, REGISTER NOW!

ntsqd

Well-known member
Joined
Jan 22, 2005
Messages
1,039
Location
Lower left coast
When I made a new dip-stick for Patch I used a compression to NPT adapter fitting. Screwed the fitting into the block (in this case, could've been an NPT bung), stuck the 3/8" Bundy tubing in it, bent the tubing to clear things (in one plane only), and then tightened the compression fitting. Used a compression by compression fitting to seal the dipstick into the tube. Set both ferrules and then backed the top nut loose to finger tight.

I poured one quart short of full into the engine and let it sit unstarted overnight, and marked that on the dipstick. Poured the last quart and let it sit overnight again, then marked that on the dipstick. I was making a bunch of different changes and didn't need to start it anyway, so letting it sit over a couple of days wasn't a problem.

Water is easy for leak-checking, but terrible about it. Mineral spirits, diesel, and ATF are far, far better. All three will go thru holes that water won't.
 
OP
R

rattle_snake

Well-known member
Joined
Jun 25, 2015
Messages
5,344
Location
Chandler, AZ
Picked up the rear sump truck oil pan and compared it to the 1980s dual sump car pan.
The area I'm most interested in is the front of the pan that is close to the crossmember. The truck pan is about 1/2" shorter and is tight on the pump body. The Banjo fitting needed to run the dual sumper is 1" tall, so total clearance improvement is 1.5" This will allow me to lower the motor as far as I want, beyond where it was.
yiLJLUXDYVdzuI6NVKvA=w1214-h911-s-no-gm?authuser=1.jpg

Planning on a tube crossmember under cab mounts, like factory. The truck pan sump is farther forward and should allow the tube to run behind it.
cN253l2ZehodsMJQOPjA=w1214-h911-s-no-gm?authuser=1.jpg

The rear sump is deeper on the truck pan by a decent amount, don't really care.
Un0nm1L77m1a8jCw9fwQ=w1214-h911-s-no-gm?authuser=1.jpg

The pans use different pickups, for the different sump location and depth. Car top, truck bottom.
Gx9WcvCC3kzZxQTbNCKA=w1214-h911-s-no-gm?authuser=1.jpg

When pan is in position the front sump pocket for the pump is below the saddle still. This means that a minor amount of oil cannot be drained, which is OK. But it also means the front cover dipstick cannot be used. It would always read some oil even is rear sump is empty. Have to abandon it and plug the hole.
Kg-N2MqpkCI6lECXUX5g=w1214-h911-s-no-gm?authuser=1.jpg

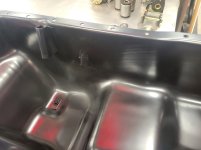
The truck pans in general are 6 qts and car pans are 5. I put 6 qts of water in the pan and marked the level to have a target for the new dipstick.
t1sOE76CgQQe5tbgU07Q=w1214-h911-s-no-gm?authuser=1.jpg

I cut a short piece of DOM (7/16 ID?) and drilled out one side for the dipstick o-ring to fit properly. Next step is to drill a hole in the pan. The flexable dipstick length can be adjusted.
 
Last edited:

ntsqd

Well-known member
Joined
Jan 22, 2005
Messages
1,039
Location
Lower left coast
Looks like the pan has a guard of sorts for a block mounted dip-stick location. I thought Ford never did that? Timing cover, yes, not in the block. The FSB's dip-stick is in the area where that part is, but I can't really see how the tube joins the engine down there.
 
OP
R

rattle_snake

Well-known member
Joined
Jun 25, 2015
Messages
5,344
Location
Chandler, AZ
Some 351Ws have a dipstick hole in the block where you see the provisions in the pan. Some early and then late 90s blocks. The pan I bought is for the late model engines that have that hole in the block. Using that is also an option. Have to look and see if my block has that, I don't think it does. Would be easy to drill it though, so it is an option. I haven't drilled the pan yet.
 
To avoid these ads, REGISTER NOW!
OP
R

rattle_snake

Well-known member
Joined
Jun 25, 2015
Messages
5,344
Location
Chandler, AZ
Stared at the oil pan some more. Realized that the entire 6 qts won't be in the pan when checking oil. After running engine, fill filter, let sit. So target is 5 qts-ish and can trim the cable after it's running. Made a longer bung with smaller DOM to secure the tube. Dipstick length seems too short....
 
OP
R

rattle_snake

Well-known member
Joined
Jun 25, 2015
Messages
5,344
Location
Chandler, AZ
Drilled a hole in the new oil pan
2rJS8a0O_QUiwiE2Ewjw=w1215-h911-s-no-gm?authuser=1.jpg

Welded up the new sleeve both sides.
WrbEoLPqMHsu11qzpJXA=w1215-h911-s-no-gm?authuser=1.jpg

z9qtKZJI4QP5ACSqgfYg=w1215-h911-s-no-gm?authuser=1.jpg


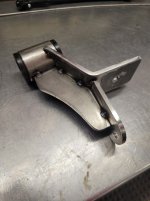
Right motor mount
NsW_yrpoDIPnx7QvWHwKA=w683-h911-s-no-gm?authuser=1.jpg

WbdsZzixfJNjxUCWlrI6w=w683-h911-s-no-gm?authuser=1.jpg

2NWO7IzwnPhBRZotV3wig=w683-h911-s-no-gm?authuser=1.jpg

xoUMnsl77v5RuwPouqYA=w1215-h911-s-no-gm?authuser=1.jpg

224rDSiKhQRPHjVopMMiQ=w683-h911-s-no-gm?authuser=1.jpg

EQh_h7uvHBZmIZiZkHZAA=w683-h911-s-no-gm?authuser=1.jpg

DYp3e1VKEYwlFCE-v5AQ=w1215-h911-s-no-gm?authuser=1.jpg

XmJEqA99R9nxRzxxJn1Q=w1215-h911-s-no-gm?authuser=1.jpg

Left motor mount
235X8YSNFMAvqbqEn39g=w1215-h911-s-no-gm?authuser=1.jpg


3YqdyAw5fco9x1AexYPw=w1215-h911-s-no-gm?authuser=1.jpg

MBhiexxTJeabgYMYFS2sg=w683-h911-s-no-gm?authuser=1.jpg

tP3ceUEI1dba0QMIXucaQ=w683-h911-s-no-gm?authuser=1.jpg

MqsKDsn8VHoBjXonn5uA=w1215-h911-s-no-gm?authuser=1.jpg

jEo2-P3vgAyudhdiceJA=w1215-h911-s-no-gm?authuser=1.jpg

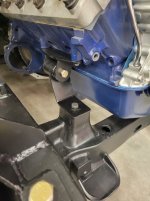
Ended up lowering the front of the engine by about 3/4" from before. This leaves about 3/4 between the oil pan and the cross member. Left the trans cross member as-is for now. Kinda have to do the rear suspension and see what the driveline angles are going to be and design the mount to that. But the motor is in.

I think the next item is the LCA/cab cross member. Now that motor is in and headers in place I can route the tubing as needed.

Removed the front dipstick, trying to find a freeze plug that will fit. Then figure out best mounting method for the new dipstick.

Time to start thinking about the brake lines and hoses, and steering.
 
OP
R

rattle_snake

Well-known member
Joined
Jun 25, 2015
Messages
5,344
Location
Chandler, AZ
Thanks! Seemingly simple but took me an entire day to weld three pieces together. With axle forward, have to get a little more creative that what is available to purchase.
 
OP
R

rattle_snake

Well-known member
Joined
Jun 25, 2015
Messages
5,344
Location
Chandler, AZ
Working on chassis brace under the cab mounts and rear LCA mounts. Since the frame is boxed, the brace can be a pinned connection, single link on the bottom instead of attaching to both flanges like the factory brace. The header collectors are the lowest point and prevent a straight shot from side to side. I broke out my old HF pipe kinker to attempt to bend some tube. Does almost OK on shallow bends on certain material after some modifications.
R3sV5zkRaEonv46nqSBCQ=w683-h911-s-no-gm?authuser=1.jpg

Having built pipe fence I notch with a grinder. A belt grinder makes quick work of it, and can narrow in on the best angle given the different tubing sizes. Tube is 1.5 OD 0.125 wall, sleeves are 2 OD 0.250 wall.
HDDpkNc3lAnRdrxQHTag=w1215-h911-s-no-gm?authuser=1.jpg

Tight joint almost no gap.
3AkC-PXXX8vVB-_rjz5WQ=w683-h911-s-no-gm?authuser=1.jpg

Clamped the sleeves to the bench at the desired width, and fit the bar in between. Ended up with about 13* bends and a 1.75 drop.
ii_7RTqDrfvEk_3WlVZaw=w683-h911-s-no-gm?authuser=1.jpg

Weld-r-up. Full power Scotty.
IwXyNG2VgBrL1vZ351zA=w1215-h911-s-no-gm?authuser=1.jpg

Painted the bar and installed the bushings. Re-tacked the frame tabs slightly for best fitment. Decent clearance around the collectors, but didn't like how low the bar hangs down.
On1ppgDm9MKJx8pUn4KA=w1215-h911-s-no-gm?authuser=1.jpg

So back into the kinker for another bend. Decided to do a single bend in the middle to make a double hump type of deal. Ended up the same length, because math.
9mj5rbDBMn8Ob7Ye56VA=w1215-h911-s-no-gm?authuser=1.jpg

Burned in the frame tabs with solid spacer. Been awhile on overhead welds. Now bar is tucked up to the trans decently while still having 3/4" clearance on the collectors.
wEoh4cNMW9nLOC7PiukQ=w1215-h911-s-no-gm?authuser=1.jpg
 
To avoid these ads, REGISTER NOW!
Top Bottom