To avoid these ads, REGISTER NOW!

Rebuild compressor that got water in it?

anythingyoucanimagine

Well-known member
Joined
Feb 6, 2019
Messages
425
Location
New England
Water got in air compressor's cylinders and wondering if I need to rebuild it or if I can just change the oil and run it.

I've never rebuilt a compressor so don't know much about them. Compressor is a 1984 twin-cyl Devilbiss D27194 off a 4hp Craftsman 20-gal horizontal. Neighbor gave it to me (free) but he let is sit out in the back of his truck/rain for a few days before he got around to dropping it off.

I hand-turned the compressor until the water stopped spitting out of the cylinders. Then I put a little isopropyl in the cylinders, hand cranked that out, put a little wd40 in the cylinders, hand cranked that, then plugged it in and fired it up.

It made good pressure, oil was black but no milky foam/water in crank. Is it fine or should I rebuild it? Thanks.
 
To avoid these ads, REGISTER NOW!

May Pop

Well-known member
Joined
Aug 7, 2005
Messages
783
Location
Lake in the hills Il.
I dont think any permanat damage was done. I would lube the cylinders with some motor oil, just a little. then run for a few minutes. Change the oil in the compressor and you should be good to go.
 

The Cobbler

Super Moderator
Staff member
Joined
Oct 24, 2013
Messages
25,980
Location
Niagara Region, Ontario, Canada
I acquired an older sears twin cylinder (devilbiss ) compressor. when I opened up the oil it was grey, and full of water . drained it, rinsed a few times with mineral spirits( splashed around.)I think I mixed up 50/50 oil & mineral spirits and ran it a but, drained it and refilled & drained a few times at least. been working fine for a few years .

mine looks to be same model as yours
 

SGKent

Banned
Joined
Feb 12, 2010
Messages
1,959
Location
Citrus Heights CA
you can get head kits if you look that include reeds and a gasket. Regardless change the oil and run it 10 minutes, drain and fill again. You fill to the top thread in the fill hole if it is like both of my craftsman twin cyl devilbliss. I recently changed the reed valves and filters in mine and they run really smooth. One of them was really carboned up on the reed valves - I bought it used and the guy who owned it used it in a wood shop but never changed the filters so it burned oil Lowering the pressure from 150 psi to 125 psi by changing the pressure switch, and a tune up it is like new.
 
Last edited:
OP
A

anythingyoucanimagine

Well-known member
Joined
Feb 6, 2019
Messages
425
Location
New England
Thanks. This thing is going to be a gift to family. He’s barely going to use the thing but I’d rather rebuild than give him something that’s going to break in a week.
 

rsanter

Well-known member
Joined
Dec 22, 2007
Messages
18,523
Location
visalia ca
Clean it out and run it.
The only damage water cab do is rust it and it was not exposed long enough to do that
 

Lwel9226

Well-known member
Joined
Jun 7, 2014
Messages
764
Location
So Oregon
Clean it out and run it.
The only damage water cab do is rust it and it was not exposed long enough to do that

I'll second that thought... Clean it up and change the oil as others have mentioned and run it....

LynnW
 
Last edited:

brownbagg

Well-known member
Joined
Mar 20, 2006
Messages
5,208
my compressor been outside for 27 year, no problem, it gets rain on daily
 

James-W

Well-known member
Joined
Feb 3, 2013
Messages
12,432
Location
Southeastern Wisconsin
I doubt that it would need to be rebuilt, it will most likely work just fine the way it is. But since it is 35 years old it certainly wouldn't hurt to rebuild it, especially since you are going to give it to someone.
 

Citation

Well-known member
Joined
Jan 20, 2016
Messages
3,225
Location
Indy
Turn it by hand first!
You might have a rust line. Other than having to replace a head gasket there isn't much harm in pulling the head to look. But if it turns freely by hand then you are probably find.
 
OP
A

anythingyoucanimagine

Well-known member
Joined
Feb 6, 2019
Messages
425
Location
New England
Quick question about inter and after coolers. Will they make any difference on a small single stage like this? I have a couple coolers that I can easily adapt/use.

Turn it by hand first!
You might have a rust line. Other than having to replace a head gasket there isn't much harm in pulling the head to look. But if it turns freely by hand then you are probably find.

Yes will hand turn and oil everything. I used brake parts cleaner in the crankcase so will oil the cylinders and crank, hand turn then put on sump cover, fill, hand turn some more, etc. Will fill, use and change oil quickly after first use too. Thanks.
 

EOC_Jason

Well-known member
Joined
Jun 25, 2012
Messages
11,388
Location
Bentonville, AR
See if you can get a new head gasket for it first, then pull the head off and take a look at the cylinder walls & reed valves and such... More than likely everything is okay, maybe some carbon buildup on the reeds you can scrape off... But if something needs to be replaced, then you can order those parts along with the gasket...
 
OP
A

anythingyoucanimagine

Well-known member
Joined
Feb 6, 2019
Messages
425
Location
New England
See if you can get a new head gasket for it first, then pull the head off and take a look at the cylinder walls & reed valves and such... More than likely everything is okay, maybe some carbon buildup on the reeds you can scrape off... But if something needs to be replaced, then you can order those parts along with the gasket...

I took the oil pan off to clean out the crank case and then sprayed the **** out of it (crank case, reed valves at intake, cylinder walls from underneath, etc.) with brake parts clean. I had a bunch of cork/gasket material and already traced out and cut a new oil pan gasket for it.

Really what I was wondering about was the inter/after cooler and if it would make a difference on that compressor.
 

EOC_Jason

Well-known member
Joined
Jun 25, 2012
Messages
11,388
Location
Bentonville, AR
I just googled that pump and realized I've owned a few of that model. If it runs okay I wouldn't bother pulling the head, just pull the filter material off and check behind there with a flashlight. Oddly enough one pump managed to get a staple wedged in the intake reed! How, where, why... I don't know...

If you have to re-pipe from the pump to the tank, adding a couple extra loops of copper can help reduce the temp. A cooler is really only necessary if you are going to be running the pump continuously using things like air tools, paint sprayers, media blasting, etc.

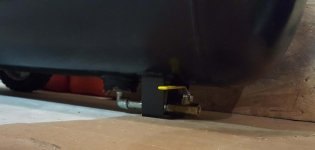
More importantly is being able to drain the tank. On my 20gal the petcock was very difficult to get to (and all chewed up from previous owner using pliers). Using some 1/4" pipe fittings and a ball valve makes it a million times easier to drain.
 

Attachments

  • 20160406_200837.jpg
    20160406_200837.jpg
    63.6 KB · Views: 36
OP
A

anythingyoucanimagine

Well-known member
Joined
Feb 6, 2019
Messages
425
Location
New England
I just googled that pump and realized I've owned a few of that model.

This is going to be a gift. My cousin's boyfriend (finally) proposed. I like the guy enough that if I can give him his own set of jack stands, compressor and floor jack... Maybe he'll come over just to drink my beer (and stop borrowing my tools).

Thanks for the drain idea, that's great. I'm going to do that to my compressor tomorrow. Yeah the Devilbiss runs fine (builds pressure very fast, sounds strong) but it didn't come with a filter or filter box.

On my list to do this 4th is run over to my buddy's house and use the metal brake I F'n lent him about a year ago... and make up a little cover for a filter box.

Yes I'm re-piping it. The original pipes are all dented and mangled. They will either get replaced with bent copper or I can sweat something and make it work in the space available.

The belt driven compressor platform off the tank is going to be transplanted over to an oil-less tank. I cut the top off the old tank and I'll bolt it to the new tank (I'll start a thread, lots of pictures), there will be no welding to the new/good tank. The over-all compressor is completely taken apart so yes, it will be re-piped.

I have benders and a couple flare tools. (copper & brake line stuff, not exhaust)
 

The Cobbler

Super Moderator
Staff member
Joined
Oct 24, 2013
Messages
25,980
Location
Niagara Region, Ontario, Canada
are you going to rig up an element filter or the traditional felt rectangle?
Funny, I got my compressor for the exact same thing , I want to mount it on my 33 gallon Craftsman oil-less compressor tank .
How long of a belt does yours have? I have a new one that was the wrong length . if it's fits, it's yours for shipping in a small flat rate box
 
Last edited:

EOC_Jason

Well-known member
Joined
Jun 25, 2012
Messages
11,388
Location
Bentonville, AR
On my list to do this 4th is run over to my buddy's house and use the metal brake I F'n lent him about a year ago... and make up a little cover for a filter box.

There were 2 styles for that pump. One uses a thick felt rectangle (you can get them on eBay cheap enough). The other style had a block-off plate in the same rectangular space with two threaded holes for a pair of screw-in air filters (they looked like solberg style).

You can look up part diagrams and see both styles. I've never actually come across any of those pumps with the screwed on air filters, only the felt ones.
 
OP
A

anythingyoucanimagine

Well-known member
Joined
Feb 6, 2019
Messages
425
Location
New England
are you going to rig up an element filter or the traditional felt rectangle?
Funny, I got my compressor for the exact same thing , I want to mount it on my 33 gallon Craftsman oil-less compressor tank .
How long of a belt does yours have? I have a new one that was the wrong length . if it's fits, it's yours for shipping in a small flat rate box

How are you going to do your swap? When our local Sears closed I bought several broken oil-less compressors thinking I could fix them and flip/sell them. Good thing I paid less than scrap for the lot because the motor shafts were all sheared/broken. I ended up with a bunch of 20 & 26 gal compressors with basically brand new tanks, bad motors and all the other stuff (regulators, pressure valves, etc.)

Neighbor is closing down his shop and moving, he came by to shoot the s*** (he knows my beer fridge is always full) and offered me the older 1980's compressor. I needed another compressor like I need a hole in the head but what the heck... it was free. Worst that happens is I put it out on the curb and the scrappers will take it away. He said "it works", was good compressor, they used it in his shop for years, etc.

Compressor he dropped off was an older 1980's belt driven horizontal 20-gal. When I turned it on it immediatley started hissing out of several pin holes in the bottom. I guess that's the only thing I don't really like about horizontal tanks. Would be nice if the base of the tank was curved or if the drain valve was at one end so you could use/keep the compressor on a little bit of a slope.

I have a new (manufactured in August 2015, was floor model at Sears, I bought it broken in 2017) horizontal 20-gal tank from oil-less compressor. I thought swapping everything over would be easy except the handle is different and everything on the newer tank is in different places. Some people are comfortable welding pressure vessels... I'm not.

I cut the flat plate off the rusty 20-gal horizontal belt-drive tank, laid it on top of the clean oil-less horizontal 20gal tank... And realized that the center hole from the belt drive doesn't line up with the two tank ports... and to slide the belt-drive mounting plate forward enough to make it work, stuff starts bumping into the tank handle (compressor head, pulley, belt guard, etc.).

Basically what I did was slide the belt drive mount plate back on the tank so the compressor would fit, then measure and raise up the mounting plate enough that I have clearance for all the valves and ports. That part was easy, the belt-drive mounting plate is 1/8" thick, I have a bunch of 1/8" metal, a bandsaw and a welder. All I did was weld on four tabs extending where the motor side of the plate was welded to the old tank so new mount plate sits up about 3-1/2" above the top/center of the horizontal tank.

But that still doesn't solve the problem that the mounting plate for the oil-less tanks is 7-3/4" by 7-3/8" at the back/wheel side of the tank and the belt drive mount plate is something like 21" x 9". Had to weld an extension to the front of the mount plate for an anti-vibration foot to steady the front (compressor side) of the plate. I'm not exactly sure how it's going to work (still making it) but it's coming along.

If your 33-gal is vertical it should be super easy. I'd use two lengths of something like 1" angle iron, drill and bolt it to the oil-less mounting bracket and then screw or weld the belt drive bracket to the angle iron. My biggest concern with a belt drive compressor/motor setup on a vertical oil-less mount plate would be balancing the weight. The belt drive oiled compressor is SO MUCH quieter and doesn't vibrate nearly as much as the Craftsman oil-less models (the 20-gal belt is way quieter than my 26-gal oil-less). I'd just want to balance the weight evenly enough that you don't end up stressing the welds on the 33-gal tank.

If your 33-gal is horizontal hopefully it'll be big enough that you don't run into all the issues I'm dealing with. But also part of what I'm doing is trying to make something that looks clean, nice, new, legit, etc. Can't really give someone a total hack-job, Frankenstein compressor as a gift.


Belt:
I'm not sure what size this is. It's a 6-groove flat belt. I looked it up quick and saw part numbers like CB-215, CB-222, etc. I assume the 222 and 215 are lengths. I was going to give him the compressor with a little bit of spare oil, original and spare belt. I'll find out what size I need and PM you. Thanks for the offer.

Air Filter:
I'm not sure. Haven't gotten that far, haven't really thought about it yet. I'm guessing that an element style would be better but looking at the head, I'm not sure how I'd rig up something like that.

I really like how the Emglo KU compressors have filter elements. Seems much simpler/easier than the ****-tastic Craftsman method.


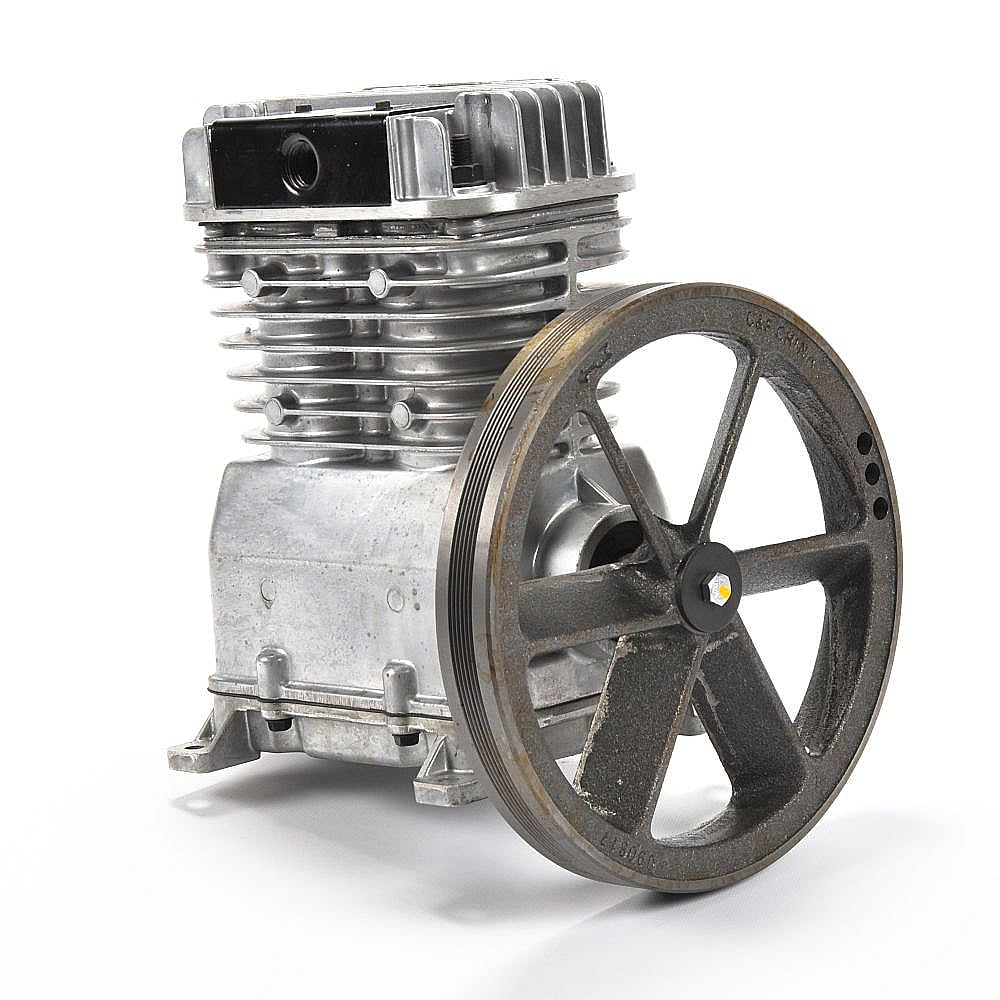
EMGLO-KU-Air-Compressor-Pump-USED.jpg


Wow this reply got long... What are you going to do about your air filter? I'd love a NPT threaded inlet port but the Devilbiss doesn't have that. I guess I could use much thicker gauge steel, goop on some RTV and weld on a NPT female port. Just not sure how strong the two screws are that are tapped into the head. Any other ideas? Interested to hear what you end up doing or what ideas you are thinking about.

There were 2 styles for that pump. One uses a thick felt rectangle (you can get them on eBay cheap enough). The other style had a block-off plate in the same rectangular space with two threaded holes for a pair of screw-in air filters (they looked like solberg style).

You can look up part diagrams and see both styles. I've never actually come across any of those pumps with the screwed on air filters, only the felt ones.

Heh. Interesting. I'll have to go back and edit my reply to The Cobbler. This compressor definitely has two threaded screws in the head right by where a filter would go. I assumed the screws were for a cover or something to help hold the felt in place.

OK this makes a little more sense. Thank you for the heads up. Yes, I have the two screws like this but don't have the filter element part, that was missing. Any suggestions? It seems they are all Devilbiss Z-D27194 compressors. I'll search for a blow up diagram. Are those solberg style filters decent? Can you still buy them? I don't mind making up something custom as long as it has a very easy to obtain, generic/universal filter. I don't want to be going through all this effort to give someone a headache down the road...


Interesting, just noticed that the belt pulley wheel in that pic I linked says something like C&F CHINA, has three balance holes drilled and looks like part number on it. Mine has a "265-102" and a much smaller "2.62" stamped on the back/compressor side then only an arrow and one drill/balance hole on the front side. All of my casting marks are from 1984 and 1985. Bottoms of pistons have a 5 where something looks like a date reference stamp.

PD_0009_919_Z-D27194
 
To avoid these ads, REGISTER NOW!
OP
A

anythingyoucanimagine

Well-known member
Joined
Feb 6, 2019
Messages
425
Location
New England
Solberg sells all their filters on Amazon.

Maybe I'm wrong. The picture I linked may be just a metal cover over the felt, NOT a solberg style filter. By solberg style you mean a mini version of an old round carburetor car air filter?

I don't see many of these compressors on Google or Google Images so hard to find pictures of the two different styles. I would have a hard time seeing how you could screw a can style filter onto the pump head I have.
 

EOC_Jason

Well-known member
Joined
Jun 25, 2012
Messages
11,388
Location
Bentonville, AR
Maybe I'm wrong. The picture I linked may be just a metal cover over the felt, NOT a solberg style filter. By solberg style you mean a mini version of an old round carburetor car air filter?

I don't see many of these compressors on Google or Google Images so hard to find pictures of the two different styles. I would have a hard time seeing how you could screw a can style filter onto the pump head I have.

Yes, the round metal can carb type...

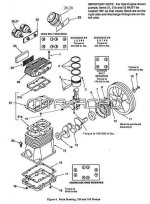
Attached is a parts diagram showing the 3 different style (I forgot there was also a single large can filter). I realize it's a *slightly* different pump style, but the air intake parts are basically the same.

I'm trying to think if mine with the felt filter always had the wire mesh screen behind it. I think on one of them it was missing.

Can't you just post a picture of your pump???
 

Attachments

  • Sanborn_165_pump_parts.jpg
    Sanborn_165_pump_parts.jpg
    52.3 KB · Views: 19

SGKent

Banned
Joined
Feb 12, 2010
Messages
1,959
Location
Citrus Heights CA
I have 2 craftsman made by devilbliss twin cylinder compressors. One is 125 psi, the other 150 psi. The difference is in the compression ratio between the units, and the pressure switch among other things like the motor and tank. The one that was 150 psi is the later one and it has the round paper filter. The older one has the felt filter. Both filters flow approximately the same air flow. I think the felt has more surface area but the paper filter has pleats that make up for it.

The felt filter is held in place by a plate and small braces cast into the head on the inside. The paper one has a metal plate instead of the felt that the filter screws into. There are kts to convert to the felt to a later filter but not backwards from the paper to the felt. I just had the heads off both units two weeks ago, and replaced gaskets and reeds as well as glass beaded the heads and reed plates to clean them up. I also lowered the PSI on the 150 unit by putting in a 125 psi switch. It runs so much cooler and I have no need for 150 PSI. Both are paired together following some instructions from kind folks here on the GF. I also have them converted to 240 V using factory wiring kits for 240 V instead of the 120 V they came with.
 

The Cobbler

Super Moderator
Staff member
Joined
Oct 24, 2013
Messages
25,980
Location
Niagara Region, Ontario, Canada
How are you going to do your swap?

wow, you get the award for the longest post in this thread! LOL
My plan is to cut off the mounting plate from the compressor & weld it to the mounting plate of the 33 gallon compressor. It's an upright tank.
The plumbing for the most part will all have to be re done. I havnt compared the 2 side by side yet to see what I'm in for , but I like to tinker with plumbing, and have benders etc so hopefully the job isn't too difficult.
I know what you mean about the filter, mine is the felt rectangle but I hope to rig up something to accept a threaded filter. my recolection is that I thought I could stiffen the assy by using a few head bolts if needed. they are small screws that hold that plate in for sure, Im thinking 8/32. some high temp good RTV might be enough too .
 

curiousB

Well-known member
Joined
Dec 15, 2011
Messages
143
Location
NW Chicago, IL
Run it, no load, and with fresh oil? Keep tank open so little to no back pressure on the pump.

That should polish up the cylinder walls.
 

The Cobbler

Super Moderator
Staff member
Joined
Oct 24, 2013
Messages
25,980
Location
Niagara Region, Ontario, Canada
Curiosity got to me, here's mine with the filter & cover removed. there's 4 holes in the corners that could be tapped to support a different plate. also the head bolt inside could easily be used to fasten a leg for more support .
Im thinking of a plate that lays in the bottom groove on the head and screwed with the original screws is probably good too.


compressor 001.jpg
 

Citation

Well-known member
Joined
Jan 20, 2016
Messages
3,225
Location
Indy
If you can set it up to use a screw on filter you can do a lot to reduce noise. The felt in head is basically zero noise reduction. I have a similar compressor and got an 8db noise reduction with a screw on "automotive" style air intake (the current setup CH would used on a similar compressor) plus a length of rubber tube stuck onto the intake of the automotive type filter. MUCH better than the no muffler option.
 

nafterclifen

Well-known member
Joined
Nov 22, 2014
Messages
525
Location
Poconos, PA
Been following this thread because I just got one of these compressors myself. It's so much better than my old oil-less pancake. If I can make it even quieter by replacing the felt air filter with a screw on air filter, I would LOVE it even more! Can anyone point me in the direction to where I can purchase a direct bolt-on kit?

EDIT: according to this video (
), the felt air filter is a newer design that can not be easily retrofitted to use the older style screw on air filters. I think someone mentioned this somewhere in this thread. Now I get it. Oh well.
 
Last edited:

SGKent

Banned
Joined
Feb 12, 2010
Messages
1,959
Location
Citrus Heights CA
according to this video (
), the felt air filter is a newer design that can not be easily retrofitted to use the older style screw on air filters. I think someone mentioned this somewhere in this thread. Now I get it. Oh well.

The video that was shown above that did not work was for a SANBORN compressor. Different design. This post is for the DEVILBLISS built compressors like Craftsman, Porter Cable etc sold.

The late DEVILBLISS unit has a steel plate that is drilled and threaded for the screw on filter housing. Behind it there is a felt filter with a hole in it. The felt seals the plate and the hole in the plate and the hole in the new felt align.

View media item 94017
Parts are individually:

metal plate that replaces top plate and holds Solberg filter AC-0322
example:http://www.allpartsinc.com/filter-plate-heavy-duty-for-ac-0330-ac-0322.html

Solberg filter AC-0330
example:http://www.allpartsinc.com/filter-assembly-heavy-duty-metal-with-ac-0330.html

Felt seal behind plate AC-0333
example:http://www.allpartsinc.com/filter-felt-ac-0333.html

Uses the same screws that held the original top plate on that holds felt filter.

This video at 3:01 into it the guy changes the felt filter. The parts listed above in this thread replace that filter and the top plate if you have this design.
 
Last edited:
OP
A

anythingyoucanimagine

Well-known member
Joined
Feb 6, 2019
Messages
425
Location
New England
The video that was shown above that did not work was for a SANBORN compressor. Different design. This post is for the DEVILBLISS built compressors like Craftsman, Porter Cable etc sold.

The late DEVILBLISS unit has a steel plate that is drilled and threaded for the screw on filter housing. Behind it there is a felt filter with a hole in it. The felt seals the plate and the hole in the plate and the hole in the new felt align.

View media item 94017
Parts are individually:

metal plate that replaces top plate and holds Solberg filter AC-0322
example:http://www.allpartsinc.com/filter-plate-heavy-duty-for-ac-0330-ac-0322.html

Solberg filter AC-0330
example:http://www.allpartsinc.com/filter-assembly-heavy-duty-metal-with-ac-0330.html

Felt seal behind plate AC-0333
example:http://www.allpartsinc.com/filter-felt-ac-0333.html

Uses the same screws that held the original top plate on that holds felt filter.

This video at 3:01 into it the guy changes the felt filter. The parts listed above in this thread replace that filter and the top plate if you have this design.

Thank you SGKent! Seeing a picture of the metal plate makes everything clear as mud. A picture of mine is attached. I've got the later style head. Thanks again.

Cobbler, I'm not paying $50 for a bracket. I'd rather burn $75 in wire/gas and spend three weeks building it myself :lol_hitti

My plate opening/space is roughly 59.32, 59.21 mm deep by 113.92, prob 114mm wide and 39.96mm, prob 40mm high/tall. (sorry for mm not inches)

I have a bender. Get me measurements on yours and I'll make up a couple. If anyone has an opinion on bending aluminum, drilling and using threaded fittings/washers vs. welding a steel threaded bung to steel bracket, I'm all ears.

Cobbler, do you have a drill press or access to a bender? This is easy. Bend Al/steel to 90, drill some holes, thread in fittings (either weld in a steel bung or use brass with a nut & washer) If you don't have a bender or drill press post up some numbers for what the old style head sizes are (so next guy who Googles knows) and I'll make something that'll work.

If anyone else has a Devilbiss compressor and wants this bracket I'm happy to make up several one-off parts. Just know that I'm a homeowner/hobbyist with diapers to change and a desk job that pays the bills. I'm happy to make 3-4, maybe 10 parts but anything over that will start to be more hassle than it's worth for me.

edit: my picture didn't attach. Here's a link:

https://imgur.com/4fj3WEI
 
Last edited:

Citation

Well-known member
Joined
Jan 20, 2016
Messages
3,225
Location
Indy
Thank you SGKent! Seeing a picture of the metal plate makes everything clear as mud. A picture of mine is attached. I've got the later style head. Thanks again.

Cobbler, I'm not paying $50 for a bracket. I'd rather burn $75 in wire/gas and spend three weeks building it myself :lol_hitti

My plate opening/space is roughly 59.32, 59.21 mm deep by 113.92, prob 114mm wide and 39.96mm, prob 40mm high/tall. (sorry for mm not inches)

I have a bender. Get me measurements on yours and I'll make up a couple. If anyone has an opinion on bending aluminum, drilling and using threaded fittings/washers vs. welding a steel threaded bung to steel bracket, I'm all ears.

Cobbler, do you have a drill press or access to a bender? This is easy. Bend Al/steel to 90, drill some holes, thread in fittings (either weld in a steel bung or use brass with a nut & washer) If you don't have a bender or drill press post up some numbers for what the old style head sizes are (so next guy who Googles knows) and I'll make something that'll work.

If anyone else has a Devilbiss compressor and wants this bracket I'm happy to make up several one-off parts. Just know that I'm a homeowner/hobbyist with diapers to change and a desk job that pays the bills. I'm happy to make 3-4, maybe 10 parts but anything over that will start to be more hassle than it's worth for me.

edit: my picture didn't attach. Here's a link:

https://imgur.com/4fj3WEI

I would think you could fold some sheet metal or get an angle stock, drill holes to attach two the two bolts on the towers, drill/tap a hole for the filter and seal the gaps with RTV. You don't have to make it exact, just make sure the gap filler can handle high heat.

Also, rather than a Solenberg filter, I used one like below (not the exact model) + about 14" of rubber hose fit around the OD of the air intake to the filter housing.
https://www.amazon.com/dp/B008JVM0F0/?tag=atomicindus08-20
 

nafterclifen

Well-known member
Joined
Nov 22, 2014
Messages
525
Location
Poconos, PA
The video that was shown above that did not work was for a SANBORN compressor. Different design. This post is for the DEVILBLISS built compressors like Craftsman, Porter Cable etc sold.

The late DEVILBLISS unit has a steel plate that is drilled and threaded for the screw on filter housing. Behind it there is a felt filter with a hole in it. The felt seals the plate and the hole in the plate and the hole in the new felt align.

View media item 94017
Parts are individually:

metal plate that replaces top plate and holds Solberg filter AC-0322
example:http://www.allpartsinc.com/filter-plate-heavy-duty-for-ac-0330-ac-0322.html

Solberg filter AC-0330
example:http://www.allpartsinc.com/filter-assembly-heavy-duty-metal-with-ac-0330.html

Felt seal behind plate AC-0333
example:http://www.allpartsinc.com/filter-felt-ac-0333.html

Uses the same screws that held the original top plate on that holds felt filter.

This video at 3:01 into it the guy changes the felt filter. The parts listed above in this thread replace that filter and the top plate if you have this design.

Bless you, kind sir! My compressor is a 1984 Sears/Craftsman made by Devilbiss. Thank you so much for posting these links. They are the exact parts I was looking for. A bit pricey though.
 

nafterclifen

Well-known member
Joined
Nov 22, 2014
Messages
525
Location
Poconos, PA
If anyone else has a Devilbiss compressor and wants this bracket I'm happy to make up several one-off parts. Just know that I'm a homeowner/hobbyist with diapers to change and a desk job that pays the bills. I'm happy to make 3-4, maybe 10 parts but anything over that will start to be more hassle than it's worth for me.

I'd be interested in one. My measurements are the same as yours. The casting is slightly different though. See attached pic.
 

Attachments

  • IMG_0140.jpg
    IMG_0140.jpg
    80.1 KB · Views: 14

The Cobbler

Super Moderator
Staff member
Joined
Oct 24, 2013
Messages
25,980
Location
Niagara Region, Ontario, Canada
Cobbler, I'm not paying $50 for a bracket. I'd rather burn $75 in wire/gas and spend three weeks building it myself :lol_hitti

My plate opening/space is roughly 59.32, 59.21 mm deep by 113.92, prob 114mm wide and 39.96mm, prob 40mm high/tall. (sorry for mm not inches)
]

I measured mine roughly and I get 2.25" ( 57mm)deep, and 2.5"( 63.5mm) high, I didn't measure the length .
so we do see variations it looks like .
But easy enough to make something up, thanks for the offer
 

SGKent

Banned
Joined
Feb 12, 2010
Messages
1,959
Location
Citrus Heights CA
the angled part is somewhat thin but thick where the filter screws in. It is in how it was stamped. To duplicate one would have to weld a ring with threads on the inside of the hole where the filter threads. Angle iron would be too thick. The size of the filter will be limited by the layout of the actual compressor - how close the pipes are, etc.. If someone charged for their time it would cost more to make it than buy one. An hour's time in any trade these days is worth $100. Get the metal and ring, cut the metal to size, make the bend if you get it right the first time, drill the hole and tig the ring, clean up the piece, anodize or paint etc.. Stainless or aluminum would be preferred.

The filter housing can be found for a little less than the link I provided because they are common these days. I forget what the pipe size is where they screw in - want to say 3/4 or 7/8.
 
Last edited:

The Cobbler

Super Moderator
Staff member
Joined
Oct 24, 2013
Messages
25,980
Location
Niagara Region, Ontario, Canada
I measured mine roughly and I get 2.25" ( 57mm)deep, and 2.5"( 63.5mm) high, I didn't measure the length .
so we do see variations it looks like .
But easy enough to make something up, thanks for the offer

well I be damned, I had another look today & I must have been using a bad ruler! LOL or bad glasses! LOL
today's measurements are 2-1/4 deep(top side) and 1-9/16 high(front side)
more like the OP size. I also found laying a pc of 2-1/2 thin wall square tube that will make a nice filter plate .:lol_hitti
 
To avoid these ads, REGISTER NOW!
Top Bottom