To avoid these ads, REGISTER NOW!

Redneck HotTub Build Thread

ForceFed70

Well-known member
Joined
Apr 27, 2010
Messages
3,441
Location
BC, Canada
Off Grid HotTub Build - Lots of pics

Hello everyone and welcome to my redneck HotTub build thread. :rocker:

Background:
My family owns a rustic cabin up at a mountain lake in the woods. Being that it's a mountain lake in Canada it's often quite cold up there! I want to build a hot tub for use while we've visiting the cabin. The cabin is used only about 1 weekend a month in the summer and tub will be drained and filled each trip.

About this build:
I'm sorry but this thread is going to drag on for nearly a year. My goal is to have this tub up in running by Fall of 2017 - about 10 months from now. There is a project I must complete (Install new gas water pump, water line, water reservoir, and plumb the cabin) before the tub can be installed. It's winter and no work can be done at the cabin until May. Plus I'm a family man with 2 small boys - it's difficult to find shop time nowadays. All of this adds up to a long timeline.

Challenges:
1)The cabin is difficult to access. There is no road leading to the cabin. You must drive up a fairly rough forest service road until you reach the lake, then take a fishing boat across to the cabin. This is a time consuming exercise and makes it impossible to transport a traditional hot tub short of hiring a helicopter or something.
2) No power at the cabin. The cabin does have a basic 12V solar power system for running lights and charging electronics, but nothing robust enough to run a pump.
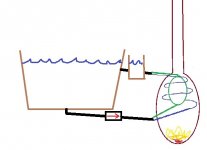
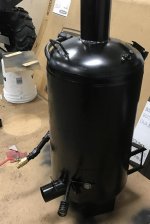
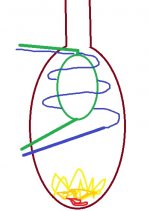
3) No treated water at the cabin. We pack in all drinking water. Bathing and dish water currently comes from the lake. Hot tub will need to be filled with lakewater pumped up via a gas powered water pump.

Goals:
1) Big enough to fit my family of 4 (2 small kids) if we don't mind being cozy.
2) Big enough so I don't feel weird sharing the tub with another dude.
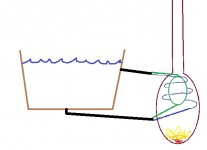
3) Able to heat the water in a day. If I fill it in the morning, I want to be able to use it that evening.

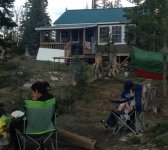
Here's a picture of the cabin. Plan is to put the tub to the immediate left of the deck. I'll likely take out a section of the railing there so you can access the tub directly from the deck. That stump is going to have to go..

attachment.php
 

Attachments

  • cabin1.jpg
    cabin1.jpg
    112.1 KB · Views: 1,891
Last edited:
To avoid these ads, REGISTER NOW!
OP
F

ForceFed70

Well-known member
Joined
Apr 27, 2010
Messages
3,441
Location
BC, Canada
This post reserved for cost tracking. As I update the thread, I will edit this post to include costs.

Costs are in Canadian dollars and include any taxes, shipping, etc. Things cost more in Canada and not just due to the exchange rate. For you americans reading this, your cost would likely be between 1/2 to 2/3 of the cost shown below.


Boiler costs:
- Compressor tank, steel - $60
- 40' of 3/4" soft copper (Type K) - $140
- Pipe fittings - $50
- Brass ball valve - $20

Tub Costs:
- Rubbermaid 300gallon stock tank - $405
- 2 x 1" brass ball valves - $55
- Tub surround materials (wood, paint, insulation) - $250
 
Last edited:
OP
F

ForceFed70

Well-known member
Joined
Apr 27, 2010
Messages
3,441
Location
BC, Canada
While I can't access the cabin until Spring, there is some work I can do ahead of time. Like build the wood fired boiler!

Building the boiler is going to be a challenge for 4 reasons.
1) I want to heat a lot of very cold water in a rather short amount of time. The boiler needs to transfer a LOT of heat.
2) I don't have power for a pump! Water needs to self-circulate through the boiler using the properties of thermosiphon effect. This requires careful design. Lines must be carefully sloped - If air is trapped in the lines/boiler it won't work. Also the lines must allow for easy/high flow as the thermosiphon effect isn't very strong. https://en.wikipedia.org/wiki/Thermosiphon
3) In the winter it's likely that the boiler will freeze overnight when the fire goes out. I need to be able to easily drain the boiler without draining the tub so that it can be drained overnight.
4) Boiler need to be fairly light weight so that I can carry it from fishing boat to cabin, etc.

All of these challenges are unique to my situation and probably wouldn't apply if you were doing this in your back yard.

Here's a couple of pictures showing the intended design:
attachment.php

attachment.php


The boiler is designed with 2 "heating loops". The blue line represents a coil of copper tubing. The Green represents steel piping leading to a steel reservoir in the center.

You may be scratching your head at this design. The reason I chose this design is based on the materials I'm working with and a desire to maximize efficiency. The tank in the center's main purpose is to divert hot exhaust gasses around the tank and through the copper coil. But, if I'm going to have such a diverter in there I might as well take advantage of the situation and run water through it as well to maximize heat transfer.
 

Attachments

  • boiler drawing.jpg
    boiler drawing.jpg
    45.9 KB · Views: 1,840
  • tub drawing.jpg
    tub drawing.jpg
    36 KB · Views: 1,831
Last edited:
OP
F

ForceFed70

Well-known member
Joined
Apr 27, 2010
Messages
3,441
Location
BC, Canada
Here's a pic of the raw materials.

The tall tank doesn't end up getting used (for boiler material anyway). This is an old tank I had laying around and was going to be my boiler casing until I pulled it out of the weeds and realized it was too narrow.

The blue compressor tank will be the main body of the boiler. I picked it up from the local metal recycler for $40. It came with some bonus air pressure gauges and an air pressure regulator that I'll keep for a rainy day.

The pink steel tank is an empty helium tank. It came as part of a "party balloon kit" from Costco. My wife LOVES the fact I used it for this build instead of throwing in the garbage.

attachment.php
 

Attachments

  • Materials-resized.JPG
    Materials-resized.JPG
    108.3 KB · Views: 1,808
OP
F

ForceFed70

Well-known member
Joined
Apr 27, 2010
Messages
3,441
Location
BC, Canada
1st step - preparing the boiler body:
- Remove all compressor fittings, air gauges, etc.
- Cut sheetmetal off the top that compressor motor used to be bolted to.
- Cut top off of tank.
- Build hinge for top. To remain openable for easy access.

attachment.php
 

Attachments

  • Tank with top cut off.jpg
    Tank with top cut off.jpg
    85 KB · Views: 1,797
OP
F

ForceFed70

Well-known member
Joined
Apr 27, 2010
Messages
3,441
Location
BC, Canada
Here's a picture showing the forming of the copper coil.

Managed for find this length in my local online classifieds and met a nice old couple in the process. Total length used was right at 40'

I had planned to fill the coil with water then freeze before bending. Unfortunately I couldn't fit the coil in the deepfreeze and the weather has been unseasonably warm outside. Luckily, I was able to make due without. The radius of the bend wasn't too tight and only resulted in a slight ovaling of the tube.

For anyone considering doing this themselves. 3/4" type K copper was difficult to work with. It's hard to bend by hand. I'd say it's at the limit of what is usable for something like this. If your situation permits, consider using smaller diameter, or the other type (Type L?) that's a little thinner. Forming this coil wasn't too bad, but bending it later to line up with fittings in the boiler was difficult.

attachment.php
 

Attachments

  • Shaping Copper Coil.jpg
    Shaping Copper Coil.jpg
    76.8 KB · Views: 1,789
Last edited:
OP
F

ForceFed70

Well-known member
Joined
Apr 27, 2010
Messages
3,441
Location
BC, Canada
Here's the inner steel insert all welded up and ready for fitment inside.

All 3/4" black iron piping and fittings. I welded them to prevent leaks.

attachment.php
 

Attachments

  • Boiler Steel Insert.jpg
    Boiler Steel Insert.jpg
    118.5 KB · Views: 1,789
OP
F

ForceFed70

Well-known member
Joined
Apr 27, 2010
Messages
3,441
Location
BC, Canada
Here's a picture from the top showing both heat exchanger loops installed and fittings connected. Some temporary reducers attached to output for pressure test.

Here I think you'll see the idea behind the design with the center tank intended to divert hot stove gasses through the copper coil.

attachment.php
 

Attachments

  • Boiler Inside.jpg
    Boiler Inside.jpg
    115.8 KB · Views: 1,782
OP
F

ForceFed70

Well-known member
Joined
Apr 27, 2010
Messages
3,441
Location
BC, Canada
Alright. Time to move on to firebox area.

Here's a picture of the door I built:
- Hinge made using 1" angle iron, a spare piece of pipe, and a spare bolt. Bolt will be flipped later when I re-attach the door after painting.
- Latch is also 1" angle iron, notched so I can partially open the door for improved draft.
- Handle is 1" flat stock and pivots on the bolt holding it to the door. Spare piece of pipe and an old 351W valve spring are also used in construction.

attachment.php
 

Attachments

  • Boiler Firebox door hinge handle and latch.jpg
    Boiler Firebox door hinge handle and latch.jpg
    77.5 KB · Views: 1,765
OP
F

ForceFed70

Well-known member
Joined
Apr 27, 2010
Messages
3,441
Location
BC, Canada
Door open showing the firebox. Could be larger, but it'll do.

attachment.php
 

Attachments

  • Boiler Firebox Door Open.jpg
    Boiler Firebox Door Open.jpg
    68.1 KB · Views: 1,767

Shiftless

Well-known member
Joined
Mar 9, 2014
Messages
14,463
Location
East Bay SFO
I admire your ingenuity and wish you good luck with your project.
I assume your tub might be something at least 5 feet in diameter and 2 feet deep. That translates to about 300 gallons of water. If the lake water is at 50 F.and you want to heat it to 100 F., that would require about 120,000 BTUs.
That is a LOT of heat energy.
If I were you, I would try out the heater under different conditions before hauling it to the cabin. But you probably already thought of that. :)

For Cedar wood, the heat content is about 6000 BTU per pound. Sounds great so far because that calculates to only needing 120,000 / 6000 or 20 pounds of wood.
But the big unknown is the efficiency of your heater. What percentage of the heat goes into your water and what percentage is lost up the chimney?
 
Last edited:
OP
F

ForceFed70

Well-known member
Joined
Apr 27, 2010
Messages
3,441
Location
BC, Canada
Fresh air damper.

This is built using an old piece of 3" exhaust pipe. I drilled a hole through the center and welded a nut over 1 of the holes. A bolt goes through the pipe and threads into the nut. The section of tank I cutout is repurposed as the "flapper" and is welded to the bolt.

Not shown - a small piece of rod will be welded onto the bolt head to act as a handle for adjusting the flapper position.

attachment.php
 

Attachments

  • Damper.jpg
    Damper.jpg
    44.2 KB · Views: 1,751
OP
F

ForceFed70

Well-known member
Joined
Apr 27, 2010
Messages
3,441
Location
BC, Canada
And here's where we are at today!

This is a picture of the almost finished boiler ready for a test run. Lid has been finished with a handle for opening and the stovepipe opening.

I was unable to peel the stickers from the tank. I'm hoping the heat will soften the glue and I'll be able to peel them off once lit.

I'm hoping the test run will also burn off the paint so I can repaint with a high temp BBQ paint. However, the boiler will be wrapped in a layer of fireproof insulation and you won't see much of the paint job anyway.

Wish me luck on the test run today!

attachment.php
 

Attachments

  • Boiler ready for test.jpg
    Boiler ready for test.jpg
    125.4 KB · Views: 1,753
Last edited:
OP
F

ForceFed70

Well-known member
Joined
Apr 27, 2010
Messages
3,441
Location
BC, Canada
I admire your ingenuity and wish you good luck with your project.
I assume your tub might be something at least 5 feet in diameter and 2 feet deep. That translates to about 300 gallons of water. If the lake water is at 50 F.and you want to heat it to 100 F., that would require about 120,000 BTUs.
That is a LOT of heat energy.
If I were you, I would try out the heater under different conditions before hauling it to the cabin. But you probably already thought of that. :)

Thank-you.

That's the exact dimension I'm planning on, and 300 gallons is exactly what I'm planning for. Impressive!

Yes, I've got the same concerns which is why today has been identified as "Test run day". I don't have the tub, but I can do some testing using a smaller container and do some math.

From research I've done online, people have been successful in heating smaller tubs with much less efficient boiler designs and no insulation around their tubs. I'm hoping that my more efficient boiler design and the tub insulation will make heating 300 gallons possible.

I'll let you know the results of the testing this evening. :fingersx:
 

Shiftless

Well-known member
Joined
Mar 9, 2014
Messages
14,463
Location
East Bay SFO
FF
Great minds think alike! Best wishes on your test run. Here's to you. :beer:

BTW, once you get that heater up and running, I would be really careful about sitting near the inlet. I would guess that the water coming in from your heater would be nearly boiling hot.

Regarding insulation, most of the heat loss will be upward. Focus your energy and $$ on a tight fitting high R value top to use while the tub is heating up. My electrically heated hot tub (30 amp, 240 V.) has a 3 inch thick closed cell foam cover with flaps hanging down on the edges to help seal off air leaks.
 
Last edited:

Streetbu

Well-known member
Joined
Jan 7, 2014
Messages
3,082
Location
Central NY
The engineering side of me really enjoys seeing a different way to build a mouse trap. The OCD side of me says but if you just did it MY way it would have all of these benefits LOL good luck and I'm interested to see how it turns out!
 

Hoops1

Member
Joined
Mar 1, 2014
Messages
13
great idea !!i will be following this to see how it works maybe build something like it for my pool next summer ( not looking for hot water ) just to take the chill out
 
OP
F

ForceFed70

Well-known member
Joined
Apr 27, 2010
Messages
3,441
Location
BC, Canada
The engineering side of me really enjoys seeing a different way to build a mouse trap. The OCD side of me says but if you just did it MY way it would have all of these benefits LOL good luck and I'm interested to see how it turns out!

Lol. Thanks!

Requirements for the thermosiphon effect resulted in a lot of compromise on design. Add to that a desire to keep cost and amount of work/effort down also resulted in compromise.

I'm certainly no engineer tho and always appreciate feedback on how it could be better. Don't feel a need to hold back!
 
To avoid these ads, REGISTER NOW!
OP
F

ForceFed70

Well-known member
Joined
Apr 27, 2010
Messages
3,441
Location
BC, Canada
great idea !!i will be following this to see how it works maybe build something like it for my pool next summer ( not looking for hot water ) just to take the chill out

Thanks. A lot of the internet research I did leading up to this build came from people building their own wood fired pool heaters!
 

Shiftless

Well-known member
Joined
Mar 9, 2014
Messages
14,463
Location
East Bay SFO
Thanks. A lot of the internet research I did leading up to this build came from people building their own wood fired pool heaters!

Of course the nice thing about wood fired pool heaters is that a guy almost always has an electric pump to circulate the water at an acceptable rate. The thermosiphon effect will definately work, but I don't have a clue about the gallons per minute flow rate for your particular design.

To heat your 300 gallons up by 50 degrees in 10 hours you need to have 12,000 BTU per hour average input from your heater. That is more or less the same as a gas stove burner cranked all the way up to the highest setting. So you need to have a decent flow rate to avoid boiling the water while it is going through the heater.
 
Last edited:
OP
F

ForceFed70

Well-known member
Joined
Apr 27, 2010
Messages
3,441
Location
BC, Canada
Just fished up for the day. Boiler worked perfectly! :rocker:

So stoked! Unfortunately, my testing was an absolute disaster. I didn't get to record nearly as much data as I wanted, and no pictures :sad:

I should have realized. A boiler big enough to heat 300 gallons is going to heat a smaller test tank quickly! Unfortunately, I wasn't really prepared for that.

However, I did manage to take enough measurements to be able to provide the summary data below:
- Time from 1st lighting the paper for the fire in the boiler, to heating the 5 gallon primer tank, to then heating the 20 gallon tank from 50* to 100* = 13minutes! 13 minutes to heat 25 gallons of water from 50* to 100* and that's counting the time to lite the boiler! :beer:
- 6 minutes after 1st lighting the fire, I recorded 77* water going into the boiler and 110* coming out (2gpm)for a whopping 33,000BTU/hr! It's at this point that the fire was burning it's hottest as I didn't add any additional wood since shortly after lighting.
- 30 minutes after 1st lighting the fire, the fire has burnt down to just coals. Heat output is calculated at 8000BTU/hr.
- It was cold outside, about 40* It wasn't until about 50 minutes after lighting the fire, with a very low bed of coals remaining that the water temperature in the 20gallon tank peaked at 128* Heat output required to maintain this temperature was measured at 3000BTU/hr.

I plan to wrap the boiler with fireproof insulation to improve efficiency. I believe that with the insulation and a little more time to warm up the boiler/fire I bet I'll be able to get a peak of 40,000BTU/hr out of it!:shocking:
 
Last edited:
OP
F

ForceFed70

Well-known member
Joined
Apr 27, 2010
Messages
3,441
Location
BC, Canada
Time for some math. It takes 8.33 BTU to heat 1 gallon of water 1*

So to heat 300 gallons from 50* to 100* would be 8.33 x 300 x 50 = 125,000BTU

40,000BTH/hr output of the boiler would mean a little over 3 hours for 125,000BTU.

However, even tho the tub will be insulated, there will be heat loss. I have no idea how to calculate the impact of that heat loss, but I'm pretty confident I'm well within my goal of heating the tub in 8hrs or less. Likely it'll take 4 or 5hrs!
 
Last edited:

ADSR

Well-known member
Joined
Jan 12, 2013
Messages
10,713
wow! very cool thread! Can't wait to see this in action!
 
OP
F

ForceFed70

Well-known member
Joined
Apr 27, 2010
Messages
3,441
Location
BC, Canada
To heat your 300 gallons up by 50 degrees in 10 hours you need to have 12,000 BTU per hour average input from your heater. That is more or less the same as a gas stove burner cranked all the way up to the highest setting. So you need to have a decent flow rate to avoid boiling the water while it is going through the heater.

Something I've also been considering! Now that I know the maximum BTU output of my boiler (40,000BTU/hr) we can do some math to better understand.

Let's consider a worst case scenario Inlet temp is 100*, Outlet is 200* and boiler is turned to full output. According to this calculator: http://www.advantageengineering.com...&Outlet=200&Submit=Submit&BTU=4,000&Tons=0.33

I need to maintain 0.8 gallons per minute of flow to avoid boiling (with a small safety margin). All my testing was done with a small pond pump (2gpm - was lots of flow). I have no idea what flow rate I'll see with thermosiphon effect but 0.8gpm seems in the realm of possibility. The lines to and from the tub are 1", with each boiler loop being 3/4".

However, I'm going to investigate small 12VDC pumps that I could use when the boiler is at full output just in case.
 
Last edited:

Shiftless

Well-known member
Joined
Mar 9, 2014
Messages
14,463
Location
East Bay SFO
Something I've also been considering! Now that I know the maximum BTU output of my boiler (40,000BTU/hr) we can do some math to better understand.

Let's consider a worst case scenario Inlet temp is 100*, Outlet is 200* and boiler is turned to full output. According to this calculator: http://www.advantageengineering.com...&Outlet=200&Submit=Submit&BTU=4,000&Tons=0.33

I need to maintain 0.8 gallons per minute of flow to avoid boiling (with a small safety margin). I have no idea what flow rate I'll see with thermosiphon effect but 0.8gpm seems in the realm of possibility. The lines to and from the tub are 1", with each boiler loop being 3/4".

However, I'm going to investigate small 12VDC pumps that I could use when the boiler is at full output just in case.

Glad to see that you are considering that factor. Is there any way flow could get blocked while the heat was on? if so, you need a pressure relief valve to avoid explosions.
 
OP
F

ForceFed70

Well-known member
Joined
Apr 27, 2010
Messages
3,441
Location
BC, Canada
Glad to see that you are considering that factor. Is there any way flow could get blocked while the heat was on? if so, you need a pressure relief valve to avoid explosions.

Yes, something that has me concerned as well. A rag or something could prevent flow. I considered a relief valve but I don't think it'll help. Both ends of the boiler empty to the tub with no backpressure and I really doubt it'll build up enough pressure in the boiler to open a relief valve prior to spraying everyone in the tub with steam.

I have 2 idea so far to help avoid such a situation:

1) I hope to build some sort of protective screen over both inlet and outlet of tub. To protect against both clogs and burns.
2) When I connect the tub I plan to place an upwards facing T at the boiler on the hot side output with a length of pipe just above max tub water height. The idea being that any vapor would take this route up into atmosphere rather than the more restrictive path of pushing water ahead of it into the tub.

Burns/safety has been my biggest concern all along with this project. Especially with 3yo and 6yo boys running around. Would love to hear any ideas on other steps that could be taken.
 

walrus

Well-known member
Joined
Nov 12, 2008
Messages
11,673
Location
Maine
Yes, something that has me concerned as well. A rag or something could prevent flow. I considered a relief valve but I don't think it'll help. Both ends of the boiler empty to the tub with no backpressure and I really doubt it'll build up enough pressure in the boiler to open a relief valve prior to spraying everyone in the tub with steam.

I have 2 idea so far to help avoid such a situation:

1) I hope to build some sort of protective screen over both inlet and outlet of tub. To protect against both clogs and burns.
2) When I connect the tub I plan to place an upwards facing T at the boiler on the hot side output with a length of pipe just above max tub water height. The idea being that any vapor would take this route up into atmosphere rather than the more restrictive path of pushing water ahead of it into the tub.

Burns/safety has been my biggest concern all along with this project. Especially with 3yo and 6yo boys running around. Would love to hear any ideas on other steps that could be taken.
A rag could certainly plug a screen on the inlet, you are building a bomb without some kind of pressure relief. Take it from a guy who knows Prof Richard C Hill the king of wood fired boilers. Google him
 

tyme2par4

Well-known member
Joined
May 16, 2016
Messages
571
Location
NH
My great Uncle used to have a wood fired hot tub at one of his camps.
Rather than use a separate boiler, it was simply a sealed wood stove that sat in the water. There was a door on top to feed wood and air, and a chimney, and that's it. No piping or pumping needed. And from what I've heard, it heated up pretty fast.
 

Brian_WK

Well-known member
Joined
Jun 30, 2015
Messages
1,177
Location
NE South Dakota
A rag could certainly plug a screen on the inlet, you are building a bomb without some kind of pressure relief. Take it from a guy who knows Prof Richard C Hill the king of wood fired boilers. Google him

How could this possibly ever be a bomb? A rag on the inlet would just stop the siphon effect the top would still be open. And with the T in the top tube on the outside of the hot tub with a stand pipe on it. A plugged bottom tube would only cause a "boiling Pot" situation the steam, the pressure, would be allowed to escape. It just wouldn't heat the hot tub any more as the siphon would stop circulating.

Brian
 
OP
F

ForceFed70

Well-known member
Joined
Apr 27, 2010
Messages
3,441
Location
BC, Canada
My great Uncle used to have a wood fired hot tub at one of his camps.
Rather than use a separate boiler, it was simply a sealed wood stove that sat in the water. There was a door on top to feed wood and air, and a chimney, and that's it. No piping or pumping needed. And from what I've heard, it heated up pretty fast.


Thank you for the ideas!

Yes, I considered that design but decided not to use it for 3 reasons:

1) I have young kids that'll be playing in there and don't like the idea of them playing near a stove (even with a guard/fence).

2) The fire is awkward to lite and feed. Often you end up with bark and dirt in your water.

3) This design requires a large tub with a lot more water. I didn't want to go that large.
 
OP
F

ForceFed70

Well-known member
Joined
Apr 27, 2010
Messages
3,441
Location
BC, Canada
After speaking with my father today, I've changed the tub design. I don't know how Dad knows this stuff, but the guy is a wealth of knowledge. I explained my concerns to him about safety and not enough flow. His recommendation is great and is an improvement on my idea of putting a T at the boiler output.

The changes are 2 fold:
1) Place a 1-way valve at the tub outlet allowing water to only flow into the boiler. For safety and to assist with "pumping action" of water.
2) Instead of a T at the boiler output, place what I'm going to call a "surge tank" into the loop. This small tank (I'm thinking 5 gallon) will sit at same elevation as the tub but will be open to atmosphere. That way any steam or bursts of hot water or whatever may come out of the boiler will 1st go into this tank before entering the main tank via gravity.

attachment.php


The changes will allow for the water to safely boil in the boiler if required and if it does boil, the 1 way valve and pressure pulses caused by the boiling will act like a pump to draw water through the system and cool things down. Plus, it still allows for thermosiphon to work!

It adds some complexity and cost to the build but the safety improvement alone is worth it.
 

Attachments

  • Improved tub drawing.jpg
    Improved tub drawing.jpg
    38.5 KB · Views: 967
Last edited:

brewchief

Well-known member
Joined
Sep 20, 2008
Messages
2,370
Location
Michigan
With steel and iron exposed to the water you will get some rust, I would pipe it so when you fill it you can flush the boiler diverting any rusty water away from the tub for the first few minutes.


How about putting the boiler in a sauna for a dual purpose heater?
 
OP
F

ForceFed70

Well-known member
Joined
Apr 27, 2010
Messages
3,441
Location
BC, Canada
All cleaned up with a fresh coat of paint. Ready for install at the cabin.

attachment.php


It burnt really well for my test. I was worried that smoke would leak through the lid and other gaps but that only happened for a minute or so until the fire built up a little heat. After that the only smoke came out of the stack which I had extended to 8' high with a length of slip-over stovepipe.
 

Attachments

  • Finished Boiler - Painted.jpg
    Finished Boiler - Painted.jpg
    70.7 KB · Views: 964
OP
F

ForceFed70

Well-known member
Joined
Apr 27, 2010
Messages
3,441
Location
BC, Canada
With steel and iron exposed to the water you will get some rust, I would pipe it so when you fill it you can flush the boiler diverting any rusty water away from the tub for the first few minutes.


How about putting the boiler in a sauna for a dual purpose heater?

Good point! That valve at the bottom of the boiler is intended as a drain valve for the whole system. I'll see If I can find a way to feed water into the boiler from the output side to backflush before filling.

The boiler transfers heat really well and I plan to wrap it in insulation to improve efficiency. It's surprising how little heat it throws. I don't know if I could dual purpose it in a practical way but I'll give it some thought.

Thank you for your input!:beer:
 

Muzzy

Well-known member
Joined
Jun 20, 2015
Messages
335
Location
Northeast PA
Your dad beat me to it with the "surge tank" to flash off any steam.

Have you considered piping the return in a perforated pipe around the perimeter of the tub to diffuse the hot water? You could even be elaborate and line the one side of it with foam pool-noodle to have a cushy back rest.
 
OP
F

ForceFed70

Well-known member
Joined
Apr 27, 2010
Messages
3,441
Location
BC, Canada
Your dad beat me to it with the "surge tank" to flash off any steam.

Have you considered piping the return in a perforated pipe around the perimeter of the tub to diffuse the hot water? You could even be elaborate and line the one side of it with foam pool-noodle to have a cushy back rest.

Great idea! I hadn't considered it. I'll give it some thought but my initial reaction is to wait and see what happens. It'll be tricky to implement without hampering thermosiphon. With the surge tank I'm not expecting any times when there will be a large amount of flow. I'm thinking that it won't be all that dangerous and not worth the effort. But perhaps I can come up with an easy way I like.
 
OP
F

ForceFed70

Well-known member
Joined
Apr 27, 2010
Messages
3,441
Location
BC, Canada
Picked the tub up today. It's a Rubbermaid 300 gallon "Stock Tank". Designed for providing water to livestock but I'm using it for a much different purpose :lol_hitti

It's not quite round at 63.5x69" and 24" deep. Honestly, It's a little larger than I'd prefer. 250 Gallons would be perfect but the next size down was 150gallon and too small. I looked at lot of different tanks and styles, considered cutting open a 250 gallon water tote, etc but finally decided on the Rubbermaid. Of course, it's also the most expensive tank as well :( I liked the construction, the material, and the shape with the slightly sloped sides is almost perfect.

Here's a pic. Youngest shop foreman just finished his inspection - it passed! :rocker:
attachment.php
 

Attachments

  • Empty Tub1.jpg
    Empty Tub1.jpg
    77 KB · Views: 896
To avoid these ads, REGISTER NOW!
Top Bottom