
You are using an out of date browser. It may not display this or other websites correctly.
You should upgrade or use an alternative browser.
You should upgrade or use an alternative browser.
Reed 4C vise repair
- Thread starter Grigg
- Start date
drivesitfar
Well-known member
Very nice work making the split nut and pictures were great. You have a lot of talent and that old Reed definitely found the right guy to make him whole again.
Don't be surprised if you might get another chance to make the other version of the split nut you mentioned for a needy member for his reed.
Practically new condition now and looking forward to final pics and your comments on how it works once you get it finished and mounted on your bench.

Don't be surprised if you might get another chance to make the other version of the split nut you mentioned for a needy member for his reed.
Practically new condition now and looking forward to final pics and your comments on how it works once you get it finished and mounted on your bench.
Thanks. I too am looking forward to having it done and useful. Though I plan to build a stout bench for it which will take a little while yet. Found a 1.75" thick steel plate about 2'x4', close to 500 lb. It'll have 2" square tube legs angled out a little for a better foot print in the 2' dimension. Also will have a couple pieces of 2" receiver tube under the top for mounting other tools like small shear, hole punch, smaller vise and so on.
Test fit the new split nut this evening. Needed to file the break just a little bit, works great still. It did bend/deform just the slightest bit before breaking, another reason I should have frozen it prior to breaking.

Here it is in my little old vice, an Athol I think, have to check. My Dad gave it to me when I was about 13 and mounted it on a workbench in an old shed, it was the greatest tool ever back then, I used it for all sorts of things for years. Just recently I set it up in my own shop with a stand made from a truck axle shaft and brake drum, handy for many things and portable but not sturdy enough sometimes. It'll be nice to have a good solid bench vise again.

Test fit the new split nut this evening. Needed to file the break just a little bit, works great still. It did bend/deform just the slightest bit before breaking, another reason I should have frozen it prior to breaking.
Here it is in my little old vice, an Athol I think, have to check. My Dad gave it to me when I was about 13 and mounted it on a workbench in an old shed, it was the greatest tool ever back then, I used it for all sorts of things for years. Just recently I set it up in my own shop with a stand made from a truck axle shaft and brake drum, handy for many things and portable but not sturdy enough sometimes. It'll be nice to have a good solid bench vise again.
EOC_Jason
Well-known member
Looks good! Is that with the bearing in it?
EOC_Jason
Well-known member
Awww... after all that work! I really liked those nice round holes for the spanner.
Yes, I've smashed a couple fingers so far trying to remove mine. Hopefully it will warm up a little this weekend and I can have another go at it. Ironically I'll probably end up putting the 4C in my other 4C to hold it steady instead of just having it on the ground. I'll be sure to post a picture of it, I'm sure someone will get a grin.
Yes, I've smashed a couple fingers so far trying to remove mine. Hopefully it will warm up a little this weekend and I can have another go at it. Ironically I'll probably end up putting the 4C in my other 4C to hold it steady instead of just having it on the ground. I'll be sure to post a picture of it, I'm sure someone will get a grin.
oldldh
Well-known member
Isn't that against the ****** Laws????
Or does that make it an 8C???
Will your bench hold that much iron in one place???
Or does that make it an 8C???
Will your bench hold that much iron in one place???
jakemac
Well-known member
Isn't that against the ****** Laws????
^^^^^ I was thinking the same thing, but decided to wait until he posted the picture before calling him out for decimating lewd pictures on the internet.

EOC_Jason
Well-known member
Soooo.... Any update on completion?
EOC_Jason
Well-known member
I usually just use bearing grease on the screw and also in the front hole where the handle makes contact against the dynamic face.
I'm sure you could use a more fluid type oil, like motor oil or way lube, but then you would have to always be lubing it.
I'm sure you could use a more fluid type oil, like motor oil or way lube, but then you would have to always be lubing it.
drivesitfar
Well-known member
Grigg: I love TriFlow products and i'm going to grease all my vises with the synthetic grease they sell. i'm lining all my projects up because like you it's too cold to paint so why have them rust and then have to redo them.
http://www.triflowlubricants.com/Tri-Flow_Synthetic_Grease.html
I haven't used this grease yet, but I have used their little bottle of oil and their spray and they are awesome.
I'd take all my vises and pack them up for a road trip to your garage/shop if you were closer so you could do your magic. i'd even provide a new gyro so your arms wouldn't hurt as much.
good luck on the painting and can hardly wait. you took a very tough looking vise and made it a gem.
Thanks for the advice,
I used some thick Lucas oil stabilizer stuff on the thrust bearing and screw for now. Used red grease on the split nut. Anti-seize on all threads and the body of the center pivot screw. For the main slide I set it on the wood stove for a while and melted some paraffin into the machined/unpainted surfaces, I think that'll lubricate without attracting dust and grit as well as protect from rust in the long run.
It's all done except for a couple pins for the pipe jaws.
drivesitfar
Well-known member
Truly a pleasure watching you take that old Reed from the deepest part of the scrap heap and making it look like a new vise. do you have a wood stove in the shop for your heat and I think all those combinations will serve you well so you can use that vise for years to come.
maybe another picture with the before and after pictures alongside each other to complete the story?
by the way nice looking vise on the little stand in the background and i'd love to see the car those wheels fit on?
thanks again for sharing your journey.
maybe another picture with the before and after pictures alongside each other to complete the story?
by the way nice looking vise on the little stand in the background and i'd love to see the car those wheels fit on?
thanks again for sharing your journey.
EOC_Jason
Well-known member
WOW! Excellent job, the front looks practically new... Nobody would ever know how futzed up it was unless you showed them pictures!
Thanks, It's nice to be done with the vice. Next step is a table for it.
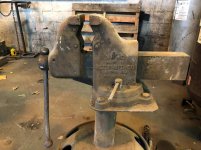
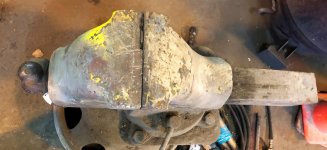
Before

After
The wheels are on a 48 Chevy 2 ton truck I've been working on for a while. https://picasaweb.google.com/118082...ProgressPictures02?authuser=0&feat=directlink

Yes, have a wood stove in the shop and it heats the attached house too.
Before
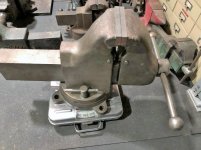
After
The wheels are on a 48 Chevy 2 ton truck I've been working on for a while. https://picasaweb.google.com/118082...ProgressPictures02?authuser=0&feat=directlink
Yes, have a wood stove in the shop and it heats the attached house too.
drivesitfar
Well-known member
that old truck is cool and thanks for sharing all your pictures. it looks like the entire workforce was standing around admiring your truck frame on the trailer when you had it on the trailer. pretty cool project and wish I had the talent.
in case you might want to paint the lettering on your Reed here is a thread with some fairly easy methods that will also work on some of your other projects.
http://www.garagejournal.com/forum/showthread.php?t=234098&highlight=painting+vise+letters&page=2
also i'm amazed at the quality and look of those old Emmert vises that you shared one of yours on the vise thread. yours looks like it has one small defect in one of the jaws, but what a gem anyway.
again it was a pleasure watching you work. since it looks like you do quite a few steel projects you might want to have a little electrolysis tank set up which is not that difficult and there is actually another new thread started that you can watch and learn.
take care
G20-Budo
Well-known member
Grigg, WOW you did an amazing job on refurb'n that vise. I just received an old vise yesterday, and I have some work to do. You've giving me some great ideas on how to clean mine up.
Thanks for sharing.
Thanks for sharing.
Thanks guys,
It actually wasn't that hard. I let NAPA do the heavy cleaning in the hot tank. I quickly wire brushed any remaining rust, remove burs and such with a file, wipe with thinner and prime and paint. Didn't spend any time polishing the handles and such as some folks do, I just wanted a clean functioning vise.
The missing part took a little effort but as for the rest of it anyone looking to restore a vise could follow the same steps and have a nice looking vice. Using the hot tank at NAPA was well worth the very few $ in all the time and aggravation saved not cleaning and stripping paint.
Grigg
ToxicFab.com
New member
- Joined
- Dec 1, 2012
- Messages
- 2
Absolutely beautiful work. Unfortunately my Reed 4C has way more damage and has been sitting in the corner rotting away until I have time to turn a new lead screw.
Great work on the split nut, ill have to do the same with mine
Collin
Great work on the split nut, ill have to do the same with mine
Collin
mtesh73
Well-known member
grigg, that is a fantastic job. turned out nicely, for what looked pretty grim.
Thanks,
I've been using it a little and it is a very nice vise, glad to have it and have it all fixed up. The thrust bearing on the lead screw is quite nice, it's real smooth and precise clamping something, and adjusted to essentially no backlash so it opens crisply too just as soon as the handle is turned.
I did eventually make a new 9/16" pin for the pipe jaw so it's all done now.
I do still want to order a set of new jaw inserts for it, and make a better table.
Grigg
drivesitfar
Well-known member
GRIGG: another member is missing a split nut for his REED vise and I recalled you making your own from scratch. just curious how your big REED 4C is holding up and would you do anything different if you were making another split nut?
thanks again for posting all your pictures and sharing your knowledge and process when you restored your big Reed.
cheers
thanks again for posting all your pictures and sharing your knowledge and process when you restored your big Reed.
cheers
I8AWRENCH
Well-known member
Yes I'd like to order a split nut for a 104r - seriously tho great thread and skills . I'll hopefully have some luck finding something as I don't possess those fab skills/tools/powers.
GRIGG: ...would you do anything different if you were making another split nut?
I scrounged a piece of cast iron from an old diesel piston, you could purchase some cast iron bar stock to start with. Cast iron because the nut needs to be broken in half later, cast iron breaks instead of bending
http://www.dura-bar.com/products/gray-iron/index.cfm
The threads are 3"-12, I machined the pitch diameter to the small side of the allowed tolerance to be sure it'd fit on the first go.
The rest of the dimensions you can measure what you have and make it to fit.
I didn't do this, but to do it again I'd first chill the nut in liquid nitrogen. Then quickly split it having previously made two passing wedges to fit in the ID of the nut and when slipped past each other would expand to break the nut. Or, might could clamp half the frozen nut in a vice with smooth flat jaws and whack the other half with a dead blow hammer, might snap off clean, I didn't try this.
Doing it at room temperature in the press caused some deformation at the break and required a little filing to get it to fit and screw in again, not ideal.
I used a needle thrust bearing part number FNTKF-4872, not original but a nice upgrade. Needs a washer (just thinner than the bearing) made to adapt the the ID of the bearing to the screw diameter which keeps new bearing centered.
Good luck,
Grigg
Dimitriy
Well-known member
Very impressive restoration. Makes me more impatient with my search for a 3C.
D
D
GONE2VT
New member
Absolutely gorgeous work Grigg. Very impressive restoration of that beautiful 4C.
drivesitfar
Well-known member
Grigg: when you were starting your Reed 4c restoration I had no idea how big that vise actually was, but I really enjoyed you taking the time to restore yours and now I know why. at 185 pounds it might be one of the biggest combination vises (has pipe jaws too) made in the USA pre WWII. AND REED is one of my favorite makers prior to 1960's so a win win for me.
that said I now own 2 of these and one came to me restored by another member in a nice trade since he owned 3 of them and I just picked up another one that is older and needs some love.
thanks again for spending all the time telling us how you restored your 4c and all the pictures will really help me when i start spiffing up my old one.
a couple pictures of my restored and unrestored 4c's.
Attachments
-
 Reed 4c Duwamish River Fab shop 1.jpg152.1 KB · Views: 45
 -
 Reed 4c Duwamish River Fab shop 3.jpg139.4 KB · Views: 41
 -
 May 16, 2018 filling up oak cabinet Reed 4c too 1.jpg149.2 KB · Views: 36
 -
 Reed 4c 178 pounds (2).jpg148.2 KB · Views: 38
 -
 Reed 4c moved to stout shelf 5 (2).jpg129.4 KB · Views: 40
 -
 Reed 4c moved to stout shelf 2 (2).jpg146.8 KB · Views: 36