To avoid these ads, REGISTER NOW!

Removing Walker Turner Drill Press chuck

GLaD in TX

Well-known member
Joined
Jan 10, 2020
Messages
85
Location
Fort Worth TX
Any advice on how to remove the drill press chuck? I backed out the collar all the way and it didn't pop off like some have mentioned on other threads. Want to take this all apart to clean up the spindle bearings and replace the chuck. Thanks.
 

Attachments

  • drill.press.chuck.jpg
    drill.press.chuck.jpg
    63.4 KB · Views: 151
  • drill.press.chuck1.jpg
    drill.press.chuck1.jpg
    64 KB · Views: 138
  • drill.press.chuck2.jpg
    drill.press.chuck2.jpg
    106.6 KB · Views: 130
  • drill.press.chuck3.jpg
    drill.press.chuck3.jpg
    63.6 KB · Views: 132
To avoid these ads, REGISTER NOW!

FrankLee

Well-known member
Joined
Sep 13, 2010
Messages
3,577
Location
seMI, 48317
Any advice on how to remove the drill press chuck? I backed out the collar all the way and it didn't pop off like some have mentioned on other threads. Want to take this all apart to clean up the spindle bearings and replace the chuck. Thanks.
You may need a wedge set to remove the chuck.
If you are saying the thrust nut is completely off the thrust collar and spinning, you may be able to cut out a section of a large washer or two to use as a spacer between the nut and chuck.
 

matt_i

Well-known member
Joined
Mar 14, 2008
Messages
10,725
Location
SE Michigan
The black knurled ring might force the chuck off the taper.

To be cautious, I would chuck up a large allen wrench like a 3/8". Then use a pin spanner to first back off the black knurled ring.

I would just check that the threads don't go down & also thread into the body as well (knurled ring would be more of a jam nut then)

But assuming you find evidence of a taper or a transition away from the thread then I think the ring will be your friend....use the hex wrench and the pin spanner in opposition to drive the chuck down. Little lube on the threadform first.
 
OP
G

GLaD in TX

Well-known member
Joined
Jan 10, 2020
Messages
85
Location
Fort Worth TX
Got the spindle and quill assembly apart but the chuck won't budge. Used a puller with no luck. Bent the bolt. Next step is to put a torch on it and get it hot enough that maybe it will break loose. Any other suggestions?
 

Attachments

  • drill.press.chuck6.jpg
    drill.press.chuck6.jpg
    65.3 KB · Views: 81
  • drill.press.chuck5.jpg
    drill.press.chuck5.jpg
    49 KB · Views: 74
  • drill.press.chuck4.jpg
    drill.press.chuck4.jpg
    52.8 KB · Views: 75

FrankLee

Well-known member
Joined
Sep 13, 2010
Messages
3,577
Location
seMI, 48317
Got the spindle and quill assembly apart but the chuck won't budge. Used a puller with no luck. Bent the bolt. Next step is to put a torch on it and get it hot enough that maybe it will break loose. Any other suggestions?
I had a similar problem removing a chuck from it's spindle. See the end of this post:
https://www.garagejournal.com/forum/showthread.php?p=8691976

After I removed the bearing and thrust collar, I dismantled the chuck while still attached to the spindle.

Then, outdoors, I inserted the spindle into a standing pipe and heated the chuck body with a propane torch for several minutes. I then pounded the pipe with spindle/chuck on a 2x4 and the spindle popped out and down the pipe.


What brand of chuck is that?
 
OP
G

GLaD in TX

Well-known member
Joined
Jan 10, 2020
Messages
85
Location
Fort Worth TX
It says Almond Co ASH MCO 40-39. Other numbers are faded. Is this a good chuck? I was thinking of going with a keyless chuck. Trying to visualize how you're pounding the pipe with the spindle inside of it and the chuck is outside of the pipe? And how do you dismantle the chuck while it is still attached?
 

Attachments

  • drill.press.chuck7.jpg
    drill.press.chuck7.jpg
    50.6 KB · Views: 47
  • drill.press.chuck8.jpg
    drill.press.chuck8.jpg
    54.7 KB · Views: 49

FrankLee

Well-known member
Joined
Sep 13, 2010
Messages
3,577
Location
seMI, 48317
It says Almond Co ASH MCO 40-39. Other numbers are faded. Is this a good chuck? I was thinking of going with a keyless chuck. Trying to visualize how you're pounding the pipe with the spindle inside of it and the chuck is outside of the pipe? And how do you dismantle the chuck while it is still attached?
I never heard of Almond, but that doesn't mean much.

The pipe was smaller than the chuck body and larger than the spindle, so the chuck was resting on the end edge of the pipe.

There are pictures in the post link above on how I dismantled the chuck. It depends on which direction the sleeve comes off. Jacobs chucks and Supreme chucks come apart differently. No idea on the Almond.
 
OP
G

GLaD in TX

Well-known member
Joined
Jan 10, 2020
Messages
85
Location
Fort Worth TX
Got it on the spindle inside the pipe. Once the chuck got hot, did you set a steel rod inside of the chuck and pounded down on the spindle to pop it loose?
 
To avoid these ads, REGISTER NOW!

FrankLee

Well-known member
Joined
Sep 13, 2010
Messages
3,577
Location
seMI, 48317
Got it on the spindle inside the pipe. Once the chuck got hot, did you set a steel rod inside of the chuck and pounded down on the spindle to pop it loose?
No. With the spindle/chuck still in the pipe, I just raised the pipe a couple feet and banged the pipe on a 2x4. Newton was a pretty smart guy... an object in motion tends to stay in motion. The spindle popped out on the first try.

I had the 2x4 on the lawn to absorb the impact of the spindle falling through the pipe. The chuck just fell to the ground.

These photos were taken indoors, but I actually did this outside.

 
Last edited:
OP
G

GLaD in TX

Well-known member
Joined
Jan 10, 2020
Messages
85
Location
Fort Worth TX
Interesting. So put heat on the chuck, grab the pipe and slam it to the ground on top of the 2x4. I can't seem to disassemble the chuck. Does that matter with this technique?
 

FrankLee

Well-known member
Joined
Sep 13, 2010
Messages
3,577
Location
seMI, 48317
Interesting. So put heat on the chuck, grab the pipe and slam it to the ground on top of the 2x4. I can't seem to disassemble the chuck. Does that matter with this technique?
Well, there are voids inside chucks that would hinder applying heat.

You might try researching the Almond chuck for dismantling instructions and to verify that it utilizes a taper mount.

However, after reviewing your posts in this thread, I have a couple questions...

The last photo in your first post shows the inside of the chuck. The bottom of the inside is typically not the end of the spindle taper.

In post #7, you show your puller set-up. Did you drill through the bottom of the chuck to expose the end of the spindle? Is the bolt against the end of the spindle? If not, the puller cannot do anything.


....
7/25/2016

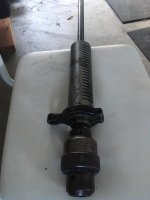
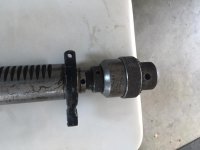
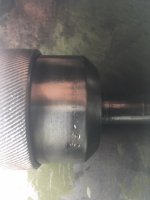
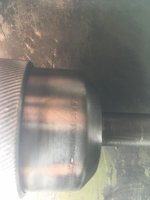
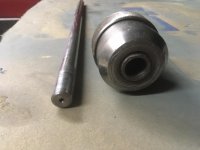
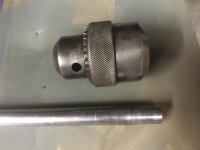
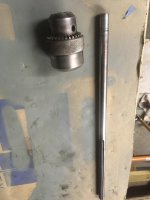
The chuck from dp#15 above was very easy to remove from the spindle. On the other end of the "effort-to-remove" spectrum, was this chuck from dp#20. The threaded collar was missing and the chuck sleeve was broken.


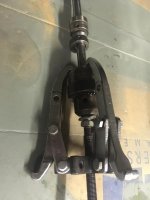
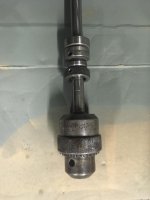
I tried and failed with a slide hammer on my first removal attempt. I then pulled the sleeve of the chuck and removed the jaws and split nut. My last resort was to drill a 5/16" hole through the chuck inside the jaw cavity to the spindle. I was then able to use a puller to remove it from the spindle. I then saw why it was so difficult to remove; the previous owner had use some kind adhesive to attach the chuck to the spindle. The taper is badly chewed-up. I'm surprised that run-out was so good. I'll likely need to use green Loctite on the replacement chuck.


......
 
OP
G

GLaD in TX

Well-known member
Joined
Jan 10, 2020
Messages
85
Location
Fort Worth TX
Used your method with the pipe and worked it loose after heating it with a torch. Wouldn't come out the whole way so had to grab the spindle point the chuck down and whacked it with a ball peen hammer a couple times. Came out easily. And your right about the puller, it wasn't doing anything because the inside of the chuck was not the spindle end. Now that it is out, do you have a thread on this site or any other site to explain the different chucks available and how to measure my taper end so a replacement will fit properly. I have read a lot about Jacobs and they appear to be good quality. Appreciate you helping me with this. Looking forward to getting the drill press up and running.
 

Attachments

  • drill.press.chuck9.jpg
    drill.press.chuck9.jpg
    93.3 KB · Views: 57
  • drill.press.chuck10.jpg
    drill.press.chuck10.jpg
    98 KB · Views: 56
  • drill.press.chuck11.jpg
    drill.press.chuck11.jpg
    64 KB · Views: 70

FrankLee

Well-known member
Joined
Sep 13, 2010
Messages
3,577
Location
seMI, 48317
Used your method with the pipe and worked it loose after heating it with a torch. Wouldn't come out the whole way so had to grab the spindle point the chuck down and whacked it with a ball peen hammer a couple times. Came out easily. And your right about the puller, it wasn't doing anything because the inside of the chuck was not the spindle end. Now that it is out, do you have a thread on this site or any other site to explain the different chucks available and how to measure my taper end so a replacement will fit properly. I have read a lot about Jacobs and they appear to be good quality. Appreciate you helping me with this. Looking forward to getting the drill press up and running.
Good news!

No, I don't have a post regarding chuck comparisons. I believe your spindle should be the standard 0.625" diameter with a Jacobs taper. I also believe Jacobs chucks were, by far, the standard on drill presses of that era for many manufacturers for many years.

Early drill presses, pre-1950-ish, had chucks with separate thrust nuts. Later chucks had the attached safety collar.

I'll send you a PM later today.
 

jjj240

Member
Joined
Oct 29, 2018
Messages
19
Location
CA
Got the spindle and quill assembly apart but the chuck won't budge. Used a puller with no luck. Bent the bolt. Next step is to put a torch on it and get it hot enough that maybe it will break loose. Any other suggestions?

I wonder how did you get the adapter screw piece (not the adapter nut) above the chuck (and below the bearing) off the quill shaft ? is it just pressed fit like bearing? According to WT-900 parts diagram, it does not show separated from the quill shaft.
 
OP
G

GLaD in TX

Well-known member
Joined
Jan 10, 2020
Messages
85
Location
Fort Worth TX
Hi sorry for the late response, just read the message. You may have figured it out by now. This has been some time since I worked on the drill press. From what I recall the screw piece slides on the spindle. I remember using a pipe that would slide over the spindle and catch this screw piece to tap it off and put it back on when I cleaned everything up. And this screw piece is what the adapter nut (#30) screws onto. I used two chuck spanner tools to remove the chuck. Hope this helps.
 

Attachments

  • WT.quill.jpg
    WT.quill.jpg
    230.9 KB · Views: 33

jjj240

Member
Joined
Oct 29, 2018
Messages
19
Location
CA
Hi sorry for the late response, just read the message. You may have figured it out by now. This has been some time since I worked on the drill press. From what I recall the screw piece slides on the spindle. I remember using a pipe that would slide over the spindle and catch this screw piece to tap it off and put it back on when I cleaned everything up. And this screw piece is what the adapter nut (#30) screws onto. I used two chuck spanner tools to remove the chuck. Hope this helps.

No, I am still not able to take the piece off the spindle. The manual page also shows the screw piece attached on the spindle, so I thought it meant to be attached as a single piece but your photos clearly show that the piece was off the spindle. Did you have to knock the pipe really hard to take the piece off? Which direction did you push out to?

I have started a new thread with additional questions. Hope I get additional answers from other users.

 
OP
G

GLaD in TX

Well-known member
Joined
Jan 10, 2020
Messages
85
Location
Fort Worth TX
You should be able to determine if it is two pieces. Try some penetrating spray first and then some heat from a plumbers torch on the screw piece only. Get it hot enough and slide a pipe over the spindle, the diameter of pipe has to be wide enough to catch the screw piece to be able to hit it with a hammer. I would drive it out the chuck end so that it doesn't have to travel as much. But it can go either way. I would stand up the spindle on a wood work bench slide your pipe over it let it rest on the screw piece and heat up the screw.. Then tap the pipe down. That should work. IF you use a vise use small wood blocks between the vise jaws and spindle to avoid scarring it. Shouldn't take too much force. I have removed bearings with the heat method.
 
To avoid these ads, REGISTER NOW!
Top Bottom