To avoid these ads, REGISTER NOW!

Replacing obsolete parts

vette-kid

Well-known member
Joined
Jul 21, 2008
Messages
3,636
Location
Navarre, FL
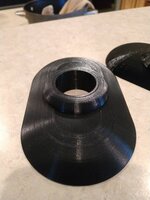
I guess this is the best place for this. Many pre-war cars are facing the problem of not having parts available an longer. While there are some parts available for the 26 P2, most seem to be 36 P1 parts and not the correct piece or color for the P2. Such is the case for the steering column pad. Here you can see the original is in a bad way. what is being sold as a replacement is pictured along side of the original. This is actually the closest of about 5 different versions, all listed to fit a 36 P2 Delux, all CLEARLY not the correct piece. And while I COULD make this replacement work, its not the right color and will bug me to no end....so whats a guy to do?

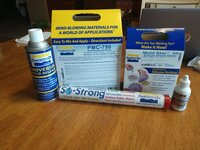
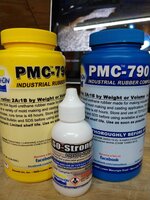
Im going to ATTEMPT to cast a mold and a new part of pigmented rubber using silicone mold casting and PMC 790 (Shore A, hardness of 90). This was a tip I picked up in this months "Auto Restorer" magazine. Ive never attempted something like this, so this might take some trial and error. But between myself and my dad, we have two pre-war cars (36 P2 delux and a 28 Chevy Master Deluxe) and a 47 P15. So Im sure the skill will come in handy.


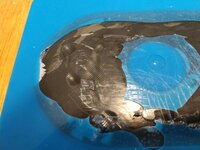
First up is to fill in the cracks and stretched hole with some modeling clay. Im sure this will not be perfect, but its the best o can think of right now.


Next is to pour in the molding silicone. Unfortunately, I ran a little short of product with this one. So I'm going to see how the mold looks overall once cured and probably redo it anyway.


More to follow as I progress. Curious if anyone else has done this and how it worked out. I feel a bit lucky as the backside of the pad is flat. Not sure how to make a mold if both sides are shaped???
35e59dac0ca5d22387c72289effc07cd.jpgb238e55922b7f3410794e909876b6773.jpgd9956b17093104e16f9ca07c312f3526.jpg
 

Attachments

  • 35e59dac0ca5d22387c72289effc07cd.jpg
    35e59dac0ca5d22387c72289effc07cd.jpg
    66.5 KB · Views: 0
  • d9956b17093104e16f9ca07c312f3526.jpg
    d9956b17093104e16f9ca07c312f3526.jpg
    69.6 KB · Views: 0
  • b238e55922b7f3410794e909876b6773.jpg
    b238e55922b7f3410794e909876b6773.jpg
    73.5 KB · Views: 0
Last edited:
To avoid these ads, REGISTER NOW!
OP
V

vette-kid

Well-known member
Joined
Jul 21, 2008
Messages
3,636
Location
Navarre, FL
Ok, so the mold worked ok. I'm not sure my method is the best. I'll have to call it and see how it turns out.
c873a4b57c424b8c1cbacd2e55cee0f6.jpg

Sent from my Moto Z (2) using Tapatalk
 

Attachments

  • c873a4b57c424b8c1cbacd2e55cee0f6.jpg
    c873a4b57c424b8c1cbacd2e55cee0f6.jpg
    35.4 KB · Views: 0

J.C.

Well-known member
Joined
Mar 8, 2019
Messages
166
Location
Newcastle, AU
If that mold doesn't work out how you want there's another way of doing it that I have seen some local blokes use - If you know anyone with a 3D printer who is handy at designing (or can utilise a 3D scanner) you may have some luck getting a nice mold done that way, which you can then fill with silicone and cast your piece.

I have been 3D printing replacement parts that are otherwise not obtainable for motorcycles and they have worked well, have not yet tried my hand at molds for casting myself but as I said above, have seen it done.
 
OP
V

vette-kid

Well-known member
Joined
Jul 21, 2008
Messages
3,636
Location
Navarre, FL
If that mold doesn't work out how you want there's another way of doing it that I have seen some local blokes use - If you know anyone with a 3D printer who is handy at designing (or can utilise a 3D scanner) you may have some luck getting a nice mold done that way, which you can then fill with silicone and cast your piece.

I have been 3D printing replacement parts that are otherwise not obtainable for motorcycles and they have worked well, have not yet tried my hand at molds for casting myself but as I said above, have seen it done.
I have actually wandered about that and been eyeing 3D printers for that purpose. Rubber boots aren't they only thing coming up short for these cars. Knobs, handles, clips, etc.

Sent from my Moto Z (2) using Tapatalk
 

chaosracing

Well-known member
Joined
Nov 14, 2015
Messages
585
Location
Kutztown, Pa
3 D printing seems to be the way to go when looking for some replacement parts these days. Even the pros have gone that route to make replacement or custom parts. Not saying what your doing wont work(thats how they used to do it before 3 D printing, and some still do it that way)
One issue I see though is I do not think they can 3D print rubber yet, (titanium can be 3D printed, go figure) so casting rubber parts is still probably the best method.
 

bradleykd

Well-known member
Joined
Apr 6, 2010
Messages
547
Location
Georgetown, KY
3 D printing seems to be the way to go when looking for some replacement parts these days. Even the pros have gone that route to make replacement or custom parts. Not saying what your doing wont work(thats how they used to do it before 3 D printing, and some still do it that way)
One issue I see though is I do not think they can 3D print rubber yet, (titanium can be 3D printed, go figure) so casting rubber parts is still probably the best method.

I got some rubber parts 3D printed for work about a month ago.

OP: Love what you are doing here. Anybody can swap parts. It takes a skilled person to fix something with no parts available :beer:
 
OP
V

vette-kid

Well-known member
Joined
Jul 21, 2008
Messages
3,636
Location
Navarre, FL
I got some rubber parts 3D printed for work about a month ago.


OP: Love what you are doing here. Anybody can swap parts. It takes a skilled person to fix something with no parts available [emoji481]
Let's not get carried away! I'm a long way from what you would call 'skilled'. Let's at least see how the part turns out.

I think where the 3D printer would help is being able to recreate the part in plastic to use as a mold. That would allow me to correct the defects of my original in the software. But I'm guessing there is a good learning curve there as well. I may try my hand at the software and see if it's doable and then either take the plunge into a printer or send the file to someone. But that's if I can't get this to work out. I don't believe residential level printers can do rubber, and this is pretty hard rubber.

The original is rather stuff and brittle, as well as warped from 80 years of being in a hot car. I don't think my mold will work very well as is, so I'm going to try and clean up the original better with week water and mild soap in hopes that I can get it back to shape a bit and get the clay to stick better. Some of the clay pulled out into the silicon.

I think it would also be better to have a full cast, having it fully submersed in the silicon. I just don't know how to do that and one; get it free from the silicon once cured; two, pour the rubber into that once it is removed.

Going to surf YouTube and see if I can learn something there.

Sent from my Moto Z (2) using Tapatalk
 

bdbecker

ALLIANCE MEMBER
Joined
Nov 18, 2015
Messages
5,558
Location
Iowa
I recently purchased a 3D printer and one of the reasons for getting it was with the intention of using it to cast custom motorcycle and car parts. Here's a neat write up on using 3D printed parts to make molds for casting parts out of metal. There are also several good videos on YouTube.

http://3dtopo.com/lostPLA/

We also have a GJ 3D printer thread with a bunch of good info here:
https://www.garagejournal.com/forum/showthread.php?t=384990
 
OP
V

vette-kid

Well-known member
Joined
Jul 21, 2008
Messages
3,636
Location
Navarre, FL
I've actually been watching that post, that's where I got the idea. What scares me is if the complex shape of some of the rubber parts that seem like they would be hard to do on a computer. Mind you I have NO experience with CAD type programs, and I'm not much of an artist.

Sent from my Moto Z (2) using Tapatalk
 

bdbecker

ALLIANCE MEMBER
Joined
Nov 18, 2015
Messages
5,558
Location
Iowa
Its probably not as difficult as you might think. Learning how to model something in a CAD software is a lot like learning to ride a bike - once you get it, you get it, but you have to fail a whole bunch of times in the process. Patience and persistence key.

The main thing to keep in mind is that everything is just a series of interconnected shapes. Breaking those complex parts into their basic shapes and figuring out how to connect them together is the secret when thinking about how to model something in CAD. Admittedly, that is much easier said than done when you're first learning.

While I don't have any time on Fusion 360 (yet) it seems to be the most popular software for this type of work, and there is a good library of tutorials on YouTube for it. Fusion 360 is also free for non-business use, so the only investment is really time (assuming you already have a PC that can run it).
 

Stuart in MN

Well-known member
Joined
Sep 8, 2005
Messages
23,101
Location
Minneapolis
It would be more clear what you're doing if you could define what 26 P2, 36 P1, and 36 P2 mean...I assume they're some make and model of car, and maybe someone knows of a source for the parts you're trying to make.
 

38 Dodge Coupe

ALLIANCE MEMBER
Joined
Mar 19, 2013
Messages
419
Location
Delaware Ohio
I think each those of numbers in vette-kids post refer to a 1926 & 1936 Plymouth. If not I am sure of our other members will jump to help out.
 
OP
V

vette-kid

Well-known member
Joined
Jul 21, 2008
Messages
3,636
Location
Navarre, FL
I think each those of numbers in vette-kids post refer to a 1926 & 1936 Plymouth. If not I am sure of our other members will jump to help out.
Yes, I apologize. 26 was a typo, it is a 1936 Plymouth P2 deluxe. P1 was the other Plymouth model offered that year. I have exhausted all the the aftermarket suppliers and I'm confident it doesn't exist, but I'd love to be proven wrong

Sent from my Moto Z (2) using Tapatalk
 
OP
V

vette-kid

Well-known member
Joined
Jul 21, 2008
Messages
3,636
Location
Navarre, FL
Playing with tinkercad I came up with this. It doesn't have the same contour as the original, but would be 100% functional. The original has a slight ride around the hole, so the area around the hole is 2mm thick and only 0.5mm toward the top and bottom. I havn't figured out how to do that yet.

67c15f30a1d6203893ed60529664a7d6.jpgc0fcd1d9dd04f03db39bc9161b83c6d3.jpg

Sent from my Moto Z (2) using Tapatalk
 

Attachments

  • 67c15f30a1d6203893ed60529664a7d6.jpg
    67c15f30a1d6203893ed60529664a7d6.jpg
    71.2 KB · Views: 0
  • c0fcd1d9dd04f03db39bc9161b83c6d3.jpg
    c0fcd1d9dd04f03db39bc9161b83c6d3.jpg
    75.9 KB · Views: 0

unslow1

Well-known member
Joined
Mar 3, 2012
Messages
7,880
Location
Illinois
I'm interested in seeing how you make out. I've got a 1912 that you can't really buy anything for. I'd never heard of 3D rubber printing. I've watched a few Jay Leno videos on different kinds of metal and plastic printing he has done for his resto shop.
 
OP
V

vette-kid

Well-known member
Joined
Jul 21, 2008
Messages
3,636
Location
Navarre, FL
I'm interested in seeing how you make out. I've got a 1912 that you can't really buy anything for. I'd never heard of 3D rubber printing. I've watched a few Jay Leno videos on different kinds of metal and plastic printing he has done for his resto shop.
Look at the 3D thread linked above. Also have a look at all3dp.com and craftcloud.com (hope that's allowed). If you can design it on a CAD software, you can get it printed out CNC for fairly cheap. There are also 3D scanners, but I don't know much about those yet, not sure if they are good enough to recreate parts digitally for CNC or printing

Sent from my Moto Z (2) using Tapatalk
 
OP
V

vette-kid

Well-known member
Joined
Jul 21, 2008
Messages
3,636
Location
Navarre, FL
Got some goodies in the mail today! Unfortunately I've been out of commission all day after having a nodule in my throat biopsied (not a big deal... Hopefully). But while I was "resting" I played with the 3d file and ordered a print for $15.

I'm actually doing two things now; trying to recreate this part, and learning/testing methods for future use. Just need some time to cast the urethane and see how it comes out!
f296a149610e9a286f081951123180d3.jpg1354a54063a83a1bc983146b178e45ea.jpg

Sent from my Moto Z (2) using Tapatalk
 

Attachments

  • 1354a54063a83a1bc983146b178e45ea.jpg
    1354a54063a83a1bc983146b178e45ea.jpg
    37.8 KB · Views: 0
  • f296a149610e9a286f081951123180d3.jpg
    f296a149610e9a286f081951123180d3.jpg
    109.7 KB · Views: 0
OP
V

vette-kid

Well-known member
Joined
Jul 21, 2008
Messages
3,636
Location
Navarre, FL
Slow going, but I got to pour some rubber today ( man that **** stinks!!). I'm not very confident in this mold, as you can see after cleaning it up a bit it's still a little rough and the pad was so deformed after 80+ years of abuse that I'm not sure how close we got. Still, I need to test the process and the coloring I added, so we will see. If it's usable, great, if not, at least I get familiar with the process.

We're using two parts A to one part B plus one drop off brown coloring. Using water I determined that the mold needed three ounces of fluid, so I mixed up 4.5 to keep the math easy.

This stuff is kinda thick so you need a good stuck to stir with before moving the two parts. Somehow I got done air bubbles in mine, not sure the best way to get them out, but it looks like a lot came out when I poured it. Hopefully it doesn't cause a problem.


Before putting into the mold, use a little mold release to ensure it comes out smooth. You can use coming spray, but then it will smell like vegetable oil and probably attract critters!

It's actually a little translucent, hopefully it dries solid, definitely do not recall seeing that in the literature. Now we wait 48 hours to cure!5f54fec426272b559354cac8bfb06b36.jpg0192c20e76857130c59d98a944cf728d.jpg607ad00f715b8783ce31ab86ebe23dc7.jpg4e7f0d9fbdb5729ed6fe4ce7f9b38e63.jpg

Sent from my Moto Z (2) using Tapatalk
 

Attachments

  • 5f54fec426272b559354cac8bfb06b36.jpg
    5f54fec426272b559354cac8bfb06b36.jpg
    107.4 KB · Views: 0
  • 0192c20e76857130c59d98a944cf728d.jpg
    0192c20e76857130c59d98a944cf728d.jpg
    103.5 KB · Views: 0
  • 607ad00f715b8783ce31ab86ebe23dc7.jpg
    607ad00f715b8783ce31ab86ebe23dc7.jpg
    20 KB · Views: 0
  • 4e7f0d9fbdb5729ed6fe4ce7f9b38e63.jpg
    4e7f0d9fbdb5729ed6fe4ce7f9b38e63.jpg
    48.4 KB · Views: 0
OP
V

vette-kid

Well-known member
Joined
Jul 21, 2008
Messages
3,636
Location
Navarre, FL
Well, just as I thought. First attempt is a no go. Looks VERY sloppy and the pmc790 is WAY to hard and opaque. Does anyone know anything about shoe hardness levels? What hardness should I be going for here? 90 is too hard, clearly. But u can't find a good reference for what to expect if I drop down to an 80, for example.

f62b20648439b5eb4c67b689f58fc503.jpg

Sent from my Moto Z (2) using Tapatalk
 

Attachments

  • f62b20648439b5eb4c67b689f58fc503.jpg
    f62b20648439b5eb4c67b689f58fc503.jpg
    55.2 KB · Views: 0

bdbecker

ALLIANCE MEMBER
Joined
Nov 18, 2015
Messages
5,558
Location
Iowa
These are rubber boots meant to be somewhat flexible, correct? I'd think you'd want to be closer to 30-50A range.

https://www.smooth-on.com/page/durometer-shore-hardness-scale/

Looking around on the interwebs for "castable rubber", there appear to be a fair number of suppliers offering a variety of materials.

https://www.sculpturedepot.net/clay-wax-tools/product.asp?Castable_Rubber
https://www.polytek.com/product-type/pt-flex-liquid-casting-rubbers-new-improved
https://creaturecastrubber.com/new-products/1-pint-flexible-creature-cast-liquid-rubber-black
 
To avoid these ads, REGISTER NOW!
OP
V

vette-kid

Well-known member
Joined
Jul 21, 2008
Messages
3,636
Location
Navarre, FL
These are rubber boots meant to be somewhat flexible, correct? I'd think you'd want to be closer to 30-50A range.

https://www.smooth-on.com/page/durometer-shore-hardness-scale/

Looking around on the interwebs for "castable rubber", there appear to be a fair number of suppliers offering a variety of materials.

https://www.sculpturedepot.net/clay-wax-tools/product.asp?Castable_Rubber
https://www.polytek.com/product-type/pt-flex-liquid-casting-rubbers-new-improved
https://creaturecastrubber.com/new-products/1-pint-flexible-creature-cast-liquid-rubber-black
Thank you for the links! Smooth on offers urethane rubber in a variety of hardness levels and a variety of other variables. I'm glad to find another option, I'll have to do some research here.

Sent from my Moto Z (2) using Tapatalk
 
OP
V

vette-kid

Well-known member
Joined
Jul 21, 2008
Messages
3,636
Location
Navarre, FL
Well I figure its time for an update, even though its not complete. A big thank you to forum member bdbecker, who printed my 3D file for me. He even cleaned up and perfected it for me so I had a good model to mold from.

The 3D printers do a good job, but do leave some lines that would transfer to the mold. A few good coats of high fill primer and a few minutes with some 400 grit and it came out pretty smooth!

I managed to find a plastic box that was good and flat on the bottom, so I didnt have to build a mold box, thankfully. I decided the best way to mold this would be with the flat side of the model on the bottom of the box. That would give us a one piece mold that is perfectly flat and level. Then I just pour the rubber into that and allow it to self level. Similar to the wway I poured the first mold, but starting with the model on the bottom will help ensure the mold is a good flat surface without needing to suspend the model at the top. The problem with that process is that the plastic model floats! SO I hot glued it to the bottom of the box. Mold release agent should allow the mold to pop right out leaving the model still attached to the bottom....

I did, however, forget to spray mold release agent on it before pouring the silicon mold compound. So right now I'm trying to figure out how to get it out. The silicon made its way under the edge of the model just slightly due to the hot glue leaving a small gap. Its not enough to affect the usefulness of the mold, but it is causing the mold to hold on and not come out. Im trying to freeze it in hopes that the glue will let go in the cold temp and then I can trim the model out from the mold.

I hope to pour the rubber in the next day or two and this time I am trying ReoFlex 60. A shore hardness of 60 was recommended by the folks at smooth on who also sent me some samples disks of a few different hardness levels.

More to follow, but its looking promising!
51daf1ba198e53299f30e6575d351abe.jpg10f3dcd1cd5a83f5bae40edbce12cdf2.jpg9c63150af8d1fb6ff43340f3ddc239c6.jpg4c13360eb0cf5f1bef008bc2f6ee7815.jpgf433741b02145c96878348e259466437.jpg
 

Attachments

  • 51daf1ba198e53299f30e6575d351abe.jpg
    51daf1ba198e53299f30e6575d351abe.jpg
    63.3 KB · Views: 0
  • 10f3dcd1cd5a83f5bae40edbce12cdf2.jpg
    10f3dcd1cd5a83f5bae40edbce12cdf2.jpg
    38.1 KB · Views: 0
  • 4c13360eb0cf5f1bef008bc2f6ee7815.jpg
    4c13360eb0cf5f1bef008bc2f6ee7815.jpg
    72.2 KB · Views: 0
  • f433741b02145c96878348e259466437.jpg
    f433741b02145c96878348e259466437.jpg
    90.9 KB · Views: 0
  • 9c63150af8d1fb6ff43340f3ddc239c6.jpg
    9c63150af8d1fb6ff43340f3ddc239c6.jpg
    27.8 KB · Views: 0
Last edited:
OP
V

vette-kid

Well-known member
Joined
Jul 21, 2008
Messages
3,636
Location
Navarre, FL
And presto, its free! Note that the hot glue did melt the model slightly. Not a problem for me the way I'm using it, but something to be aware of. Might just try regular Elmer's glue if I had to do it again.

f8b5635bb007dbcb8393497be96d7dc7.jpg013950f395e88c7bfc6839104724bb5e.jpg

Sent from my Moto Z (2) using Tapatalk
 

Attachments

  • 013950f395e88c7bfc6839104724bb5e.jpg
    013950f395e88c7bfc6839104724bb5e.jpg
    71.6 KB · Views: 0
  • f8b5635bb007dbcb8393497be96d7dc7.jpg
    f8b5635bb007dbcb8393497be96d7dc7.jpg
    77.6 KB · Views: 0
OP
V

vette-kid

Well-known member
Joined
Jul 21, 2008
Messages
3,636
Location
Navarre, FL
Ok, looks like something went wrong with the mold compound (silicon rubber). Cure time is 6 hours, I left it for 9. So I'm wandering if perhaps it just didn't get mixed thoroughly? There are some definite pits that would show up. I may go ahead and cancelled this to test the color and process for the reoflex. I'll have to order now silicon to try again.

6261618f3cb16fd9f457a3ea6a6ba8f8.jpg80c843a27c83bbb6b1ef6ecf168983cc.jpg

Sent from my Moto Z (2) using Tapatalk
 

Attachments

  • 6261618f3cb16fd9f457a3ea6a6ba8f8.jpg
    6261618f3cb16fd9f457a3ea6a6ba8f8.jpg
    64.5 KB · Views: 0
  • 80c843a27c83bbb6b1ef6ecf168983cc.jpg
    80c843a27c83bbb6b1ef6ecf168983cc.jpg
    43.2 KB · Views: 0

gte718p

Well-known member
Joined
Mar 12, 2009
Messages
3,972
It looks like you had air bubbles trapped in your silicone. When mixing, you don't want to whip air into the mixture.

You may be able to fill the little divits with mold putty or with a tiny brush and some brush one mold silicone. On the on there hand it mighy just make a mess.

I would still run that mold just to test all the steps in the process.

Looks like you are moving in the right direction.
 
OP
V

vette-kid

Well-known member
Joined
Jul 21, 2008
Messages
3,636
Location
Navarre, FL
Hasn't thought of air bubbles, but they only seem to be right there against the plastic model. The rest of the silicon of perfectly smooth. I was leaning towards not missing properly, but I'm thinking possibly some kind of interaction with the primer on the model?

Sent from my Moto Z (2) using Tapatalk
 

Firstram

Well-known member
Joined
May 16, 2017
Messages
1,391
How did you pour the silicone? It's easy to trap bubbles if you're not careful. I like to pour a long thin stream off to the side and allow the level to rise evenly around the part.

Silicone sticks to itself! If you have any material left, brush a thin coat over the whole interior of the mold and snap the part back in.
 
OP
V

vette-kid

Well-known member
Joined
Jul 21, 2008
Messages
3,636
Location
Navarre, FL
I'm beginning to think it's a chemical interaction with the primer. I need to look at the primer ingredients and see if I can verify.

That said, does anyone know how to get a matte finish with polyurethane rubber? I have some curing in the mold right now but it's drying high gloss. I think I need to mix some white with the brown to get the shade right, but I'm not sure how to fix the gloss.

Sent from my Moto Z (2) using Tapatalk
 
Last edited:

Firstram

Well-known member
Joined
May 16, 2017
Messages
1,391
Most of the casting work I've been around has the finish/texture applied to the master so it becomes a part of the mold. Poly parts will have the same texture as the mold.

I'm not sure how you could add texture now.

You could take your first part and spray a slight texture on it, think auto primer over spray. Pour a new mold out of polyester resin mixed with bondo, aka "Rondo". It's dirt cheap and makes great molds for soft parts or parts from soft molds. Test a small batch first because it takes very little hardener.
Don't forget liberal amounts of mold release or the paint will stick to the mold.
 
OP
V

vette-kid

Well-known member
Joined
Jul 21, 2008
Messages
3,636
Location
Navarre, FL
Most of the casting work I've been around has the finish/texture applied to the master so it becomes a part of the mold. Poly parts will have the same texture as the mold.

I'm not sure how you could add texture now.

You could take your first part and spray a slight texture on it, think auto primer over spray. Pour a new mold out of polyester resin mixed with bondo, aka "Rondo". It's dirt cheap and makes great molds for soft parts or parts from soft molds. Test a small batch first because it takes very little hardener.
Don't forget liberal amounts of mold release or the paint will stick to the mold.
I'm not going for texture. Smooth is what I'm after. The problem is some of the silicon appeared not to cure, giving the textured look. I'll see how the first go turns out in the morning, but I think I'm going to have to redo the mold. Just need to figure out what caused it not to cure so I can avoid that next round. Then figure out how to get the color right, matte instead of gloss.

Sent from my Moto Z (2) using Tapatalk
 

mrolds88

Well-known member
Joined
Feb 17, 2010
Messages
117
Location
WV
Vette-kid, check out Steele rubber products. They may have what you are looking for. #40-0078-36 looks like a candidate. And I am enjoying this thread.
 
OP
V

vette-kid

Well-known member
Joined
Jul 21, 2008
Messages
3,636
Location
Navarre, FL
Vette-kid, check out Steele rubber products. They may have what you are looking for. #40-0078-36 looks like a candidate. And I am enjoying this thread.
I think they just have added this. I've looked at that site dozens of times and hadn't seen that in brown and it was different shape. I emailed to ask even. Got no response. That looks different from my original, but the dimensions are close. If I can't make this to my satisfaction that might have to work.

Sent from my Moto Z (2) using Tapatalk
 
Last edited:

Monza Harry

Well-known member
Joined
Dec 29, 2018
Messages
1,433
Location
Windsor ON
Vette Kid, gte718p and Firstram are steering you right, those do look like bubbles and when mixing these two (or More)part, products air is usually your ENEMY! For satin parts we [I am a mould maker] will use a fine glass bead to get to "Satin" and way more complex means for different finishes. The moulds are finished dead smooth and then the required "Texture" is added. I think a light coat of primer will land you with a dull sheen [non glossy] Harry
 
OP
V

vette-kid

Well-known member
Joined
Jul 21, 2008
Messages
3,636
Location
Navarre, FL
Vette Kid, gte718p and Firstram are steering you right, those do look like bubbles and when mixing these two (or More)part, products air is usually your ENEMY! For satin parts we [I am a mould maker] will use a fine glass bead to get to "Satin" and way more complex means for different finishes. The moulds are finished dead smooth and then the required "Texture" is added. I think a light coat of primer will land you with a dull sheen [non glossy] Harry
I appreciate the input. I wish I had a picture of the model, it had gooey uncured silicon on it. Smooth on guys think it is curing inhibition ( think that was the term). The defects are only where silicon meets the model, nowhere else.

I used primer on the model. Perhaps rough it up with course grit sandpaper? If it's non cured silicon from the primer, how do I stop that next time?

Sent from my Moto Z (2) using Tapatalk
 
OP
V

vette-kid

Well-known member
Joined
Jul 21, 2008
Messages
3,636
Location
Navarre, FL
Ok, here is take one. To much brown. I think adding some white would actually have gotten me there. Besides the color and finish, the rest is great. Shape is perfect, consistency is great.

Plan forward, use some 300 grit on the model to give it some texture. Seal over primer with something (will release agent accomplish this?). Recast rubber with brown and white pigments. I think I'll use some plastic eggs and experiment with the color.

cf133a5dd12ea3b0e6add7c9f16b21a4.jpg

Sent from my Moto Z (2) using Tapatalk
 

Attachments

  • cf133a5dd12ea3b0e6add7c9f16b21a4.jpg
    cf133a5dd12ea3b0e6add7c9f16b21a4.jpg
    52.9 KB · Views: 0

gte718p

Well-known member
Joined
Mar 12, 2009
Messages
3,972
Definitely paint over the primer. Primer by definition is porous and wants to grab on to things. That is why paint sticks to it. You don't want any interaction with your buck and your silicone. I haven't done silicone molds in a long time, but for carbon fiber I just use rustoleum. Anything to seal the surface.

I missed where you said you didn't apply the release agent on the last mold. I think that explains some of the unwanted texture on the mold. I would still paint before using release agent. The "slicker" the buck is the better the mold will be.

Looks like you are making really good progress though.
 

Monza Harry

Well-known member
Joined
Dec 29, 2018
Messages
1,433
Location
Windsor ON
For the fiberglass models we used to make for duplicating, they were sanded smooth and "finished" with a gloss coating, [Lacquer?] Given a buffed coat of Carnauba paste wax, green parting agent, and a dabbled brush coat of the Carnauba paste wax on top. this still sometimes could really put up a fight. So my next question is can a paint/dye be purchased and applied? The OEM's do this to many/most interior parts that I know of now, as this is the easiest/most cost effective solution to colour match. There are much better release agents/waxes now, but be careful as silicone protectants/release agents aren't always a good match for silicone moulds. Perhaps try things like "Pledge" or "Pam" cooking spray? Just some out of the box idea's [on a test piece] Harry
 
To avoid these ads, REGISTER NOW!
Top Bottom