To avoid these ads, REGISTER NOW!

Request for Help = Broken Server Chassis Rack Ear [self-clinching standoff nut]

svtkobra7

Active member
Joined
Nov 24, 2018
Messages
32
Location
Atlanta
Hi,

Happy holidays to all! :)

I was referred here by a good friend whom I met on an IT oriented forum (and hope that I'm posting in the correct place here). I'm hoping that your community can provide me with the information needed to remedy a damaged fastener on a server chassis. As an additional preference, I'm quite handy, except I don't have any experience with metal working, so if you are kind enough to assist, I welcome as thorough a reply as you would like to offer. I've spent many hours (no exaggeration) searching the internet to attempt to solve this problem myself; however, I've been unsuccessful and would be very grateful for any assistance.

[Due to this being my first post, I'm unfortunately limited to uploaded attachments]

Due to the particularity of the issue, let me begin with a brief overview of the purpose of the fastener
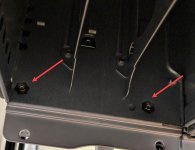
  • Supermicro rack server chassis have two fasteners on each side (I believe they are called "self-clinching standoff nuts") and these threaded fasteners are used to connect the server chassis to the "rack ear" (L Shaped bracket) which has a handle on it. That handle is used to pull the server out of the server rack, but also the rack ear allows the server to be secured to the server rack with a rack nut / bolt. (see attachment - 1 Rack Ear Front.jpg)
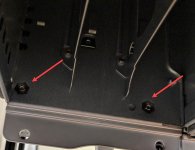
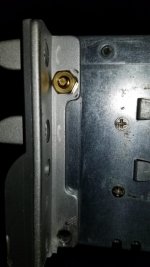
  • On the inside of the chassis, this faster has a hex head and with the fastener removed, there is a hex shaped impression (possibly because the fastener was pressed in with quite some force?). (see attachment - 2 Chassis Interior.jpg)
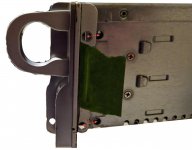
  • On the outside of the chassis there is a standoff which the rack ear screws into. I've provided a picture of what the exterior looks like, but without the fastener. (see attachment - 3 Chassis Exterior.jpg)
As to the issue, unfortunately the 4 fasteners are broken and need to be replaced
  • I contacted the manufacturer and they wouldn't provide any information as to the type of fastener and said it is a non-user replaceable part.
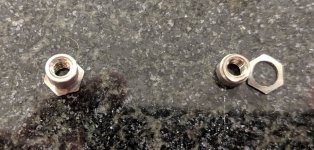
  • Images of the fastener are provided and it doesn't surprise me that they broke as they look quite feeble to my untrained eye.
  • Note, where you see a fastener that looks like it is intact (hex head + threaded standoff) that is because I pressed it together in order to provide a picture, but I don’t think that is a solution of course. (see attachment - 4 Fastener 1.jpg) (see attachment - 5 Fastener 2.jpg)
To my questions
  • Would anyone be kind enough to identify a like-kind replacement for what I believe is a "self-clinching standoff nut" and where I may procure? I don't need to replace the screws which insert, but unfortunately I don't know what size they are, whether metric or SAE, but I do know they are smaller than M4.
  • Can anyone tell me how I would go about installing? Hopefully some sort of hand tool would suffice?
    • To that end my research suggested similar looking fasteners are typically installed with a machine press (which I don't have), but I believe that is because I was looking at fasteners used to fasten two pieces of sheet metal.
    • While the fastener does certainly go through two pieces of sheet metal, I don't believe the fastening the sheet metal is its primary purpose, rather I think that primary purpose is to provide a secure threaded standoff into which a screw is inserted to attach the rack ear.
Thank you so very much in advance. :)

Kind Regards, Mike
 

Attachments

  • 1 Rack Ear Front.jpg
    1 Rack Ear Front.jpg
    115.1 KB · Views: 228
  • 2 Chassis Interior.jpg
    2 Chassis Interior.jpg
    104.5 KB · Views: 218
  • 3 Chassis Exterior.jpg
    3 Chassis Exterior.jpg
    92.5 KB · Views: 224
  • 4 Fastener 1.jpg
    4 Fastener 1.jpg
    146 KB · Views: 221
  • 5 Fastener 2.jpg
    5 Fastener 2.jpg
    128.5 KB · Views: 189
To avoid these ads, REGISTER NOW!

jumbojak

Well-known member
Joined
Jun 21, 2016
Messages
1,358
Location
Surry, VA
Is the broken bit from the chassis or the rack? I'm a bit confused by your explanation but feel like a rivnut might work either way. Replace the threaded insert with a rivnut and you'd be back in business.
 

matt_i

Well-known member
Joined
Mar 14, 2008
Messages
10,716
Location
SE Michigan
I'm finding it hard to follow exactly. How about epoxying a standard hex nut of appropriate size into the place its supposed to go and then using judicious torque.
 
OP
S

svtkobra7

Active member
Joined
Nov 24, 2018
Messages
32
Location
Atlanta
Thanks much for your reply!

Is the broken bit from the chassis or the rack?

Broken fastener = part of chassis. (mention of a rack was simply intended to convey how the broken fastener plays into the larger picture, i.e. that fastener connects the server chassis to a rack ear, and the rack ear is secured to the rack)

I'm a bit confused by your explanation but feel like a rivnut might work either way. Replace the threaded insert with a rivnut and you'd be back in business.

Sorry for that - I tried to explain too much to the extent that my explanation wasn't so great. I wasn't sure how much surrounding context was needed and how familiar forum members may or may not be with racking servers.
 
OP
S

svtkobra7

Active member
Joined
Nov 24, 2018
Messages
32
Location
Atlanta
I'm finding it hard to follow exactly. How about epoxying a standard hex nut of appropriate size into the place its supposed to go and then using judicious torque.

Sorry for not conveying my question adequately. :(

That is a creative idea which I like (and thanks for the reply), but unfortunately there is a reason the head of that standoff is flush with the rest of the chassis interior: If it wasn't flush, it would prohibit ingress of the caddies [1] that contain the hard drives. See attached for illustration of what I mean.

(I suppose it could work, but it would have to be a really, really thin hex nut)

[1] Just as an FYI - by "caddies" i mean each of the 3 "enclosures" pictured with a black perforated front (for airflow) + LEDs to display drive activity + maroon lever / lock to secure the caddy into the chassis (which slide into and out of "bays" in the chassis). The ones pictured are for standard 3.5" internal HDDs (SSDs are 2.5" and use a smaller caddy).
 

Attachments

  • 2 Chassis Interior.jpg
    2 Chassis Interior.jpg
    104.5 KB · Views: 90
  • 1 Rack Ear Front.jpg
    1 Rack Ear Front.jpg
    115.1 KB · Views: 72
OP
S

svtkobra7

Active member
Joined
Nov 24, 2018
Messages
32
Location
Atlanta
[note: blank post needed in order to achieve 5 messages to post links - sorry about that, but I'm not doing anything dubious by posting links]
 
Last edited:
OP
S

svtkobra7

Active member
Joined
Nov 24, 2018
Messages
32
Location
Atlanta
[note: blank post needed in order to achieve 5 messages to post links - sorry about that, but I'm not doing anything dubious by posting links]
 
Last edited:
OP
S

svtkobra7

Active member
Joined
Nov 24, 2018
Messages
32
Location
Atlanta
Code:
[disregard prior two messages, I needed 5 messages to post links]

Rivnut. They work great and should solve your problem.

http://www.swfastener.com/pdf/RIVNUT-TheOriginalRivnut.pdf

I came across these when I was spending hours trying to solve the issue myself (thanks much for the reply!).

Ideally I believe I need a hex head (page 22), to fit into the existing hex indentation, but don't see this as an option in the document (unless I missed it). Since it is called out on the "Design Options" page, I'm not sure if this precise solution (with hex head) would be economical?

Not a rivnut, and not disregarding your proposal, but what do you think of something like this (came across it while researching):
Thru-Hole Threaded Standoffs for Installation into Stainless Steel - Type SO4 Metric-
 

Attachments

  • rivnut.jpg
    rivnut.jpg
    28 KB · Views: 55

jumbojak

Well-known member
Joined
Jun 21, 2016
Messages
1,358
Location
Surry, VA
What size thread do you need? Looking at matt_i's suggestion of epoxying a nut in place, you might be able to get away with a jam nut. If it's still a little too proud of the surface you might be able to file it flat. Might.
 
OP
S

svtkobra7

Active member
Joined
Nov 24, 2018
Messages
32
Location
Atlanta
What size thread do you need? Looking at matt_i's suggestion of epoxying a nut in place, you might be able to get away with a jam nut. If it's still a little too proud of the surface you might be able to file it flat. Might.

I *think* it is 6/32 ... which fits but has a tad bit of play ... but I also don't know whether that broken fastener is metric or SAE and I don't have anything smaller than an M4 (too large) to test with. (think 6/32 "equivalent" to M3.5?)

[I wish I could provide a more precise answer]
 
OP
S

svtkobra7

Active member
Joined
Nov 24, 2018
Messages
32
Location
Atlanta
Google flat head hexagon rivnut

I must be missing something, but in terms of heads, I can't seem to find a flat "hex" head + full round body. I can find plenty of "round" heads with a hex hole and even flat "hex" heads + half or whole hex bodies, but I think a like kind replacement is a flat "hex" head + full round body.

But rivets (and rivnuts in this case) are new to me, so I may be entirely incorrect in that a flat "hex" head + full round body is a "custom" option (as per my prior comment)?
 

juiced10

Well-known member
Joined
Oct 21, 2009
Messages
365
Location
Parish,NY
When I google it I get this......notice they are hexagon not round. Figure out your size. 60fe962f1b3f44f3c76536d966c8bdc8.jpg


Sent from my iPhone using Tapatalk
 

Attachments

  • 60fe962f1b3f44f3c76536d966c8bdc8.jpg
    60fe962f1b3f44f3c76536d966c8bdc8.jpg
    266.9 KB · Views: 20
OP
S

svtkobra7

Active member
Joined
Nov 24, 2018
Messages
32
Location
Atlanta
What size thread do you need? Looking at matt_i's suggestion of epoxying a nut in place, you might be able to get away with a jam nut. If it's still a little too proud of the surface you might be able to file it flat. Might.

One additional layer of complexity to offer (I didn't mention it previously as my explanation was confusing enough as is) ...

Typical Rack Orientation = Servers are oriented horizontally such that they can be pulled in and out of a server rack and the "rack ear" (rack ear = 1st image - aluminum L bracket behind handle and plastic piece with LEDs) is only used to secure the server such that the screw you see ensures the server doesn't horizontally slide out of the rack. NOTE: This is not the rack solution my home would allow.

Atypical Rack Orientation = Server is mounted vertically using a single vertical rack mount and oriented nearly flush with the wall. With a single vertical rack mount servers are "hung" from the rack ears (i.e. the front of the server faces the ceiling) and they bear the weight of the server.

Extremely Atypical Rack Orientation = My "Solution" (and I've never seen this deployed elsewhere) = Server is mounted vertically using two vertical rack mounts (emulates 4 "posts" of a standard rack) and rack ears at the bottom bear the weight of the server (i.e. the front of the server faces the floor).

If you are scratching your head as to why I mounted vertically and also "upside down", it was out of necessity: (a) server depth > closet depth; (b) air flow travels from front to rear, so by mounting with the chassis front facing the floor, it intakes cool, dense air and exhausts warm air in the same direction as the established air flow in the closet (there is an active exhaust fan in the ceiling). The difference in mounting in this manner is quite meaningful and compared to mounting vertically "right side up", my solution ("upside down") = HDDs which are 5C cooler (and much less noise from the fans).

My point with all of this is that normally the structural soundness of that fastener isn't critical (with a typical horizontally mounted server), but here it is crucial (with a vertically mounted server). And BTW - my wonky solution didn't cause the broken fasteners - I never had an issue - they broke when I had already removed the server to service and accidentally bumped it off the table it was on. :(

Hopefully that makes sense - pics attached to illustrate. Note in the first pic the camera is aimed to the ceiling - orientation is more obvious in the second pic.


OP
S

svtkobra7

Active member
Joined
Nov 24, 2018
Messages
32
Location
Atlanta
When I google it I get this......notice they are hexagon not round. Figure out your size.

Thank you! Got it - I get get the same results via Google. I was confused as I was trying to find the exact same fastener, which looks different.

Broken fastener, but "reconstructed" (not sound), which hopefully explains my prior confusion:

standoff.jpg


My inference is that your suggestion is not to replace with the same type rivnut and that the pictured rivnut would work?

(My thought process, that I was stuck in, was that it had to be identical to the existing part ... but you of course know what you are talking about (I don't) ... the only "problem" I see is that a round head won't fit in the very shallow, existing hex shaped indention in the chassis, but I suppose that doesn't matter - if it works it works)

Thanks again.
 

cmandp

Well-known member
Joined
Dec 22, 2011
Messages
1,270
Location
New Jersey
Take a look around Mcmaster-Carr

Search for self-clinching nut. PEM is a company that makes all kinds of self-clinching nuts, stand-offs, studs, etc. Looking at their website may help you too as they are one of the major players in making self-clinching fasteners.

Below could be what you need.
 

Attachments

  • Mcmaster.JPG
    Mcmaster.JPG
    129.1 KB · Views: 225
To avoid these ads, REGISTER NOW!

bsdummy

New member
Joined
Aug 7, 2020
Messages
4
Location
CA
Hi
I know this thread is two years old but wonder if the original poster managed to find a solution? I am having the same issues and not able to find any solution in homedepot or online.

Thanks
 
OP
S

svtkobra7

Active member
Joined
Nov 24, 2018
Messages
32
Location
Atlanta
Hi
I know this thread is two years old but wonder if the original poster managed to find a solution? I am having the same issues and not able to find any solution in homedepot or online.

Thanks

How about this for a 2 year old thread ... a reply in 2 min ;)

But that's the extent of any good news. Unfortunately I was not ultimately able to fix, ended up purchasing a new chassis, and swapping my h/w into it.

There was a silver lining however - granted it took the effort to list the items on ebay and what not, but after i sold the bare bone accessories except for the chassis, I not only broke even, but made a few bucks.

IMO the rack ear is the Achilles heel of a SMCI server. I'm no engineer, but I think they could have made it a little more robust.

May I ask how yours failed you?
 

bsdummy

New member
Joined
Aug 7, 2020
Messages
4
Location
CA
Thanks for the prompt reply. I bought it used from a person here in the bay area. Maybe he got it from you ^_^
The left ear is already broken off when I got it from him. The chassis is still very much usable just that its tend to move whenever I try to remove/insert a caddy into it. I have it slotted into a 19" rack but not mounted/screwed into the rack since I dont have the mounting kits and the ear is broken.
 
OP
S

svtkobra7

Active member
Joined
Nov 24, 2018
Messages
32
Location
Atlanta
Thanks for the prompt reply. I bought it used from a person here in the bay area. Maybe he got it from you ^_^

LOL I know you are joking o/c but I trashed the chassis.

Sorry to hear about your issue. But your scenario is a bit different than mine, which may be an opportunity. To the chagrin to SMCI engineers, my limited space for placement required creativity, mounting upside down, and causing the rack ears to carry the entire weight of the server & 24 3.5" HDDs. A failure there causes the server to do a face plant on the floor from 12" (something I want to avoid).

Pics maybe to see if there may be an alternative - but not perfect - solution.

PS - I like the handle. (forum name / whatever they are called)
 

Mike Folks

Well-known member
Joined
Feb 26, 2020
Messages
170
Location
Springfield Mo.
Another type is a "Nutsert but not a spacer type,it can be hand installed with the tooling, www,browntool.com may have this hand installation tool.
 
OP
S

svtkobra7

Active member
Joined
Nov 24, 2018
Messages
32
Location
Atlanta
Bolt thru from the other direction?

It is a solid idea but unfortunately that would mean it is no longer flush and impede the movement of HDDs into their slots. There is only the slightest amount of room (as is) brand new from the factory and by the time most IT "home labbers" get their hands on them that light sheet is no longer 90 deg at corner. I'm sure there are pros on here who could reset being bent as such back to spec (not me), but once out of whack they are a pain to deal with.


IMG-20200903-100912.jpg
 
OP
S

svtkobra7

Active member
Joined
Nov 24, 2018
Messages
32
Location
Atlanta
Still think a low profile flange rivet nut (rivnut) would do the trick.

https://www.mcmaster.com/nut-inserts/rivet-nuts/steel-low-profile-rivet-nuts-7/

or similar
My recommendation for @bsdummy - being experienced in its use - but not more precise matters requiring skill:
proxy-image

A poor joke of course.
Seems you could spec the round flange to fit within the hex emboss? or even have it overlap with the low profile flange listed above?

attachment.php


I favor this one, with a direct replacement of the hex head, possibly requiring a few more feet lbs of force to defeat? However, I think @bsdummy has a far more "forgiving" situation than I did - where I was already placing extra duress on the chassis that it wouldn't otherwise be subjected to.

... but any would get the job done. At any
Take a look around Mcmaster-Carr

Search for self-clinching nut. PEM is a company that makes all kinds of self-clinching nuts, stand-offs, studs, etc. Looking at their website may help you too as they are one of the major players in making self-clinching fasteners.

Below could be what you need.
 

bsdummy

New member
Joined
Aug 7, 2020
Messages
4
Location
CA
I managed to find one screw in my tools box that is quite flat and takes a #8 or #10/32 nut. It seats quite flush and I am able to slide the caddy in and out, but it is a very tight fit.
I also find some fan screws (screws from 80mm fans), that has a thin head but I cant find its thread and a nut to fasten it. I dont need it to carry the weight of the chassis, just to be able to seat the chassis flush to the rack so that it dont move around when I insert/remove the caddy.
Thanks
 

Attachments

  • 20200831_163146.jpg
    20200831_163146.jpg
    123 KB · Views: 23
  • 20200831_163158.jpg
    20200831_163158.jpg
    72.8 KB · Views: 23
  • 20200831_163107.jpg
    20200831_163107.jpg
    148.5 KB · Views: 35
OP
S

svtkobra7

Active member
Joined
Nov 24, 2018
Messages
32
Location
Atlanta
Look familiar?

IMG-20200903-215532.jpg

standoff.jpg


I can't believe that I didn't think of this earlier - but I kept the precise rivnuts that are used in our chassis. See right @ top. The bit on the left, no clue what it went to, but could be used by you to for an "engineered" solution.

I was pissed at myself for what happened and when I mean I stripped it to the bone - that chassis went in the dumpster with not a single fastener remaining. Goodnesss there are hundreds of them! All sorted in small plastic bags by type. And not needed since I stored them for future use - thus why I offer a potential solution at the 11th hour.

I'm glad you got it fixed - but for myself (and my @$$clown mounting) I needed both a functional and aesthetically perfect solution (I'm ****).

So with those parts we could get you back to aesthetically perfect, but of course their strength (or lack of) comes from the force with which they are stamped into the sheet, which you would never be able to get back to in full, but I don't think you need to.

Yours for free if you want.

Some may read this and balk at reuse of such; however, they are offered only in a friendly manner and with knowledge that you are losing some (if not significant) fastener strength. I think it is a non-issue, potentially offset with the knowledge and creativity of this forum.

I managed to find one screw in my tools box that is quite flat and takes a #8 or #10/32 nut. It seats quite flush and I am able to slide the caddy in and out, but it is a very tight fit.
I also find some fan screws (screws from 80mm fans), that has a thin head but I cant find its thread and a nut to fasten it. I dont need it to carry the weight of the chassis, just to be able to seat the chassis flush to the rack so that it dont move around when I insert/remove the caddy.
Thanks
 

VR6ix

Well-known member
Joined
Mar 24, 2013
Messages
355
Location
Onterrible, Canuckistan
I remember this thread, was going to reply but didn't, as I don't know how helpful this would be considering we're dealing with DIY level repairs instead of a manufacturing environment, but this looks like a simple application for PEM press-in fasteners. Check Penn Engineering www.pemnet.com
 
OP
S

svtkobra7

Active member
Joined
Nov 24, 2018
Messages
32
Location
Atlanta
I remember this thread, was going to reply but didn't, as I don't know how helpful this would be considering we're dealing with DIY level repairs instead of a manufacturing environment, but this looks like a simple application for PEM press-in fasteners. Check Penn Engineering www.pemnet.com

I really like this forum! I read your post and think that sounds familar, oh yeah I saw it earlier today, couldn't find it (but was looking for a picture and it was a link) here. Since I linked to a Penn / Pem did I just get an upgrade from DIY greenhorn to the next level?

Code:
Not a rivnut, and not disregarding your proposal, but what do you think of something like this (came across it while researching):
Thru-Hole Threaded Standoffs for Installation into Stainless Steel - Type SO4 Metric-
 

DigitalPackrat

New member
Joined
Jul 6, 2023
Messages
1
I know this is a 2018 thread but this was google's best result and cmandp/svtkobra7 suggestion of mcmaster flush mount press fit nuts was close enough to repair a SC847 chassis. Specifically 94674A515 nuts and 97519A096 rivets. On the SC847, I needed to drill a few rivets and remove the drive cages for access.

94674A515 is nearly identical to a factory installed Supermicro nut but has a groove cut in it.
1688695765253.png


The old holes were out of shape, I roughed them into shape with pliars then some hammer and dolly work. Still far from perfect but close enough to rivet the drive cage back in. The fix is ugly zoomed in on camera but short of having a press that could fit in between the sheet metal sides of the chassis and a die or spending way too much on the correct installation tool it's good enough and out of sight.
1688695677516.png
1688695700194.png
1688696661385.png
 

mew0717

New member
Joined
Nov 10, 2023
Messages
1
@DigitalPackrat did you buy the $500+ tool to insert these? Your solution looks like it would probably work for me. Attached is a picture of my damage. Curious to know if you found an aftermarket press cheaper and if you have insight into what i might need to do to get this fixed.
 

Attachments

  • RackEars.jpg
    RackEars.jpg
    579.4 KB · Views: 49

PAININMYREAR

New member
Joined
Mar 29, 2024
Messages
1
I know this is a 2018 thread but this was google's best result and cmandp/svtkobra7 suggestion of mcmaster flush mount press fit nuts was close enough to repair a SC847 chassis. Specifically 94674A515 nuts and 97519A096 rivets. On the SC847, I needed to drill a few rivets and remove the drive cages for access.

94674A515 is nearly identical to a factory installed Supermicro nut but has a groove cut in it.
1688695765253.png


The old holes were out of shape, I roughed them into shape with pliars then some hammer and dolly work. Still far from perfect but close enough to rivet the drive cage back in. The fix is ugly zoomed in on camera but short of having a press that could fit in between the sheet metal sides of the chassis and a die or spending way too much on the correct installation tool it's good enough and out of sight.
1688695677516.png
1688695700194.png
1688696661385.png

Left us hanging. Doubt he spent $500 to do it but failed to tell us how. How utterly annoying and useless....
 

carlsoncustoms

New member
Joined
Feb 12, 2025
Messages
2
@DigitalPackrat did you buy the $500+ tool to insert these? Your solution looks like it would probably work for me. Attached is a picture of my damage. Curious to know if you found an aftermarket press cheaper and if you have insight into what i might need to do to get this fixed.
I’ll let you know how my adventure goes, I ordered the parts he listed to fix a chassis I bought with a missing handle that I didn’t realize at the time was missing the nut inserts.

I didn’t use a press, I just lined the nut up and thwacked it with a hammer. Once they get past they are a little loose. I put a piece of scotch tape on the back to hold it in and I put a spot of super glue on it to hold it.

In a couple days my new handle will arrive and I’ll reassemble it all and rivet it all together and I’ll come back and let you know if it all worked.
 
To avoid these ads, REGISTER NOW!
Top Bottom