To avoid these ads, REGISTER NOW!

Above 1200 Sq/FT Restored 1930's Auto Shop

Wokspaces above 1200 squarefeet.

ZRX61

Well-known member
Joined
Aug 15, 2006
Messages
28,716
Location
Solar Blight Valley, SoCal
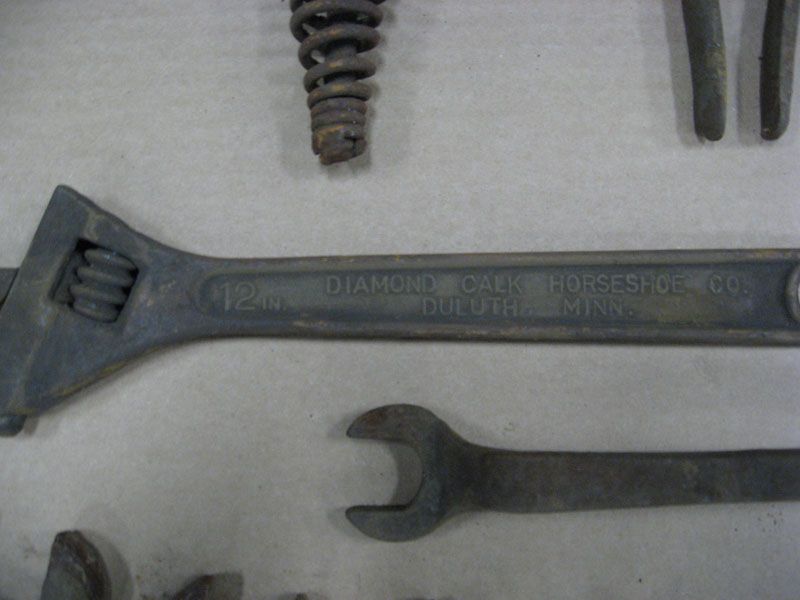
Besides removing the rust not sure what might be the proper way to recondition them. Some of them show evidence of paint. If they're just left raw steel they'll rust again eventually. I think any surface protection that was on them originally is long gone. Any thoughts out there on what might be the best way to keep them in shape. While I don't plan on using them on a regular basis, if I need them, anything in the shop is there to work.

Thomas

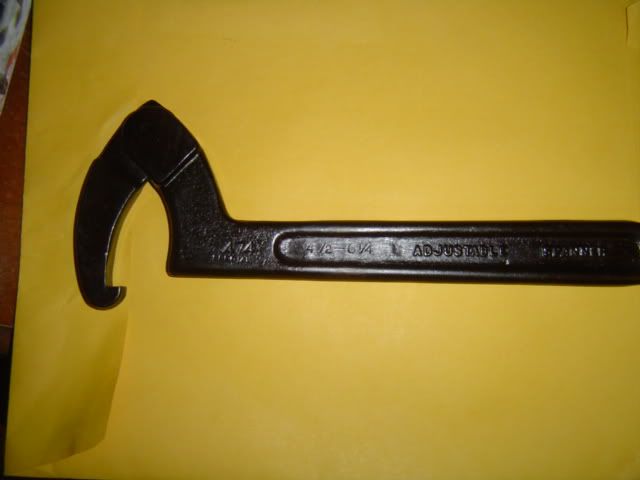
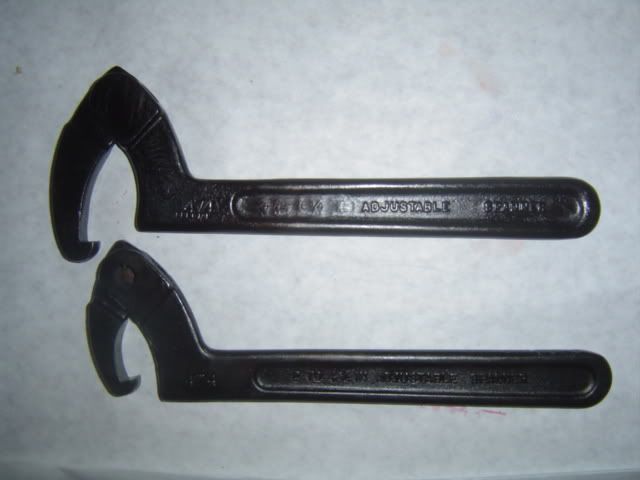
Glassbead blast then repeated blowtorch/oil dipping until they turn black.

Like this:

3-27-10a006.jpg

3-27-10a007.jpg

Projects6006.jpg
 
To avoid these ads, REGISTER NOW!

ZRX61

Well-known member
Joined
Aug 15, 2006
Messages
28,716
Location
Solar Blight Valley, SoCal
8-14-10011.jpg


8-14-10013.jpg


Baracalo005.jpg
 

jsaw

Well-known member
Joined
Oct 11, 2008
Messages
1,788
Location
Geneva, N.Y.
The aluminum wrenches that you have pictured, look like ones that I have seen used on dairy farms to turn fittings on the stainless steel piping.
 
OP
B

BB767

Well-known member
Joined
Dec 24, 2009
Messages
3,724
Location
Philo, IL
That hammer looks like a meat tenderizer and the pliers/cutters look like ferrier tools (for removing horseshoe nails).

BTW, do you have room for an Evinrude outboard motor? :bounce::thumbup:

As a matter of fact I do have room for it Dennis. When are you guys gonna bring it??? :)

My first thought on that hammer was that's a meat tenderizer but then thought, no, what the heck would that be doing out in the shop? :dunno: We'll probably never know why it was out there.

Thomas
 
OP
B

BB767

Well-known member
Joined
Dec 24, 2009
Messages
3,724
Location
Philo, IL
My grandfather had a hammer like that with the pattern on both heads. He used it as a meat tenderizer, though I dont think that was the intended purpose. The red handled pliers are used as fencing pliers, with the top part used to pull staples and the sides used to cut barbed wire. The 3 "nipper" pliers (lower left) look like what are used to trim horse hooves.

I had seen the fencing pliers before but couldn't remember their specialty use. The farmers used to use a lot of barb wire around here 50+ years ago when live stock was more common.

Looks like the consensus is the nippers were indeed for horse hooves. Thank you very much.

Thomas
 
OP
B

BB767

Well-known member
Joined
Dec 24, 2009
Messages
3,724
Location
Philo, IL
The aluminum wrenches that you have pictured, look like ones that I have seen used on dairy farms to turn fittings on the stainless steel piping.

I'll get the sizes on them and the manufactures writing on the sides. The large one I would guess to be 5"-6" opening, very unusual. Thanks.

Thomas
 

ZRX61

Well-known member
Joined
Aug 15, 2006
Messages
28,716
Location
Solar Blight Valley, SoCal
Any motor oil, I think I used Valvoline 30wt. Grab the tool with some visegrips, heat, dip, repeat. Do it outdoors & somewhere where oil drips won't matter because it can be just a bit messy. No need to heat the tool red hot, just get it "too damn hot to touch". Do one end, change the grip & do the other. Experiment a bit, you'l soon get the hang of it.
Caution: there will be flaming oil & smoke.... & it won't turn black with just 2 or 3 dip/heat cycles...
 
Last edited:
OP
B

BB767

Well-known member
Joined
Dec 24, 2009
Messages
3,724
Location
Philo, IL
Here are a few more of my daughters photographs from my first week of ownership. I've posted similar ones (page 81, post#1613,) but these are new. These are on the east side of the shop.

EastSide05sm-2.jpg


The lift room is on the left side behind where the old, scrap oil tanks are sitting on their ends.


EastSide05sm-1.jpg


Slightly to the right of the tree you can see the stems of the honey suckle bushes that I trimmed off. To the left of the tree trunk is a brown air tank that supplied a second air powered, drive on hoist located outside. Behind, by the window are propane tanks that were piped inside the shop. They had a torch in this area and this is where radiators were soldered and repaired. To the right...

EastSide05sm-3.jpg


...in the foreground is a "portable" arc welder on a skid that was powered by a 4 cylinder Continental engine. It got scraped. Lots of copper in that welder. Behind the welder, slightly left is the extended post of another in ground, drive on floor hoist extended up about 4 feet. Note the scrap pile in the background on the right.

EastSide05sm-4.jpg


Reverse angle on the welder and the hoist post. This second lift had drive on ramps much like the Rotary Lift now situated inside. In the 50's these ramps were removed and turned into a car trailer. This same fate happened to many of these old drive on lifts. The Johnson's still used this lift for trucks that were too big to bring inside on the other lift. They would drive them over the post and use the post only to lift the vehicle up a few feet. Not the safest way to do it but it seemed to work. This lift used only pneumatics from the air tank already mentioned. No hydraulic fluid at all. The tires and rims came off the family Studebaker last seen in front of the shop on page 75, post # 1482.

EastSide05sm-5.jpg


A close up of the post.

EastSide05sm-7.jpg


This is the back side of the shop. I hadn't cleaned much of the "jungle" out yet. These days my new barn is located in the distance, back right.

EastSide05sm-8.jpg


And so the tire pile begins...eventually 278 were disposed of and 4 more were recently discovered in the tool shed. Hope you're taking notes for the quiz?? :dunno:

EastSide05sm-9.jpg


There's a roll of barbed wire in the back. Some of the now, 56 tons of metal recycled off the property.

I also have several interior shop pictures from this same first week I'll get on here.

Thomas
 
OP
B

BB767

Well-known member
Joined
Dec 24, 2009
Messages
3,724
Location
Philo, IL
An update I found on that adjustable wrench from Diamond Calk Horseshoe co...

IMG_3271.jpg


"The Diamond Calk Horseshoe Company was founded in 1908 by Otto Swanstrom, a blacksmith operating in Duluth, Minnesota. As the name suggests, the company was formed to make calks and horseshoes, and their initial product was a patented insertable calk for horseshoes. (A calk is a gripping bit on a horseshoe, added for better traction on ice or slippery surfaces.)

Diamond was very successful in their calk and horseshoe business, but as the tractor and automobile reduced the need for horses and horseshoes, the company turned its forging skills to the production of adjustable wrenches.

An example of an early Diamond adjustable wrench can be seen in the illustration, part of an advertisement placed in a 1922 issue of The Horseshoer's Magazine.

In the mid 1920s Diamond was selected as the supplier of adjustable wrenches for the Motor Tool Specialty Company, the distributor organization for the Snap-On Wrench Company. This must have been both a high honor and a tremendous boost for their sales efforts, as Diamond brand wrenches were shown together with the Snap-On sockets and drive tools. Snap-On continued to offer Diamond brand wrenches in its catalogs until the late 1930s, and when its own Blue Point brand adjustable wrenches were introduced, Diamond appears to have continued as the contract manufacturer."

So Diamond Calk has a connection with Snap-On Tools. I'd have never guessed.....:dunno:

Thomas
 

Superlifted06FX4

Well-known member
Joined
Nov 19, 2010
Messages
515
Location
Lowell, IN
An update I found on that adjustable wrench from Diamond Calk Horseshoe co...

IMG_3271.jpg


"The Diamond Calk Horseshoe Company was founded in 1908 by Otto Swanstrom, a blacksmith operating in Duluth, Minnesota. As the name suggests, the company was formed to make calks and horseshoes, and their initial product was a patented insertable calk for horseshoes. (A calk is a gripping bit on a horseshoe, added for better traction on ice or slippery surfaces.)

Diamond was very successful in their calk and horseshoe business, but as the tractor and automobile reduced the need for horses and horseshoes, the company turned its forging skills to the production of adjustable wrenches.

An example of an early Diamond adjustable wrench can be seen in the illustration, part of an advertisement placed in a 1922 issue of The Horseshoer's Magazine.

In the mid 1920s Diamond was selected as the supplier of adjustable wrenches for the Motor Tool Specialty Company, the distributor organization for the Snap-On Wrench Company. This must have been both a high honor and a tremendous boost for their sales efforts, as Diamond brand wrenches were shown together with the Snap-On sockets and drive tools. Snap-On continued to offer Diamond brand wrenches in its catalogs until the late 1930s, and when its own Blue Point brand adjustable wrenches were introduced, Diamond appears to have continued as the contract manufacturer."

So Diamond Calk has a connection with Snap-On Tools. I'd have never guessed.....:dunno:

Thomas

Very interesting....
 

Warg

Well-known member
Joined
Nov 17, 2009
Messages
62
Location
Malmo, Sweden
Yup, that adjustable wrench is a typically Swedish design, and if I recall correctly, the design was made by the BAHCO tool company. They're still famous for their good tools, although the quality these days has been lowered, and most of the production is in Spain.
Interestingly it seems to have the "newer" design feature of an 15 degree angle between jaws and handle. The original design was 45 degrees. I have a couple of both designs and I use them still today.

-Paul

PS, How's the pool coming? ;)
 

344chief

Well-known member
Joined
Sep 13, 2009
Messages
118
Location
Norway
Yup, that adjustable wrench is a typically Swedish design, and if I recall correctly, the design was made by the BAHCO tool company. They're still famous for their good tools, although the quality these days has been lowered, and most of the production is in Spain.
Interestingly it seems to have the "newer" design feature of an 15 degree angle between jaws and handle. The original design was 45 degrees. I have a couple of both designs and I use them still today.

-Paul

PS, How's the pool coming? ;)

I believe the US made adjustable wrenches works in the opposite direction, the threads being links/right compared to the original Bacho design ?
 

tdkkart

Well-known member
Joined
Jun 17, 2006
Messages
6,887
Location
Eastern Iowa
An update I found on that adjustable wrench from Diamond Calk Horseshoe co...

IMG_3271.jpg


"The Diamond Calk Horseshoe Company was founded in 1908 by Otto Swanstrom, a blacksmith operating in Duluth, Minnesota.


Hmmm??
I went to electronics school in Minneapolis 25 years ago with a Swanstrom from Minnesota, had relatives in the Duluth area. He works at the same company as me now.
 

3bay

Well-known member
Joined
Dec 29, 2007
Messages
157
Location
Indiana
I had seen the fencing pliers before but couldn't remember their specialty use. The farmers used to use a lot of barb wire around here 50+ years ago when live stock was more common.

Even today a farmer who has livestock will have at least a couple pairs of fence pliers, they have many purposes and I've worn out a few pairs over the years.

I bought a new pair just a few months ago.
 

Attachments

  • fence_2_methods_staple_removal.jpg
    fence_2_methods_staple_removal.jpg
    40.8 KB · Views: 251
  • 3.png
    3.png
    15.8 KB · Views: 38

FordExec

Member
Joined
Nov 21, 2010
Messages
13
This wrench caught my eye. As you know Mr.Johnson was a blacksmith. This 12" adjustable wrench is made by the "Diamond Calk Horseshoe Co., Duluth Minn." That's a new manufacturer for me. Maybe they're quite famous, but I've never heard of them. Some of the other tools have manufactures names on them, just haven't really looked that close at them yet.
Anyone who can help out and identify the uses of any tools seen here, as always, feel free to please help us out.

Thomas, can you tell me whether the "Diamond Calk" adjustable wrench is an adjustable metric or an adjustable standard/SAE?
bb
 

Warg

Well-known member
Joined
Nov 17, 2009
Messages
62
Location
Malmo, Sweden
I believe the US made adjustable wrenches works in the opposite direction, the threads being links/right compared to the original Bacho design ?

I'm not sure if there is any difference, never seen an American made of those. I only have the originals (and the occasional Japanese cheap copy). :)

Thomas, can you tell me whether the "Diamond Calk" adjustable wrench is an adjustable metric or an adjustable standard/SAE?
bb

Those wrenches adjust seamlessly, metric, SAE and anything between it. Very useful for bolts and nuts that were made before there were any standards at all.

-Paul
 

Stuart in MN

Well-known member
Joined
Sep 8, 2005
Messages
23,129
Location
Minneapolis
This wrench caught my eye. As you know Mr.Johnson was a blacksmith. This 12" adjustable wrench is made by the "Diamond Calk Horseshoe Co., Duluth Minn." That's a new manufacturer for me. Maybe they're quite famous, but I've never heard of them.

It may be a regional thing but living in Minnesota, I've known about them for a long time...I have a couple Diamond Caulk wrenches I got from my dad, I imagine they're 70 years old or more. I've picked up a few more over the years. :)
 

Attachments

  • diamalloy.jpg
    diamalloy.jpg
    108.9 KB · Views: 252
To avoid these ads, REGISTER NOW!
OP
B

BB767

Well-known member
Joined
Dec 24, 2009
Messages
3,724
Location
Philo, IL
This wrench caught my eye. As you know Mr.Johnson was a blacksmith...

.....Thomas, can you tell me whether the "Diamond Calk" adjustable wrench is an adjustable metric or an adjustable standard/SAE?
bb

Good one Bill!! :D

IF I were a REAL, REAL serious kind of guy I'd point out that the handle has 12 in. cast into it....

IMG_3272.jpg


....and not .30480 m therefore making it SAE. But I'm a fun loving guy so thanks for your day brightener. :thumbup:

As I've always told my kids, "if you're not having fun, what's the point?"

Thomas
 
OP
B

BB767

Well-known member
Joined
Dec 24, 2009
Messages
3,724
Location
Philo, IL
The aluminum wrenches that you have pictured, look like ones that I have seen used on dairy farms to turn fittings on the stainless steel piping.

Here's a follow up to that...

IMG_3335.jpg


"STUART JOHNSON" on one side ( I doubt any relation-but hey- who knows!! :dunno:


IMG_3338-1.jpg


"LAKE GENEVA" on the other. The opening in 4 1/2". The smaller wrench...


IMG_3336.jpg


"KENOSHA WISCONSIN" (home to Snap-On Tools I might point out) and is blank, I recall, on the other side. It's opening is 2 1/2"

Thomas
 
OP
B

BB767

Well-known member
Joined
Dec 24, 2009
Messages
3,724
Location
Philo, IL
...I have a couple Diamond Caulk wrenches I got from my dad, I imagine they're 70 years old or more. I've picked up a few more over the years. :)

Ya, I'd say that was "a couple" :D

This is the reverse side of mine...

IMG_3334.jpg


Here's what my research says about it...


Diamalloy , marked with "Forged Diamalloy Steel" and "Made in U.S.A." forged into the shank, with "Diamond Calk Horseshoe Co." and "Duluth, Minn." forged into the reverse. Both sides are also marked with the "12 In." nominal size.


The finish is plain steel.

The plain steel finish with the Diamalloy trademark suggests production during the 1942-1945 wartime years, when standard chrome-plated finishes were temporarily discontinued.

And two other wrenches of any note in this lot...

IMG_3342.jpg


IMG_3343.jpg


This one has 9 AUTO cast into it.


IMG_3341.jpg


And then this one. It's the only one I quickly looked at that was engraved. Faintly seen is--V.H.J.- Virgil H. Johnson.

Thomas
 
OP
B

BB767

Well-known member
Joined
Dec 24, 2009
Messages
3,724
Location
Philo, IL
Following are some more interior pictures from my first week of ownership in Nov, 2005.

DSCN0081.jpg


This is standing in the doorway of the fab room looking into the lift room looking east toward the windows in there. On the left out of frame is the Pepsi machine. Back and to the right is the 30 ton press I saved with a go kart leaning against it, front wheels in air. The black cables in the center are welding cable extensions. The red 5 gallon fuel can in the foreground is sitting on one of the lift ramps.


IMG_3299.jpg


This is the same view taken today, Nov, 2010- 5 years and untold sweat later! Use the lift ramp and windows to orientate yourself.

Next is......

DSCN0085.jpg


...the same room looking slightly left. Again standing in the fab room doorway looking into the lift room. The Pepsi machine just out of frame to the left. The fire extinguisher is hanging on that doorway. Background shows shelving with NOS auto parts. You can just see below the extinguisher, part of a Chrysler 340 engine attached to Mr.Johnson's engine stand.

IMG_3305.jpg


Same approximate view 5 years later in Nov, 2010. The doorways had multiple holes of various sizes all over them so I used stainless steel to finish them out.

DSCN0087.jpg


These manuals, seen through a ladder, were sitting on their backs on the shelves by the Rotary Lift controls. That ladder by the way was used to get up into a car when the car was on the lift and up in the air. Note the Chevrolet Truck Shop Manual 1958 Models and above it, 1959-60 Chevrolet Passenger Car Shop Manual....

IMG_3303.jpg


...seen here now standing correctly, back upright....

IMG_3304.jpg


.... with some of the other manuals that were left.

There is more on the way, to be continued....

Thomas
 

FordExec

Member
Joined
Nov 21, 2010
Messages
13
Good one Bill!! :D

IF I were a REAL, REAL serious kind of guy I'd point out that the handle has 12 in. cast into it....

IMG_3272.jpg


....and not .30480 m therefore making it SAE. But I'm a fun loving guy so thanks for your day brightener. :thumbup:

As I've always told my kids, "if you're not having fun, what's the point?"

Thomas

You're welcome! I guess I should have caught the 12" marking on the wrench.
 
Joined
Oct 23, 2010
Messages
19
Location
Lacombe, Alberta
You probably have already explained this am Im sure I missed it, but how did you keep everything organized as you went through this process. Do you have another building that you moved everything into, sorted, recycled, gave away, moved back into this building, etc? Or did you deal with each item as it was first touched in the "mess"?

I would love to tackle a project like this. I think it would be extremely fun as I am one who loves to see progress, and also love old treasures. But at the same time I dont think I would be able to keep it organized to a point where I could stay sane.

You have done a amazing job with this project. I have shared this thread with anyone that will look at it.
 

willy3486

Well-known member
Joined
Jan 14, 2010
Messages
1,594
Location
Middle Tennessee
I just got through rebuilding a old drill press for my shop. I used the electrolitic method I posted about on some of the parts. You can see in this photo the handles that tighten the drill head to the post and also the handle that tightens the drill spindle in the photo. I used it on both handles. I like to clean parts like these this way to get the rust off. I let it clean then I clean the residue off usually by taking a fine steel wool or scotchbrite to the part. Once it is clean I either coat it in wd40 or clear coat it which is what I did to these knobs. They have a black tint in the photo but no rust anymore.

2639849170101948653S425x425Q85.jpg


The flip side of the drill I cleaned the 4 spoke handle as well. I have found out you leave in it a while it will get it cleaner and cleaner. I left these parts in not as long because I wanted a darker shade. I have put in stuff that eventually would get bright.
I took the round bakelite knobs off to clean it. They just unscrewed and I didn't want to chance hurting them. I did it one time to a draw knife with a wood handle and it stained the wood black.

2986354950101948653S425x425Q85.jpg


I also used it some on my scroll saw I rebuilt. I used it with the head of it. The head that holds the foot and all those parts came clean. After I did it and cleaned them I used primer and painted the gray parts. Here it is after the rebuild. It takes primer and paint good.

2763724580101948653S425x425Q85.jpg


And the last picture is of my lathe. I found this and it was entirely rusted up. Nothing would spin. I did it to the head and tailstock to break it down. To my surprise the bearings were in good shape,the other pieces were just rusted. I was able to put it back together,make a stand and put a motor on it. I rebuilt it 7 or 8 years ago.

2420426650101948653S425x425Q85.jpg


So I have had good luck with it. I do use a beefed up power supply but any battery charger will work.
 
OP
B

BB767

Well-known member
Joined
Dec 24, 2009
Messages
3,724
Location
Philo, IL
I just spent the past few days reading this from start to finish. INCREDIBLE! You sir, deserve a medal.

What a nice thought, but I'd just as soon have....

IMG_3406.jpg


... a nice cold "Green River" out of the Pepsi machine! I got it stocked with 'em. A buddy of mine say's he comes over for the cold soda and stays for the great music. :)

Thomas
 
OP
B

BB767

Well-known member
Joined
Dec 24, 2009
Messages
3,724
Location
Philo, IL
You probably have already explained this am Im sure I missed it, but how did you keep everything organized as you went through this process. Do you have another building that you moved everything into, sorted, recycled, gave away, moved back into this building, etc? Or did you deal with each item as it was first touched in the "mess"?

I would love to tackle a project like this. I think it would be extremely fun as I am one who loves to see progress, and also love old treasures. But at the same time I dont think I would be able to keep it organized to a point where I could stay sane.

You have done a amazing job with this project. I have shared this thread with anyone that will look at it.

Thank you Tyler for sharing this with others, that was the whole idea behind my starting this thread 11 months ago. Sharing with those who might find it of interest and apparently there were a lot who had interest! That's a good thing as it's really inspired me to stick with organizing more material for inclusion here.

Now to answer your question about how I went through the process of organizing this project, yes that has been answered here before. Once I finish the index for this thread ( I hope before page 100!!!!) I will be able to direct you right to it. That said I do have some new (old) photographs that will lead in to that very subject. See my next post and that'll give you some insight. Thank you again for the kind words, they are much appreciated. :thumbup:

Thomas
 
OP
B

BB767

Well-known member
Joined
Dec 24, 2009
Messages
3,724
Location
Philo, IL
Continuing with some images from my first week of ownership, Nov, 2005....

NorthGar05sm-1.jpg


This is the north overhead door on the 1958 north addition, see page 17, post # 339 for more on that addition. This is the back of the shop away from the road out front.

IMG_3380.jpg


Here it's seen 5 years later, Nov, 2010 the rear end of the Terraplane lurking in the background to the right around the corner.

DSCN0063.jpg


The first order of business before that door could be opened was to clear away enough brush and "debris" outside so I could get to a few of the buildings on the property. I initially worked only outside while the weather was nice and dry. Once the weather turned rainy I would work inside. You can see here that the shop was absolutely filled from one end to the other with "treasure" so to speak. To the left of the green John Deere grade box is the narrow path that lead through the building. I started the clean out at this doorway and slowly worked my way to the front of the shop.

IMG_3405.jpg


A look at that same overhead door opening almost 5 years later, Nov, 2010. Paint has been removed from the outside of the concrete blocks, a concrete driveway poured and the overhead car port has been added.

DSCN0053.jpg


As I sorted out material I was going to keep, I placed it on top of other material that was already in other buildings on the property, primarily the two car garage and tool shed seen here in the background. I had to create some working space so it meant I had to sort it twice but it got me going. You can just see some bushes to the left showing I had only cleared enough space to work in front of the overhead door. Note the concrete block pile in the back to the right. Those were what is left of the original chimney for the forge in the shop which I dismantled.

IMG_3310.jpg


5 years later. The rock pile is my solution to the grade work necessary to keep water from running around the corner of the shop and potentially coming in under the overhead door. There is road pack under the rock pile. It's about 2' above the driveway grade in front of the door. Seems to have worked, never had any water in front of that door.

IMG_3353.jpg


Here's a better prospective of it. The road pack directs water to the end of the driveway and the rock pile just dresses up the road pack and provides a nice home for toads and who doesn't love toads? :dunno: These rocks were mainly collected from the fields around here. The frost brings some up every year. They were deposited here by the glaciers that came through and ground this area flat. The last glacier came through some 15,000 years ago and with global warming they melted leaving behind flat ground and these rocks. As they were carried down from Wisconsin and Canada they were ground round in profile. I need about 1 years worth more to complete the pile.

Be sure now to take notes for that all important quiz!! :)

I'll continue next with more from the inside.


Thomas
 

jaso

Member
Joined
Apr 26, 2010
Messages
16
Location
Geelong Australia
An update I found on that adjustable wrench from Diamond Calk Horseshoe co...

IMG_3271.jpg


"The Diamond Calk Horseshoe Company was founded in 1908 by Otto Swanstrom, a blacksmith operating in Duluth, Minnesota. As the name suggests, the company was formed to make calks and horseshoes, and their initial product was a patented insertable calk for horseshoes. (A calk is a gripping bit on a horseshoe, added for better traction on ice or slippery surfaces.)

Diamond was very successful in their calk and horseshoe business, but as the tractor and automobile reduced the need for horses and horseshoes, the company turned its forging skills to the production of adjustable wrenches.

An example of an early Diamond adjustable wrench can be seen in the illustration, part of an advertisement placed in a 1922 issue of The Horseshoer's Magazine.

In the mid 1920s Diamond was selected as the supplier of adjustable wrenches for the Motor Tool Specialty Company, the distributor organization for the Snap-On Wrench Company. This must have been both a high honor and a tremendous boost for their sales efforts, as Diamond brand wrenches were shown together with the Snap-On sockets and drive tools. Snap-On continued to offer Diamond brand wrenches in its catalogs until the late 1930s, and when its own Blue Point brand adjustable wrenches were introduced, Diamond appears to have continued as the contract manufacturer."

So Diamond Calk has a connection with Snap-On Tools. I'd have never guessed.....:dunno:

Thomas

found this info as well
http://home.comcast.net/~alloy-artifacts/diamond-calk-horseshoe.html

hope that gives you a bit more insight to the shifter as well

Jason
 

ZRX61

Well-known member
Joined
Aug 15, 2006
Messages
28,716
Location
Solar Blight Valley, SoCal
I think that 12in adjustable should be the first hot oil treatment after you've glassbeaded it :)

I did a couple of Williams C-spanners & they came out looking just ****.

wrench001.jpg


Or..
You could mail it here, I'll sort it & mail it back, then you'l have something to gauge your success against ;)
 
Last edited:
OP
B

BB767

Well-known member
Joined
Dec 24, 2009
Messages
3,724
Location
Philo, IL
OP
B

BB767

Well-known member
Joined
Dec 24, 2009
Messages
3,724
Location
Philo, IL
I think that 12in adjustable should be the first hot oil treatment after you've glassbeaded it :)

I did a couple of Williams C-spanners & they came out looking just ****.


Or..
You could mail it here, I'll sort it & mail it back, then you'l have something to gauge your success against ;)


Nice work as always Rick! What was that mailing address again to have you sort it and then I'd have something to gauge it to??.... and then of course mail it back me!! :D

Thomas
 
To avoid these ads, REGISTER NOW!
Top Bottom