To avoid these ads, REGISTER NOW!

Above 1200 Sq/FT Restored 1930's Auto Shop

Wokspaces above 1200 squarefeet.

merr6267

Well-known member
Joined
Nov 17, 2010
Messages
47
Location
Ravenna, MI
Merr
That is a factory 64 Impala rear end not a Ford.

Thomas will know all the details but it should be an earlier Salisbury style rear with 8.2" ring gears.

Looks like 2.91 gearing.

Interesting,
I didn't know that GM built that style in cars. I do know that they had the drop-out style in 3/4 ton trucks, but it was definitely not that one.

Now that I look a little more closely, I can see it's not a 9", but it sure does look a lot alike. I just assumed that it was an aftermarket adaptation, or a home-brew deal like I have in my Jeep.

Thanks for the new info.

Phill
 
To avoid these ads, REGISTER NOW!
OP
B

BB767

Well-known member
Joined
Dec 24, 2009
Messages
3,724
Location
Philo, IL
That exhaust system is nice (Flowmaster?) and someone knows how to tuck those pipes into the chassis nice and snug!
The diameter of the pipes looks a little large, but I assume that's because it's new and pretty, or a trick of the light - Pure Stock rules don't allow a freer flowing exhaust, do they?

The SPOSE benches are great! Stuff like that makes fixing broken axles a pleasure, I reckon!

As always, thanks for keeping us all in the loop!

m

oberst, the exhaust system uses...

IMG_9731.jpg


... Dynomax muffles in a stock profile and are polished stainless steel...

IMG_9733.jpg


...and the pipes...

IMG_9732.jpg


... hangers and hardware are all from Shafers Reproductions. Every component of the system is stainless steel, mufflers, pipes, clamps, hangers and all hardware. I did the installation myself and it's all in the stock location.

IMG_9729.jpg


I can't say enough good things about any reproduction parts I get from Shafers. They are always high quality, exact as can be and are made in the USA.

IMG_9734.jpg


As for it being pretty and new, pretty it is except when Cameron does burnouts, but as for new; well it's 10 years old. Surprise! :) I installed that system when I first set the car up and wanted to do it right the first time. Stainless is a little more expensive but it's like powder coating, it's almost forever. The only drawback for racing is it's heavier than regular steel but that was a trade off I was willing to make for longevity.

IMG_9682.jpg


Everything on the car has held up remarkably well. I've been very happy with how it performs and looks these last 10 years. Storing it in a environmentally controlled area I'm sure has helped. Our Pure Stock rules allow an exhaust system to be 2.5" diameter from the manifolds to the tail pipes. From the factory the '64 Impala 300 HP engine had 2.5" exhaust up to the muffler inlet and reduced to 2.25" on the outlet so it's been upsized .25" from the muffler back, not a real big deal.

BTW you are so right about fixing broken axels on those benches. They are solid, stable and have a large work surface, all good things. :thumbup:

Thomas
 
OP
B

BB767

Well-known member
Joined
Dec 24, 2009
Messages
3,724
Location
Philo, IL
Thomas,

WOW, great work! I've chased a many of threads with my Tap/die sets, the do indeed help a lot. Question, I've heard chasing threads with a normal tap is bad, and you can actually do damage (supposed to use a special thread chasing tap). I've not heard the same about chasing threads with a die, nor have I seen special thread chasing dies. Do you know if they make a thread chasing die?

Will

Yes they do make thread chasing dies.

W_A_Watson_II, you bring up a most excellent point! I should have pointed that out myself but thank you for bringing it up. There is a difference between a normal tap and die and thread chaser / thread restorer tap and die.

Thread chasers are slightly smaller in diameter than a normal tap or larger than a normal die. They don't have a cutting edge on them and are used only to clean threads and restore a damaged thread by pushing metal back into it's original location. A tap or die on the other hand does have a cutting edge which can clean a thread out but when it come to a damaged area it recuts metal to form a new thread, rather than push the existing, damaged metal back into its original location. That's why it's recommended to use a specific thread chaser and not a tap or die when chasing threads to prevent unwanted reduction in metal whenever possible.

OK that said, a normal tap or die can be used to chase threads if it is done with care.


IMG_9680copyEdit.jpg


Note that the die I'm using doesn't have a handle on it. I'm just turning the die itself with my hand. That way I'm not very likely to use enough pressure to cut a new thread instead just clean the thread. Same with a tap. They can be used but it must be done with care. Using a thread chaser it's not possible to cut new threads so you can't possibly reduce the metal and possibly weaken it by doing so. I would guess that most of us just use normal taps and dies for thread chasing to save the expense of and having to provide storage for more tools!

I was taught to use regular taps and dies for chasing early in my career and I didn't think to explain the potential pitfalls of using them. My bad! :eek:

jsaw is quite correct, they make both internal and external thread chasers. They really aren't all that expensive and make thread chasing a very easy task. My thanks to both you learned gentleman. :thumbup:

Thomas
 
Last edited:

charlief1

Well-known member
Joined
Dec 1, 2010
Messages
248
What you've got there is an adjustable die Thomas. You can open or tighten it up to fit the threaded portion you're trying to fix/thread. I've got 1 for 1.125 12 TPI whitworth threads that I used to thread barrels with. The fact that it was adjustable was a big advantage when trying to fit a barrel in a reciever. If it barely fit you could tighten it up and just barely reduce the threads to get the barrel to fit. ;)
 
OP
B

BB767

Well-known member
Joined
Dec 24, 2009
Messages
3,724
Location
Philo, IL
Re: the PRD and the PPGS C-clamps

The powder coat looks great, but the clamps possibly biting into the coating made me wince! I went looking for these -
http://www.maxiloc.com.au/maxiloc_p...811P&textid=Toggle Clamp, Vertical Acting, HD

I don't know if there is room to mount them, but having a couple on both the PRD and the PPGS might make a slick addition and little chance of marring the finish.

I'm thinking those would not keep the tools 100% stable? With the rubber feet and all? My thought were (to late now, though), you could just weld four shims to the underside, and mask them before coating. That way you have a flat protruding surface to clamp to. There is always next time, boss!

The top plate appears to have eight holes. The holes could be tapped for wing bolts and the mounting plates drilled with matching plain holes. Some of your aluminum plates are as big or bigger than the top plate on the stand while some are smaller. The small plates would line up with the inner square and the large ones with the outer square of holes. The four wing bolts you aren't using could just be screwed in from the bottom so they don't interfere with the grinder you are using.

Assuming you would want stainless steel wing- or spade-head bolts, McMaster-Carr carries them in quite a few thread sizes.

92625ac1l.png
90772ac2s.png
http://www.mcmaster.com/#wing-bolts/=j8eup6

While those are all admirable thoughts...

IMG_9754.jpg


IMG_9756.jpg


...keep in mind that powder coating, unlike paint, is tough stuff!

IMG_9757.jpg


I considered doing something to protect it underneath like using an aluminum shim between the clamp pad and the powder coat...

IMG_9758.jpg


...but in the end figured that coating really is rugged. If it was clamping to a surface that could be seen I might have done it differently...

IMG_9759.jpg


...but it's underneath and is out of sight. While it might scuff a bit it should hold up nicely through the years, honest. Using my clamps make it a snap to change out different sized grinders and gives me plenty of flexibility. K I S S is often the best way for me anyway!

Thanks guys for the suggestions though. I have learned a lot from everyone here so don't be shy. ;)

Thomas
 
OP
B

BB767

Well-known member
Joined
Dec 24, 2009
Messages
3,724
Location
Philo, IL
What you've got there is an adjustable die Thomas. You can open or tighten it up to fit the threaded portion you're trying to fix/thread. I've got 1 for 1.125 12 TPI whitworth threads that I used to thread barrels with. The fact that it was adjustable was a big advantage when trying to fit a barrel in a reciever. If it barely fit you could tighten it up and just barely reduce the threads to get the barrel to fit. ;)

And by having it open to it's largest diameter, it makes using it for chasing threads much easier and more unlikely to cut new threads. That's why I can thread it with the die only, no handle.

Thanks charlief1

Thomas
 

mdbeck1

Well-known member
Joined
Mar 7, 2010
Messages
2,297
Location
Norman, OK
While those are all admirable thoughts......

...but in the end figured that coating really is rugged. If it was clamping to a surface that could be seen I might have done it differently...

IMG_9759.jpg


...but it's underneath and is out of sight. While it might scuff a bit it should hold up nicely through the years, honest. Using my clamps make it a snap to change out different sized grinders and gives me plenty of flexibility. K I S S is often the best way for me anyway!

Thanks guys for the suggestions though. I have learned a lot from everyone here so don't be shy. ;)

Thomas

I expected that you would have a slicker system than C Clamps. Maybe a piece of small C-Channel that the plate slid into in the back and a small clamp of some type on the front (hard mounted to the plate) to hold it all down. :dunno:
 

Omphaloskeptic

Well-known member
Joined
Oct 11, 2008
Messages
2,346
Location
Ultima Ratio, Wa.
Okay Thomas, I have to agree with your 'KISS' philosophy. Maybe I was just taken aback because the C-clamps were not powder coated; the project didn't seem to have that 'Thomas Touch' which we've all come to expect. lol
 

MisteR Tee

Well-known member
Joined
Nov 8, 2006
Messages
61
Location
England
Having been away from this forum for a while, I was intrigued to see the pics of a fairly "modern" Allard race car & thought you might be interested in an old Allard that I'm involved with. This one is the original Allard Chrysler dragster that Sydney Allard built in 1960/61 & raced against Dante Duce in the Mooneyes dragster & Mickey Thompson in the Harvey Aluminum Special.

The car had been on display in the Beaulieu Motor Museum for many years, without its original engine, but in 2008 a plan was formed to restore it, with many people & companies donating parts & labour to achieve this. 2 weeks ago, the car was invited to appear at the Chelsea Autolegends show in SW London & I was pleased to be asked to transport it from its temporary home at Andy Robinson Racecars in Basingstoke to London & back.

Here is the now dry-built car, with me & some fellow team members in period uniforms. The car will now be stripped & everything painted, chromed & polished, ready to be finally assembled & re-presented back to the museum. It will then be brought out for special occasions & "cacklefests", notably at Dragstalgia at its natural home, Santa Pod Raceway in Bedfordshire.

281959_10151225443783973_1416669249_n.jpg


This is the "mean & moody" shot taken at this year's Dragstalgia!

526155_460088690678984_1764200673_n.jpg
 

Jeff Ivers

Well-known member
Joined
Apr 9, 2010
Messages
2,549
Location
Oklahoma
BB767,

Whew! I have been in and out of this thread several times over the last couple of years and always felt I was missing something that would only be resolved by going through this sequentially. Started that process a couple of weeks ago and just made it to the last post!

Thank you for all you have shared on here. I really appreciate the way you approach what you acquired - preserve, repurpose, restore, recycle or donate as appropriate. Your restorations are superb. Your powder coater is a genious. You and he have powder coated things, I would have resorted to paint on because of the complexity. I do have a couple of questions I didn't see the answer to:

How do you keep everything so clean? Do you have Merry Maids coming to your shop weekly?

How many square feet is the restored shop?

What has happened to all the recovered treasures like the Fram and Champion signage I think I saw?

Best of luck with your continuing saga.
 
OP
B

BB767

Well-known member
Joined
Dec 24, 2009
Messages
3,724
Location
Philo, IL
How does the Brand "F" rear end fit into the rules for a "Stock" racing class? Safety, due to lack of C-clips?...

Thanks,
Phill

Merr
That is a factory 64 Impala rear end not a Ford.

Thomas will know all the details but it should be an earlier Salisbury style rear with 8.2" ring gears.

Looks like 2.91 gearing.

Interesting,
I didn't know that GM built that style in cars. I do know that they had the drop-out style in 3/4 ton trucks, but it was definitely not that one.

Now that I look a little more closely, I can see it's not a 9", but it sure does look a lot alike. I just assumed that it was an aftermarket adaptation, or a home-brew deal like I have in my Jeep.

Thanks for the new info.

Phill

Guess who's been gone but is now back?!

Phil, klaus is correct, it is indeed a stock GM '64 Impala rear positraction unit. Looking at the outside of the case...

IMG_9763copyEdit.jpg


...note the yellow circled area to the right.

IMG_9762.jpg


This close up shows how to identify whether or not it is a posi unit. The large elongated P between the two nuts denotes a posi unit. Slightly above and to the left of the P you can see the raised letters GM cast sideways into the unit. These casting letters are often obscured with caked on grease. If you really want to know, you'll need to clean that area off well to see the castings.

IMG_9764.jpg


This is the other side...

IMG_9765.jpg


..and bottom as well as...

IMG_9767.jpg


... the rear view. It uses a 4.11 rear gear ratio and a M20 Muncie wide ratio transmission.

IMG_9789.jpg


It needs that gearing to help launch a 3800+ lbs (1727 kg) car. (Picture from Stanton, MI 15-09-12) Thanks to you both for your input and interest.

Thomas
 
OP
B

BB767

Well-known member
Joined
Dec 24, 2009
Messages
3,724
Location
Philo, IL
I expected that you would have a slicker system than C Clamps. Maybe a piece of small C-Channel that the plate slid into in the back and a small clamp of some type on the front (hard mounted to the plate) to hold it all down. :dunno:

Okay Thomas, I have to agree with your 'KISS' philosophy. Maybe I was just taken aback because the C-clamps were not powder coated; the project didn't seem to have that 'Thomas Touch' which we've all come to expect. lol

Chris will never have to worry about me becoming big-headed or full of myself will she because everyone here keeps me pretty well grounded. :eek: OK, admittedly C-clamps aren't very elegant but they function so darn well with minimum fuss. All my grinders and the plates they are mounted to are different sizes plus who knows what the future will hold so using a system with permanent C-Channels or such makes that difficult. Also Omphaloskeptic if it helps at all I do have...

IMG_3560.jpg


...one of Mr Johnson's C-clamps that...

IMG_3988.jpg


...I had powder coated. If it helps any I could used it to clamp a grinder. :dunno: I'm trying not to get bogged down with over engineering, at least not until I retire and have more time. :) Thanks anyway fellows for the thought.

Thomas
 
OP
B

BB767

Well-known member
Joined
Dec 24, 2009
Messages
3,724
Location
Philo, IL
Having been away from this forum for a while, I was intrigued to see the pics of a fairly "modern" Allard race car & thought you might be interested in an old Allard that I'm involved with. This one is the original Allard Chrysler dragster that Sydney Allard built in 1960/61 & raced against Dante Duce in the Mooneyes dragster & Mickey Thompson in the Harvey Aluminum Special.....

Ah, Nostalgia, it ain't what it used to be!

MisteR Tee you are so right we'd like to see that car and wow is it terrific!! My compliments to all involved with it. Wouldn't it have been a shame if back in the mid-sixties that car had been parted out and scrapped like so many others were?! :eek: Nice job saving all that history and sharing it here with us. We're all about preserving the past. Don't be gone so long next time!

:3gears: Thomas
 

klaus

Active member
Joined
Dec 24, 2006
Messages
31
Location
BC Canada
IMG_9708.jpg


So here's the repaired posi unit or third member as it's sometimes called. Notice I use cardboard to protect the Masonite top of the bench.

IMG_9707.jpg


I thought it would have to be geared more than 2.91 but the 291 (which is a factory available ratio) written on the ring gear threw me off.
 
OP
B

BB767

Well-known member
Joined
Dec 24, 2009
Messages
3,724
Location
Philo, IL
BB767,

Whew!...

.... I do have a couple of questions I didn't see the answer to:

How do you keep everything so clean? Do you have Merry Maids coming to your shop weekly?

How many square feet is the restored shop?

What has happened to all the recovered treasures like the Fram and Champion signage I think I saw?

Best of luck with your continuing saga.

Jeff at least you had an idea of what you were getting into when you decided to read it all the way through. :) I still think a short book about the shop (with pictures!) would be an interesting and fun project to do. Clearly there are some folks who would take the time to read about it in book form.

As to your questions:

- Keeping the shop clean is very important to me. It's the type of atmosphere I wish to work in. To that end I tend to clean up immediately after the day's work is done. Clean up is all part of the job. Normally tools are cleaned and put away every day, even if they will be used again the next day. That reduces clutter, you know where everything is and you start out each day with a clean, organized shop. It only takes a few minutes. The tile floor is a snap to keep clean. It has several layers of wax on it and any spilled liquids just wipe up with a paper towel. Because it's smooth, sweeping it with a push broom goes quickly also. Periodically I spend a couple of hours with a shop vac and vacuum all around the lower spaces near the floor like under equipment and around benches. That gets everything like spider webs, dirt and dust that inevitably build up over time in corners and crevasses. Vacuuming more than anything seems to help keep the shop tidy. A good, powerful shop vac is your best friend in the shop. A couple of weeks back I was installing a new intake manifold gasket and after scraping the remains of the old one away I vacuumed the debris up rather than take an air gun and blow them away. I do dirty tasks outside whenever possible and now with the Portable Dirty Room - PDR and Potable Pedestal Grinding Stand -PPGS that has become even easier.

IMG_7038.jpg


The shop does get dirty and messy...

IMG_0389.jpg


...I just don't let it stay that way very long.

-The old shop is approximately 2,200 square feet (670 m) inside.

IMG_3637.jpg


The longest space is the fab room to the back of the north room, about 70' (21 m) long and 24' (7 m) wide.

-Recovered items like...

IMG_3512.jpg


...and...

IMG_3515.jpg


...have been cleaned and are presently in storage in the barn awaiting disposition. I'm undecided if or how they should be displayed.

2009PestoneThermo-sm.jpg


I have installed a few but I still need to fabricate some wall shelving units so I don't know as yet what wall space will be available. I wanted to work out in the shop a while and see how the space flows for final placement.

LiftRmSE2005smEditcopy.jpg


Originally all the old "Vee" belts, seen circle here, were going to be reinstalled in the lift room but I'm undecided if I'll do that. I keep going back and forth on them. I've got all of them and the hooks so they're not going anywhere. If I can manage to get myself retired I might have more time out there. Bet Joe would like that. :D

Thanks Jeff for your kind words and good questions.

Thomas
 
OP
B

BB767

Well-known member
Joined
Dec 24, 2009
Messages
3,724
Location
Philo, IL
Backlash is measured with a dial indicator in thousands of an inch.

Figure_27.jpg


Figure_5.jpg


An excellent link on gear setup (above pictures are from this site): http://www.pirate4x4.com/tech/billavista/Gear_Setup/

Terrific link csp, thank you for it. What a professionally produced site. That should be quite helpful and answer many questions. No surprise it's had over 9 million views. You have done everyone here a great service. Thank you.

BTW, the two pictures on backlash don't show but the link works.

Thomas
 

hobbitss

Well-known member
Joined
May 31, 2010
Messages
341
Location
Southestern Massachusetts
-Recovered items like...

IMG_3512.jpg


...and...

IMG_3515.jpg


...have been cleaned and are presently in storage in the barn awaiting disposition. I'm undecided if or how they should be displayed.

2009PestoneThermo-sm.jpg


I have installed a few but I still need to fabricate some wall shelving units so I don't know as yet what wall space will be available. I wanted to work out in the shop a while and see how the space flows for final placement.

LiftRmSE2005smEditcopy.jpg


Originally all the old "Vee" belts, seen circle here, were going to be reinstalled in the lift room but I'm undecided if I'll do that. I keep going back and forth on them. I've got all of them and the hooks so they're not going anywhere. If I can manage to get myself retired I might have more time out there. Bet Joe would like that. :D

Thanks Jeff for your kind words and good questions.

Thomas

If that were to happen I wouldn't be able to keep up... :lol_hitti
 

dsquire

Well-known member
Joined
Jun 18, 2011
Messages
50
Location
Kitchener, Ontario
Thomas

I found an interesting picture and guess where home is for it? You guessed it, Redkey, IN 47373, USA. I figured you and the other readers would enjoy seeing it. If it wasn't for the tree, a bit of putty and paint and it would be good to go.

TreeThruFrame_20070429-168_zpsfbf270b1.jpg

Rusted, Plumb Busted & Plain Wore Out © 2007 by Robert E Pence

For anyone that is interested in old equipment, steam engines, construction equipment,tractors, trucks and cars follow this link. http://urbanindiana.com/in_mauzy/in_mauzy.html One word of caution, better pack a lunch and something to drink as it will take a while to see everything.

Cheers :beer:

Don
 
To avoid these ads, REGISTER NOW!

robin1731

Well-known member
Joined
Dec 25, 2007
Messages
483
Location
Decatur, Indiana
Thomas

I found an interesting picture and guess where home is for it? You guessed it, Redkey, IN 47373, USA. I figured you and the other readers would enjoy seeing it. If it wasn't for the tree, a bit of putty and paint and it would be good to go.

TreeThruFrame_20070429-168_zpsfbf270b1.jpg

Rusted, Plumb Busted & Plain Wore Out © 2007 by Robert E Pence

For anyone that is interested in old equipment, steam engines, construction equipment,tractors, trucks and cars follow this link. http://urbanindiana.com/in_mauzy/in_mauzy.html One word of caution, better pack a lunch and something to drink as it will take a while to see everything.

Cheers :beer:

Don

That's only about a 45 minute drive from me. MMMMMMMMmmmmmmmmmmm.
 

timbitca

Well-known member
Joined
Aug 7, 2012
Messages
966
Location
Moncton, NB, Canada
Thomas

I found an interesting picture and guess where home is for it? You guessed it, Redkey, IN 47373, USA. I figured you and the other readers would enjoy seeing it. If it wasn't for the tree, a bit of putty and paint and it would be good to go.

TreeThruFrame_20070429-168_zpsfbf270b1.jpg

Rusted, Plumb Busted & Plain Wore Out © 2007 by Robert E Pence

For anyone that is interested in old equipment, steam engines, construction equipment,tractors, trucks and cars follow this link. http://urbanindiana.com/in_mauzy/in_mauzy.html One word of caution, better pack a lunch and something to drink as it will take a while to see everything.

Cheers :beer:

Don

Wow! I have to bookmark that link... That's going to take some time to go through!
 
OP
B

BB767

Well-known member
Joined
Dec 24, 2009
Messages
3,724
Location
Philo, IL
Thomas

I found an interesting picture and guess where home is for it? You guessed it, Redkey, IN 47373, USA. I figured you and the other readers would enjoy seeing it. If it wasn't for the tree, a bit of putty and paint and it would be good to go.

For anyone that is interested in old equipment, steam engines, construction equipment,tractors, trucks and cars follow this link. http://urbanindiana.com/in_mauzy/in_mauzy.html One word of caution, better pack a lunch and something to drink as it will take a while to see everything.

Cheers :beer:

Don

Don, what a great discovery. Redkey is about 3 1/2 hours from here but what an interesting place. I can remember some old equipment like that laying around rusting in farm yards here in the Mid-West as I was growing up. I fact I use to play on a few of them, imagining myself as a heavy equipment operator. Little did I know! I doubt that Chris would be much interested but I might suggest a car club tour. We've got some older folks in the club and I bet they could tell us quite a bit about what's there.

Many thanks for posting the picture and link here. :thumbup:

Thomas
 
OP
B

BB767

Well-known member
Joined
Dec 24, 2009
Messages
3,724
Location
Philo, IL
Guess that I am being plain "nosey", how did things go in Stanton, MI?

Bill, that's not being "nosey" at all. Right after I got home from that race I hit the ground running and haven't had a chance to post the mixed results.

Cameron had a very successful winning weekend and posting a personal best as well. He was extremely consistent with some terrific reaction times. A perfect reaction time with a sportsman tree is either a .001 or .000 depending on who you talk to. He had several reaction times in the .002-.003 range.

IMG_9819_zps957068b2.jpg


I qualified against a '70 Buick GSX I think it was. I had familiar problems power shifting all weekend. I keep thinking I've found the cause and in abbreviated testing at the shop all seems well. But after a few runs on the track it rears its ugly head again. That I am beyond frustrated is an understatement! But I'm an awfully stubborn guy as you might recall and will find and fix the problem. I prefer to do it sooner rather than later however. I'll keep you posted on my progress. Maybe I should put that drag strip in at the shop after all? :dunno: It'd be a lot easier for testing and tuning.

IMG_9827_zps31ab233d.jpg


There was a near twin to my car there...

IMG_9832_zps2545f9d4.jpg


...a '66 Chevy II, series 100, 2 door post, L79 car, with hubcaps.

IMG_9837_zps08e9f884.jpg


Note the windshield washer fluid container on the bottom right - his engine...

IMG_9838_zpse28ffe23.jpg


...while mine is without.

IMG_9841_zpsd0c1a9bf.jpg


He has a radio and a heater...

IMG_9844_zps7766d769.jpg


...while mine is deleted. Interestingly enough the cars weight within 7 lbs of each other. It really confused the spectators. :)

I'm up early in the morning, a man on a mission, so stay tuned. Thanks Bill for the inquiry.

Thomas
 

charlief1

Well-known member
Joined
Dec 1, 2010
Messages
248
Thank you for the link to the old equipment Don. Very cool and I hope someone steps in to restore most of it rather than selling it off as scrap.:willy_nil

I think I know who owns that GSX Thomas and it's nice to see it up before the Buick Nationals in October. It's one of my favorite cars as well as the Chey II/Nova cars. There's something about that body style that I just love.:thumbup::bounce:
 
OP
B

BB767

Well-known member
Joined
Dec 24, 2009
Messages
3,724
Location
Philo, IL
Here's an update on our latest activity at the shop.

IMG_9974.jpg


I brought in a bucket truck to do the final tree trimming on the new property next door.

IMG_9976.jpg


We were able to reach all areas I couldn't get to earlier this summer and remove all the dead limbs so...

IMG_9971.jpg


...we've just about wrapped up our work out there this year.

IMG_9975.jpg


It's all been cleaned up so all that's left now is to till up the bare areas and plant new grass and then wait till next year. My work there has delayed my posting here lately and for that I apologize, but I have been busy in the shop as you'll see. Don't give up yet. :)

Thomas
 

Sweet Old Bill

Well-known member
Joined
Mar 20, 2009
Messages
362
Location
N. California
Thomas,

Thanks for the Stanton, MI update. Congratulations to Cameron on the incredible consistency before the tree! I enjoyed the update.

Joe said: "The shop is heated, The Tool Shed is not....


__________________
Joe

Jack of all Trades , Master of None.... "

Joe,

You might consider changing that signature line. Perhaps, it should conclude: "Task Master of the Toolshed"! j/k
 

Motown 454

Well-known member
Joined
Sep 25, 2008
Messages
1,359
Thomas I wish I had one tenth of your energy. You amaze me with all you do. Love the Nova.
 

hobbitss

Well-known member
Joined
May 31, 2010
Messages
341
Location
Southestern Massachusetts
Thomas,

Thanks for the Stanton, MI update. Congratulations to Cameron on the incredible consistency before the tree! I enjoyed the update.

Joe said: "The shop is heated, The Tool Shed is not....


__________________
Joe

Jack of all Trades , Master of None.... "

Joe,

You might consider changing that signature line. Perhaps, it should conclude: "Task Master of the Toolshed"! j/k

Ask and you shall receive!!! :lol_hitti

I tried to add the LOL sign crew too but it didn't work...
 
Last edited:
OP
B

BB767

Well-known member
Joined
Dec 24, 2009
Messages
3,724
Location
Philo, IL
Thomas I wish I had one tenth of your energy. You amaze me with all you do. Love the Nova.

Motown 454 I see you're still checking in here from time to time. You are certainly persistent, having been one of the earliest to post in here coming up soon on 3 years now! Who knew?? :dunno: Once home, I've got a follow up to the PDR among others in the chute.


Thank you for your unwavering interest. :)

Thomas
 
OP
B

BB767

Well-known member
Joined
Dec 24, 2009
Messages
3,724
Location
Philo, IL
Ask and you shall receive!!! :lol_hitti

I tried to add the LOL sign crew too but it didn't work...

And talk about unwavering interest, Joe you are right there. I'm having a problem finding places to put items from the tool shed. Some are being saved for later restoration while others are slowing finding new homes but it does take time. The lean-to is perhaps 2/3rds cleaned out now, I've got just one more major pile to sort.

If there are any Studebaker fans out there I've got some rims and at least a pair of rear doors from what looks like a '56 Commander I think, that need a new home. I'm having a problem with the hotel WiFi and can't get the pictures posted right now. I'll get them on here shortly and that should help. Just hate to scrap them out if anyone could use them.

Thomas
 

smrflng

Member
Joined
Mar 24, 2011
Messages
13
Location
Virginia Beach, Virginia
Just got caught up after a busy summer working on a diesel swap in my Toyota. Glad to see you are still hard at it. Like the grinder stand a bunch, keep up the great work. Here's to 280 more pages.
Russ
 
OP
B

BB767

Well-known member
Joined
Dec 24, 2009
Messages
3,724
Location
Philo, IL
So sometimes the hotel WiFi in foreign countries isn't cooperative and I can't post the pictures I need for some of my posts here until I get home, such as now. So continuing with project...

Portable Dirty Room, PDR.

IMG_9855.jpg


The steel plate top had some minor surface rust...

IMG_9856.jpg


...that needed to be removed. And after all, since it is Portable...

IMG_9858.jpg


...the PDR was wheeled outside to do just that.

IMG_9862.jpg


I initially used a stainless steel brush on a grinder.

IMG_9863.jpg


This one had bristles that were twisted to help minimize "flattening out" of the wire when downward pressure was applied. Once the top had been gone over with the brush a 60 grit flapper disc and then a 120 grit were used lightly to smooth out and finish cleaning up the top.

IMG_9865.jpg


A light coating of WD 40 was sprayed all over it...

IMG_9864.jpg


...and then the top was wiped down.

IMG_9869.jpg


I also did an initial clean up of Dads old Samson machinist vise.

IMG_9870.jpg


It has retained most of its original paint so I think all I'll do is polish the two bare metal handles and parts of the jaws. The rest of it cleaned up very nicely. The mounting bolts seen are not what I finally used for the vise, I'll show that in another post.

IMG_9590.jpg


Next came mounting a power strip on this plate on one end. Note the holes on it were drilled and tapped prior to powder coating.

IMG_9871.jpg


I selected a heavy duty power strip with a metal housing which I thought to more durable than plastic. It was disassembled so that...

IMG_9872.jpg


...the base plate could be installed...

IMG_9874.jpg


...using 3 bolts and large washers.

IMG_9875.jpg


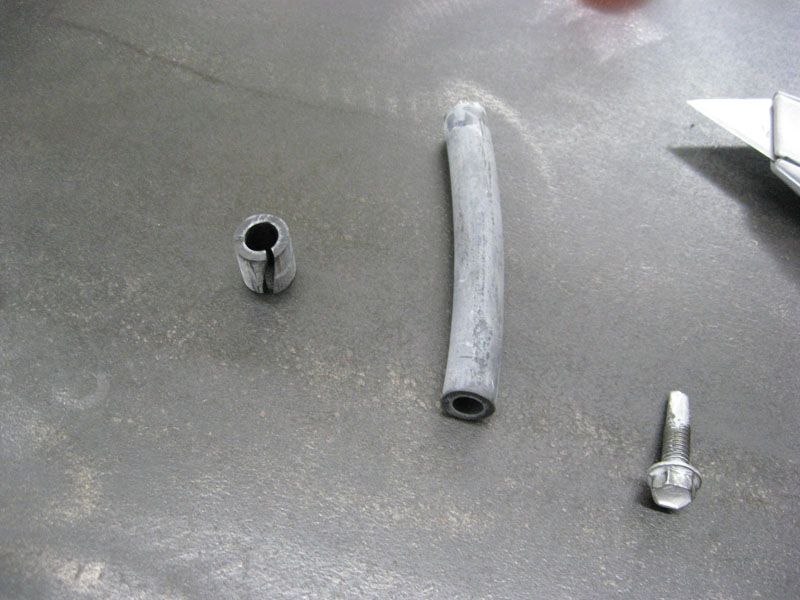
The power strip cord was secured using metal clamps. To prevent chaffing of the power cord...

IMG_9878.jpg


...I used some automotive vacuum hose to act as a buffer. The small piece of hose on the left has been cut to size and then cut lengthwise.

IMG_9879.jpg


In turn that small piece of hose was placed over the power cord...

IMG_9876.jpg


...right where the clamp would come into contact with it.

IMG_9882.jpg


Now the cord was secured, but the metal clamp won't chaff through it over the years.

IMG_9885.jpg


I did the same thing everywhere the clamps came into contact with the power cord.

IMG_9889.jpg


Now I have a ready source of electrical power close at hand. There is more to come on this project so please check back. Thanks.

Thomas
 
OP
B

BB767

Well-known member
Joined
Dec 24, 2009
Messages
3,724
Location
Philo, IL
Just got caught up after a busy summer working on a diesel swap in my Toyota. Glad to see you are still hard at it. Like the grinder stand a bunch, keep up the great work. Here's to 280 more pages.
Russ

Hello again Russ, you have been missed! Yeah, about that 280 pages. Ya know it wasn't planned that way, really. It just kinda happened. I don't know if Ryan could stand me posting another 280 pages on this thread. :dunno: Maybe if I lay low, below his radar I'll be able to keep at it? Welcome back BTW. ;)

Thomas
 
To avoid these ads, REGISTER NOW!
Top Bottom