
You are using an out of date browser. It may not display this or other websites correctly.
You should upgrade or use an alternative browser.
You should upgrade or use an alternative browser.
Restoring a Snap-on body hammer
- Thread starter afazz
- Start date
Bruce Lancaster
Well-known member
- Joined
- Apr 3, 2006
- Messages
- 1,642
"When you soak wood in water, it swells, then when it dries, it shrinks..."
I let nature do the work...usually keep the head and new handle until late winter, when there is no humidity and house has been dry as a bone for a while. Fittemup then. If I were in a hurry in August, I might well take the bits to work to enjoy ridiculously excessive AC. Anything that hammer ever encounters in the future will have to cause swelling and not shrinking. Agree that soaking to further tighten is probably bad...the maximum expansion the wood sees will inevitably crush fibers and potentially cause extra looseness when the hammer encounters drier environs. It will inevitably cycle with changing weather, but no need to exaggerate the process.
I let nature do the work...usually keep the head and new handle until late winter, when there is no humidity and house has been dry as a bone for a while. Fittemup then. If I were in a hurry in August, I might well take the bits to work to enjoy ridiculously excessive AC. Anything that hammer ever encounters in the future will have to cause swelling and not shrinking. Agree that soaking to further tighten is probably bad...the maximum expansion the wood sees will inevitably crush fibers and potentially cause extra looseness when the hammer encounters drier environs. It will inevitably cycle with changing weather, but no need to exaggerate the process.
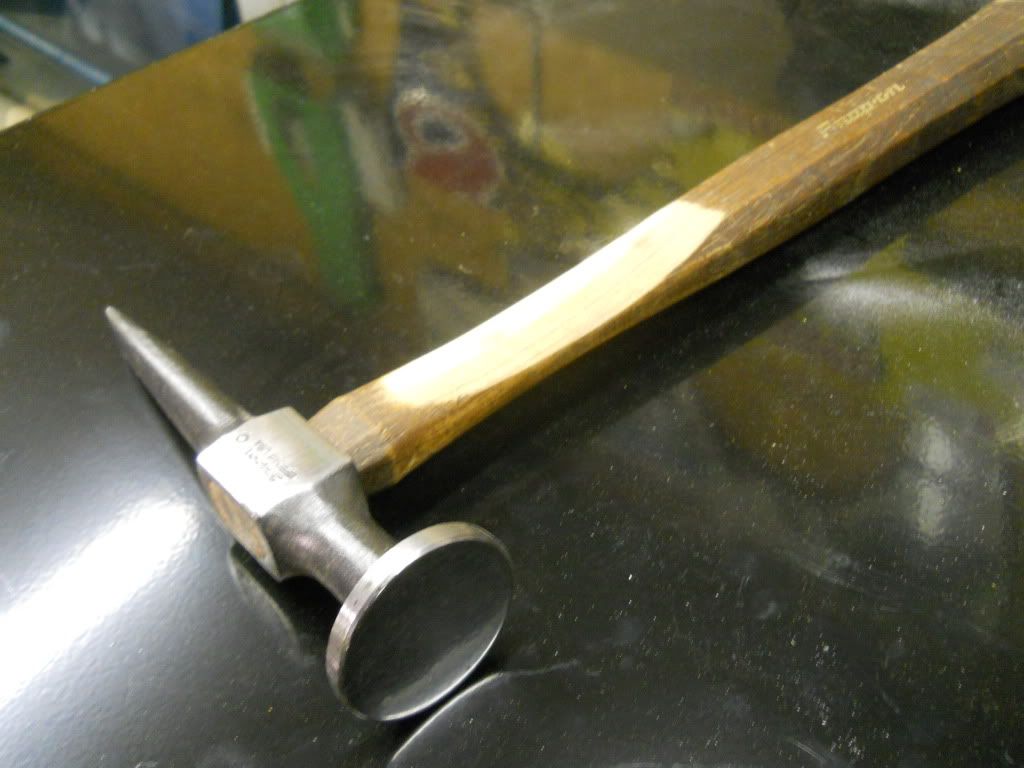
I did two more this weekend. I bought these two from Snaparxon here on GJ, one is Blue-Point one is Snap-on and both are BF611.


The face of the Snap-on was really pitted, so I decided to make it a high-crown hammer and sand away most of the surface. This is the only hammer I've done so far that was round enough to hold steady in the chuck. I was spinning slow and just sanding the shape instead of machining away the surface, so it worked fine.

Comparison with the Snap-on BF618B high crown cross peen hammer


Here the profile gauge is set to the BF618, this hammer is slightly higher crowned.

Here is a comparison of the BF618B, the Fairmount I did earlier, and the new hammer.

There are still a few pits in the face of the Blue Point, but it will certainly work for what I'm doing.

Here are the balance points of both heads. The Fairmount was right in this range as well, I was surprised to find they weren't exactly balanced.


I can't wait to get new handles and start using them!


The face of the Snap-on was really pitted, so I decided to make it a high-crown hammer and sand away most of the surface. This is the only hammer I've done so far that was round enough to hold steady in the chuck. I was spinning slow and just sanding the shape instead of machining away the surface, so it worked fine.
Comparison with the Snap-on BF618B high crown cross peen hammer
Here the profile gauge is set to the BF618, this hammer is slightly higher crowned.
Here is a comparison of the BF618B, the Fairmount I did earlier, and the new hammer.
There are still a few pits in the face of the Blue Point, but it will certainly work for what I'm doing.
Here are the balance points of both heads. The Fairmount was right in this range as well, I was surprised to find they weren't exactly balanced.
I can't wait to get new handles and start using them!
Hammer1963
Well-known member
Flat out NICE work. I hope to be able to get started back on some of mine this week. Key word is hope.
I have done the opposite with a 618. I removed most of the crown from one and it has now become my most used hammer. I use it much more often than the high crowned version.
When you fit the Blue Point 611 with its new handle, remember the handles are natural and not the walnut color, unless it is during the cross over period of production. From the photos, it appears this is a pre war era Blue Point.
Keep us posted on updates.
Thanks! Do you have any details on the progression from Blue-Point to Snap-on? The BF617 you sold me is Snap-on but doesn't have a date code; this Blue-Point has no date code either. Were they originally Blue-Point then switched to Snap-on? What years did they skip the date code?
I might use the walnut color handle anyway, I like that look much better than the natural hickory. Maybe I'll consider that one a restomod instead of a true restoration")
I might use the walnut color handle anyway, I like that look much better than the natural hickory. Maybe I'll consider that one a restomod instead of a true restoration
socalbodydude
Well-known member
in an article from Ron Covell, he stated that no hammer should be totally flat and that body hammers that appear flat actually have a slight crown. This is new information to me but makes sense because if the face was totally flat even the slightest mispaced blow or tapping would make an indentation in the sheet metal.
But anyway that hammer looks SWEET
But anyway that hammer looks SWEET
Last edited:
socalbodydude
Well-known member
Thanks for the compliments
I didn't soak the handle, I thought about it but didn't get a chance to do any research. I did drip some thin varnish down into the splits after the pics were taken, at least to seal it up. It's nice and tight for now, hopefully it lasts but I can always buy another handle.
I was doing other things all day, but I probably have about 2-3 hours total into it. Not a spectacular cash savings, but I enjoyed the process.
An oldschool trick is to soak them over the weekend in a bucket with water and anti-freeze. When the wood swells up it will be nice and tight.
Last edited:
socalbodydude
Well-known member
what equipment are you using to do this work? this is amazing stuff!
Hammer1963
Well-known member
Between Afazz and myself, we can walk you thru some processes on what we do to restore these hammers. I can send you some ideas on the techniques both of us have used to restore these hammers.
socalbodydude
Well-known member
Between Afazz and myself, we can walk you thru some processes on what we do to restore these hammers. I can send you some ideas on the techniques both of us have used to restore these hammers.
Sounds good! This is some high quality work here! I would have done the vast majority by hand, but seeing this thread I can see the faces often require some machining. I'm glad I didn't mess one up by eyeballing it and screwin up up the crown on a good hammer.
I have done a couple tool resto's myself. no hammers just a small vice and a couple misc tools... This was before coming here, of course, I just had the idea to make my old crappy tools look like nice new ones but after coming here I have a greater passion for it. I really respect the work in these pics.
Agree that soaking to further tighten is probably bad...the maximum expansion the wood sees will inevitably crush fibers and potentially cause extra looseness when the hammer encounters drier environs. It will inevitably cycle with changing weather, but no need to exaggerate the process.
That is exactly what would happen. When handmade wooden chair spindles are fitted, the spindle ends are first placed in a container of very warm sand - so that the moisture is drawn out. That way when they are fitted to the appropriate hole, they are at the lowest moisture content, and therefore should maintain a very tight joint.
Last edited:
That is exactly what would happen. When handmade wooden chair spindles are fitted, the spindle ends are first placed in a container of very warm sand - so that the moisture is drawn out. That way when they are fitted to the appropriate whole, they are at the lowest moisture content, and therefore should maintain a very tight joint.
The stuff I learn on here is amazing. Thanks for sharing this fact.
Honestly most of my work has been done simply sanding by hand and with a D/A sander, other than the surface grinder on page 1. I mounted the BF611 head in the lathe, but I didn't actually do any machining on it. I used the lathe to spin it slowly while I used a 4-1/2" angle grinder with an 80 grit flap disc to sand the shape I wanted, checking it against the profile gauge I set to the BF618B hammer. Hammer1963 has shared a lot of his techniques with me, he uses a belt sander "multi-tool" attachment on the bench grinder which I don't own.
The flattened hammer is used very rarely, but a completely flat (zero crown) hammer does come in handy occasionally on domed surfaces. It is the only truly flat hammer I own, all off-the-shelf hammers have some crown.
The flattened hammer is used very rarely, but a completely flat (zero crown) hammer does come in handy occasionally on domed surfaces. It is the only truly flat hammer I own, all off-the-shelf hammers have some crown.
Here is another pic of the polished high-crown face on the BF611. This one I roughed with an 80 grit flap disc on the lathe and touched up the shape with 150 grit by hand. Then I used 180/320/400/600 grits on the D/A, then 800 and 2000 by hand in the lathe with some WD40 as lube. I polished with tripoli compound and white rouge on a sewn buffing wheel. Those aren't the best compounds to use on hardened steel, but it's what I had laying around.

Hammer1963
Well-known member
Wow ! Period
Hammer1963
Well-known member
This thread rules!!
Hammer1963, do you have some threads on here, showcasing your collection and resto work?
Unfortunately no. I must admit I'm a bit lax on documenting my work with photos. I have been trading resto techniques with Afazz and a couple others thru email and PM. I hope to have a thread ready within the next 2 weeks.
Unfortunately no. I must admit I'm a bit lax on documenting my work with photos. I have been trading resto techniques with Afazz and a couple others thru email and PM. I hope to have a thread ready within the next 2 weeks.
Well, I look forward to its appearance. Don't be afraid to give some teaser shots of your collection, in addition to restoration shots
I got two new handles for the BF611 pair, $16.50 each from snapon.com


I have noticed there are differences in the thickness of the handles, although they are the same part number. I suppose it could be different revisions through the years, the handles I just purchased are "Revision R" so there have been lots of different types! This is a beautifully restored 1967 BF615 (refurbished by Hammer1963) compared to the new handle I just bought. I prefer the thinner handle, I will probably plane down the BF615 or install a new handle in the future.


A few months back I found the hammer webpage from Fay Butler, he suggests making this modification to Snap-on hammer handles. I decided to give it a shot. I haven't really used it yet other than some quick test swings, but you can feel a difference in the weight and balance.
http://www.faybutler.com/bodyhammer.htm

When I bought the restored BF615, Kevin also included this old post dolly, which I believe to be a Pexto. It needed finishing, this has been my first dolly resto.


Some work on the belt sander

After some polishing

The hammer drawer is getting pretty fully now!

I have noticed there are differences in the thickness of the handles, although they are the same part number. I suppose it could be different revisions through the years, the handles I just purchased are "Revision R" so there have been lots of different types! This is a beautifully restored 1967 BF615 (refurbished by Hammer1963) compared to the new handle I just bought. I prefer the thinner handle, I will probably plane down the BF615 or install a new handle in the future.
A few months back I found the hammer webpage from Fay Butler, he suggests making this modification to Snap-on hammer handles. I decided to give it a shot. I haven't really used it yet other than some quick test swings, but you can feel a difference in the weight and balance.
http://www.faybutler.com/bodyhammer.htm
When I bought the restored BF615, Kevin also included this old post dolly, which I believe to be a Pexto. It needed finishing, this has been my first dolly resto.
Some work on the belt sander
After some polishing
The hammer drawer is getting pretty fully now!
Hammer1963
Well-known member
The Body tools drawer is looking quite handsome. I great selection of tools for just about any straightening project.
I too prefer the thinner handle. I have developed a very easy process of which I use when I choose to do so. It's so simple, your going to say " I never thought of that "
I am going to start a post on it this evening. The simplicity of it will amaze you. The results, fantastic.
I too prefer the thinner handle. I have developed a very easy process of which I use when I choose to do so. It's so simple, your going to say " I never thought of that "
I am going to start a post on it this evening. The simplicity of it will amaze you. The results, fantastic.
ECP
Well-known member
This thread is fantastic! Had to make my first post here. I'm working on my 6th year as a body tech (I'm 21). I really appreciate a well made hammer. I only have an old Proto doorskin hammer (I'd date it in the 70's) that I retro-fitted a Snap-On handle onto. Been looking to get my own set of hammers soon. Was going back and forth from Snap-On, to Mac, to Martin. Lately I've been looking around here and started getting interested in the older hammers and dressing them up. I hate any of the cheap **** you get at the tool stores that aren't made on this continent (or the UK). Snap-On gets pricey after you start getting 4+ hammers. Gonna start keeping my eyes peeled at swap meets and eBay for old hammers that need some love. Might post up my findings if all goes well.
PS, I love that high crown hammer!
PS, I love that high crown hammer!
4Tigers
Well-known member
Well done AFAZZ !
Nice collection of body tools!
Nice collection of body tools!
ECP
Well-known member
Found another old Proto head at my shop on Monday. Did a little work on it:


Took the "shrinking" face down and made it a very slight crown; stripped whatever paint was left; sprayed some epoxy primer, then a cast finish color coat.
Still need to do some finish filing and then some polishing on the faces and sides. After that, she gets a new handle from SO.
Took the "shrinking" face down and made it a very slight crown; stripped whatever paint was left; sprayed some epoxy primer, then a cast finish color coat.
Still need to do some finish filing and then some polishing on the faces and sides. After that, she gets a new handle from SO.
ECP
Well-known member
Yeah, it takes some trimming and shaping of the handle, but it works quite nicely. Here's another Proto I did earlier this year:


It's a bit crooked... but it turned out to be okay, we can hammer around things better, like say a pulling clamp.
It's a daily user and my favorite so far.
It's a bit crooked... but it turned out to be okay, we can hammer around things better, like say a pulling clamp.
It's a daily user and my favorite so far.
Hammer1963
Well-known member
I really like the Proto 1426. You don't see a tremendous amount of those. I've been looking for one for quite some time. I sent you a GJ email the other day about body hammers. Check your inbox.
I noticed you said you had to finish the faces of the 1423. Try using a 3" DA on them. You'll get very good control with the that tool.
I noticed you said you had to finish the faces of the 1423. Try using a 3" DA on them. You'll get very good control with the that tool.
ECP
Well-known member
Thanks guys.... glad I found a place that appreciates what other people think is "weird". Haha. Polished the faces a bit tonight... I may sand it down finer to get rid of the marks, or I may just leave it as is since it will be a daily user.
Good tip about the 3" DA Kevin, I used a fine file first; then 80g, 120g, 220g, 320g all my hand then polished. Very time consuming, but the results made me smile!


When I get a chance, I'll re-do the head on the 1426. I really like the "cast finish" spray paint. Gives it a nice industrial look. If anyone cares, it's Plastikote Rebuilders Cast Finish, 285 Gray.
Good tip about the 3" DA Kevin, I used a fine file first; then 80g, 120g, 220g, 320g all my hand then polished. Very time consuming, but the results made me smile!
When I get a chance, I'll re-do the head on the 1426. I really like the "cast finish" spray paint. Gives it a nice industrial look. If anyone cares, it's Plastikote Rebuilders Cast Finish, 285 Gray.
CaseyJoes.
Well-known member
Very nice work! All of those hammers look really sharp! Im looking to start getting some body hammers for myself soon.
Hammer1963
Well-known member
Hey, that looks great. I do like the Cast Blast paint as well. I put the hammer heads under a heat lamp, warm them and spray them when they close to 200 degrees. The paint drys quick and hard. When I am going to use a Gloss color, I use a catalysed paint and dip them instead of spraying.
sevt_chevelle
Well-known member
Very nice job on those hammers. I've done a few hammer and dolly restorations. Looking forward to seeing some more pictures and learn some new different techniques...Eric
ECP
Well-known member
Found some more projects at a swap meet today:

The toe dolly is in very nice shape, looks like it was hardly used. Should be an easy resto. The other is a little more beat, but definitely usable. Both are unmarked as far as brands... but I figured a chunk of steel is a chunk of steel, and after a little work on them; what's the difference? Got em both for $20
Also found some more old hammers:

One bronze and one plastic. Both are very "seasoned" but I couldn't walk away from them at $10/piece, especially since I didn't find any body hammers.
PS, afazz, sorry for hi-jacking your thread
The toe dolly is in very nice shape, looks like it was hardly used. Should be an easy resto. The other is a little more beat, but definitely usable. Both are unmarked as far as brands... but I figured a chunk of steel is a chunk of steel, and after a little work on them; what's the difference? Got em both for $20
Also found some more old hammers:
One bronze and one plastic. Both are very "seasoned" but I couldn't walk away from them at $10/piece, especially since I didn't find any body hammers.
PS, afazz, sorry for hi-jacking your thread
Nice job on the body hammers/dollies.
ZRX61
Well-known member
The toe dolly is in very nice shape, looks like it was hardly used.
That's a heel dolly...
ECP
Well-known member
That's a heel dolly...
You're right about that. Driving all day is showing it's side effects....
PS, afazz, sorry for hi-jacking your thread
No problem, body tool restoration is what this thread is about

I will second the recommendation to use a 3" DA sander, I use a little Matco and it works really well for polishing hammer faces.
I bought a batch of stuff recently from a retired bodyman, I cleaned it up a little but I still need to buy a new 17" handle for the BF614 long pick hammer. He sawed it off because he couldn't fit the handle in his toolbox! That's a Herbrand spoon, I think the track dolly is a Snapon but it's not marked (some years were not stamped with the part number). I think the curved dolly is a Snap-on BF705, it is also unmarked but he claims they are snap-on. The Herbrand spoon is also sawed off, I might weld a handle back on but I may leave it alone.


I bought a Beta dolly from Amazon, and an old Proto dolly from ebay that's pretty rough looking, that will be the next project when I get some time.


