To avoid these ads, REGISTER NOW!

Restoring a Snap-on body hammer

spotco2

Well-known member
Joined
May 18, 2012
Messages
1,050
Location
NW Georgia
****. Now that's I've seen all of this I've got to start restoring hammers!

Great looking work guys.
 
To avoid these ads, REGISTER NOW!

e-tek

Well-known member
Joined
Dec 19, 2007
Messages
10,690
Location
Saskatoon, SK
Jesus guys - they are just hammers!! I've been doing bodywork for 35 years, have about 3 hammers I use often, none are Snap-On and none look good.

Having said all that, now I want to buy some nice hammers and restore mine! Great work on all of them - what a difference a little sanding and paint makes.

As far as the discussion on handle fitment and moisture, for what it's worth, all the men in my Dad's shop dropped their hammers in buckets of water everynight, or over the weekend. I do it sometimes and love the tight handles - until they dry out again....

Has anyone tried the sand method on hammer handles?
 
Last edited:

snapmom

Well-known member
Joined
Sep 4, 2008
Messages
3,519
Location
Florida
Here is a Blue Point HB252 double offset that I restored. When you use it, it rings like a tuning fork.
002-17_zps4f3d4a68.jpg
 

e-tek

Well-known member
Joined
Dec 19, 2007
Messages
10,690
Location
Saskatoon, SK
Having said all that, now I want to buy some nice hammer and restore mine! Great work on all of them - what a difference a lot off sanding and paint makes.

changed it, sorry

No worries! ;) Took me about 20 minutes to do this one this afternoon - including the handle. I chose this one as it's the first body hammer I ever purchased myself and one of my favourites.

113_4776.JPG


113_4777.JPG


113_4781.JPG


113_4782.JPG


Epoxied the head as suggested because I hate loose handles!

113_4788.JPG


113_4790.JPG


May have to do some of the others now!

:beer:
 
To avoid these ads, REGISTER NOW!

Geurt

Well-known member
Joined
Jun 5, 2011
Messages
284
Location
The Hague, Holland
This threat deserves some new input. Let me kick it off with a very good deal on a set of Gedore dolleys and a hammer I got yesterday.

IMG_1357.JPG
 

Flatheadsmith

New member
Joined
Apr 5, 2012
Messages
2
As for handle selection make sure the grain is straight and does not run off to the side, but that the grain is parallel the length of the handle. The strongest hickory handles have a wide grain structure. If using Hickory for the handle, brown (heartwood) or white (sapwood) or a mixture of both grain colors does not affect strength. Flame hardened handles are superior and do not need to be finished.

Here are some suggestions for installing handles:

1. As several have mentioned before Do Not soak the handle in water, or anything else, before installation, as the handle will loosen after drying.

2. Clean up the hammer eye with a file so that there are no sharp edges to cut into the handle. especially be mindful of striking marks on top the hammer head that may intrude into the eye.

3. I use a wood rasp to fit the handle and then sand it to smooth out the rasp marks with 80 grit sandpaper or emery cloth so that the handle fits about 2/3s of the way in the hammer eye. Make sure that when the handle is driven in it is not so tight as to close up the wedge slot. Before you fit the handle make sure the head is not upside down, sounds stupid I know, but sometimes it's hard to tell.

4. If you can, use a hydraulic press to drive the handle in the rest of the way. Use some type of open end wrench or socket to allow the handle to go past the hammer head while being pressed. A bar clamp can also be used in place of a press.

5. I use a hydraulic press to drive in the wooden wedge (this will keep it from mushrooming and breaking). After I trim the wedge and handle so that it's about a 1/16" proud of the head. I then use the press to drive in the steel wedge perpendicular to the wooden wedge. I tap it in about a 1/4" first and then hold it with channel locks as long as I can while using the press.

6. Use a belt sander to smooth handle smooth with the top of the head.

7. Boiled linseed oil is good for protecting polished steel surfaces from rusting if the tool is not to be used. Do not throw a rag or paper towel away soaked with linseed oil, it can burst into flames, leave it outside opened up and allow it to dry. You will probably want to remove the coating with thinner or acetone before you use the tool. Penetrol is another good coating option.
 
Last edited:

70staged

Well-known member
Joined
Oct 8, 2013
Messages
200
just an update for everyone here, the Snap On hammer handles have gone up in price since this thread began, They are now $22 a piece.
 

Basher

Well-known member
Joined
Sep 14, 2009
Messages
146
Location
Blighty
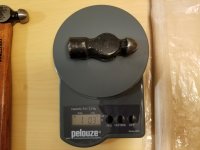
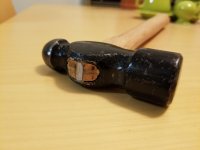
I bought this, what appears to be, stretching hammer for a few Euro's. The ends were pretty damaged. I have no idea how it was used by previous owners, but both sides, wich should be rounded, were completely hammered flat. I have re-ground and polished the ends and sanded the handle. I have re-used the original metal wedge for the handle. I don't know how long it will look like this, for I am going to us it. I found a chip of yellow paint in one of the deep scratches which looked like an original paint left over, hence the yellow finish.

Strekhamer.jpg

Wow - that's bright!

looks like the head is on back-to-front though?

still, if it suits you, just use it

:thumbup:
 

Smokeshow69

Well-known member
Joined
Dec 7, 2012
Messages
8,368
Location
Pacific Northwest
Anybody know where to get proto/ plomb shaped wood handles? They are a little different this the snapon ones !


Sent from my iPhone using Tapatalk Pro
 

tym

Well-known member
Joined
Mar 5, 2016
Messages
2,430
Location
MA
Think about this. When you soak wood in water, it swells, then when it dries, it shrinks. You should always keep a wooden handle dry. It should even be sealed when you're done with the wedges. If the splits bother you, fill them with epoxy, as someone else has already suggested.
I've had success soaking the wood in BLO. The BLO will soak in, expand the wood, then cure permanently, keeping the wood in an expanded state. I've done this to a couple of tools that had loose original wooden handles that I didn't want to replace.

I've only ever done this on something that was already assembled, for the reasons you state.
 

tym

Well-known member
Joined
Mar 5, 2016
Messages
2,430
Location
MA
This thread inspired me! I noticed I didn't have anything between my 12 oz ball pein and 48 oz sledge, so when I saw the following 16 oz PLUMB hammer head for sale, I snapped it up. The local independent hardware store still had some hickory handles on the rack for $8 each, so I grabbed one and got to work.

The second photo is after driving in the wood and steel wedges and rough-cutting the protruding end of the handle eye. The last two photos are after cleaning up with a grinder (old grind marks were still visible) and applying a few coats of BLO.

The eye of the head has a flared lip at both openings (looks like an artifact of the forging to me), so even after pounding in the wedges quite firmly, there was a slight gap. I put the hammer upside down in a tray of BLO to let the end grain of the handle eye soak up the BLO and provide a little extra insurance that everything stays tight. Not pictured, but today I came back and filled any remaining gap with epoxy.

I decided to keep the old patina of the head. All told, I invested less than the cost of a new Vaughn or Estwing 16oz sledge from the local big box store, so I think I came out ahead.

Now I just need to find something to hit!... ;)
 

Attachments

  • 20180212_202244.jpg
    20180212_202244.jpg
    125.2 KB · Views: 41
  • 20180209_231728.jpg
    20180209_231728.jpg
    120.5 KB · Views: 39
  • 20180209_231714.jpg
    20180209_231714.jpg
    129.5 KB · Views: 37
  • 20180212_000911.jpg
    20180212_000911.jpg
    125.2 KB · Views: 34
  • 20180212_202537.jpg
    20180212_202537.jpg
    142.1 KB · Views: 33
Last edited:
To avoid these ads, REGISTER NOW!
Top Bottom