To avoid these ads, REGISTER NOW!

Between 705 & 1200 SQ/FT Roboto's Garage

Workspaces between 705 and 1200 squarefeet.
OP
M

Mr. Roboto

Well-known member
Joined
Dec 11, 2012
Messages
2,159
Location
New Hampshire
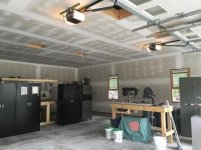
I was able to work out there Saturday all day. Sheetrock is now 95% hung. I just have to finish some of the smaller areas around the garage door openings. I also changed my mind about a few electrical things so I ran one more 2 gang electrical outlet in between the 2 garage doors, and also mounted my generator inlet there as well. The left wall of my garage was all hung using 5/8" fire code drywall because I'd like to attach it to my house someday and damn...that stuff is heavy in a 12 foot sheet!

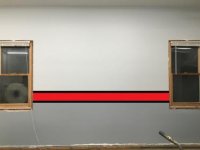
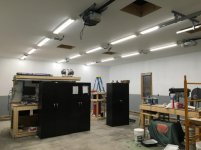
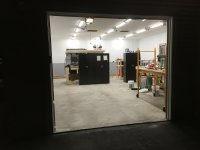
Crappy iPhpone panoramic, but you get the idea. You'll notice that the area above and below the subpanel is open at the moment. I decided I am going to patch in 2 sections there that will be removable in case I ever need to get access to run additional electrical services.
attachment.php


attachment.php


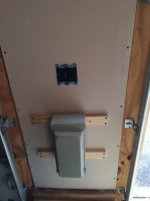
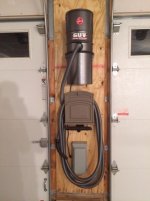
This is in between the 2 garage doors. I added the 110 outlets here just for convenience sake, but also because I'd like to get a small wall mounted shop/canister vac mounted here for vacuuming out my cars. The large gray box is the power inlet for my generator. I didn't like how I had to run the 2 pieces of strapping to support the box, but the thing is pretty heavy. I didn't want to leave it up to drywall anchors and/or toggle bolts to support it. Hopefully once I just paint them the same color as the wall, they will blend in. They are screwed right into the studs.

attachment.php
 

Attachments

  • 2agvkok.jpg
    2agvkok.jpg
    48.8 KB · Views: 1,402
  • ezqq6u.jpg
    ezqq6u.jpg
    68.9 KB · Views: 1,396
  • t97812.jpg
    t97812.jpg
    36.8 KB · Views: 1,398
Last edited:
To avoid these ads, REGISTER NOW!
OP
M

Mr. Roboto

Well-known member
Joined
Dec 11, 2012
Messages
2,159
Location
New Hampshire
Drywall is officially done. I was able to wrap up the areas around the garage doors. Been having a hard time to actually get someone come out and give me a quote on the taping/mudding. Lots of guys don't even want to waste their time unless they know who hung the Sheetrock. One guy finally said he'd come and take a look tonight, so fingers crossed that he actually shows.


attachment.php
 

Attachments

  • 1zyjacg.jpg
    1zyjacg.jpg
    124.4 KB · Views: 1,397
Last edited:

Jjbates

Well-known member
Joined
Apr 28, 2015
Messages
60
I've had the same problem on the last two places I've hung the drywall myself. No one wants to do the finish work unless they're guys hung it. I had one guy tell me it would be the same price if he only finished or hung and finished. It's ridiculous.
 

drz400smoto

Well-known member
Joined
Aug 14, 2013
Messages
73
Location
Colorado
I've had the same problem on the last two places I've hung the drywall myself. No one wants to do the finish work unless they're guys hung it. I had one guy tell me it would be the same price if he only finished or hung and finished. It's ridiculous.

This is good to know. I guess I'll just sub all the drywall work out for my garage. :dunno:
 

BigNuge

Well-known member
Joined
Feb 23, 2015
Messages
608
Location
Live Free or Die
Re: Mr. Roboto's Garage Makeover

All the guys that primarily do Sheetrock work price it based on the amount of sheets, and by the complete job (hung, tape, mud, sand, ready for paint).

I have a one-man-band guy that lives 6 houses away from me that has no issue just taping & mudding. Focus on the small time guy and you'll have no problem getting a fair price. Just hope you get someone who is decently good at it....

Place looks great BTW!


Sent from Taptalk
 
OP
M

Mr. Roboto

Well-known member
Joined
Dec 11, 2012
Messages
2,159
Location
New Hampshire
The guy who is supposed to come by tonight is an acquaintance of my father in law who just does taping and mudding on the side, so Im hoping he actually shows up, and that we can work something out. Fingers crossed. I have pretty much made up my mind at this point that I want no part of the taping and mudding!
 
OP
M

Mr. Roboto

Well-known member
Joined
Dec 11, 2012
Messages
2,159
Location
New Hampshire
Guy came and quoted me $800 for labor only - I have nothing to compare this to. Does this seem high based on anyones previous experiences?
 
Last edited:

Jjbates

Well-known member
Joined
Apr 28, 2015
Messages
60
Re: Mr. Roboto's Garage Makeover

All the guys that primarily do Sheetrock work price it based on the amount of sheets, and by the complete job (hung, tape, mud, sand, ready for paint).

I have a one-man-band guy that lives 6 houses away from me that has no issue just taping & mudding. Focus on the small time guy and you'll have no problem getting a fair price. Just hope you get someone who is decently good at it....

Place looks great BTW!


Sent from Taptalk
^^^^^^ This^^^^^^
 

BigNuge

Well-known member
Joined
Feb 23, 2015
Messages
608
Location
Live Free or Die
Guy came and quoted me $800 for labor only - I have nothing to compare this to. Does this seem high based on anyones previous experiences?


If that's ready for paint price then I'd say that's a good price.

You'll be less than $50 in materials to get that done BTW.


Sent from Taptalk
 
OP
M

Mr. Roboto

Well-known member
Joined
Dec 11, 2012
Messages
2,159
Location
New Hampshire
If that's ready for paint price then I'd say that's a good price.

You'll be less than $50 in materials to get that done BTW.


Sent from Taptalk

Thanks for the reply - yeah I told him I want it ready for me to prime, so he should take care of everything.

I (allegedly, though I'm not holding my breath) have one other guy coming tonight to take a look as well so we'll see what he says. I was hoping for a 500-600 bill for the labor, but I guess I was being un-realistic.
 

taumac

Well-known member
Joined
Aug 30, 2011
Messages
8,104
Location
Brooksville, Fl
Re: Mr. Roboto's Garage Makeover

$800 For me that's 2 HF 44's, a welder or something else for the garage. IMO at that cost I would really do it myself.
 
OP
M

Mr. Roboto

Well-known member
Joined
Dec 11, 2012
Messages
2,159
Location
New Hampshire
Well, long story short...I'm doing this myself. Seems like everyone who came to quote the job was either incredibly shady, or seemed to want me to work around their schedule. Day 1 in the books..... I can already tell it's going to take me a while, and probably wont be perfect, but at least I'll save myself some money.

attachment.php
 

Attachments

  • 118ospu.jpg
    118ospu.jpg
    105.1 KB · Views: 1,337
Last edited:

indyokie

Well-known member
Joined
May 20, 2012
Messages
260
Location
Yukon, Oklahoma
Best thing I can tell you about drywall is to take your time, let it sit ( to dry completely ) I have had great results as long as I never tried to do to much at one time. Looks like you got a great start on it. Those long pole with drywall sanding blocks are a real time saver.
 
OP
M

Mr. Roboto

Well-known member
Joined
Dec 11, 2012
Messages
2,159
Location
New Hampshire
Best thing I can tell you about drywall is to take your time, let it sit ( to dry completely ) I have had great results as long as I never tried to do to much at one time. Looks like you got a great start on it. Those long pole with drywall sanding blocks are a real time saver.

Thanks, yeah, I actually bought one of those pole sanders last night when I bought all the supplies. All in, I'm at $120 for the tools and supplies. I will probably have to go back and buy another bucket of mud (I bought 2 already), but those are only around $14 bucks. After much deliberation, I decided to go with the pre-mixed joint compound.
 
Last edited:

Jjbates

Well-known member
Joined
Apr 28, 2015
Messages
60
Glad to see you decided to do the finishing on the drywall yourself. You'll hate that you did about midway through sanding the ceiling out, but when it's done you'll be happy you did it yourself and saved the money. Just don't get in a rush and don't give up. :thumbup:
 
OP
M

Mr. Roboto

Well-known member
Joined
Dec 11, 2012
Messages
2,159
Location
New Hampshire
Glad to see you decided to do the finishing on the drywall yourself. You'll hate that you did about midway through sanding the ceiling out, but when it's done you'll be happy you did it yourself and saved the money. Just don't get in a rush and don't give up. :thumbup:

I think I'll be glad in the long run too once it's all over. Money saved is always a good thing. I can put that towards my shop heater.
 
OP
M

Mr. Roboto

Well-known member
Joined
Dec 11, 2012
Messages
2,159
Location
New Hampshire
Now I know what you guys were saying about that sore neck.... started on the ceiling this weekend finally. I'm going to try and get motivated about chipping away at this after work again little by little to move it a long. We've had some busy weekends recently, and they will continue to be busy moving forward. The couple hours I've been able to get out there during the weekends just isn't enough time. Regardless....progress is progress!

attachment.php
 

Attachments

  • 313mvqd.jpg
    313mvqd.jpg
    119.6 KB · Views: 1,335
Last edited:

BigNuge

Well-known member
Joined
Feb 23, 2015
Messages
608
Location
Live Free or Die
Looking good man....

Those ceilings will be the bane of your existence (my shoulders, neck, and back all hurt just looking at the picture).

One thing I did (when I attempted the same) is chose a section to focus on and stopped, then moved on to the next the following day. That way it kept the frustration (and neck/shoulder/back soreness) to a minimum.

Good luck on the rest of your taping adventure!
 

Kevin54

MEMBER EMERITUS
Joined
Jan 12, 2005
Messages
29,341
Location
Urbana, Ohio
Roboto......great job on the garage, and kudos to the wifey for having you rip out the shrubs. It looks way better now that you got rid of the "contractor taxus" that all houses in that time period seem to have. Now you have to update your avatar. Garage is looking great. Just take your time and don't get in a hurry with the mud. Lightly sand what you have, then use a wider trowel to put on the second coat. After that is dried, sand, and put on your third coat with a wider trowel yet. After that is dry, sand, and look for any pits that need filled and hit them. Final sand, don't tear up any paper, then prime with a GOOD primer. Good luck, and keep us updated. And get that avatar changed.:lol:
 
OP
M

Mr. Roboto

Well-known member
Joined
Dec 11, 2012
Messages
2,159
Location
New Hampshire
Looking good man....

Those ceilings will be the bane of your existence (my shoulders, neck, and back all hurt just looking at the picture).

One thing I did (when I attempted the same) is chose a section to focus on and stopped, then moved on to the next the following day. That way it kept the frustration (and neck/shoulder/back soreness) to a minimum.

Good luck on the rest of your taping adventure!

That's my plan, to tape and mud one tapered joint a night after work this week. Doesn't sound like much, but each one is 26 feet long, and it's a lot of up and down. Like you said, breaking it up should help to keep me from going insane.

Roboto......great job on the garage, and kudos to the wifey for having you rip out the shrubs. It looks way better now that you got rid of the "contractor taxus" that all houses in that time period seem to have. Now you have to update your avatar. Garage is looking great. Just take your time and don't get in a hurry with the mud. Lightly sand what you have, then use a wider trowel to put on the second coat. After that is dried, sand, and put on your third coat with a wider trowel yet. After that is dry, sand, and look for any pits that need filled and hit them. Final sand, don't tear up any paper, then prime with a GOOD primer. Good luck, and keep us updated. And get that avatar changed.:lol:

Thanks for the kind words! Good point, I really need to get the avatar updated....I will need to snap a new picture from the same spot as the old one! I was so happy to see those old shrubs go. the bushes in the middle of each bed are really cool, they are called spirea. They go through a couple different phases throughout each season. They started out all green, then the leaves all got red tips on them, and now they are beginning to grow purple flowers. Then come the fall, they should get yellow/red, but will not lose their leaves. Pretty cool I thought!
 
To avoid these ads, REGISTER NOW!
OP
M

Mr. Roboto

Well-known member
Joined
Dec 11, 2012
Messages
2,159
Location
New Hampshire
Well...I am getting there on the taping and mudding. I pretty much just have to give it all a 3rd coat, and final sanding, and then I think I am good to go. Admittedly, it has taken me much longer than I had anticipated, but I have not been spending as much time out there because we've been enjoying our summer. They go by so fast, so the wife and I did not want to regret not having some fun. It's our first full summer together as a married couple, after all! I also got side tracked by addressing some house issues as well...ended up having to rip my deck off that the previous owner added himself due to some improper (read: non existent) flashing. Always something! Looks like I'll also be building a deck this fall.
 
OP
M

Mr. Roboto

Well-known member
Joined
Dec 11, 2012
Messages
2,159
Location
New Hampshire
Time for a quick Monday update.

I Purchased a wall mounted shop vac for the garage for the sole purpose of vacuuming out my cars - after some research I ended up with the Hoover GUV. I decided to mount it on the wall in between the 2 garage doors (glad I added that plug there!) above my generator inlet box. Once I mounted it, though, I wasn't too happy with there being a little bit of wiggle to it since I wasn't able to lag into a stud due to the location, and I felt like I was always going to have to be delicate as to not damage the drywall there. I decided to rip a piece of plywood for this wall and mount the vac and the generator box to this. Much sturdier. The vac also came with a bent wire hanger for the hose storage, which I also thought was kind of cheesy. I went to home depot to just get a steel hose hanger, but I came across this instead: http://www.amazon.com/dp/B000RULG8I/?tag=atomicindus08-20

Which was perfect, because it had a built in storage compartment which I could use to hold all the vac accessories and attachments. I'm happy with how this all came out, although I'll have to pull it all down again to paint the wall. Once I do, though, I don't think it will be too noticeable that this is plywood instead of drywall.

attachment.php


And...some more obligatory drywall pics....I have 2 coats on all of the corners (except where the rear wall meets the ceiling) and have 3 coats on the left, right, and 90% of the rear wall. Need to get a 3rd coat done on the ceiling now and I think I will (finally) be in pretty good shape. I can't wait until I can actually start painting in there.

attachment.php


attachment.php
 

Attachments

  • 2d44zp.jpg
    2d44zp.jpg
    45.2 KB · Views: 1,692
  • 16jkph.jpg
    16jkph.jpg
    46.5 KB · Views: 1,706
  • 20ivq78.jpg
    20ivq78.jpg
    107.5 KB · Views: 1,703
Last edited:

BBSkylark

Well-known member
Joined
Nov 9, 2013
Messages
93
Location
Niagara Region, Ontario
Great job on the mud & tape work. You are scaring me with how much time it is going to take. I just finished sheeting my garage this weekend and plan to tackle it for the first time.

Your shop is going to be killer once it is finished!
 
OP
M

Mr. Roboto

Well-known member
Joined
Dec 11, 2012
Messages
2,159
Location
New Hampshire
Great job on the mud & tape work. You are scaring me with how much time it is going to take. I just finished sheeting my garage this weekend and plan to tackle it for the first time.

Your shop is going to be killer once it is finished!

Don't worry, I have been dragging my feet :lol: I'm sure you'll be able to wrap it up quicker than me!
 

BigNuge

Well-known member
Joined
Feb 23, 2015
Messages
608
Location
Live Free or Die
Re: Mr. Roboto's Garage Makeover

Nice work man, place looks great! Cool idea on the vacuum, I never gave a thought to a mounted vacuum in the shop...hmmm.


Sent from Taptalk
 
OP
M

Mr. Roboto

Well-known member
Joined
Dec 11, 2012
Messages
2,159
Location
New Hampshire
Re: Mr. Roboto's Garage Makeover

Nice work man, place looks great! Cool idea on the vacuum, I never gave a thought to a mounted vacuum in the shop...hmmm.


Sent from Taptalk

Thank you sir! The vacuum is great so far, I can give the rides a quick cleaning without having to lug the shop vac out. So convenient.
 
OP
M

Mr. Roboto

Well-known member
Joined
Dec 11, 2012
Messages
2,159
Location
New Hampshire
Nothing to show as far as pictures, but quick update: Got all of the 3rd coat applied and sanded on the seams and have 2 coats on all the screw heads. I just need to do a quick 3rd coat and the screws that need it, and a quick final sand, and I'm ready for paint!! Does anybody have any tips on the best way to get all the damn drywall dust off the walls to get them prepped for paint? I'm thinking ill just go to town in there with my backpack leaf blower.

I started on my birthday, April 21st. Here were are 5 months later. After a lot of electrical, insulation, furring strips, hanging drywall, taping, mudding, sanding, mudding, sanding, mudding, sanding...I finally feel like the light at the end of the tunnel is near. Once it's painted, the real fun can begin!
 

BBSkylark

Well-known member
Joined
Nov 9, 2013
Messages
93
Location
Niagara Region, Ontario
To brush off the drywall dust I tried my shop vac at first and it was way to slow going. I ended up using a new broom with a handle that was only 8" long. I brushed it top down and vacuumed it up afterward. I feel as though the leaf blower may just create a dust cloud and it will settle back on everything/ the walls.

I used a good quality PVA primer after my final sand, and it really worked well sealing the drywall and compound to an even finish.

Good luck!
 

M-technik-3

Well-known member
Joined
Feb 16, 2008
Messages
1,785
Location
Western Mass
Dig the Garage vac and I'm sure it was significantly less money than Griots unit. Did you mention if your walls were 2x4 or 2x6? Somebody else asked so was wondering. Did you consider spray foam or was the batting that much cheaper?
 
OP
M

Mr. Roboto

Well-known member
Joined
Dec 11, 2012
Messages
2,159
Location
New Hampshire
To brush off the drywall dust I tried my shop vac at first and it was way to slow going. I ended up using a new broom with a handle that was only 8" long. I brushed it top down and vacuumed it up afterward. I feel as though the leaf blower may just create a dust cloud and it will settle back on everything/ the walls.

I used a good quality PVA primer after my final sand, and it really worked well sealing the drywall and compound to an even finish. I like the broom idea. I will go pick up a brand new cheapie and go to town.

Good luck!

I had the same thought, getting the dust OUT vs just blowing it around. I started with my shop vac, but the dust is so fine that it started to clog the filter.

Dig the Garage vac and I'm sure it was significantly less money than Griots unit. Did you mention if your walls were 2x4 or 2x6? Somebody else asked so was wondering. Did you consider spray foam or was the batting that much cheaper?

The vac was $159.99 - not the cheapest thing in the world, but I think I will get my fair share of use out of it to justify it. Not sure how much the Griot's unit is for comparison's sake.

The walls are all 2x4 unfortunately. I would have loved to do spray foam, but the fiberglass roll insulation could not be beat for the money. I will be doing fiberglass blown-in in the attic as well. I'll be doing the attic-cat system from home depot. They give you the machine rental for free for a day when you purchase 10+ bags of insulation.
 
Last edited:
OP
M

Mr. Roboto

Well-known member
Joined
Dec 11, 2012
Messages
2,159
Location
New Hampshire
I did not think I would ever be able to say these words, however, I am finally DONE with taping and mudding!! Now that it's done, I am glad I did it myself. Yes, it was a TON of work, but I now know how to do it, and I saved enough money to fund my heater.

attachment.php


attachment.php


I was also able to get primer up on all the walls. One 5 gallon bucked ended up being perfect. I only did one coat. I can still see where my mud lines are due to the difference in texture, but the guy at the paint store assured me one coat would be fine, and that following it up with 2 coats of paint will give me a good result. I hope he's right.

attachment.php


attachment.php


I also took a trip to the Benjamin Moore dealer and picked out my colors. Very similar to many others color scheme, but I've always loved the look. Heres a quick mock up using the color samples from the online color selector.

attachment.php


I hope it's not too dark, it looked a lot lighter in the store when we were comparing samples, but we'll see. Regardless, I'm really looking forward to getting color on the walls!
 

Attachments

  • xbzlf4.jpg
    xbzlf4.jpg
    55.3 KB · Views: 1,237
  • vmyi50.jpg
    vmyi50.jpg
    91.5 KB · Views: 1,244
  • 28b7bdj.jpg
    28b7bdj.jpg
    141.6 KB · Views: 1,251
  • 2pyckeh.jpg
    2pyckeh.jpg
    5.1 KB · Views: 1,244
  • 8x6l5e.jpg
    8x6l5e.jpg
    100.9 KB · Views: 1,254
Last edited:
OP
M

Mr. Roboto

Well-known member
Joined
Dec 11, 2012
Messages
2,159
Location
New Hampshire
Looking good! Really hoping my next garage resembles the size and ceiling height of yours. I am running out of room very quick.

Thanks! Your space is coming along nicely as well. I like the white/gray combo you've done in there. The ceiling height is nice, but it's definitely not tall enough for a full height lift like I was hoping for. I think I am going to be getting an Atlast BP9000 2 post baseplate lift for mine - a good compromise.

http://www.gregsmithequipment.com/Atlas-BP9000
 
OP
M

Mr. Roboto

Well-known member
Joined
Dec 11, 2012
Messages
2,159
Location
New Hampshire
Was able to get my ceiling -painted and most of the first coat of the lower wall color painted this weekend. Hoping to chip away at the painting every night this week, and get it wrapped up this weekend. Need to get my lights hung as well.

attachment.php


attachment.php


Next task will be to get my Hot Dawg heater hung!
 

Attachments

  • 2m76bzq.jpg
    2m76bzq.jpg
    46.2 KB · Views: 1,229
  • 23v0rom.jpg
    23v0rom.jpg
    45.8 KB · Views: 1,226
Last edited:
OP
M

Mr. Roboto

Well-known member
Joined
Dec 11, 2012
Messages
2,159
Location
New Hampshire
Late night working to get these up, but FINALLLY, let there be light!! I'll neaten up the wires later. For 532 watts/5.32A total consumption for 14 lights, the output is great. Very happy with the LED fixtures initially.

attachment.php


attachment.php
 

Attachments

  • 2nkmibk.jpg
    2nkmibk.jpg
    49 KB · Views: 1,228
  • 23s67g0.jpg
    23s67g0.jpg
    107.2 KB · Views: 1,238
Last edited:

NedNorton

Well-known member
Joined
Jul 14, 2012
Messages
608
Location
Colorado, USA
Great job powering through the drywall. :beer: I know from recent experience that it can be a long and drawn out process. The garage looks great.

Subscribed!

Cheers,
Chris
 
OP
M

Mr. Roboto

Well-known member
Joined
Dec 11, 2012
Messages
2,159
Location
New Hampshire
Re: Mr. Roboto's Garage Makeover

Great job powering through the drywall. :beer: I know from recent experience that it can be a long and drawn out process. The garage looks great.

Subscribed!

Cheers,
Chris

Thanks! It took about twice as long as I'd hoped, but I'm glad it's done haha. I just took a quick look at your thread, don't know how I haven't stumbled across it until now! I will have to take a thorough read through it tonight when I have some more time.

Looking good... Lots of lights is very helpful.

Thanks you! Yes it sure is. I was worried it would be TOO bright, but now I don't think that there is such a thing :)
 
OP
M

Mr. Roboto

Well-known member
Joined
Dec 11, 2012
Messages
2,159
Location
New Hampshire
Like the color scheme....looks familiar.

Speaking of the color scheme...I'm actually still up in the air. I decided I wanted to try and tie in some color (red) but I can't decide which option. What do you guys think?

I'm also up in the air on what color to use for the window/door/base trim. White, black, or some shade of stain.

EDIT: for some reason I can onky attach one photo at a time per post from my phone...so I apologize for having to make 4 posts. Here is option 1.
 

Attachments

  • image.jpg
    image.jpg
    9.4 KB · Views: 499
Last edited:
To avoid these ads, REGISTER NOW!
Top Bottom