OP

You are using an out of date browser. It may not display this or other websites correctly.
You should upgrade or use an alternative browser.
You should upgrade or use an alternative browser.
Between 705 & 1200 SQ/FT Roboto's Garage
- Thread starter Mr. Roboto
- Start date
Workspaces between 705 and 1200 squarefeet.
OP
Mr. Roboto
Well-known member
OP
Mr. Roboto
Well-known member

Superbec
Well-known member
Option 2
2 !, and I'm going to have that myself too
OP
Mr. Roboto
Well-known member
2 !, and I'm going to have that myself too
Thanks for the input, that is the color scheme I was leaning towards as well.
BBSkylark
Well-known member
Option 4:
I'm partial to #4 but that's because that is almost exact to what I am doing to mine

OP
Mr. Roboto
Well-known member
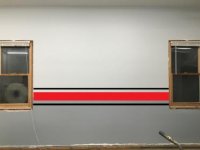
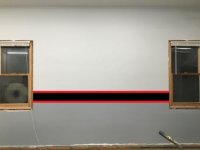
For those following along, after (too much) thought, I've decided to go with Option 1. A 6" red stripe with 1" black stripes directly above and below. Picked up a laser level (which definitely worked out awesome) and got the first round of taping done last night. I painted the edges of the tape using the base color of the upper/lower portion of the wall to "seal in" the edges of the tape as so many have suggested on this site. Hopefully I get some clean edges as a result. I will be painting the black tonight, then re-mask, and then paint the red.

Attachments

Last edited:
OP
Mr. Roboto
Well-known member
I have a bit of a predicament. I went to town hall yesterday to pull 2 permits for my garage. One for the gas line and the other for the heater. NH allows you to do the work on your own home without being licensed, so I'll be doing the work myself. They handed me a piece of paper with some of the pertinent sections of code and I may have an issue.
They require a 1 hour fire seperation installed above the heater, which equates to 5/8" drywall. When I hung my Sheetrock, only used 1/2" on the ceiling because I was under the impression that 5/8" was only required as a seperation between living spaces.
Since I just have an attic space above my garage, do you think they will fail me for the 1/2" drywall above the heater? I suppose I could throw up a small piece of 5/8" above the heater, but it would look like ****. Is there a piece of fire rated stainless steel sheet metal or similar I could use instead that's rated for 1 hour as a substitute?
NedNorton
Well-known member
I may have a solution for you. Check out this product. It's a paint on and rated for 2hr on 1/2" in ceiling installations. We have used it over rigid foam with good results. Give them a call and they should be able to send over the stamped labs report for the inspector.
http://www.firefree.com/fire-retardant-fire-resistant-paint-products/ff88-intumescent-coating.php
Here is the assembly notation.
Two Hour Ceiling Assemblies
Sheetrock
Defective U.L assembly BXUV-G524 where 1/2" type-C was required & 1/2" non-rated was installed
WFC Fire Engineering Report
Cheers,
Chris
OP
Mr. Roboto
Well-known member
I may have a solution for you. Check out this product. It's a paint on and rated for 2hr on 1/2" in ceiling installations. We have used it over rigid foam with good results. Give them a call and they should be able to send over the stamped labs report for the inspector.
http://www.firefree.com/fire-retardant-fire-resistant-paint-products/ff88-intumescent-coating.php
Here is the assembly notation.
Two Hour Ceiling Assemblies
Sheetrock
Defective U.L assembly BXUV-G524 where 1/2" type-C was required & 1/2" non-rated was installed
WFC Fire Engineering Report
Cheers,
Chris
Great solution!! Thanks for the great idea. I'm going to call them tomorrow morning to see if I need the fire guard without a living space overhead. If so, I will be going that route.
OP
Mr. Roboto
Well-known member
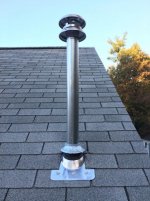
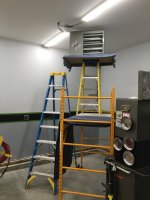
Had a productive weekend. Got the gas line routed:

My OSHA approved setup for getting the heater into place.

Hung!

and vented.


I still need to wire the power to the heater. The instruction manual for the heater was very detailed in all aspects of the installation, aside from this. Can I just wire a standard 110 plug to the leads in the unit and run an outlet above the heater and plug it in? Or does the unit need to be direct wired with BX or similar wire? Thanks!
My OSHA approved setup for getting the heater into place.
Hung!
and vented.
I still need to wire the power to the heater. The instruction manual for the heater was very detailed in all aspects of the installation, aside from this. Can I just wire a standard 110 plug to the leads in the unit and run an outlet above the heater and plug it in? Or does the unit need to be direct wired with BX or similar wire? Thanks!
Attachments


Last edited:
OP
Mr. Roboto
Well-known member
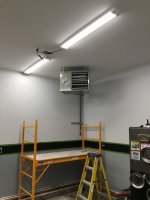
Well, good news, my gas pipe passed inspection on Friday! It helpd 15 PSI overnight. The required test was 10 PSI for 10 min, so I'm confident in it. I also ran the electrical/thermostat wiring as well, so everything is ready to go. Just need the propane company to come and drop my 120lb propane tank.
Final heater hookups:

I also framed up the cabinet to hide the electrical. I wanted to keep it accessible for the future, so I boxed it in. I just need to build the cabinet doors for it. You can also see the thermostat and final stripe on the wall.

Final heater hookups:
I also framed up the cabinet to hide the electrical. I wanted to keep it accessible for the future, so I boxed it in. I just need to build the cabinet doors for it. You can also see the thermostat and final stripe on the wall.
Attachments


Last edited:
BBSkylark
Well-known member
Looks great! I love the idea of keeping the cabinet accessible. I had thought of different ways to do this but never ended up following through. I hope my spare conduit runs to the ceiling are going to be enough.
Stripe came out killer as well!
Stripe came out killer as well!
OP
Mr. Roboto
Well-known member
Looks great! I love the idea of keeping the cabinet accessible. I had thought of different ways to do this but never ended up following through. I hope my spare conduit runs to the ceiling are going to be enough.
Stripe came out killer as well!
Thanks man! I wanted to keep the run in to the garage accessible, as well as the runs out of the panel. Someday, I'd like to attach the garage to the house with a mud room, so the access should come in handy so I can tie a circuit into the connection. Just a pipe dream at this point, though. Your conduit runs should prove just as handy as well.
Thanks for the comment on the strip as well, I'm very happy with it!
OP
Mr. Roboto
Well-known member
Turns out, propane companies are no so eager to create new residential accounts this time of year.... too busy I guess with the impending cold months. I've been struggling to get one to come out and set up a new account on a leased tank, but I finally got someone. They're dropping, installing, and filling a 120lb tank next Friday. That that point I should be able to flick the switch on the heater and I will have heat! It's been a long time coming......can't wait.
I will be very curious to see what the propane usage will be once it is running. I'm planning on leaving it turned down to 45 or so when I am not out there, only turning it up when I'm in the garage working on something.
I will be very curious to see what the propane usage will be once it is running. I'm planning on leaving it turned down to 45 or so when I am not out there, only turning it up when I'm in the garage working on something.
Last edited:
lane meyer
Active member
- Joined
- Jun 28, 2013
- Messages
- 34
Love the color scheme...keep up the good work
MichaelBikel
Well-known member
Killer job! One question though, why only 10' ceilings and not higher? My shop is in the basement, I don't do automotive, a assume if you do its limited? Either way can't wait to see more!
OP
Mr. Roboto
Well-known member
Love the color scheme...keep up the good work
Thanks!
Killer job! One question though, why only 10' ceilings and not higher? My shop is in the basement, I don't do automotive, a assume if you do its limited? Either way can't wait to see more!
I did not build the garage, it came with the house
If I had, I surely would have done a few things differently, taller ceilings being one of them. I was lucky to get what I did in my budget, though, so no complaints.MichaelBikel
Well-known member
I only asked as many of the members here "lift" the ceiling, guess I wasn't thinking in terms of budget though. I wouldn't complain if I had a garage like that either, i'm stuck in a basement and have to keep the windows/cellar door open when I'm down there on account of radon. Beautiful job, can't wait to see more.
OP
Mr. Roboto
Well-known member
Got the base molding done last night. I boxed in the 2x6 sill plate to hide that because it protruded past the 2x4 walls. I was planning on leaving it white, but it really stuck out like a sore thumb, so I painted it the same color as the bottom of the wall.

With that being done I was finally able to push my bench and cabinets back against the rear wall. It's been forever since I've been able to get my car this far into the garage

With that being done I was finally able to push my bench and cabinets back against the rear wall. It's been forever since I've been able to get my car this far into the garage
Attachments


Last edited:
NedNorton
Well-known member
Way to keep knocking away at it!
Just to give credit where credit is due... You took this...

And, after a lot of work, made it this...

One hell of a job!
Cheers,
Chris
Just to give credit where credit is due... You took this...
And, after a lot of work, made it this...
One hell of a job!
Cheers,
Chris
OP
Mr. Roboto
Well-known member
Way to keep knocking away at it!
Just to give credit where credit is due... You took this...
And, after a lot of work, made it this...
One hell of a job!
Cheers,
Chris
Thaks, that brought a smile to my face
Sometimes I get too caught up over beating myself up for taking so long to realize the space really has come a long way!
OP
Mr. Roboto
Well-known member
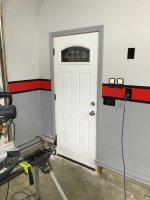
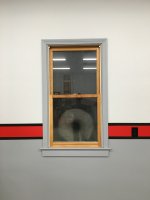
Didn't get too much accomplished this weekend, had a busy one doing other stuff. I managed to get the windows and the door trimmed out, though. I was planning on painting the windows themselves the same gray as the trim, but I ran out of the gray paint. Oh well, I'll probably grab another quart next time I'm there.


Attachments
Last edited:
Didn't get too much accomplished this weekend, had a busy one doing other stuff. I managed to get the windows and the door trimmed out, though. I was planning on painting the windows themselves the same gray as the trim, but I ran out of the gray paint. Oh well, I'll probably grab another quart next time I'm there.


Ohio State BUCKEYES color theme
OP
Mr. Roboto
Well-known member
Ohio State BUCKEYES color theme
Not quite what I was going for

In other news, my mind has been wandering on what to do on the floor in there. I got a RaceDeck sample of free flow and diamond, however I have concerns over both. I don't think free flow will work for me at all, I find myself rolling things around in there quite often and I don't think the free flow is very conducive to that. I am worried about the diamond staying looking pretty in a working shop, weather it be from cracking, scratching, etc.
I don't want to deal with the prep of an epoxy floor....which pretty much just leaves rust bullet.
Or, just live with the concrete floor that I have..... It just seems that any floor you pick has it's pros and cons, so it's kind of a "Pick your Poison" ordeal.
Last edited:
OP
Mr. Roboto
Well-known member
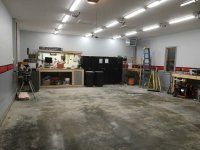
Spent last night trimming out the hatches for my "attic" access.

And then I finally pushed all my junk along the walls and swept the floor. Finally, some space!

And for the first time in over 6 months, I was able to get 2 vehicles in the garage.

Next projects will be building the new L-shaped work bench, and doing the blown-in insulation up in the attic space.
And then I finally pushed all my junk along the walls and swept the floor. Finally, some space!
And for the first time in over 6 months, I was able to get 2 vehicles in the garage.
Next projects will be building the new L-shaped work bench, and doing the blown-in insulation up in the attic space.
Attachments


Last edited:
BBSkylark
Well-known member
Came out amazing, love the space that you have in there. Any plans for the floor?
OP
Mr. Roboto
Well-known member
Came out amazing, love the space that you have in there. Any plans for the floor?
Thanks! Check out the post I made 2 posts back. I copied it below too. Still undecided!
In other news, my mind has been wandering on what to do on the floor in there. I got a RaceDeck sample of free flow and diamond, however I have concerns over both. I don't think free flow will work for me at all, I find myself rolling things around in there quite often and I don't think the free flow is very conducive to that. I am worried about the diamond staying looking pretty in a working shop, weather it be from cracking, scratching, etc.
I don't want to deal with the prep of an epoxy floor....which pretty much just leaves rust bullet.
Or, just live with the concrete floor that I have..... It just seems that any floor you pick has it's pros and cons, so it's kind of a "Pick your Poison" ordeal.
I have to say, "Job Well Done"!
As for the floor, I was at the same juncture and went with race deck. I did just diamond plate and despite trying to damage it...it has stood up over the past few years pretty well.
I will say one thing, when using a floor jack or jack stands, you need to use a piece of plywood under them. I just made a few pads of plywood and they work great.
Best of luck in your choice.
BBSkylark
Well-known member
Thanks! Check out the post I made 2 posts back. I copied it below too. Still undecided!
Oh wow, how did I miss that. I went with a floor tile system for mine as my slab was/is a total wreck. One day it will get replaced and an epoxy system will be used. However so far, I am happy with the tiles I decided on(Costco.ca). But if I was to do it again I would go with a professional epoxy route. I am having this done on one of my job sites right now and have to say the outcome is truely amazing (Mind you its an industrial application).
Good luck with the decision.
OP
Mr. Roboto
Well-known member
I have to say, "Job Well Done"!
As for the floor, I was at the same juncture and went with race deck. I did just diamond plate and despite trying to damage it...it has stood up over the past few years pretty well.
I will say one thing, when using a floor jack or jack stands, you need to use a piece of plywood under them. I just made a few pads of plywood and they work great.
Best of luck in your choice.
Oh wow, how did I miss that. I went with a floor tile system for mine as my slab was/is a total wreck. One day it will get replaced and an epoxy system will be used. However so far, I am happy with the tiles I decided on(Costco.ca). But if I was to do it again I would go with a professional epoxy route. I am having this done on one of my job sites right now and have to say the outcome is truely amazing (Mind you its an industrial application).
Good luck with the decision.
Thanks both for the input. I really want to love the race deck, there's no denying how awesome it looks!
OP
Mr. Roboto
Well-known member
Wow, just wow! Good job sir!
Thank you!
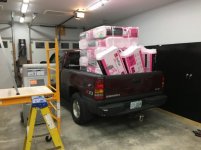
In other news, this guy followed me home last night! Can't wait to get it loaded up.
Attachments

Last edited:
NedNorton
Well-known member
Just had a min to check your progress and you have both vehicles parked in the garage! 
Nice job getting it done. It looks great!
What is next on the agenda?
Cheers,
Chris
Nice job getting it done. It looks great!
What is next on the agenda?
Cheers,
Chris
OP
Mr. Roboto
Well-known member
Just had a min to check your progress and you have both vehicles parked in the garage!
Nice job getting it done. It looks great!
What is next on the agenda?
Cheers,
Chris
Thank you!
Next up is building an L shaped work bench in the rear left corner to replace my old much to large bench I built (everything was "the bigger the better" to me back then haha) and doing the blow in insulation in the attic space.
Been having issues with the propane company. The tank has been installed, however the regulator would not enter into lock-up state when the heater stopped calling for gas. The guy who installed the tank apparently was not qualified to diagnose the issue, so I've been struggling since frday to get them to send someone back out to try and rectify the issue. Word is, they'll come between 8-10 today, but that's also what they told me on Saturday as well, and nobody came.
OP
Mr. Roboto
Well-known member
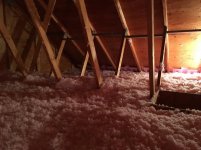
Another big milestone....attic is now insulated!
Went with the Owens Corning atticat system from Home Depot. 30 bags of blown in equate to an r-60. It went smoother than I thought for a change..


Went with the Owens Corning atticat system from Home Depot. 30 bags of blown in equate to an r-60. It went smoother than I thought for a change..
Attachments

Last edited:
OP
Mr. Roboto
Well-known member
OP
Mr. Roboto
Well-known member
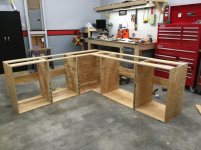
For anyone following along, I got the cabinets installed onto their toe-kick base and got the 2x4 bench top framed out. I also moved my mobile workbench into position to see what it would be like to have the U shape. This mobile bench will be where I do most of my woodworking....I will slowly transform it into more of a traditional woodworking bench. I also built it the same height as my table saw so I could use it as an outfeed table.
The pictures are kind of crappy, but you get the idea.
I have to say, I am overjoyed with having a heated shop. It was 25-30 out this weekend and the shop stayed really warm. I was out there for around 5 hours and I only heard the heater cycle on 3 times. Not bad in my book.
The town fire inspector came last Friday as well for the final signoff on my permit for the heater. Everything passed. I was relieved. Glad I was able to handle the install myself and saved a bunch of money.
Attachments

Last edited:
NedNorton
Well-known member
Looks great! Terrific work! What is the plan for the lower section? Drawers? Doors? Can't wait to see it painted with the top on. Lately, most of my shop "improvements" have been acquisitions and you are motivating me to get going and get the Chop Saw/ Radial Arm station built.
Keep up the good work.
Cheers,
Chris
Keep up the good work.
Cheers,
Chris
OP
Mr. Roboto
Well-known member
Looks great! Terrific work! What is the plan for the lower section? Drawers? Doors? Can't wait to see it painted with the top on. Lately, most of my shop "improvements" have been acquisitions and you are motivating me to get going and get the Chop Saw/ Radial Arm station built.
Keep up the good work.
Cheers,
Chris
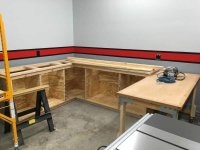
Thank you! I am not sure yet. This is my first attempt at cabinet building, so I may stick with just doors for simplicity sake, however, I do like the idea of having a drawer above each door. We'll see just how motivated I am feeling. I need to research how to build a drawer too, and this would be a good time to learn...
Small update after tonight.
Attachments

Last edited: