To avoid these ads, REGISTER NOW!

Between 705 & 1200 SQ/FT Roboto's Garage

Workspaces between 705 and 1200 squarefeet.
OP
M

Mr. Roboto

Well-known member
Joined
Dec 11, 2012
Messages
2,159
Location
New Hampshire
Few small updates this morning. We had visitors for a good part of the weekend, so my time was limited.

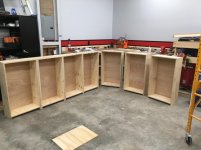
I was able to get the backsplash (so to speak) mounted to the work bench, finished the face frame, and installed the adjustable shelves in the cabinets. I mounted the power strip I had on my old bench as well. I need to pick up another one for the other side of the bench now as well. I'm really happy with it so far. Pretty much just need to get the doors made and paint the bench and I will be in good shape. Oh, and I'm planning on building a set of drawers into the cabinet on the far right. Next up will be building the upper cabinets.

attachment.php


I also made this rack to hold my pry bars out of some of the 3/4" scrap pieces I had left over. These things have never really had a home until now.

attachment.php


I also picked up a Gladiator Geartrack kit from sears - it was a "hot buy" this weekend. Installed it to the right of the man door next to my wife's car.

attachment.php
 

Attachments

  • IMG_0708_zpsumzjwjpd.jpg
    IMG_0708_zpsumzjwjpd.jpg
    110.6 KB · Views: 981
  • IMG_0709_zpsdcusbzb6.jpg
    IMG_0709_zpsdcusbzb6.jpg
    82.3 KB · Views: 980
  • IMG_0714_zpsybimwmn0.JPG
    IMG_0714_zpsybimwmn0.JPG
    131.9 KB · Views: 984
Last edited:
To avoid these ads, REGISTER NOW!

920kip

Well-known member
Joined
Aug 11, 2011
Messages
168
Location
Titletown USA
Just read the whole thread this morning. You have done some great work here. I will keep following along.
Kip
 

NedNorton

Well-known member
Joined
Jul 14, 2012
Messages
608
Location
Colorado, USA
The bench looks great and I can't wait to see it with the doors on and painted! The pry-bar rack is excellent too. Must feel great, new tool box and a new bench.

Keep cranking on it.

Cheers,
Chris
 
OP
M

Mr. Roboto

Well-known member
Joined
Dec 11, 2012
Messages
2,159
Location
New Hampshire
The bench looks great and I can't wait to see it with the doors on and painted! The pry-bar rack is excellent too. Must feel great, new tool box and a new bench.

Keep cranking on it.

Cheers,
Chris

Thanks Chris, it sure as heck doesn't feel bad, that's for sure :)
 
Last edited:
OP
M

Mr. Roboto

Well-known member
Joined
Dec 11, 2012
Messages
2,159
Location
New Hampshire
Bench is looking good-nice job.

Thank you! Much appreciated.

One quick bench related updated...built my first door last night! Not as hard as I thought. Hopefully they go together quickly. I attached this one for a test, but the rest will be built and left off because I'll be painting the bench. Hopefully, this bench will be done by the next update.

attachment.php
 

Attachments

  • IMG_0732_zpsvqeoad6e.jpg
    IMG_0732_zpsvqeoad6e.jpg
    97 KB · Views: 971
Last edited:

ksp683

Active member
Joined
Oct 4, 2010
Messages
33
Location
Regina, SK
Awesome work on the garage!! Looks great. Your work bench is looking stellar. I've often contemplated building a U shaped work bench in my garage.
 

ballroller

New member
Joined
Nov 30, 2015
Messages
1
Now your garage looks nice! I bet you can spend whole day in it ))) .... just find the place for refrigerator with beer.
 
OP
M

Mr. Roboto

Well-known member
Joined
Dec 11, 2012
Messages
2,159
Location
New Hampshire
Awesome work on the garage!! Looks great. Your work bench is looking stellar. I've often contemplated building a U shaped work bench in my garage.

Thanks! I think the layout will work out quite nicely.

New bench looks nice and slick.

Thank you!

Now your garage looks nice! I bet you can spend whole day in it ))) .... just find the place for refrigerator with beer.

I sure can...it's amazing how fast time time flies sometimes when I am out there working.


Can you share some details on how you built the door?

Sure, I can take pictures for you step by step if you'd like as I build the remaining doors, but the steps are fairly basic.

First I cut the stiles and rails to length (these are the "perimeter" pieces so to speak). After that, I cut a 1/4" dado along their inner length for the panel to sit in. Then I cut the panel to size, assembled 2 rails to one of the stiles (I used pocket screws for the attachments) and slid in the inner panel, which is 1/4" sanded plywood. Finally, I attached the remaining stile and hung the door.

322px-Woodworking-frameandpanel-p.svg.png
 
Last edited:

goodysgotacuda

Well-known member
Joined
Jun 13, 2012
Messages
668
Location
DFW
I also framed up the cabinet to hide the electrical. I wanted to keep it accessible for the future, so I boxed it in. I just need to build the cabinet doors for it. You can also see the thermostat and final stripe on the wall.

30ngrc7.jpg


Do you have any pictures of this all buttoned up? After wrestling with my attached 2car last night to run new circuits, if I do build a stickbuilt shop, this is certainly an idea I want to steal!
 
OP
M

Mr. Roboto

Well-known member
Joined
Dec 11, 2012
Messages
2,159
Location
New Hampshire
Killer progress Roboto!! The place is coming along great!!


Sent from my iPad using Tapatalk

Thanks man! Glad to see you stop through. I'm going to have to swing over to your thread and check out your updates.

What more can I say other than well done.:thumbup:

Regards

Thanks so much!

Do you have any pictures of this all buttoned up? After wrestling with my attached 2car last night to run new circuits, if I do build a stickbuilt shop, this is certainly an idea I want to steal!

Unfortunately, it looks exactly the same today haha. I am going to build my upper workbench cabinets, and then build all the doors at once for the bench and electrical panel cover.

Fantastic job!

Thank you sir!
 
To avoid these ads, REGISTER NOW!

tab2

Well-known member
Joined
Apr 9, 2009
Messages
381
Location
Boston
Sure, I can take pictures for you step by step if you'd like as I build the remaining doors, but the steps are fairly basic.

First I cut the stiles and rails to length (these are the "perimeter" pieces so to speak). After that, I cut a 1/4" dado along their inner length for the panel to sit in. Then I cut the panel to size, assembled 2 rails to one of the stiles (I used pocket screws for the attachments) and slid in the inner panel, which is 1/4" sanded plywood. Finally, I attached the remaining stile and hung the door.

Thanks. I never thought about using pocket screws before that way. What thickness are the rails & stiles?
 
OP
M

Mr. Roboto

Well-known member
Joined
Dec 11, 2012
Messages
2,159
Location
New Hampshire
Thanks. I never thought about using pocket screws before that way. What thickness are the rails & stiles?

I used 1x3 stock for these. The pocket screws do the job, but a tounge in groove joint is the best and strongest way to do it. I may give this method a shot when building the next door.

Got my wall cabinets built. Next step is building the face frame and French cleats to get them up on the wall.

attachment.php
 

Attachments

  • 1BE5A165-1070-4445-9197-9D7B530D906A_zpssvvnjf58.jpg
    1BE5A165-1070-4445-9197-9D7B530D906A_zpssvvnjf58.jpg
    84.9 KB · Views: 946
Last edited:
OP
M

Mr. Roboto

Well-known member
Joined
Dec 11, 2012
Messages
2,159
Location
New Hampshire
Cabinets are up on the wall! They look a lot bigger than I thought they would when compared to the bench, but I think adding the doors will help to balance it out a bit. I also wish I had done something a little different in the corner, but I didn't want to lose that space, and I didn't want to build an angled corner cabinet. We'll see how this works out.

attachment.php
 

Attachments

  • AC7F7598-DBF8-45CF-9703-0780BB491010_zpsqkxswxy6.jpg
    AC7F7598-DBF8-45CF-9703-0780BB491010_zpsqkxswxy6.jpg
    85.3 KB · Views: 964
Last edited:

NedNorton

Well-known member
Joined
Jul 14, 2012
Messages
608
Location
Colorado, USA
It's looking great! I wouldn't sweat the corner cabinet. Outside of building an angled one the choices are limited. How are the doors coming along? It is shaping up to be one terrific work space.

Cheers,
Chris
 

BigNuge

Well-known member
Joined
Feb 23, 2015
Messages
608
Location
Live Free or Die
Cabinets are up on the wall! They look a lot bigger than I thought they would when compared to the bench, but I think adding the doors will help to balance it out a bit. I also wish I had done something a little different in the corner, but I didn't want to lose that space, and I didn't want to build an angled corner cabinet. We'll see how this works out.


AC7F7598-DBF8-45CF-9703-0780BB491010_zpsqkxswxy6.jpg


Nice! I see you have one of those "Job Rocker" speakers. Aren't those things killer!! Loud, and an unbelievable battery life! I have he same one for camping, love it!


Sent from Taptalk
 
OP
M

Mr. Roboto

Well-known member
Joined
Dec 11, 2012
Messages
2,159
Location
New Hampshire
It's looking great! I wouldn't sweat the corner cabinet. Outside of building an angled one the choices are limited. How are the doors coming along? It is shaping up to be one terrific work space.

Cheers,
Chris

Thanks! I contemplated going the angled route, but I did not want to cut into the "airspace" so to speak above my bench top. I still haven't been able to get started on the doors. Work has been busy with end of the year stuff going on, and then I caught the flu, which im still recovering from.

You have done a great job, a very functional workspace.:thumbup:

Thank you!

Nice! I see you have one of those "Job Rocker" speakers. Aren't those things killer!! Loud, and an unbelievable battery life! I have he same one for camping, love it!

.
Sent from Taptalk

I do, and I love that thing! I tote that thing around everywhere haha

Cabinets came out great. Can't wait to see the doors.

Bret

Thank you sir, stay tuned...hoping to get started on those sometime late this week or next week.
 
Last edited:
OP
M

Mr. Roboto

Well-known member
Joined
Dec 11, 2012
Messages
2,159
Location
New Hampshire
Well, my updates might be a little lame lately, since they're all about the workbench, but i was finally feeling well enough to get outside and get a few things done yesterday. Here's the current state of the bench:

attachment.php


The face frame is up on the upper cabinets, and most of the shelves are made (I ran out of wood). I also ran some plugs inside a few of the cabinets and a switched outlet under the upper cabinets for future lighting. I also was able to mount the metal pegboard up from wall control. I have a strong dislike of traditional pegboard, and i wanted to make use of the space under the cabinets. I came across this stuff in Chris's (NedNorton) thread so I decided to give it a shot. They were great to work with as well. I ordered 6 sections of the horizontal pegboard powder coated gray, the deluxe starter pack of hooks, as well as the paper towel holder. The stuff looks great, and appears as though it will function much better than traditional pegboard.

attachment.php


attachment.php


I had to cut about 3" off of one section to the far left of the bench because it interfered with the electrical cabinet. It cut very easy with a cut off wheel on my angle grinder:

attachment.php


Aside from paint, I think I'm officially done building aside from the doors. Which means I need to stop being lazy and get to building them. I picked up a tounge and groove router bit set up from rockler, so I'm going to use this method for creating the doors instead of the pocket screws. It should be stronger this way, and is more of a traditional building method.

Thanks again for following along and Merry Christmas!
 

Attachments

  • B5CFCD3A-EC8B-4118-B52F-6AF9D5C1DA00_zpsjeloll4t.jpg
    B5CFCD3A-EC8B-4118-B52F-6AF9D5C1DA00_zpsjeloll4t.jpg
    86 KB · Views: 949
  • 13DE3F6D-82A7-4EF6-AEEB-2C9978E961E0_zpsfmpqzz4o.jpg
    13DE3F6D-82A7-4EF6-AEEB-2C9978E961E0_zpsfmpqzz4o.jpg
    99 KB · Views: 966
  • 9AC81E9F-6D5D-4D11-A6A7-0692B6801521_zpsmeiwpcqc.jpg
    9AC81E9F-6D5D-4D11-A6A7-0692B6801521_zpsmeiwpcqc.jpg
    81.6 KB · Views: 951
  • 3AC3BF0E-6346-4FF0-991E-21F3871A4FEF_zpsol0zvl66.jpg
    3AC3BF0E-6346-4FF0-991E-21F3871A4FEF_zpsol0zvl66.jpg
    93.7 KB · Views: 957
Last edited:
OP
M

Mr. Roboto

Well-known member
Joined
Dec 11, 2012
Messages
2,159
Location
New Hampshire
I just finished reading this thread - great transformation. :thumbup:

Thanks for taking the time to read through it all, and thanks for the compliment!

Dispite the fact that I had almost 2 weeks off from work, I did not get as much done as I had hoped. Oh well, spent a lot of time with family, which is what counts!

I was able to get just about everything painted, and built all the upper doors and electrical panel doors. I have all the styles and rails built and painted for the lowers as well, just need to cut and paint the panels. Almost done! Put the neon Chevy clock up and a few of my signs as well. Got the 2 Chevy ones from my garage journal secret Santa :) they're laying up temporarily for now, but will be hung on the wall eventually.

attachment.php


attachment.php


attachment.php
 

Attachments

  • 2B1B75F2-6692-4D0F-846D-F13F8EC0C2F7_zps0ke6xmc3.jpg
    2B1B75F2-6692-4D0F-846D-F13F8EC0C2F7_zps0ke6xmc3.jpg
    131.7 KB · Views: 950
  • 790AF2F6-F349-49BB-95BE-240E3D6FCCDC_zpsda4dsmrj.jpg
    790AF2F6-F349-49BB-95BE-240E3D6FCCDC_zpsda4dsmrj.jpg
    117.2 KB · Views: 2,222
  • EC1710BA-7C6A-4306-BDAB-9197A49CB16B_zpsq4ewdovj.jpg
    EC1710BA-7C6A-4306-BDAB-9197A49CB16B_zpsq4ewdovj.jpg
    88.7 KB · Views: 959
Last edited:
OP
M

Mr. Roboto

Well-known member
Joined
Dec 11, 2012
Messages
2,159
Location
New Hampshire
I should have waited a few hours to post my last update haha. Lower cabinets are now complete. The open cubby to the right will (eventually) be a bank of drawers.

attachment.php


Now that this bench project is finally mostly done, I can purge the rear corner of my garage of all the wood scraps and reclaim it as usable space.
 

Attachments

  • 68467155-F1F0-40ED-B806-5FAD86593DF7_zpsmjtjh9fy.jpg
    68467155-F1F0-40ED-B806-5FAD86593DF7_zpsmjtjh9fy.jpg
    80.5 KB · Views: 948
Last edited:

NedNorton

Well-known member
Joined
Jul 14, 2012
Messages
608
Location
Colorado, USA
You have been busy! The bench area is coming together. It is funny how it takes so much work to build the structural part of projects and what really sets it off, is the paint. The cabinets look terrific! :rocker:

You may even be at a place to build a project in the shop and not just, for the shop. :thumb: Something we all look forward to.

Cheers,
Chris
 

cynicalrider

Well-known member
Joined
Dec 2, 2014
Messages
52
Sorry if this has been discussed before but is that access panel technically up to code? I would assume that since the original panel has to be unscrewed to access the dangerous area's your setup wouldn't be up to code, correct? But could probably be up to code with some more technical latches?
 
OP
M

Mr. Roboto

Well-known member
Joined
Dec 11, 2012
Messages
2,159
Location
New Hampshire
You have been busy! The bench area is coming together. It is funny how it takes so much work to build the structural part of projects and what really sets it off, is the paint. The cabinets look terrific! :rocker:

You may even be at a place to build a project in the shop and not just, for the shop. :thumb: Something we all look forward to.

Cheers,
Chris

Thanks! It will certainly be nice to work IN the garage instead of ON the garage, that's for sure :lol: It has been a fun process, though. I'll probably miss it when it's done. It's kept me busy.

Sorry if this has been discussed before but is that access panel technically up to code? I would assume that since the original panel has to be unscrewed to access the dangerous area's your setup wouldn't be up to code, correct? But could probably be up to code with some more technical latches?

I'm a little confused. The original panel was left un-altered. The panel cover can also still be removed as it sits now. I just have to open the door and un-screw it.
 

cynicalrider

Well-known member
Joined
Dec 2, 2014
Messages
52
**** nevermind I see that no copper is exposed and it encases the panel itself. I was thinking about how mine looks when the panel is off and it makes sense that no copper would be exposed the way you have it. Thanks!

Definitely stealing this idea from you since I have some wiring still to do in mine.
 
To avoid these ads, REGISTER NOW!
Top Bottom