
You are using an out of date browser. It may not display this or other websites correctly.
You should upgrade or use an alternative browser.
You should upgrade or use an alternative browser.
Between 705 & 1200 SQ/FT Roboto's Garage
- Thread starter Mr. Roboto
- Start date
Workspaces between 705 and 1200 squarefeet.
BigNuge
Well-known member
Re: Mr. Roboto's Garage Makeover
That stinks man....
Shouldn't be that bad to have a section saw cut and a proper pad poured....
Sent from Taptalk
That stinks man....
Shouldn't be that bad to have a section saw cut and a proper pad poured....
Sent from Taptalk
OP
Mr. Roboto
Well-known member
Yeah, I am bummed. The lift installer said it's usually around $500 per pad, so $1000 total. I will call a few places tomorrow to get some estimates. I did the math out, for 2 sections, 4x4ft, 8" deep, it will require 72 bags on concrete. I am NOT mixing 72 bags by hand, that's for damn sure.
BigNuge
Well-known member
Re: Mr. Roboto's Garage Makeover
I second the mixer. I had to hand mix the last 40 bags (the calculation on my pad was short, so the truck ran out). With a 4 person group that is ready to work, a power mixer (rent from HD or Lowes) you can easily mix and pour those bags in under an hour.
That small of a load will cost you huge, most delivery orders penalize you when you order less than 6 yards. I got mine from Aggregate, and anything under 6 you got charged 1/2 of what the underage would cost. So if you only needed 2 yards you'd pay for half of the remaining 4 to get to the minimum (god I am doing an awful job of explaining this...lol)
Here, I'll do it with numbers....
If using round numbers just for example purposes....
$100/yard delivered, 6 yard minimum.
You order 2 yards, you pay the $200 for the two you need, plus another $200 (half of what the next 4 yards would have cost).
Lol, I hope I didn't hack that up too bad...[emoji38]
Sent from Taptalk
Yeah, I am bummed. The lift installer said it's usually around $500 per pad, so $1000 total. I will call a few places tomorrow to get some estimates. I did the math out, for 2 sections, 4x4ft, 8" deep, it will require 72 bags on concrete. I am NOT mixing 72 bags by hand, that's for damn sure.
Rent a small mixer. They go quick
Sent from my HTC6525LVW using Tapatalk
I second the mixer. I had to hand mix the last 40 bags (the calculation on my pad was short, so the truck ran out). With a 4 person group that is ready to work, a power mixer (rent from HD or Lowes) you can easily mix and pour those bags in under an hour.
That small of a load will cost you huge, most delivery orders penalize you when you order less than 6 yards. I got mine from Aggregate, and anything under 6 you got charged 1/2 of what the underage would cost. So if you only needed 2 yards you'd pay for half of the remaining 4 to get to the minimum (god I am doing an awful job of explaining this...lol)
Here, I'll do it with numbers....
If using round numbers just for example purposes....
$100/yard delivered, 6 yard minimum.
You order 2 yards, you pay the $200 for the two you need, plus another $200 (half of what the next 4 yards would have cost).
Lol, I hope I didn't hack that up too bad...[emoji38]
Sent from Taptalk
OP
Mr. Roboto
Well-known member
I understand exactly what you're saying, clear as concrete ") Just Kidding, I understand perfectly.
Just Kidding, I understand perfectly.
I just got the quote from Pro Cut, whom the lift installer recommended. It appears he was off quite a bit in his guestimate of $1,000 for 2 pads. They quoted the job at $2,200. ugh.
Just Kidding, I understand perfectly. I just got the quote from Pro Cut, whom the lift installer recommended. It appears he was off quite a bit in his guestimate of $1,000 for 2 pads. They quoted the job at $2,200. ugh.
NedNorton
Well-known member
Roboto,
Do this yourself, rent the saw and the mixer and save the 2K. I did the calcs and it looks like you need .4 yards per pad or 48 - 60b bags total. Add in the cost of a little steel and you are set. It isn't that hard to do and at $3 +/- a bag it's a no brainer.
If there are guys that hang out at HD looking for work, ask for one that can finish concrete. If not, the pads are small and you can handle it.
It may seem daunting but once you have the demo saw in hand and you make that first cut you'll see how straight forward it all is.
Cheers,
Chris
Dakota46
Active member
Re: Mr. Roboto's Garage Makeover
The rental yards around here will rent out the little 1 yard capacity trailer loaded with ready mix to your specs.
All you need is a truck that can handle the weight of the trailer plus concrete.
Last I checked it runs about $125 for a 1 yard load.
Sent from my SM-G900T using Tapatalk
The rental yards around here will rent out the little 1 yard capacity trailer loaded with ready mix to your specs.
All you need is a truck that can handle the weight of the trailer plus concrete.
Last I checked it runs about $125 for a 1 yard load.
Sent from my SM-G900T using Tapatalk
OP
Mr. Roboto
Well-known member
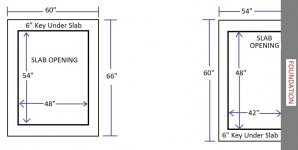
Thanks for all the feedback everyone. I've been doing a lot of reading and I am about 90% sure I'll be doing it myself. I think I can do it for under 600 dollars. Less if I can find someone with a hammer drill. The process seems very straight forward. My atlas lift comes with horrible directions, but I found this diagram in the Mohawk lift that specs out the pad pour. I think I'll be replicating it. I'll probably go one step above and do the Pins AND the 6" key in. I don't have very many strong friends to lend me a hand, but one of them does work for the state, and supervises concrete pours on a pretty regular basis.

Attachments

Last edited:
OP
Mr. Roboto
Well-known member
I spent a lot of time researching and planning this weekend. Definitely going to be tackling these pads by myself. By my math, I can do it for around $600. I actually found a place that specializes in short load concrete, which is a huge relief. A mini cement mixer will come and pour anywhere from .5 to 3 yards of concrete. No part of me wanted to mix 80 bags of concrete on site in a rented mixer, but I would have don it if it was my only option.
Will be renting a 16" Gas powered saw, borrowing a hammer drill and mini jackhammer from my father in law, and having the ready-mixed concrete delivered and poured as described above. It should be a very straight forward yet labor intensive project.
My cut plan (high end MS Paint technical drawings). Right opening will be 3.5 x 4 (due to foundation obstruction) and the left opening will be 4.5 x 4 (I went an extra 6" longer so that I could extend it past a crack in my slab. If I kept it 4x4, the upper part of the new slab would essentially be pinned to a 3" wide piece of concrete that is virtually unsupported.
Attachments
Last edited:
Re: Mr. Roboto's Garage Makeover
16" saw is a hell of a saw. We have some 14" ones we use for dry cutting although one does have provisions for a hose hookup. If you are dry cutting prepare for a mess. Wear a dust mask, glasses, and hearing protection. No shorts either.
Sent from my HTC6525LVW using Tapatalk
16" saw is a hell of a saw. We have some 14" ones we use for dry cutting although one does have provisions for a hose hookup. If you are dry cutting prepare for a mess. Wear a dust mask, glasses, and hearing protection. No shorts either.
Sent from my HTC6525LVW using Tapatalk
OP
Mr. Roboto
Well-known member
Re: Mr. Roboto's Garage Makeover
Too big you think? The 14" models the rental place had were electric. Not sure how I felt about an electric concrete saw...
16" saw is a hell of a saw. We have some 14" ones we use for dry cutting although one does have provisions for a hose hookup. If you are dry cutting prepare for a mess. Wear a dust mask, glasses, and hearing protection. No shorts either.
Sent from my HTC6525LVW using Tapatalk
Too big you think? The 14" models the rental place had were electric. Not sure how I felt about an electric concrete saw...
Re: Mr. Roboto's Garage Makeover
go with the gas and use the waterhose to keep the dust down. it also cools the concrete making it cut better.Too big you think? The 14" models the rental place had were electric. Not sure how I felt about an electric concrete saw...
OP
Mr. Roboto
Well-known member
Just reserved this bad boy for Saturday.

Yes, it's probably overkill for what I need, but I think it's a lot safer than the handheld 16" saw, and probably easier to cut a straight line for a beginner as well. Picking up the rest of the tools from my father in law on Friday. I am kind of nervous about the whole thing, to be honest, but I think it will be ok once we get going. Wish me luck!
Yes, it's probably overkill for what I need, but I think it's a lot safer than the handheld 16" saw, and probably easier to cut a straight line for a beginner as well. Picking up the rest of the tools from my father in law on Friday. I am kind of nervous about the whole thing, to be honest, but I think it will be ok once we get going. Wish me luck!
OP
Mr. Roboto
Well-known member
Re: Mr. Roboto's Garage Makeover
I will do my best to document the process with lots of pictures.
Interested to see how this goes. I am thinking I may have to do the same with my shop.
Sent from my Nexus 6P using Tapatalk
I will do my best to document the process with lots of pictures.
OP
Mr. Roboto
Well-known member
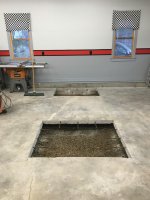
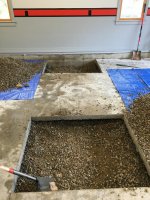
Started the process of tearing up my floor this weekend. What a lot of work!
Started the day off by hanging tarps up all over the garage around the area we'd be working in, I did not want to get dust/water all over everything. I then picked up the gas powered 16" road saw from the rental shop Saturday morning. Got it home, unloaded, water hooked up, and began cutting. 2 feet into the first cut, the belt let go:

****! I called the rental shop, and in their infinite wisdom, they do not stock extra belts, and it takes a week to get a replacement in. They have another shop further away from my house, so they called and confirmed that their road saw was available. So, off I went to go swap it out.
Came back, and was able to cut the perimeter of both holes successfully. I was naieve, and thought that I could just muscle through breaking the slab up with the mini electric jackhammer, and my sledge....but after about 30 minutes of beating on it...I was barely making any progress. Decided to fire up the saw again and cut a checkerboard pattern across each hole to effectively make a bunch of bricks that were about 12" x 6"...those bad boys came up without issue after that.
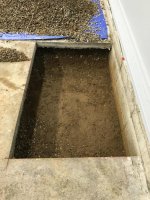
There was 6" of gravel under the slab. The plan was to excavate down 15" below the finished floor, and lay 3" of gravel back down at the bottom of each hole. So we went to work digging. Here's about where I remembered to start taking pictures again.


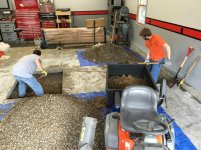
With all the gravel up, we then dig about 6" of dirt out, and tamped it all down.

Then, we added 3" of gravel BACK into each hole, tamped again, and we were at a perfect 12" depth from the finished floor. I had a ton of extra gravel left, so out it came load by load.
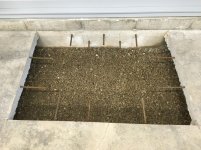
Then, the holes were drilled for the rebar pins. You can see I added two rows of thicker #5 rebar in the foundation since there is no way of keying the slab under this area.


The only thing left is the rebar mats for the bottom of each hole. One of my friends is a construction supervisor, and he's having them made up out of scraps on the site he's working on. Once those are in, I'll be ready to pour.
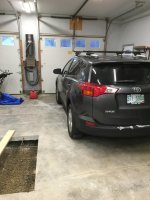
Even was able to get my car back in at the end of the day!

And that was my weekend. Yes, it was a ton of work, but thankfully I had 2 friends to help. One of them is a structural engineer who as I mentioned, supervises construction daily, so it was good to have some reassurance from him that things were being done correctly. None of it is rocket science, just extremely labor intensive, but I am glad I did not pay someone $2,200 to do the job....and they were not going to go to the extents that we did either. So far, I've spent $149 to rent the road saw, and $39 for the hammer drill...and that's it. Concrete will be about $400 delivered, so I should be pretty close to my estimate of $600.
Started the day off by hanging tarps up all over the garage around the area we'd be working in, I did not want to get dust/water all over everything. I then picked up the gas powered 16" road saw from the rental shop Saturday morning. Got it home, unloaded, water hooked up, and began cutting. 2 feet into the first cut, the belt let go:
****! I called the rental shop, and in their infinite wisdom, they do not stock extra belts, and it takes a week to get a replacement in. They have another shop further away from my house, so they called and confirmed that their road saw was available. So, off I went to go swap it out.
Came back, and was able to cut the perimeter of both holes successfully. I was naieve, and thought that I could just muscle through breaking the slab up with the mini electric jackhammer, and my sledge....but after about 30 minutes of beating on it...I was barely making any progress. Decided to fire up the saw again and cut a checkerboard pattern across each hole to effectively make a bunch of bricks that were about 12" x 6"...those bad boys came up without issue after that.
There was 6" of gravel under the slab. The plan was to excavate down 15" below the finished floor, and lay 3" of gravel back down at the bottom of each hole. So we went to work digging. Here's about where I remembered to start taking pictures again.
With all the gravel up, we then dig about 6" of dirt out, and tamped it all down.
Then, we added 3" of gravel BACK into each hole, tamped again, and we were at a perfect 12" depth from the finished floor. I had a ton of extra gravel left, so out it came load by load.
Then, the holes were drilled for the rebar pins. You can see I added two rows of thicker #5 rebar in the foundation since there is no way of keying the slab under this area.
The only thing left is the rebar mats for the bottom of each hole. One of my friends is a construction supervisor, and he's having them made up out of scraps on the site he's working on. Once those are in, I'll be ready to pour.
Even was able to get my car back in at the end of the day!
And that was my weekend. Yes, it was a ton of work, but thankfully I had 2 friends to help. One of them is a structural engineer who as I mentioned, supervises construction daily, so it was good to have some reassurance from him that things were being done correctly. None of it is rocket science, just extremely labor intensive, but I am glad I did not pay someone $2,200 to do the job....and they were not going to go to the extents that we did either. So far, I've spent $149 to rent the road saw, and $39 for the hammer drill...and that's it. Concrete will be about $400 delivered, so I should be pretty close to my estimate of $600.
Attachments
-
 C548C54B-8126-4316-90D0-8C6C744EFBAF_zpsbyd6uexu.jpg128.3 KB · Views: 898
 -
 BB588E9A-1B47-4119-95E6-098AE7A4E928_zpsvu7eizgq.jpg139.6 KB · Views: 1,278
 -
 B8A88C0D-C27E-4512-A76C-F693327A91D7_zpsxrfjn8ef.jpg145.5 KB · Views: 911
 -
 169653DA-D124-4985-AF86-6E71D88C6A31_zpswsgdf7ld.jpg150.6 KB · Views: 903
 -
 567DA95D-C7E1-4C3B-A5C1-4783A904C25D_zpshog82jwl.jpg147.7 KB · Views: 907
 -
 72FBE505-3ADA-41FD-A201-2B21E9ACDAB6_zpsw5fypsa5.jpg137.2 KB · Views: 902
 -
 33E537F1-7A23-4AD5-AE67-F4B0CC75AF2B_zpsc1yiytq6.jpg149.9 KB · Views: 908
Last edited:
Looks fantastic. Always makes you feel good to do something so much cheaper by doing it yourself. That's why I'm rebuilding an automatic transmission right now.Started the process of tearing up my floor this weekend. What a lot of work!
Started the day off by hanging tarps up all over the garage around the area we'd be working in, I did not want to get dust/water all over everything. I then picked up the gas powered 16" road saw from the rental shop Saturday morning. Got it home, unloaded, water hooked up, and began cutting. 2 feet into the first cut, the belt let go:
****! I called the rental shop, and in their infinite wisdom, they do not stock extra belts, and it takes a week to get a replacement in. They have another shop further away from my house, so they called and confirmed that their road saw was available. So, off I went to go swap it out.
Came back, and was able to cut the perimeter of both holes successfully. I was naieve, and thought that I could just muscle through breaking the slab up with the mini electric jackhammer, and my sledge....but after about 30 minutes of beating on it...I was barely making any progress. Decided to fire up the saw again and cut a checkerboard pattern across each hole to effectively make a bunch of bricks that were about 12" x 6"...those bad boys came up without issue after that.
There was 6" of gravel under the slab. The plan was to excavate down 15" below the finished floor, and lay 3" of gravel back down at the bottom of each hole. So we went to work digging. Here's about where I remembered to start taking pictures again.


With all the gravel up, we then dig about 6" of dirt out, and tamped it all down.
Then, we added 3" of gravel BACK into each hole, tamped again, and we were at a perfect 12" depth from the finished floor. I had a ton of extra gravel left, so out it came load by load.
Then, the holes were drilled for the rebar pins. You can see I added two rows of thicker #5 rebar in the foundation since there is no way of keying the slab under this area.


The only thing left is the rebar mats for the bottom of each hole. One of my friends is a construction supervisor, and he's having them made up out of scraps on the site he's working on. Once those are in, I'll be ready to pour.
Even was able to get my car back in at the end of the day!

And that was my weekend. Yes, it was a ton of work, but thankfully I had 2 friends to help. One of them is a structural engineer who as I mentioned, supervises construction daily, so it was good to have some reassurance from him that things were being done correctly. None of it is rocket science, just extremely labor intensive, but I am glad I did not pay someone $2,200 to do the job....and they were not going to go to the extents that we did either. So far, I've spent $149 to rent the road saw, and $39 for the hammer drill...and that's it. Concrete will be about $400 delivered, so I should be pretty close to my estimate of $600.
Sent from my HTC6525LVW using Tapatalk
xjjeepman
Well-known member
Looks good! Dumb question, is it me or is there a large gap between the concrete slab and the gravel?? Is that correct?
Optical illusion. He dug back under the existing slab so the new concrete will key under the old and not lift.Looks good! Dumb question, is it me or is there a large gap between the concrete slab and the gravel?? Is that correct?
Sent from my HTC6525LVW using Tapatalk
OP
Mr. Roboto
Well-known member
Looks good! Dumb question, is it me or is there a large gap between the concrete slab and the gravel?? Is that correct?
Optical illusion. He dug back under the existing slab so the new concrete will key under the old and not lift.
Sent from my HTC6525LVW using Tapatalk
shadyluke hit the nail on the head...I dug 6-8" under the existing slab so that the new concrete would be keyed under it. This, in conjunction with the rebar pins, should give it the strength it needs to prevent lifting out.
lane meyer
Active member
- Joined
- Jun 28, 2013
- Messages
- 34
Awesome!
I saw your post in the other thread, "IN you garage" and thought I'd check out your project. Great project going and glad to see another member saving money and doing it himself. 
For future reference when doing concrete work, here is a link to a concrete calculator.
http://www.concretenetwork.com/concrete/howmuch/calculator.htm
Since you'll be doing the concrete work and setting the lift up, I'd suggest marking the location of your rebar with a Sharpie.
For future reference when doing concrete work, here is a link to a concrete calculator.
http://www.concretenetwork.com/concrete/howmuch/calculator.htm
Since you'll be doing the concrete work and setting the lift up, I'd suggest marking the location of your rebar with a Sharpie.
OP
Mr. Roboto
Well-known member
I saw your post in the other thread, "IN you garage" and thought I'd check out your project. Great project going and glad to see another member saving money and doing it himself.
For future reference when doing concrete work, here is a link to a concrete calculator.
http://www.concretenetwork.com/concrete/howmuch/calculator.htm
Since you'll be doing the concrete work and setting the lift up, I'd suggest marking the location of your rebar with a Sharpie.
Thanks for checking my thread out!
I think I used that exact calculator when I was doing the planning for the concrete
 The plan is to pour 1 week from this Friday. I will definitely be marking the rebar locations, I want no part of having to drill through it.
 Then, 28 day cure cycle, and it will (finally) be time to install the lift.
BBChevro
Well-known member
Hey great work.
Do you need to run any electricals or hydraulic lines (I don't know much about lifts) from one side to the other?
(Now would be a good time to run conduit, if you do need to).
I just caught up on the last few weeks - I like the rack that you made for the parts organizers too.
Do you need to run any electricals or hydraulic lines (I don't know much about lifts) from one side to the other?
(Now would be a good time to run conduit, if you do need to).
I just caught up on the last few weeks - I like the rack that you made for the parts organizers too.
OP
Mr. Roboto
Well-known member
Hey great work.
Do you need to run any electricals or hydraulic lines (I don't know much about lifts) from one side to the other?
(Now would be a good time to run conduit, if you do need to).
I just caught up on the last few weeks - I like the rack that you made for the parts organizers too.
Thanks! No, no lines needed. I am putting in a baseplate lift, which has all of the required connections between the 2 columns contained within the baseplate that runs on the surface of the floor. Good thinking though, thanks for the heads up
Thanks for the props on the rack, too. I did finish painting that, I'll have to post an updated picture of that as well.
OP
Mr. Roboto
Well-known member
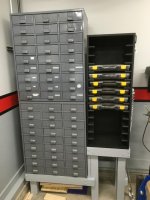
Quick update on the hardware rack. Got the inside painted, and the thread checkers I ordered came in. I mounted them on the right side of the cabinet, and they can be removed as well if needed.


Attachments
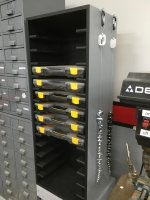
Last edited:
BBChevro
Well-known member
That looks great, the black and grey combo looks just right.
I may have to build something similar - I started organizing nuts & bolts and electrical terminals, etc. a while back, but as yet the boxes don't have a home (they're actually just stacked up on the hood of a car).
I may have to build something similar - I started organizing nuts & bolts and electrical terminals, etc. a while back, but as yet the boxes don't have a home (they're actually just stacked up on the hood of a car
).
OP
Mr. Roboto
Well-known member
That looks great, the black and grey combo looks just right.
I may have to build something similar - I started organizing nuts & bolts and electrical terminals, etc. a while back, but as yet the boxes don't have a home (they're actually just stacked up on the hood of a car
Thanks! I have to admit, all those parts bins are empty right now
I haven't found the time to get them loaded up yet. Building the unit was the fun part. Loading it up and organizing it? Not so fun...
OP
Mr. Roboto
Well-known member
Looks good! Too many projects going on. At least you never get bored. I know I never do these days.
Bret
I agree... I've been getting a little overwhelmed lately with work and then the garage project, there are not enough hours in the day. I can't wait until the concrete is poured because then I have no choice but to wait 28 days for it to cure until I can do anything
Thanks! I have to admit, all those parts bins are empty right now
If you're using them for fastners (nuts/bolts/screws) just figure out what size you want to keep on hand and label the drawers accordingly. Make a list and go buy a pound of this, this and that by your local TSC or whoever sells the stuff by the pound.
Keep a current list handy, wallet or on your phone. Everytime you go by the store or make a run to town, stop, grab some and mark it off your list. You'll fill it up before you know it.
turbowoodworker
Well-known member
I got those same thread checkers and use them all the time.
HSpencer
ALLIANCE MEMBER
The parts cabinets look fantastic. It is nice to have so much storage for the smaller items we all need in the shop. Your doing a super job!!
Best Regards
Herb Spencer
Best Regards
Herb Spencer
OP
Mr. Roboto
Well-known member
If you're using them for fastners (nuts/bolts/screws) just figure out what size you want to keep on hand and label the drawers accordingly. Make a list and go buy a pound of this, this and that by your local TSC or whoever sells the stuff by the pound.
Keep a current list handy, wallet or on your phone. Everytime you go by the store or make a run to town, stop, grab some and mark it off your list. You'll fill it up before you know it.
Good idea. A little here and there will go a long way, and they will hopefully be full before I know it.
I got those same thread checkers and use them all the time.
My only gripe with them so far is that they're missing a 4-40 checker on the SAE set! Just curious, how did you hang them, with the largest checker on the top or the bottom?
The parts cabinets look fantastic. It is nice to have so much storage for the smaller items we all need in the shop. Your doing a super job!!
Best Regards
Herb Spencer
Thank you! I am happy with how they turned out. Sometimes, storing the little things is just as important as the big stuff.
Wreckster23
Well-known member
Bummer about the lift, though it looks like you have that well sorted out.
Curious.. What was under that car cover?
Curious.. What was under that car cover?
bcoke
Well-known member
About the concrete,if you have had it delivered too late but when I need a less than truck load I refuse to pay the "penalty" so to speak , if he can't line up two small jobs the I would form out other areas to pour the excess.......small pad for garbage cans., circle for birdbath, pad for BBQ, start a sidewalk to the back , start future basketball court you get the idea I hate paying for something I am not getting , just a cheap old yankee!!!! bobbycoke
OP
Mr. Roboto
Well-known member
Bummer about the lift, though it looks like you have that well sorted out.
Curious.. What was under that car cover?
My Monte...but I've since sold it

About the concrete,if you have had it delivered too late but when I need a less than truck load I refuse to pay the "penalty" so to speak , if he can't line up two small jobs the I would form out other areas to pour the excess.......small pad for garbage cans., circle for birdbath, pad for BBQ, start a sidewalk to the back , start future basketball court you get the idea I hate paying for something I am not getting , just a cheap old yankee!!!! bobbycoke
I found a place near me who will deliver short loads of ready mixed concrete. They're coming in a week to deliver 2 cubic yards, for about 10 dollars more than it would have cost me to rent a mixer, buy 80 bags, and mix on site. I'll take it!
Willy Radio81
Member
What a Great Build man !