To avoid these ads, REGISTER NOW!

Between 705 & 1200 SQ/FT Roboto's Garage

Workspaces between 705 and 1200 squarefeet.
OP
M

Mr. Roboto

Well-known member
Joined
Dec 11, 2012
Messages
2,159
Location
New Hampshire
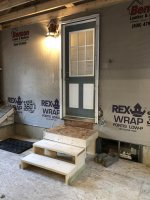
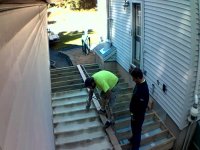
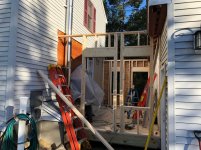
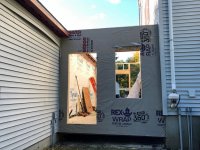
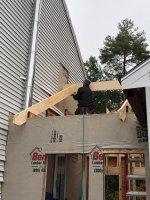
Construction has begun! The framers showed up yesterday morning. The goal for yesterday was to get the decking framed out, because spray foam was scheduled for Friday (today). Typically, they can spray the joists from the underside at any time during the project, but in my case, they don't have the clearance to spray from the underside... so they're going to do it from the top before the subfloor goes in. This meant that they had to contain the spray foam from the underside somehow, so the solution was to install a 2x4 cleat to the bottom of each floor joist, and drop in a piece of foam board from the top. They also ran a 2x6 across the top of the joists to keep them from bowing at all in case the spray foam were to expand with enough force to shift the joist position.

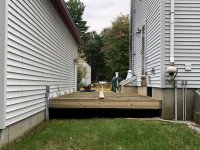
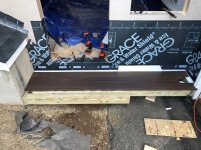
We spent a lot of time calculating out the exact placement of the finished floor, so that I could maintain the one step down into the garage I wanted. When all was said and done, it turns out I had plenty of clearance underneath to put the gravel down that I wanted to do... oh well. I can still get at the first couple feet under each side, and of any water were to run under the addition, this is where it would permeate the ground anyways, so I think I can still achieve what I wanted to do.

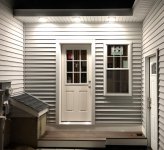
Overall I am happy so far. I can get a sense of the size of the room now that the decking is down, and I think it's going to be a great space.

attachment.php


attachment.php


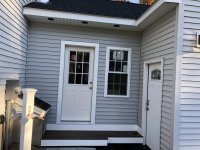
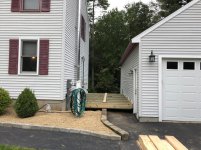
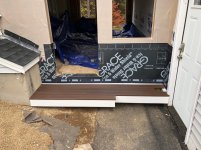
This funky area where the stone juts out in front of the addition will be removed to open it up. For a few different reasons, I decided to put the door on the left side closer to the house, and the window on the right. I'll probably end the flower bed even with the end of the house. Someday, I want to do a paver front walkway that will extend into the area of the addition. For now, I may just put some pavers down in the area, or build a small cheap ground level PT deck/platform until that day comes.

attachment.php


attachment.php
 

Attachments

  • 1.jpg
    1.jpg
    153.3 KB · Views: 1,479
  • 2.jpg
    2.jpg
    158.3 KB · Views: 1,483
  • 3.jpg
    3.jpg
    154.5 KB · Views: 1,474
  • 4.jpg
    4.jpg
    159.9 KB · Views: 1,480
Last edited:
To avoid these ads, REGISTER NOW!
OP
M

Mr. Roboto

Well-known member
Joined
Dec 11, 2012
Messages
2,159
Location
New Hampshire
One more quick update for today. They came and did the spray foam in the floor. I was at work, so I couldn't be there, but I did watch them on my security camera :lol:

attachment.php


Here's what it looked like when I got home from work.

attachment.php


As you can see in the following picture, the foam seems to have pulled away from the joist a good half inch in one joist bay. I would think this would normally be caused by the joist shifting, but I don't think that's possible, since they secured them with the cleat from above to prevent specifically that. I have no experience with spray foam... anyone have any thoughts?

attachment.php
 

Attachments

  • IMG-3591.jpg
    IMG-3591.jpg
    87 KB · Views: 1,363
  • IMG-3594.jpg
    IMG-3594.jpg
    81.8 KB · Views: 1,324
  • IMG-3582_800x600.jpg
    IMG-3582_800x600.jpg
    124.6 KB · Views: 1,365

Flanman55

Active member
Joined
Jan 11, 2013
Messages
34
What was the temperature when they sprayed? We use spray foam for pipeline installs and if it is sprayed too fast in cooler temperatures that happens.
 
OP
M

Mr. Roboto

Well-known member
Joined
Dec 11, 2012
Messages
2,159
Location
New Hampshire
What was the temperature when they sprayed? We use spray foam for pipeline installs and if it is sprayed too fast in cooler temperatures that happens.

It was about 60F-65F that day. They came back and hand touched up the void. They said it was probably due to contamination on the joist that caused the foam to pull away.... but who knows.
 
OP
M

Mr. Roboto

Well-known member
Joined
Dec 11, 2012
Messages
2,159
Location
New Hampshire
Well, the spray foam is now covered up, never to be seen again. Hopefully there are no more contraction issues under there. They came by yesterday to put the subfloor down. The original plan was to start framing, but it's going to pour all day today, and didn't want the walls holding any water. So... the plan is to start framing Friday. I am very much looking forward to watching that take shape.

It feels super solid walking around the platform. I was a little concerned it would feel more like a deck, than it would a living space, but I think it's going to be great.

attachment.php
 

Attachments

  • 1.jpg
    1.jpg
    128.6 KB · Views: 1,322
OP
M

Mr. Roboto

Well-known member
Joined
Dec 11, 2012
Messages
2,159
Location
New Hampshire
Had a fun day on Friday watching framing get underway. We spent some time trying to nail down the final wall height/roof pitch, because I really was hoping that the soffit of the addition would match the soffit height of the garage. It's amazing to see how quickly the framers can do all of that math, and thinking ahead 3 steps is second nature for them. They were able to get the front and rear walls framed up. We decided on a 7 pitch, to match the roof pitch of the house, however the dimensional lumber for the rafters ordered was just a bit too short, so they're swapping them out this morning.

I didn't take the greatest of pictures, but here they are.

Some in progress framing:

attachment.php


Front View:

attachment.php


Rear View:

attachment.php


This is where the door into the garage will be. I know it seems like it's stuffed against the rear wall, and it is. I wanted it as far forward as possible in the garage so that it would open out in front of the car parked in the left bay, rather that into the side of it.

attachment.php


Here you can see how the front wall had to be framed around the fireplace jog. It's a little un-slightly, but it is what it is. I asked them to re-shingle the piece of roof sticking out while they are roofing the main addition roof, and he said they would as long as I prepped it. So, I stripped the old shingles, flashed it all with ice and water shield, and replaced the old rotted trim. I actually had enough in my scrap pile from the front porch, so that was a small victory.

attachment.php
 

Attachments

  • 2.jpg
    2.jpg
    158.6 KB · Views: 1,144
  • 5.jpg
    5.jpg
    156.1 KB · Views: 1,147
  • 3.jpg
    3.jpg
    152.5 KB · Views: 1,145
  • 1.jpg
    1.jpg
    133.2 KB · Views: 1,147
  • 6.jpg
    6.jpg
    116.4 KB · Views: 1,148
Last edited:
OP
M

Mr. Roboto

Well-known member
Joined
Dec 11, 2012
Messages
2,159
Location
New Hampshire
The framing crew finished up today. It was awesome seeing the roofline take shape. As you can see, we lost the side window in the master bedroom, but I knew that would happen going in.

Ridge beam going up

attachment.php


attachment.php


Rafters in

attachment.php


attachment.php


And there you have it. It's really taking shape. I love how it sits tucked in there.

attachment.php
 

Attachments

  • IMG-3688.jpg
    IMG-3688.jpg
    153.8 KB · Views: 1,121
  • IMG-3683.jpg
    IMG-3683.jpg
    152.9 KB · Views: 1,117
  • IMG-3684.jpg
    IMG-3684.jpg
    158.8 KB · Views: 1,117
  • IMG-3678.jpg
    IMG-3678.jpg
    156.4 KB · Views: 1,118
  • IMG-3677.jpg
    IMG-3677.jpg
    142.2 KB · Views: 1,114

bj383ss

Well-known member
Joined
Sep 29, 2011
Messages
3,166
Location
TX
The new addition is looking great. And you are going to enjoy it this coming winter I bet when you can enter the garage without going out in the cold.

Bret
 

zmotorsports

ALLIANCE MEMBER
Joined
Oct 20, 2009
Messages
21,312
Location
Northern Utah
Breezeway looks great. I'm usually a bigger fan of detached garages but they way you tied the two together looks great. Very nice job and you will really like it come winter.
 
OP
M

Mr. Roboto

Well-known member
Joined
Dec 11, 2012
Messages
2,159
Location
New Hampshire
Thanks for all the comments, everyone. It's been fun to watch it go from a plan in my head to reality. This is the first thing I've ever hired out, so it took a little adjustment on my end to let go of the control and not be so hands on, but it's amazing to see how quickly a team of workers can get things done compared to me working alone. The company they subbed the framing out to was actually top notch. They didn't cut any corners and really worked on it as if it was their own house.

And zmotorsports, I know what you mean. I liked having the detached garage because I could make all the noise that I wanted out there without disturbing anyone in the house. I was always in my own little world when working out there, but I'm really going to love coming and going when the weather is crappy, especially when there's a bunch of snow that's piled up overnight, or when we've lost power and I need to go out to get the generator going. Coming in and out with our 19 month old will also be much easier.

Hotwire, thanks for making it through the whole thread, glad you enjoyed it!
 
Last edited:

Finallygotit

ALLIANCE MEMBER
Joined
Jul 6, 2013
Messages
4,076
Location
Tucson, AZ
Breezeway looks great. I'm usually a bigger fan of detached garages but they way you tied the two together looks great. Very nice job and you will really like it come winter.


^^^^^^^^^^^ What he said! :thumbup:


:beer:
 
OP
M

Mr. Roboto

Well-known member
Joined
Dec 11, 2012
Messages
2,159
Location
New Hampshire
The roofers came yesterday to get that buttoned up. At least it's water tight (from above now).

Hard to see in the pic, but it looks a little funky where the new and old shingles meet. They new shingles are architectural, the old garage singles are 3 tab, and they had to replace a bunch of the 3 tabs they pulled up to get the ice and water shield down in the valleys, which makes it look even worse because the new 3 tabs and old 3 tabs don't match. Oh well, some day I want to put a metal roof on the garage anyways.

attachment.php
 

Attachments

  • 1.jpg
    1.jpg
    157 KB · Views: 1,003

Purist

Well-known member
Joined
Jan 20, 2015
Messages
1,121
Location
MAsshole
Ha! Yup, we did, as well. And as is the case every single year leading up to winter, I'm still not ready for it.
 
To avoid these ads, REGISTER NOW!
OP
M

Mr. Roboto

Well-known member
Joined
Dec 11, 2012
Messages
2,159
Location
New Hampshire
Just a small update from this weekend. I'll make a long story short, but the contractor wanted to charge me way too much to do what I had envision for the steps out the front and rear of the addition. So, I decided to tackle them myself for a fraction of the proce. I got most of the front step/mini porch done this weekend, but I ran out of daylight on Sunday.

Framed up. being able to lag to the house/garage on either side made building them easier than having to either pour concrete for a pad, or get the land perfectly graded. Also, I was going to forego using joist hangers on each of the mini 11.5" "joists" but I decided to add them anyways since they're only a dollar a piece, and as most of you know by now, I tend to over build. Forgot to snap a pic after they were all on. They're technically needed to be to code if an inspector gets picky.

attachment.php


I got the rear 3 rows of decking down, ad as you can see, I sistered a few extra pieces of 2by and 1by to the face of the doubled 2x6 to build it out enough in front of the doorway to add one more deck board to give a larger area in front of the door. The hole in the decking on the right hand side is for a drain pipe for the gutters that will be going in.

attachment.php


I just need to get the last deck board down, and get the PVC fascia on the front on. Then I still need to decide what I'm doing with the ground in front of the step there, weather it be some crushed stone, pavers, or a combination of both.

Hopefully the windows and doors will go on this week, followed by the siding. At that point, the contractor will be done with what I've hired him to do, and the rest will be up to me.

Thanks again for those reading along.... I know some of the updates are minor, but I like documenting things here.... its fun to read back on from time to time!
 

Attachments

  • 1.jpg
    1.jpg
    155.4 KB · Views: 1,461
  • 3.jpg
    3.jpg
    158.8 KB · Views: 1,460

wasfast

Well-known member
Joined
Apr 10, 2014
Messages
874
Location
San Diego CA
I'd vote for a small concrete slab from the steps to the door. Much easier moving snow this winter and permanent, albeit it more effort than gravel.
 
OP
M

Mr. Roboto

Well-known member
Joined
Dec 11, 2012
Messages
2,159
Location
New Hampshire
I think you guys are probably right on the concrete pad.... Deep down I knew this was the best solution all along, but I am just so over pouring concrete. I've probably hand mixed 300 bags over the last 3 years for either my own projects or helping others. Maybe ill throw some large pavers down for now and deal with the pad in the spring :lol:

I was able to button up the decking/trim last night, so at least the front stair situation is complete. I'm happy with it. I think it will give it some character. I'm thinking of doing recessed lights in the soffit of the addition to shine down on the deck rather than a wall fixture out front. I'll have to rough in the housings soon, because they're coming either the end of this week or the beginning of next to do doors, windows, and siding.

attachment.php
 

Attachments

  • 1.jpg
    1.jpg
    155.1 KB · Views: 1,385
Last edited:

stsmytherie

Well-known member
Joined
Dec 16, 2005
Messages
171
Location
VT
FWIW I have bluestone walkways and patios around my house, mostly 24"x24"x2" pieces. Looks nice, easy to cut for repairs, and I don't have any problems clearing snow with either shovel or blower.

Most was installed by a previous owner. The only problem I've had with it is he didn't put down enough sand and no gravel, so some parts move around more than I'd like. Also he used thinner 1 1/2" or even 1" pieces that chip and break. Bluestone is inherently brittle and 1" is simply not enough.

When I've made repairs or alterations I've dug down deeper, compacted the sand properly, and used 2" pavers available from my local indie hardware.


wasfast

Well-known member
Joined
Apr 10, 2014
Messages
874
Location
San Diego CA
Not trying to be a critic but you may want to put a 45 angle on the corner that's furthest out. I can just see banging my shin on it...........and the blue air that follows that event:). Great job, just my own input.
 

M-technik-3

Well-known member
Joined
Feb 16, 2008
Messages
1,785
Location
Western Mass
All that mixing could have been solved by purchasing a used cement mixer the selling it when all your projects were done. Like the step but agree with Wasfast about the smoothing of that edge. I see an ouch coming and remember the young ones always tend to find the nasty corners for some unknown reason.
 
OP
M

Mr. Roboto

Well-known member
Joined
Dec 11, 2012
Messages
2,159
Location
New Hampshire
pushed through from the beginning....looking forward to it all coming together.

Thanks for sharing.

Thanks for making it through the whole thing!

Not trying to be a critic but you may want to put a 45 angle on the corner that's furthest out. I can just see banging my shin on it...........and the blue air that follows that event:). Great job, just my own input.

Yeah, looking back you're probably right. Because of the way it's framed, I'd have to add some material to the end to make the 45, which would now mean buying a longer deck board. I'll live with it for now and see if it's an issue.

All that mixing could have been solved by purchasing a used cement mixer the selling it when all your projects were done. Like the step but agree with Wasfast about the smoothing of that edge. I see an ouch coming and remember the young ones always tend to find the nasty corners for some unknown reason.

Every time I went through something that involved concrete, that went through my mind, but then I told myself it would be my last project for a while. I was wrong every time :lol:
 
OP
M

Mr. Roboto

Well-known member
Joined
Dec 11, 2012
Messages
2,159
Location
New Hampshire
Finally have a few progress photos to share. Windows and doors are in, and most of the siding is buttoned up. Just needs soffits, fascia, and gutters at this point. It was a very cool feeling to be able to see into the new garage through the new door for the first time.

I added some temporary stepping stones to the area in front of the door. Will properly address this next spring. I also decided to add some 6” cans in the soffit before they enclosed them. I liked the idea better than adding a fixture on the wall, as I’ve always loved the look of downlighting.

attachment.php


attachment.php


attachment.php
 

Attachments

  • C344F325-6647-413A-870C-D3C1BE542B12.jpg
    C344F325-6647-413A-870C-D3C1BE542B12.jpg
    95.3 KB · Views: 1,111
  • BB25ED3F-776A-4021-9A22-9FDCCA1D59C8.jpg
    BB25ED3F-776A-4021-9A22-9FDCCA1D59C8.jpg
    128.8 KB · Views: 1,111
  • 93AA9C5D-2E32-4AEF-837D-D0A7930C73B8.jpg
    93AA9C5D-2E32-4AEF-837D-D0A7930C73B8.jpg
    149.9 KB · Views: 1,111
Last edited:

Purist

Well-known member
Joined
Jan 20, 2015
Messages
1,121
Location
MAsshole
Looks like it's been like that all along. Great work, Roboto! Thanks for the updates.
 

Ronin22

Well-known member
Joined
Oct 2, 2018
Messages
478
Location
BA
I've been reading through the whole thread for a couple of days now. It turned out beautiful! Seems like you're ready to throw a project car in that garage now! =)
 
OP
M

Mr. Roboto

Well-known member
Joined
Dec 11, 2012
Messages
2,159
Location
New Hampshire
Looks like it's been like that all along. Great work, Roboto! Thanks for the updates.

Thanks man! Just saw your signature... looks like you decided to pull the trigger selling the raptor, can't wait to see the replacement.

Your new mudroom looks great!

Thank you!

I've been reading through the whole thread for a couple of days now. It turned out beautiful! Seems like you're ready to throw a project car in that garage now! =)

Thanks for reading through it all. You're absolutely right. I'm pretty tired of working on the house/garage. My wife is too haha... I would love to start spending my free time on a project car.

Mr. Roboto, is the new six-over-six window catching? It looks great so I'm guessing the rest of the house is coming down with windowitis.

Thanks, Bob! I do like the look of the grids in the glass. We decided on them to dress up the mudroom a bit, since there was not any space for shutters there. When the time comes, we'll be replacing the windows in the rest of the house with grids as well. The windows that my house came with are exceedingly horrible... I can't wait to replace them, but it won't be for another few years at least.
 
OP
M

Mr. Roboto

Well-known member
Joined
Dec 11, 2012
Messages
2,159
Location
New Hampshire
Well, they came today and finished up all the soffits and siding.


Front:

attachment.php


Rear:

attachment.php


Last night after work, I built the step into the garage. I’ll paint it once the PT dries out, and I had enough scrap decking from the front porch for the top surface.

attachment.php


I also built a very temporary staircase out of the scraps from the project. Once I get to finishing up the interior, the stairs will probably be the last thing I build, so these will serve the purpose until then.

attachment.php


For now, I’m super excited to get it to this stage. It’s weather tight, and will be well appreciated this winter.
 

Attachments

  • B8994ED7-46AE-40CA-8308-F50AE02EBA49.jpg
    B8994ED7-46AE-40CA-8308-F50AE02EBA49.jpg
    150.1 KB · Views: 1,021
  • D4B38A52-939B-4C25-A2E2-6C5D0DAF8B36.jpg
    D4B38A52-939B-4C25-A2E2-6C5D0DAF8B36.jpg
    152.4 KB · Views: 1,022
  • 23550981-4C7B-4ED6-B766-35F3E42F917F.jpg
    23550981-4C7B-4ED6-B766-35F3E42F917F.jpg
    98.4 KB · Views: 1,029
  • C4EB346C-2C71-4754-AFD3-D597DB2EDB23.jpg
    C4EB346C-2C71-4754-AFD3-D597DB2EDB23.jpg
    59.7 KB · Views: 1,026
Last edited:
OP
M

Mr. Roboto

Well-known member
Joined
Dec 11, 2012
Messages
2,159
Location
New Hampshire
I got the recessed lights wired up yesterday. The Halo LEDs I used are prett neat, because you can adjust the color temperature. They look awesome, but are a little bright. Will be swapping the switch out for a dimmer soon to tone them down a bit. Eventually I hope to put some in the front porch roof as well.

attachment.php


attachment.php
 

Attachments

  • CB77E832-8F71-424B-A48A-87816E3FDD38.jpg
    CB77E832-8F71-424B-A48A-87816E3FDD38.jpg
    131.9 KB · Views: 867
  • 3212190B-D721-471C-94A0-748EFB990149.jpg
    3212190B-D721-471C-94A0-748EFB990149.jpg
    103.2 KB · Views: 1,256
Last edited:
To avoid these ads, REGISTER NOW!
Top Bottom