
You are using an out of date browser. It may not display this or other websites correctly.
You should upgrade or use an alternative browser.
You should upgrade or use an alternative browser.
Between 705 & 1200 SQ/FT Roboto's Garage
- Thread starter Mr. Roboto
- Start date
Workspaces between 705 and 1200 squarefeet.
M-technik-3
Well-known member
I used wood filler, years back. Does not stain well but you are painting.
Finallygotit
ALLIANCE MEMBER
I have always used painters caulk. I guess it's just what you're comfortable with.
YMMV

YMMV
Putty in nail holes since it shrinks less and you don’t need/want them to move. If you need to close the miter I would go caulking, you should get a better result.
Also caulk the walls trim layers together and to the drywall.
Good luck with the snow, I have about 4-5” and counting.
Also caulk the walls trim layers together and to the drywall.
Good luck with the snow, I have about 4-5” and counting.
nicholam77
Well-known member
Painter's caulk will shrink a bit, especially with seasonal changes, and if used to fill large voids. I'm no expert but I've always used wood filler on the nail/brad holes and latex caulk on the miters and where the casing meets the drywall. If you're miter gaps are too big... the caulk will shrink. Based on your pics they look pretty tight already, though. I'm guessing your trim is probably pine but if it's MDF I'd definitely recommend gluing your joints. Mine opened up on me during winter.
The addition is coming together nicely!
The addition is coming together nicely!
OP
Mr. Roboto
Well-known member
Thanks for all the advice, you guys pretty much all said the same thing!
Yes, the miters are all all pretty tight already, but I just figured I could make them a hair better if possible if I was already going through the effort of filling nail holes. I'll close them up with some caulk and hit all the nail holes with wood filler, which I'm more comfortable using anyways from my woodworking projects. Working with caulk has always been one of my weaknesses, so I may just skip sealing the trim to the wall altogether out of fear of making it look even worse hahaha.
Yes, the miters are all all pretty tight already, but I just figured I could make them a hair better if possible if I was already going through the effort of filling nail holes. I'll close them up with some caulk and hit all the nail holes with wood filler, which I'm more comfortable using anyways from my woodworking projects. Working with caulk has always been one of my weaknesses, so I may just skip sealing the trim to the wall altogether out of fear of making it look even worse hahaha.
OP
Mr. Roboto
Well-known member
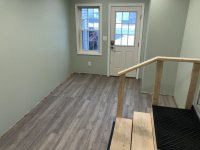
I was able to get out there for a few hours yesterday and finish out trimming the windows and doors, threw up the outlet/switch covers, as well as started to get the flooring down. It seems to photograph darker than it is in person, but I really like it. The saleswoman at the store was trying to convince me it would be too large for the small room, since the planks are 9" wide x 6' long, but we couldn't find a similar color/pattern that we liked in a smaller size so we went with it anyways. I think it looks just fine! It's COREtec Plus XL Enhanced, and the color is Teton Oak (for my own future reference, and if anyone else is interested.

Attachments

nicholam77
Well-known member
The trim is looking great, nice work.  I'd give caulking the edges where it meets the wall a try, if there are gaps. You could do on a side that's not as visible first for "practice". It's a small detail but can really make it look seamless. Again, I'm no expert, but my tips would be:
- regulate the bead size by not cutting too much off the tip of the caulk tube. A hole the size of a #2 pencil is too much. I'd do like half that and see how fast it comes out. Can always make it bigger, but not the reverse. If too much comes out too fast, it can get messy and hard to control.
- apply a thin bead by gently applying consistent pressure on the trigger and moving down the trim. On a vertical section I'll usually do about half in one go. On a horizontal section I'd apply caulk to the whole thing in one pass.
- then just stick your index finger in there at an angle and run down the trim caulk line, smoothing it out. If it starts to bunch up and collect too much, stop and wipe your finger clean with a rag and then continue. If there are any lines left behind, just wipe them away with your finger as needed.
- if it doesn't fill the gap the first time, you can always add another bead of caulk and rinse and repeat. Don't keep dabbing your finger in there trying to fix it. It's kind of like drywall finishing... take a pass, smooth it out, do it again if necessary, but too much fiddling can junk it up. Similarly less is more... if you apply a large bead, it's going to bunch up and get messy.
- it's totally doable freehand, but you could use painter's tape for cleaner lines as long as you remove it before it dries.
It's not high-risk, either... if you screw it up horribly just wipe it out with a wet rag before it dries
I don't think the flooring planks are too big, they look just fine.
I'd give caulking the edges where it meets the wall a try, if there are gaps. You could do on a side that's not as visible first for "practice". It's a small detail but can really make it look seamless. Again, I'm no expert, but my tips would be:- regulate the bead size by not cutting too much off the tip of the caulk tube. A hole the size of a #2 pencil is too much. I'd do like half that and see how fast it comes out. Can always make it bigger, but not the reverse. If too much comes out too fast, it can get messy and hard to control.
- apply a thin bead by gently applying consistent pressure on the trigger and moving down the trim. On a vertical section I'll usually do about half in one go. On a horizontal section I'd apply caulk to the whole thing in one pass.
- then just stick your index finger in there at an angle and run down the trim caulk line, smoothing it out. If it starts to bunch up and collect too much, stop and wipe your finger clean with a rag and then continue. If there are any lines left behind, just wipe them away with your finger as needed.
- if it doesn't fill the gap the first time, you can always add another bead of caulk and rinse and repeat. Don't keep dabbing your finger in there trying to fix it. It's kind of like drywall finishing... take a pass, smooth it out, do it again if necessary, but too much fiddling can junk it up. Similarly less is more... if you apply a large bead, it's going to bunch up and get messy.
- it's totally doable freehand, but you could use painter's tape for cleaner lines as long as you remove it before it dries.
It's not high-risk, either... if you screw it up horribly just wipe it out with a wet rag before it dries
I don't think the flooring planks are too big, they look just fine.
I was able to get out there for a few hours yesterday and finish out trimming the windows and doors, threw up the outlet/switch covers, as well as started to get the flooring down. It seems to photograph darker than it is in person, but I really like it. The saleswoman at the store was trying to convince me it would be too large for the small room, since the planks are 9" wide x 6' long, but we couldn't find a similar color/pattern that we liked in a smaller size so we went with it anyways. I think it looks just fine! It's COREtec Plus XL Enhanced, and the color is Teton Oak (for my own future reference, and if anyone else is interested.
We have the COREtec product in our bathrooms and it was installed almost three years ago. We really like it and have had NO issues.
OP
Mr. Roboto
Well-known member
The trim is looking great, nice work.
- regulate the bead size by not cutting too much off the tip of the caulk tube. A hole the size of a #2 pencil is too much. I'd do like half that and see how fast it comes out. Can always make it bigger, but not the reverse. If too much comes out too fast, it can get messy and hard to control.
- apply a thin bead by gently applying consistent pressure on the trigger and moving down the trim. On a vertical section I'll usually do about half in one go. On a horizontal section I'd apply caulk to the whole thing in one pass.
- then just stick your index finger in there at an angle and run down the trim caulk line, smoothing it out. If it starts to bunch up and collect too much, stop and wipe your finger clean with a rag and then continue. If there are any lines left behind, just wipe them away with your finger as needed.
- if it doesn't fill the gap the first time, you can always add another bead of caulk and rinse and repeat. Don't keep dabbing your finger in there trying to fix it. It's kind of like drywall finishing... take a pass, smooth it out, do it again if necessary, but too much fiddling can junk it up. Similarly less is more... if you apply a large bead, it's going to bunch up and get messy.
- it's totally doable freehand, but you could use painter's tape for cleaner lines as long as you remove it before it dries.
It's not high-risk, either... if you screw it up horribly just wipe it out with a wet rag before it dries
I don't think the flooring planks are too big, they look just fine.
Thanks for the detailed directions. Doesn't sound so hard when you break it down like that, and you're right, it can easily be wiped away if it doesn't go so well. I think I will give it a shot!
We have the COREtec product in our bathrooms and it was installed almost three years ago. We really like it and have had NO issues.
Great to hear, thanks for the feedback. We're going to give it a shot in here and see how we like it as well. If we do, we're also thinking about installing it in our downstairs bathroom when we get around to remodeling that space. The beauty of it is that it can go right over the existing porcelain tile that is in there now. I really don't want to have to deal with ripping up the old tile.
OP
Mr. Roboto
Well-known member
Floors are done! I’m really happy with how they turned out. Next up is base trim and building some permanent steps.


Attachments


Finallygotit
ALLIANCE MEMBER
I see there is snow outside; is it comfortable in there?
Boostingaz
Well-known member
Thank you very much!
I started out trimming out the windows and doors. Anyone have any recommendations on filing the nail holes and closing up the miters? I’ve read some saying paintable caulk, others say wood filler. I’ve never really done any finish interior trim so I’m not sure which way to go! As you can tell from the pre primed trim I used, I’ll be painting it white.

You may have already started but I use spackle (or drywall mud if it's all I have on hand). It doesn't shrink and it's super sandable so it's easy to get a very smooth finish. Since it doesn't shrink at the first weather change all your nails holes won't sink and reappear. Just make sure to hit the spots with some kilz, bullseye, etc, some type of drywall primer or else your paint sheen will look a little different over it.
OP
Mr. Roboto
Well-known member
Nice work it looks really good
[emoji41][emoji1303] good work, man!
Sent from my iPhone using Tapatalk
Thanks guys!
I see there is snow outside; is it comfortable in there?
There is snow! We got about 2 feet a few weeks ago, but it warmed up right after and has been raining a lot, so what you see is the remnants. For now, I've been leaving the door in between the mud room and the garage open, and the garage heat set to 55F. The Modine out there has been able to keep both spaces warm without issue, but that is just a temporary solution for now.
You may have already started but I use spackle (or drywall mud if it's all I have on hand). It doesn't shrink and it's super sandable so it's easy to get a very smooth finish. Since it doesn't shrink at the first weather change all your nails holes won't sink and reappear. Just make sure to hit the spots with some kilz, bullseye, etc, some type of drywall primer or else your paint sheen will look a little different over it.
Thank you for the tips! I have not started on that job yet, so I will keep that in mind as well.
OP
Mr. Roboto
Well-known member
Merry Christas everyone! Hope everyone had a nice holiday.
Been chipping away out in the mud room here and there. I got all of my baseboard cut, painted, and dry fit. Went with the taller baseboard because I though it fit better with the wide long planks. This was all my first time coping trim, rather than just measuring the angle and cutting a mitre.


Not bad for my first time coping. I was pleasantly surprised.

I used it as an excuse to pick up a new toy. Cordless M18 angle grinder. I’ve been making due with an old corded grinder up until now, but it was getting tired, and the arbor was beginning to wear. Rather than coping the trim with a coping saw, I read about using a flapper disc on a grinder to cut the cope and hog out the relief cut. It worked awesome!

My daughter also loves watching me work out here. She asked if we could lift her toy car up to work on it, so I gladly made that happen for her.

Been chipping away out in the mud room here and there. I got all of my baseboard cut, painted, and dry fit. Went with the taller baseboard because I though it fit better with the wide long planks. This was all my first time coping trim, rather than just measuring the angle and cutting a mitre.
Not bad for my first time coping. I was pleasantly surprised.
I used it as an excuse to pick up a new toy. Cordless M18 angle grinder. I’ve been making due with an old corded grinder up until now, but it was getting tired, and the arbor was beginning to wear. Rather than coping the trim with a coping saw, I read about using a flapper disc on a grinder to cut the cope and hog out the relief cut. It worked awesome!
My daughter also loves watching me work out here. She asked if we could lift her toy car up to work on it, so I gladly made that happen for her.
Attachments
-
 FCBA55C9-2F89-4BC7-B31F-52403449E248.jpg150.8 KB · Views: 1,504
 -
 A21A6595-47ED-4495-A336-A11F496C30F7.jpg150.2 KB · Views: 847
 -
 D7C61478-2231-417F-AB2A-B327B05DCD07.jpg68.1 KB · Views: 851
 -
 AA4D2121-0FCB-474E-8BAB-BC62663D09D7.jpg109.8 KB · Views: 854
 -
 9849ACDC-F110-4E17-8E97-8FFCA0B8B0FF.jpg89.7 KB · Views: 853
Arclitgold
Well-known member
- Joined
- Dec 20, 2017
- Messages
- 317
Re: Mr. Roboto's Garage Makeover
Looks awesome! That trim looks fantastic. Mind sharing where you found the info on coping/hogging the trim with the grinder?
Sent from my iPhone using Tapatalk
Looks awesome! That trim looks fantastic. Mind sharing where you found the info on coping/hogging the trim with the grinder?
Sent from my iPhone using Tapatalk
OP
Mr. Roboto
Well-known member
Re: Mr. Roboto's Garage Makeover
Thank you! I pretty much did it just how the guy in this video did it:
Looks awesome! That trim looks fantastic. Mind sharing where you found the info on coping/hogging the trim with the grinder?
Sent from my iPhone using Tapatalk
Thank you! I pretty much did it just how the guy in this video did it:
Arclitgold
Well-known member
- Joined
- Dec 20, 2017
- Messages
- 317
Re: Mr. Roboto's Garage Makeover
Thank you!!
Sent from my iPhone using Tapatalk
Thank you!!
Sent from my iPhone using Tapatalk
M-technik-3
Well-known member
Wow time is flying I remember what 3.5 years ago you were saying your wife and you were having a baby.
Things seem to going well wish you a happy 2020 and more.
Things seem to going well wish you a happy 2020 and more.
nicholam77
Well-known member
Coping is 100% the way to go on inside corners, I think. Your work looks very precise, nice job! I've never done a profile that complicated but the angle grinder is a pretty neat trick, thanks for sharing.
OP
Mr. Roboto
Well-known member
Wow time is flying I remember what 3.5 years ago you were saying your wife and you were having a baby.
Things seem to going well wish you a happy 2020 and more.
Tell me about it... time is flying for sure. Things are good, happy new year to you as well! Thanks for continuing to follow along.
Coping is 100% the way to go on inside corners, I think. Your work looks very precise, nice job! I've never done a profile that complicated but the angle grinder is a pretty neat trick, thanks for sharing.
Trial by fire as usual for me haha. Thank you for the kind words!
Pressingonward
Well-known member
My daughter also loves watching me work out here. She asked if we could lift her toy car up to work on it, so I gladly made that happen for her.
Most excellent!
OP
Mr. Roboto
Well-known member
Most excellent!
It’s a beautiful thing
")
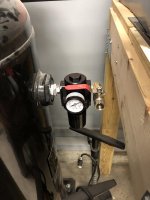
I finally took some time to give my compressor setup some love. When I was using my trim nailer, the regulator cracked and developed a leak. It was a very cheap one I pulled out of a junk pile at work, so I can’t be too mad. Needed to put together a replacement same day, so my options were limited to Home Depot.
New regulator setup:
I also picked up this extended compressor drain I found when I was there. The bleed screw the compressor came with is a pain to use, so I rarely drain the water out of my tank (shame on me). This new one is great. Much easier access and way higher flow.
I purchased these a few months back too, and never swapped them. Milton high-flow fittings. The CFM they can handle is way higher than the old fittings I had.
I still have a rapid air kit sitting in the box to plum the garage with. I’ll get to it someday, but the setup is at least much more functional with the few quick changes I just made.
Attachments


nicholam77
Well-known member
Love those digital pressure gauge/fillers. I use one on our car tires and it works great!
OP
Mr. Roboto
Well-known member
Love those digital pressure gauge/fillers. I use one on our car tires and it works great!
They certainly make checking and adding air to tires more efficient!
I've been looking at inflators. Reviews are all over the place.
How do you like the Jaco? Amazon has it for $40 - don't know if it's the same model you have.
The one I have is the Jaco Flow Pro 2.0. Here is a link:
https://www.amazon.com/gp/product/B07C25C4CQ/?tag=atomicindus08-20
It worked great for about 10 months, but then it started to develop a very minor leak at the valve that gets pressed when you squeeze the handle to fill the tires. Not really enough to effect its operation that much, but enough to annoy me, so I emailed them to ask if there was a way to adjust this or anything. Rather than having me fuss with the old one at all, they just sent me out a brand new one, no questions asked. So, they definitely stand behind their product, which is nice. Other than that one minor hiccup, I've been pleased with it.
Also, I won't bore you all with more photos, but the trim in the mudroom is all permanently fastened and painted. Still to do for the room to be complete: Lay the second layer of insulation in the ceiling, trim out the skuttle hatch for "attic" access, build the stairs going up into the house, and make a decision on a heat source. Once those are complete, I can then focus on starting to build the bench and storage for in the mud room.
Last edited:
dubber
Well-known member
Nice work in there. The pic of your daughter in the space is precious.
OP
Mr. Roboto
Well-known member
Just finished reading whole thread.
Good work on all the improvements.
Thank you! And thanks for taking the time to read through it all.
Nice work in there. The pic of your daughter in the space is precious.
Thanks a lot! I think the only thing I am missing in there to finish off the space is some flooring. Seeing you put the RaceDeck down in your third garage isn't helping either

68400BIRD
Well-known member
Did you ever get the doors replaced on your cabinet?
I was also wondering how you mounted it up above the bricks. I need to do something similar with a Husky cabinet.
I was also wondering how you mounted it up above the bricks. I need to do something similar with a Husky cabinet.
OP
Mr. Roboto
Well-known member
Did you ever get the doors replaced on your cabinet?
I was also wondering how you mounted it up above the bricks. I need to do something similar with a Husky cabinet.
Yes, after a total of 4 sets of doors, I received one that finally arrived undamaged. The cabinet is lagged into the wall studs, it’s desisted to either be wall mounted or placed on the floor.
OP
Mr. Roboto
Well-known member
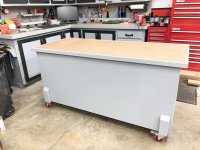
I decided to add some storage to my mobile work bench. Mainly to store my 10" sliding miter saw underneath, as well as some other bulky items. I have currently been storing the saw on top of a 6+ foot tall metal cabinet, and I nearly throw my back out every time I need to get it up/down from there. I don't have any before photos, but I have a work bench on wheels that I built out of scrap lumber and a solid core door about 5 years ago that actually gets used quite frequently. It was just open underneath, so I thought this was a good place to add some storage.
Here are the after photos. I basically just added a shelf on the bottom, and enclosed the front and sides. I will leave the back open/exposed because I sit at this bench on a stool and would like to be able to still get my feet under it. I also replaced the sacrificial hardboard top while I was at it. I have some aluminum angle I am going to throw on the corners to dress it up a little and hide the plywood end grain, but here it is.


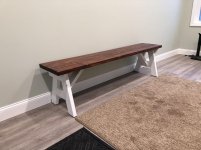
I also have been wanting to build a nice big unit for the mudroom. A "hall tree" combination bench, coat rack, storage cubbies etc. It will be a nice functional piece, and a good excuse to get into another woodworking project which I've been missing, but the reality is I just don't have the time to get to this for a while. We needed something in there for now just to sit on at least for putting shoes on/off, so I decided to build a quick and dirty bench out of some 2x4s. This way I won't feel bad when it gets replaced some day since im only into it for under 30 bucks. I got this built, and the top stained. I plan to poly the top still once the stain is dry, and paint the legs white.

It felt good to get into the shop and get a few things checked off the list at least!
Here are the after photos. I basically just added a shelf on the bottom, and enclosed the front and sides. I will leave the back open/exposed because I sit at this bench on a stool and would like to be able to still get my feet under it. I also replaced the sacrificial hardboard top while I was at it. I have some aluminum angle I am going to throw on the corners to dress it up a little and hide the plywood end grain, but here it is.
I also have been wanting to build a nice big unit for the mudroom. A "hall tree" combination bench, coat rack, storage cubbies etc. It will be a nice functional piece, and a good excuse to get into another woodworking project which I've been missing, but the reality is I just don't have the time to get to this for a while. We needed something in there for now just to sit on at least for putting shoes on/off, so I decided to build a quick and dirty bench out of some 2x4s. This way I won't feel bad when it gets replaced some day since im only into it for under 30 bucks. I got this built, and the top stained. I plan to poly the top still once the stain is dry, and paint the legs white.
It felt good to get into the shop and get a few things checked off the list at least!
Attachments


OP
Mr. Roboto
Well-known member
Finished up my cheap bench for the mud room. It will do the job! For the price of six 2x4s, I think it turned out OK.

Also got the attic hatch trimmed out, insulated, and painted.

Also got the attic hatch trimmed out, insulated, and painted.
Attachments

Last edited:
Finished up my cheap bench for the mud room. It will do the job! For the price of six 2x4s, I think it turned out OK.
Looks great. Nice work, man!
Sent from my iPhone using Tapatalk
Bob Heine
ALLIANCE MEMBER
That bench came out real nice. If you do eventually replace it with something fancier, that will be a great accessory in the garage. Every time you need a stool you'll have one that allows you to do the job with fewer ups and downs.
OP
Mr. Roboto
Well-known member
Looks great. Nice work, man!
Sent from my iPhone using Tapatalk
Superb! Keep on sharing!
That bench came out real nice. If you do eventually replace it with something fancier, that will be a great accessory in the garage. Every time you need a stool you'll have one that allows you to do the job with fewer ups and downs.
Thanks everyone! I say the bench is temporary now, but we all know it will probably be there for the next 20 years
The same goes for all the temporary rugs I have thrown down in there as well.
Last edited:
Pressingonward
Well-known member
Thanks everyone! I say the bench is temporary now, but we all know it will probably be there for the next 20 years
At work we call this a "tempermanent" solution
M-technik-3
Well-known member
The bench will be passed down to the next generation.