To avoid these ads, REGISTER NOW!

Rob’s Shop and House Addition

87jeepwrangler

Well-known member
Joined
May 23, 2013
Messages
195
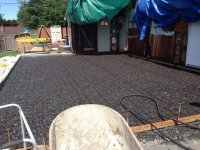
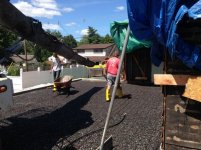
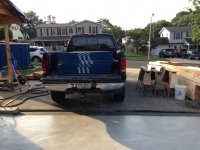
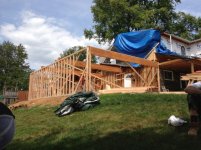
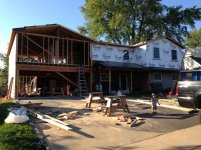
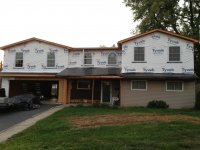
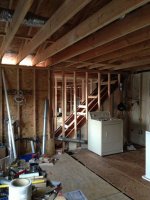
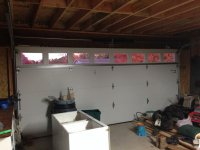
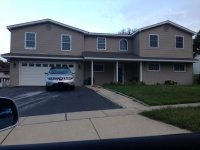
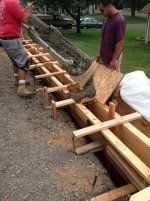
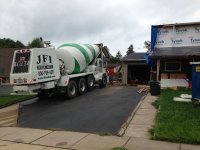
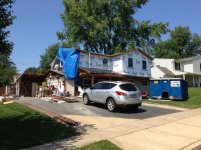
I started this addition on the 4th of July in 2013. I’ll let the pictures do most of the talking, but in short, I added approximately 1700 sq ft to my existing house, which was approximately 2000 sq ft to start. The garage is about 21’ wide x 32’ feet deep with a 10’x14’ loft above it. The addition took 4 variances for approval, and now puts me at 50% impervious surface for my lot.

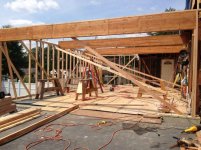
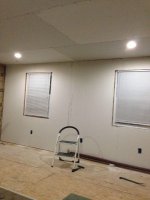
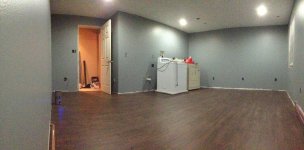
I had previously opened up the floor plan downstairs in the house, essentially eliminating 2 of the 4 bedrooms(1950's built home). With thoughts of a 2nd kid, we had to either move, or add on. The housing market sucked and we stood to loose money selling our house. So we scraped all of our money together and went for it. With my experience on prior projects and connections to friends in various construction fields who I could reference, I decided to take on the entire project myself, with the exception of the additional foundation and slab work, and help from a friend and his crew to knock out a large portion(but not all) of the framing. The rest I did on nights and weekends... including the design and drawings, finishing a good bit of framing, installing the windows, flashing, capping, siding, roofing, pier footings, all electrical, plumbing, relocating the heater, all new supply plumbing to the original kitchen and baths, insulation, drywall, spackling, painting, flooring, trim, and a few other unique customizations along the way. It will never be done, but this thread is how I plan to share my adventure.
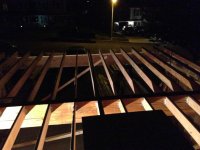
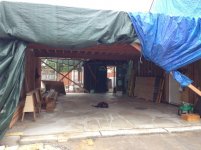
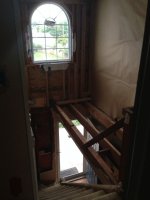
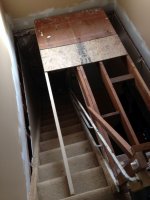

The start:
attachment.php


The Vision:
attachment.php
 

Attachments

  • 01.jpg
    01.jpg
    124.5 KB · Views: 497
  • 02.jpg
    02.jpg
    71.9 KB · Views: 496
To avoid these ads, REGISTER NOW!
OP
8

87jeepwrangler

Well-known member
Joined
May 23, 2013
Messages
195
before starting, I had to put a new wall in the upstairs master bedroom, as it was to become the 2nd kid bedroom and needed to be a little smaller. Also, a small portion of that room was to become a part of the future master suite.


attachment.php


attachment.php


attachment.php


IMG_0224.jpg

IMG_0229.jpg

IMG_0258.JPG
 
OP
8

87jeepwrangler

Well-known member
Joined
May 23, 2013
Messages
195
miscellaneous interior pictures, this will be the laundry room, but also double as the office and some storage (holiday decoration bins, etc)


attachment.php


attachment.php


attachment.php


attachment.php


attachment.php


IMG_0252.jpg

IMG_0285.JPG

IMG_0289.jpg

IMG_0347.JPG

IMG_0360.JPG
 
OP
8

87jeepwrangler

Well-known member
Joined
May 23, 2013
Messages
195
prepping for the new foundation
attachment.php


cut where the new front of the garage will be
attachment.php


attachment.php


attachment.php


found some cracks in the arm so I drilled and welded them up.
attachment.php


holes for footings. 3' deep.
attachment.php


IMG_0328.jpg

IMG_0331.jpg

IMG_0362.JPG

IMG_0367.jpg

IMG_0390.JPG

IMG_0395.jpg
 
OP
8

87jeepwrangler

Well-known member
Joined
May 23, 2013
Messages
195
attachment.php


attachment.php


attachment.php


attachment.php
 

Attachments

  • IMG_0428.jpg
    IMG_0428.jpg
    116 KB · Views: 437
  • IMG_0415.jpg
    IMG_0415.jpg
    149.7 KB · Views: 438
  • IMG_0414.JPG
    IMG_0414.JPG
    120.6 KB · Views: 441
  • IMG_0408.jpg
    IMG_0408.jpg
    150.4 KB · Views: 437
OP
8

87jeepwrangler

Well-known member
Joined
May 23, 2013
Messages
195
my buddy tim, dad, and brother helping me tear down the old garage
attachment.php


almost there...
attachment.php


attachment.php


attachment.php


attachment.php


attachment.php


removing the last of the old garage floor
attachment.php
 

Attachments

  • IMG_0476.jpg
    IMG_0476.jpg
    143.5 KB · Views: 429
  • IMG_0456.jpg
    IMG_0456.jpg
    106.7 KB · Views: 431
  • IMG_0454.jpg
    IMG_0454.jpg
    140.4 KB · Views: 428
  • IMG_0453.jpg
    IMG_0453.jpg
    136.9 KB · Views: 430
  • IMG_0448.jpg
    IMG_0448.jpg
    129.5 KB · Views: 431
  • IMG_0446.jpg
    IMG_0446.jpg
    145.5 KB · Views: 435
  • IMG_0445.jpg
    IMG_0445.jpg
    131.2 KB · Views: 432
OP
8

87jeepwrangler

Well-known member
Joined
May 23, 2013
Messages
195
the original homes had the oil burner in the kitchen :lol_hitti 
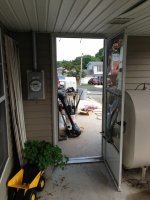
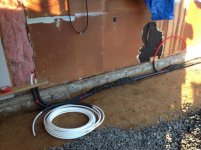
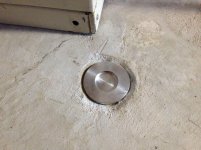
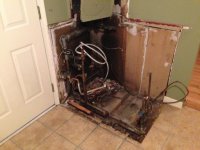
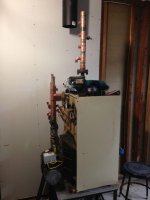
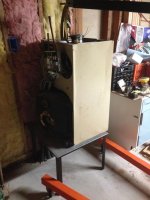
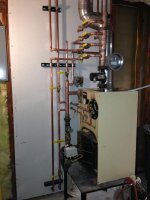
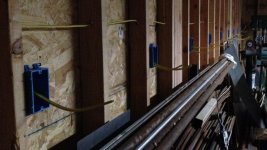
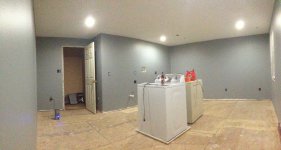
I decided to move it to the garage so I could harness it's heat a lot easier, have more room to work on it, and it was still close enough that I wouldn't have wait times for hot water to reach the far parts of the house. since I was moving it, I needed a temporary hot water supply because we were living in the house during construction and still obviously needed hot water. I got the electric 30 gallon from a plumber buddy who had recently pulled it from a customers home. it still worked obviously, so I plumbed it in temporarily and wired it to the closest welder outlet I had in the garage.
attachment.php


I routed some pex for new water supply lines under the garage floor.
attachment.php


attachment.php


attachment.php


my little guy involves himself in everything
attachment.php


almost ready to pour
attachment.php
 

Attachments

  • IMG_0498.jpg
    IMG_0498.jpg
    146 KB · Views: 423
  • IMG_0494.jpg
    IMG_0494.jpg
    128.3 KB · Views: 424
  • IMG_0486.jpg
    IMG_0486.jpg
    121.5 KB · Views: 422
  • IMG_0484.JPG
    IMG_0484.JPG
    145.7 KB · Views: 423
  • IMG_0478.jpg
    IMG_0478.jpg
    106.2 KB · Views: 423
  • IMG_0477.jpg
    IMG_0477.jpg
    132.4 KB · Views: 423
Last edited:
OP
8

87jeepwrangler

Well-known member
Joined
May 23, 2013
Messages
195
attachment.php


attachment.php


attachment.php
 

Attachments

  • IMG_0500.jpg
    IMG_0500.jpg
    134.3 KB · Views: 416
  • IMG_0502.jpg
    IMG_0502.jpg
    145.9 KB · Views: 414
  • IMG_0510.jpg
    IMG_0510.jpg
    126 KB · Views: 416
OP
8

87jeepwrangler

Well-known member
Joined
May 23, 2013
Messages
195
3 beams, 1 is the garage door header, the other 2 span the short length on the garage and support the 2nd floor, it's walls, and ceiling
attachment.php


round 2 on lumber delivery
attachment.php


attachment.php


and round 2 of OSB
attachment.php
 

Attachments

  • IMG_0532.JPG
    IMG_0532.JPG
    146 KB · Views: 404
  • IMG_0523.jpg
    IMG_0523.jpg
    120.5 KB · Views: 408
  • IMG_0517.JPG
    IMG_0517.JPG
    113 KB · Views: 406
  • IMG_0515.jpg
    IMG_0515.jpg
    121.1 KB · Views: 406
OP
8

87jeepwrangler

Well-known member
Joined
May 23, 2013
Messages
195
garage walls. yessss.
attachment.php


spy
attachment.php


attachment.php


attachment.php


attachment.php


working in to the night
attachment.php
 

Attachments

  • IMG_0541.JPG
    IMG_0541.JPG
    113.1 KB · Views: 399
  • IMG_0539.JPG
    IMG_0539.JPG
    144.3 KB · Views: 402
  • IMG_0537.jpg
    IMG_0537.jpg
    131.3 KB · Views: 399
  • IMG_0536.jpg
    IMG_0536.jpg
    137.5 KB · Views: 404
  • IMG_0535.jpg
    IMG_0535.jpg
    131.8 KB · Views: 400
  • IMG_0533.jpg
    IMG_0533.jpg
    136.1 KB · Views: 402
OP
8

87jeepwrangler

Well-known member
Joined
May 23, 2013
Messages
195
Almost feels like a garage with that there tarp roof
attachment.php


little dude helping out, as always
attachment.php


it was a little bit of a challenge routing the wires such that the ones staying didn't have to get disconnected and moved, and the ones moving didn't get in the way.
attachment.php


attachment.php


attachment.php
 

Attachments

  • IMG_0590.jpg
    IMG_0590.jpg
    145.4 KB · Views: 394
  • IMG_0583.jpg
    IMG_0583.jpg
    113.4 KB · Views: 393
  • IMG_0580.jpg
    IMG_0580.jpg
    120.7 KB · Views: 391
  • IMG_0556.JPG
    IMG_0556.JPG
    132 KB · Views: 394
  • IMG_0546.jpg
    IMG_0546.jpg
    112.7 KB · Views: 390
OP
8

87jeepwrangler

Well-known member
Joined
May 23, 2013
Messages
195
final lumber delivery, #3
attachment.php


attachment.php


attachment.php


the future master bedroom
attachment.php


attachment.php


finishing the last roof
attachment.php


attachment.php
 

Attachments

  • IMG_0604.jpg
    IMG_0604.jpg
    138.7 KB · Views: 377
  • IMG_0595.jpg
    IMG_0595.jpg
    143.9 KB · Views: 374
  • IMG_0593.jpg
    IMG_0593.jpg
    111.2 KB · Views: 374
  • IMG_0591.jpg
    IMG_0591.jpg
    134.7 KB · Views: 374
  • IMG_0582.jpg
    IMG_0582.jpg
    123.2 KB · Views: 375
  • IMG_0581.JPG
    IMG_0581.JPG
    98.6 KB · Views: 378
  • IMG_0566.jpg
    IMG_0566.jpg
    121.5 KB · Views: 376
OP
8

87jeepwrangler

Well-known member
Joined
May 23, 2013
Messages
195
this wall looked ridiculous. glad I decided to break it up with a roof line. it was quite a bit of fun getting the top course of OSB nailed up.
attachment.php


attachment.php


attachment.php


attachment.php


attachment.php


attachment.php
 

Attachments

  • IMG_0711.JPG
    IMG_0711.JPG
    142.4 KB · Views: 372
  • IMG_0709.JPG
    IMG_0709.JPG
    132.8 KB · Views: 370
  • IMG_0641.JPG
    IMG_0641.JPG
    145.3 KB · Views: 370
  • IMG_0633.jpg
    IMG_0633.jpg
    107.9 KB · Views: 372
  • IMG_0624.jpg
    IMG_0624.jpg
    109.2 KB · Views: 373
  • IMG_0606.jpg
    IMG_0606.jpg
    110.3 KB · Views: 372
OP
8

87jeepwrangler

Well-known member
Joined
May 23, 2013
Messages
195
attachment.php


attachment.php


attachment.php


attachment.php


attachment.php


attachment.php


my buddy scored me some free R-11 for all my inside walls for sound deadening.
attachment.php
 

Attachments

  • IMG_0743.JPG
    IMG_0743.JPG
    122.2 KB · Views: 284
  • IMG_0647.jpg
    IMG_0647.jpg
    141.3 KB · Views: 284
  • IMG_0637.JPG
    IMG_0637.JPG
    111.9 KB · Views: 281
  • IMG_0634.JPG
    IMG_0634.JPG
    137.1 KB · Views: 282
  • IMG_0609.JPG
    IMG_0609.JPG
    116.8 KB · Views: 280
  • IMG_0608.JPG
    IMG_0608.JPG
    106.7 KB · Views: 281
  • IMG_0602.JPG
    IMG_0602.JPG
    119.1 KB · Views: 282
OP
8

87jeepwrangler

Well-known member
Joined
May 23, 2013
Messages
195
attachment.php


I had to strip the old roof on the back half of the house, so here is my makeshift trash chute.
attachment.php


I figured i'd replace the sheathing on the old roof while I was in there
attachment.php


attachment.php


attachment.php


attachment.php


attachment.php
 

Attachments

  • IMG_0732.JPG
    IMG_0732.JPG
    120.7 KB · Views: 279
  • IMG_0731.jpg
    IMG_0731.jpg
    142.7 KB · Views: 281
  • IMG_0686.jpg
    IMG_0686.jpg
    143.6 KB · Views: 281
  • IMG_0684.jpg
    IMG_0684.jpg
    136.5 KB · Views: 283
  • IMG_0670.jpg
    IMG_0670.jpg
    145.9 KB · Views: 282
  • IMG_0669.JPG
    IMG_0669.JPG
    144.7 KB · Views: 282
  • IMG_0667.jpg
    IMG_0667.jpg
    136.4 KB · Views: 281
OP
8

87jeepwrangler

Well-known member
Joined
May 23, 2013
Messages
195
before I poured the pad, I wanted to sink an anchor point near the back of the garage. I machined a 1/4" wall piece of tubing and welded a base on it to hold a piece of chain. I dug a little footer and randomly stuck some rebar through the chain. I also machined a little water resistant lid to keep chunks and liquid out.


attachment.php


attachment.php


this was just an o-ring I had laying around. I later replaced it with one that was the correct diameter
attachment.php


attachment.php
 

Attachments

  • IMG_1086.jpg
    IMG_1086.jpg
    117 KB · Views: 272
  • IMG_0894.JPG
    IMG_0894.JPG
    83.6 KB · Views: 272
  • IMG_0871.jpg
    IMG_0871.jpg
    113.1 KB · Views: 270
  • IMG_0497.jpg
    IMG_0497.jpg
    157.7 KB · Views: 272
OP
8

87jeepwrangler

Well-known member
Joined
May 23, 2013
Messages
195
moving the original oil burner out of the kitchen
attachment.php


all of this original plumbing will eventually be abandoned, as I ran all new plumbing to all the fixtures in the rest of the house from the new heater location. until then, however, this fun little nook needs to stay.
attachment.php
 

Attachments

  • IMG_0906.JPG
    IMG_0906.JPG
    125.1 KB · Views: 260
  • IMG_0907.JPG
    IMG_0907.JPG
    114.9 KB · Views: 260
To avoid these ads, REGISTER NOW!
OP
8

87jeepwrangler

Well-known member
Joined
May 23, 2013
Messages
195
the heater will be moved to the garage, and by code, needs to be 18" above ground level. Instead of wasting the space under the heater by building a block base, I decided to weld up a table to support the heater. the legs are regular steel, but the top is 1/4" thick stainless scrap I had.
attachment.php


attachment.php


the original heater that was in the kitchen got scrapped. a friend had a Weil Mclane gold oil burner they recently pulled from a customer house that was only a few years old. the customer switched over to natural gas when it became available in their area, so the heater was free for the taking. It got rebuilt along the way with all new goodies.
attachment.php


attachment.php
 

Attachments

  • IMG_2870.jpg
    IMG_2870.jpg
    115.9 KB · Views: 197
  • IMG_1547.jpg
    IMG_1547.jpg
    138.2 KB · Views: 198
  • IMG_1544.JPG
    IMG_1544.JPG
    143 KB · Views: 196
  • IMG_1539.JPG
    IMG_1539.JPG
    103.8 KB · Views: 198
  • IMG_1489.JPG
    IMG_1489.JPG
    110.4 KB · Views: 5
  • IMG_1488.JPG
    IMG_1488.JPG
    109.4 KB · Views: 5
OP
8

87jeepwrangler

Well-known member
Joined
May 23, 2013
Messages
195
im very **** about certain things, and for no reason at all, I was hell bent on having a stainless flu in the garage because I want it to look nice when finished. the original chimney was a traditional 3 wall flue with the inner most liner being a 6" stainless pipe in still perfect condition. I used those pieces to construct the single wall flue that would be visible in the garage. I hand made the pieces for the tee to make the damper
attachment.php


attachment.php


attachment.php


attachment.php
 

Attachments

  • IMG_2896.JPG
    IMG_2896.JPG
    79.2 KB · Views: 197
  • IMG_2900.JPG
    IMG_2900.JPG
    95 KB · Views: 195
  • IMG_2901.JPG
    IMG_2901.JPG
    112.1 KB · Views: 197
  • IMG_2902.jpg
    IMG_2902.jpg
    121.3 KB · Views: 197
Last edited:
OP
8

87jeepwrangler

Well-known member
Joined
May 23, 2013
Messages
195
new to me heater getting all plumbed in. I spend a lot of time trying to get all the plumbing as neat and tidy as possible, hopefully it shows a little
attachment.php


attachment.php


attachment.php


I scored a few of these heaters, so i'll plumb one in when I get around to it to heat the shop. if one doesn't cut it, I have 3, so i'll keep adding them until it works :lol:
attachment.php
 

Attachments

  • IMG_3065.JPG
    IMG_3065.JPG
    107.6 KB · Views: 190
  • IMG_2940.jpg
    IMG_2940.jpg
    140 KB · Views: 194
  • IMG_2936.jpg
    IMG_2936.jpg
    138.9 KB · Views: 193
  • IMG_2913.jpg
    IMG_2913.jpg
    136.6 KB · Views: 194
Last edited:

J-man67

Well-known member
Joined
Aug 10, 2012
Messages
218
Location
Delaware
Beautiful work. That is quite the task! Roof looks great and won't have touch it for a while now.
 
OP
8

87jeepwrangler

Well-known member
Joined
May 23, 2013
Messages
195
The original entry way was awkward, you can see the idea from this picture. the stairs were off to the right when you first walked in the door, and there was a low ceiling above
attachment.php


I left the original ceiling in for a little while to act like a catwalk to make it easier to work on the now 20' ceiling
attachment.php


attachment.php


attachment.php


attachment.php


attachment.php


attachment.php
 

Attachments

  • IMG_1482.jpg
    IMG_1482.jpg
    141.3 KB · Views: 179
  • IMG_1473.JPG
    IMG_1473.JPG
    63.3 KB · Views: 180
  • IMG_1466.jpg
    IMG_1466.jpg
    121.4 KB · Views: 179
  • IMG_1462.JPG
    IMG_1462.JPG
    57.5 KB · Views: 178
  • IMG_1090.jpg
    IMG_1090.jpg
    121.8 KB · Views: 179
  • IMG_1089.JPG
    IMG_1089.JPG
    142.4 KB · Views: 179
  • IMG_1063.jpg
    IMG_1063.jpg
    113.2 KB · Views: 178
OP
8

87jeepwrangler

Well-known member
Joined
May 23, 2013
Messages
195
I wanted the chandelier to be able to be lowered, but even the cheapest kits were way over priced, so i made my own.

i used a worm gear style boat winch because they are self locking, and routed a few pulleys in the attic with steel cable to hang the chandelier. if anyone wants specifics, or more details, i can post them, but basically it is mounted in such a way that i can open the filter housing on my return air duct at the top of the stairs which gives access to an opening that you can put a drill hex drive in, and raise and lower the chandelier.

attachment.php


attachment.php


attachment.php


attachment.php
 

Attachments

  • IMG_1516.JPG
    IMG_1516.JPG
    62.5 KB · Views: 178
  • IMG_1514.JPG
    IMG_1514.JPG
    124.1 KB · Views: 177
  • IMG_1509.jpg
    IMG_1509.jpg
    135.4 KB · Views: 177
  • IMG_1504.JPG
    IMG_1504.JPG
    118.5 KB · Views: 178
OP
8

87jeepwrangler

Well-known member
Joined
May 23, 2013
Messages
195
attachment.php


attachment.php


attachment.php


attachment.php
 

Attachments

  • IMG_1579.JPG
    IMG_1579.JPG
    135 KB · Views: 177
  • IMG_1580.jpg
    IMG_1580.jpg
    125.5 KB · Views: 175
  • IMG_1585.JPG
    IMG_1585.JPG
    144.6 KB · Views: 175
  • IMG_1588.JPG
    IMG_1588.JPG
    124.6 KB · Views: 176
OP
8

87jeepwrangler

Well-known member
Joined
May 23, 2013
Messages
195
some pier footers for the front porch

attachment.php


attachment.php


attachment.php


attachment.php
 

Attachments

  • IMG_1138.jpg
    IMG_1138.jpg
    129.3 KB · Views: 147
  • IMG_1137.jpg
    IMG_1137.jpg
    145 KB · Views: 148
  • IMG_1072.jpg
    IMG_1072.jpg
    129.9 KB · Views: 149
  • IMG_1070.jpg
    IMG_1070.jpg
    150.4 KB · Views: 147
OP
8

87jeepwrangler

Well-known member
Joined
May 23, 2013
Messages
195
this is the north side of the house, and was not a load bearing wall prior to the addition. the 2nd floor ceiling and roof load over the laundry room is now transferred to this wall. i knew there was some water damage to the bottom plate on this wall prior to starting the addition, but had never gotten around to fixing it. now that it was load bearing, i had to fix it before re-siding over it. i jacked the wall and was able to cut a little rot off the bottom of the studs and bang some new pressure treated bottom plates in.


attachment.php


attachment.php
 

Attachments

  • IMG_1112.jpg
    IMG_1112.jpg
    124.7 KB · Views: 145
  • IMG_1113.jpg
    IMG_1113.jpg
    140.9 KB · Views: 145
OP
8

87jeepwrangler

Well-known member
Joined
May 23, 2013
Messages
195
miscellaneous insulation and electric shots


attachment.php


attachment.php


attachment.php


attachment.php


attachment.php


attachment.php


attachment.php
 

Attachments

  • IMG_3189.jpg
    IMG_3189.jpg
    137.4 KB · Views: 146
  • IMG_2798.JPG
    IMG_2798.JPG
    109.7 KB · Views: 145
  • IMG_2773.jpg
    IMG_2773.jpg
    141.4 KB · Views: 145
  • IMG_1384.jpg
    IMG_1384.jpg
    88 KB · Views: 145
  • IMG_1262.jpg
    IMG_1262.jpg
    139.3 KB · Views: 145
  • IMG_1239.jpg
    IMG_1239.jpg
    119.9 KB · Views: 146
  • IMG_1199.JPG
    IMG_1199.JPG
    141.4 KB · Views: 146
OP
8

87jeepwrangler

Well-known member
Joined
May 23, 2013
Messages
195
Here's how the house weather'd the first winter. i didn't get to siding before winter hit, and there was still plenty to do inside.

attachment.php


IMG_1230.jpg
 
Last edited:
OP
8

87jeepwrangler

Well-known member
Joined
May 23, 2013
Messages
195
attachment.php


attachment.php


attachment.php


attachment.php


attachment.php


attachment.php
 

Attachments

  • IMG_2760.JPG
    IMG_2760.JPG
    104.7 KB · Views: 141
  • IMG_2748.JPG
    IMG_2748.JPG
    137.8 KB · Views: 140
  • IMG_2555.JPG
    IMG_2555.JPG
    128.4 KB · Views: 140
  • IMG_2544.jpg
    IMG_2544.jpg
    135.9 KB · Views: 141
  • IMG_2442.JPG
    IMG_2442.JPG
    106 KB · Views: 141
  • IMG_2441.JPG
    IMG_2441.JPG
    103.2 KB · Views: 141
OP
8

87jeepwrangler

Well-known member
Joined
May 23, 2013
Messages
195
I've had an idea to make a programmable lit house number for a while, but no real time to even consider it. i teach Tech. Ed & Pre-Engineering to middle school students, and had a 7th grader who i thought would be up to the challenge of doing some extracurricular circuit design and programming for me. so, we worked on this project together; he picked out the components, i bought and physically built everything, and he did the programming. i think it came out pretty cool.

first, i used a scrap of azek to cut out the house number
attachment.php


next, i made a sacrificial jig to hold the LED's in place as i soldered them. each hole represents the location of one of the RGB LEDs
attachment.php


here's the LEDs all soldered and wired together in the jig
attachment.php


test fitting the wired assembly in the recess in the back of the number
attachment.php


i used brass threaded rod to act as the standoffs, and double as the electrical conductors for the LEDs
attachment.php


everything test fitted. notice three of the 4 brass standoffs have wires connected to them, and they are sleeved with some black delrin
attachment.php
 

Attachments

  • IMG_2799.jpg
    IMG_2799.jpg
    136.2 KB · Views: 131
  • IMG_2793.JPG
    IMG_2793.JPG
    114.3 KB · Views: 132
  • IMG_2790.JPG
    IMG_2790.JPG
    145.8 KB · Views: 132
  • IMG_2788.jpg
    IMG_2788.jpg
    140.4 KB · Views: 131
  • IMG_2787.jpg
    IMG_2787.jpg
    137 KB · Views: 132
  • IMG_2786.JPG
    IMG_2786.JPG
    117 KB · Views: 132
OP
8

87jeepwrangler

Well-known member
Joined
May 23, 2013
Messages
195
i'll let the next 3 pictures be self explanatory

attachment.php


attachment.php


attachment.php


my 7th grader picked out the 5v Trinket from Adafruit. its a sub $10 microcontroller.
attachment.php


first test fire of the number
attachment.php


it was October when we finished it, so the first program he wrote was an orange and green haloween script which cycled the number through those two colors. he wrote scripts for each holiday, but the house number will spend most of its time just backlit with a dim white light.
attachment.php
 

Attachments

  • IMG_2807.JPG
    IMG_2807.JPG
    130.2 KB · Views: 132
  • IMG_2806.jpg
    IMG_2806.jpg
    125.2 KB · Views: 132
  • IMG_2803.JPG
    IMG_2803.JPG
    144.8 KB · Views: 133
  • IMG_2802.JPG
    IMG_2802.JPG
    87.7 KB · Views: 132
  • IMG_2801.JPG
    IMG_2801.JPG
    146.4 KB · Views: 132
  • IMG_2800.JPG
    IMG_2800.JPG
    86.1 KB · Views: 132
OP
8

87jeepwrangler

Well-known member
Joined
May 23, 2013
Messages
195
Drywall time. i don't remember how many sheets it was total, close to 150 i believe. the house rock is all 1/2", and the garage and garage loft were required to be 5/8" type x, single layer. there was a mixture of 8', 9', 10', and 12' pieces

attachment.php


attachment.php


attachment.php
 

Attachments

  • IMG_3185.jpg
    IMG_3185.jpg
    141.7 KB · Views: 131
  • IMG_3184.jpg
    IMG_3184.jpg
    141.1 KB · Views: 131
  • IMG_3178.JPG
    IMG_3178.JPG
    79.8 KB · Views: 131
OP
8

87jeepwrangler

Well-known member
Joined
May 23, 2013
Messages
195
attachment.php


attachment.php


attachment.php


attachment.php


attachment.php


attachment.php


this room will also be the office and some holiday storage, hence the reason for its size
attachment.php
 

Attachments

  • IMG_3186.jpg
    IMG_3186.jpg
    143.5 KB · Views: 130
  • IMG_3201.jpg
    IMG_3201.jpg
    148.2 KB · Views: 129
  • IMG_3227.JPG
    IMG_3227.JPG
    69.7 KB · Views: 129
  • IMG_3332.JPG
    IMG_3332.JPG
    69.9 KB · Views: 130
  • IMG_3355.JPG
    IMG_3355.JPG
    98.2 KB · Views: 127
  • IMG_3363.JPG
    IMG_3363.JPG
    101.2 KB · Views: 128
  • IMG_3375.JPG
    IMG_3375.JPG
    80.3 KB · Views: 130
To avoid these ads, REGISTER NOW!
Top Bottom