To avoid these ads, REGISTER NOW!

Rock Island 574

MCMDave

Member
Joined
Apr 13, 2019
Messages
23
Location
Dawson, PA
Rock_Island_574_before.jpg


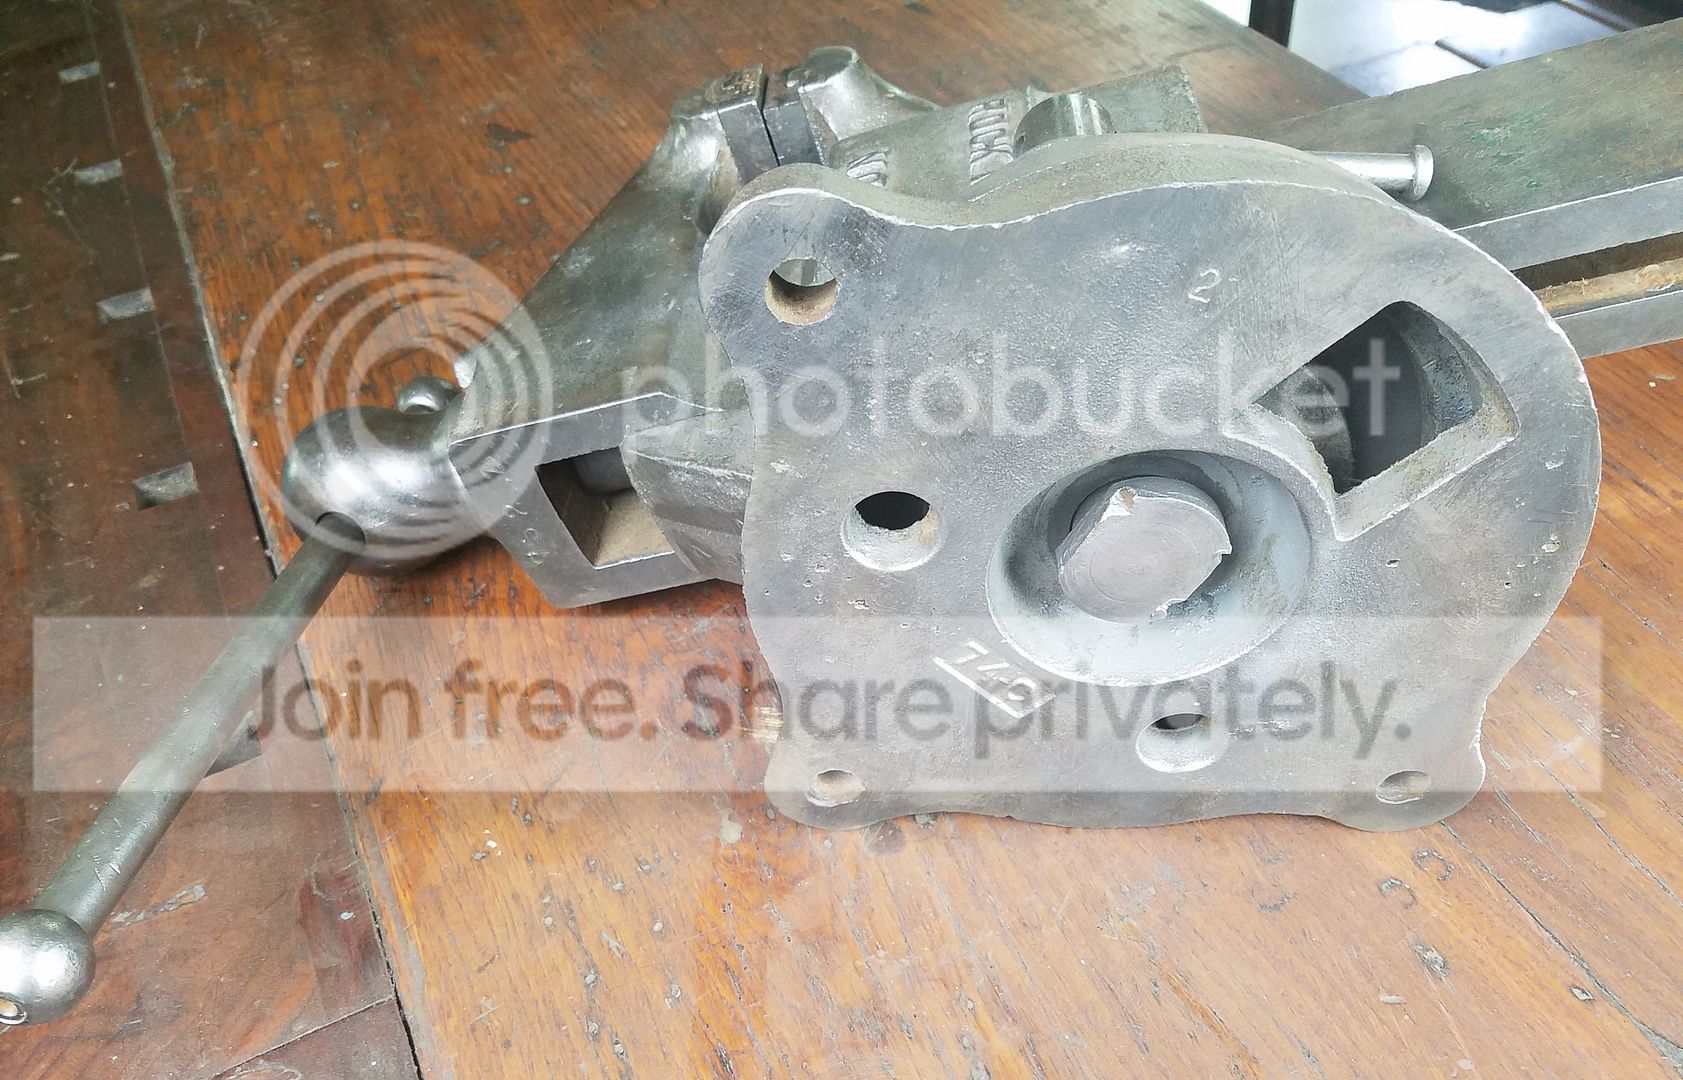
I decided to take apart, clean up, lube, and repaint my grandfather's barn vise. I've had it since he died in 1983. It's a Rock Island 574. Everything works, but it's missing the center bolt, and there appears to be little left of the old lubricant. The upper part was held to the lower part only by way of the swivel bolt assembly whose pin is bent. I think I can straighten that again. In watching videos about restoring vises, I found cfkbjVgLoSA on YouTube is also a Rock Island 574.

Rock_Island_574_pieces.jpg


The big question is to know how to replace that center bolt? In the video, it looks like it's a stepped bolt of some sort. It can be seen starting at the 29 second point of the video. I looked for parts, but could only find jaws available. Is a replacement for this part available? Can I fabricate it using a bolt, a nut, and some washers as shims?

I saw in thread 294705 of the Garage Journal that the owner of the same model found USN (for US Navy) stamped, but I don't see where he found it. My grandfather bought most of his tools as military surplus. The inside of the jaw face plates are both stamped 75.2 but if there's a date, I haven't discovered it yet. Do you know where to look? (ETA, see post 15 of this topic).

Rock_Island_574_inside-jaw.jpg
 
Last edited:
To avoid these ads, REGISTER NOW!
OP
M

MCMDave

Member
Joined
Apr 13, 2019
Messages
23
Location
Dawson, PA
Thanks; this guy does a more careful job of painting. I've watched a bunch of these...wonder how I missed this one.
 

ZRX61

Well-known member
Joined
Aug 15, 2006
Messages
28,716
Location
Solar Blight Valley, SoCal
On mine I glass-beaded the handle & lock doodad, then hit them with the wire wheel to put a shine back on them.
Jaw's got buzzed with a fiber deburring wheel & the slide was hit with a DA sander


https://scontent-lax3-1.**.fbcdn.net/v/t1.0-9/382731_2587111529847_981250831_n.jpg?_nc_cat=101&_nc_ht=scontent-lax3-1.**&oh=1478a8360dc23ec571c9e1eb8b54c183&oe=5D362641


https://scontent-lax3-1.**.fbcdn.net/v/t1.0-9/383887_2692364601108_815952525_n.jpg?_nc_cat=109&_nc_ht=scontent-lax3-1.**&oh=a34667b4d4d9ebe0441c2ea8dab908b2&oe=5D45136E


https://scontent-lax3-1.**.fbcdn.net/v/t1.0-9/10614405_10203701463889887_1561202895091876315_n.jpg?_nc_cat=103&_nc_ht=scontent-lax3-1.**&oh=fd68f784d4b381032337782568815f87&oe=5D39D30F
 
OP
M

MCMDave

Member
Joined
Apr 13, 2019
Messages
23
Location
Dawson, PA
You did a real nice job restoring that. I was able to lift the little steel badge from the back side with a knife without bending the sheet metal or tearing the holes, but it's rusty enough that I can't read anything. I'm not sure how to move forward that piece. Can you read yours? Is it etched, or printed, or something else? The color under it is the same gray of your unfinished vise. Most of the surface of mine just looks like oiled bare metal. The one you finished is impressive, but the one in original paint is in remarkable condition.

I'll show some pictures of mine when I've made enough posts that I'm allowed.
 

ZRX61

Well-known member
Joined
Aug 15, 2006
Messages
28,716
Location
Solar Blight Valley, SoCal
It's etched. Name plate for the company that took over Rock Island. I forget what it says & mine are buried in the back of a cabinet right now. I beadblasted that too.
 

lafester

Well-known member
Joined
Mar 1, 2017
Messages
2,191
Location
Northern CO
Love my 574. Perfect size for what I need.
So far my search for a birtman tag has been a failure, but not really needed.
 
OP
M

MCMDave

Member
Joined
Apr 13, 2019
Messages
23
Location
Dawson, PA
It's hard to tell from the image, but is this an original badge from another vise, or does TheHorse13 make these?

I've seen a photo transfer etching process that I saw someone do on brass, and used his own company logo on the original sized badge like this. But if a sharp edged illustration could be made or found, this original content could be used. I'd really dig that.
 
OP
M

MCMDave

Member
Joined
Apr 13, 2019
Messages
23
Location
Dawson, PA
I added some images to the OP

Still wondering how to approach that missing center bolt; ideas or suggestions?
 

ZRX61

Well-known member
Joined
Aug 15, 2006
Messages
28,716
Location
Solar Blight Valley, SoCal
If you can find a regular bolt with the correct thread, a piece of tube to act as the shoulder & a big washer you should be fine.

Failing that, maybe someone will have the bolt specs & you can have a machinist make one.
I needed a special bolt one time & someone at the local college Mech Eng program made one as a class project. Did it for free too :)
 
Last edited:

lafester

Well-known member
Joined
Mar 1, 2017
Messages
2,191
Location
Northern CO
You're right, not really needed, lafester. But it's attention to detail that make a thing special.

Personally I think the more you take away from it's as found condition the less special it becomes. It just looks like any other painted vise.

There are always exceptions of course.
 

thehorse13

Well-known member
Joined
Mar 15, 2015
Messages
3,478
Location
Jefferson County, WV
It's hard to tell from the image, but is this an original badge from another vise, or does TheHorse13 make these?

I've seen a photo transfer etching process that I saw someone do on brass, and used his own company logo on the original sized badge like this. But if a sharp edged illustration could be made or found, this original content could be used. I'd really dig that.

The badge came off a parts vise that I have in my scrap pile. It wasn't doing me any good and since another member had a need, I moved it along to a proper home. I don't make badges because I simply don't have the time.

I found the date on my vise stamped on the top side of the slide. You can see 9-44 here in the attached pic.

For those who found my original post, the old 574 has been doing just fine in my shop. No issues at all. It serves along side a few Prentiss and Wilton bullet vises.

Now then, as for your swivel base bolt, I will look in the pile and see if I have one. I believe I sent one on to another 574 restoration but I will dig around and see what I have. I know for sure that another 574 vise body is in my parts pile.
 

Attachments

  • IMG_2818.jpg
    IMG_2818.jpg
    126.8 KB · Views: 42
To avoid these ads, REGISTER NOW!
OP
M

MCMDave

Member
Joined
Apr 13, 2019
Messages
23
Location
Dawson, PA
I found the date on my vise stamped on the top side of the slide. You can see 9-44 here in the attached pic.

For those who found my original post, the old 574 has been doing just fine in my shop. No issues at all. It serves along side a few Prentiss and Wilton bullet vises.

It was your original 2015 post that brought me to the garage Journal a couple of weeks ago when I first started looking into my vise. I hadn't taken note of your name, and apparently didn't look closely enough at the picture you provided then.

Did you decide to braze those two cracked parts, leave them as they are, or something else? I mentioned your 2015 topic in my OP by number because 5 posts are required by this forum before images and/or urls can be posted. I've edited those details back in my OP. There isn't much caked on grime or paint on this vise, and while I haven't started wire brushing my parts yet, I don't see the date stamp where you found yours.

Now then, as for your swivel base bolt, I will look in the pile and see if I have one. I believe I sent one on to another 574 restoration but I will dig around and see what I have. I know for sure that another 574 vise body is in my parts pile.

That would make me very happy; much obliged for looking. If you find it and if you accept PayPal, I'll be ready. I allow for email messages from other members.
 

thehorse13

Well-known member
Joined
Mar 15, 2015
Messages
3,478
Location
Jefferson County, WV
It was your original 2015 post that brought me to the garage Journal a couple of weeks ago when I first started looking into my vise. I hadn't taken note of your name, and apparently didn't look closely enough at the picture you provided then.

Did you decide to braze those two cracked parts, leave them as they are, or something else? I mentioned your 2015 topic in my OP by number because 5 posts are required by this forum before images and/or urls can be posted. I've edited those details back in my OP. There isn't much caked on grime or paint on this vise, and while I haven't started wire brushing my parts yet, I don't see the date stamp where you found yours.


That would make me very happy; much obliged for looking. If you find it and if you accept PayPal, I'll be ready. I allow for email messages from other members.

I replaced the main nut because I didn't want to take the chance of it grenading on me. After examining the small crack on the ledge of the vise body I discovered two things. The first is that the crack is only near the surface and the second is that it doesn't bear any load. I left it alone and the vise works just fine. It's been years since I cleaned it up and it shows no signs of slowing down.

If I find the part that you need, I will just send it along. Many people here have been good to me so I pay it forward whenever I can.
 

thehorse13

Well-known member
Joined
Mar 15, 2015
Messages
3,478
Location
Jefferson County, WV
I looked at the 574 in my bone pile. All it has is a jaw pad, jaw screws, main nut pin and the actual vise body. All other parts are gone, including the part that you need.

That said, 574s are common and turn up all the time. You can wait for one or you can make your own base screw. I would use a high quality screw if you plan on making your own.
 
OP
M

MCMDave

Member
Joined
Apr 13, 2019
Messages
23
Location
Dawson, PA
Well, drat. Hey, though; thanks so much for taking the time to look. I appreciate it just the same.

Maybe someone else will have a spare?
 
OP
M

MCMDave

Member
Joined
Apr 13, 2019
Messages
23
Location
Dawson, PA
Someone from Garage Journal had a spare center bolt he salvaged from a Rock Island 74. We hoped it would fit, but it would only thread a turn before stopping. After deciding I didn't have the tools to measure or cut, I took the parts to a nearby machine shop. Two weeks later, and he had the parts fitting. He said it required only for the female threads to be re-cut.

I really like how this is looking, and I've only done preliminary wheel wire brushing so far. I purchased a gray hammered paint that's a bit darker than the original battleship gray, but I'm thinking about torching the parts, and applying boiled linseed. As you can see, it's pretty banged up. I'd be appreciative to read your thoughts.

20190515_121113%202.jpg


20190515_123042%202.jpg


20190515_123120%202.jpg
 
Last edited:

ZRX61

Well-known member
Joined
Aug 15, 2006
Messages
28,716
Location
Solar Blight Valley, SoCal
My usual method of picking a color was stand in front of the *paint prison* at Lowes for a couple of minutes until something catches my eye.


JB weld before sanding, blends in quite well on the slide afterwards:


https://scontent-lax3-1.**.fbcdn.net/v/t1.0-9/6349_4619262292346_1017633739_n.jpg?_nc_cat=105&_nc_eui2=AeEI7AEJ3SLxHARmzV9eYMDMZhW6ypLT1EJ-CU-M-M5KxXKH2LbA6tXjsKFFAfdWzGH2MpPXcj5ppqi_Wh1hRR0Io-IvOi8GPaMw3XTzcY4j_Q&_nc_pt=1&_nc_ht=scontent-lax3-1.**&oh=d5a4ea8c6a55e3a609dae59b0637d9b4&oe=5D5814CC


https://scontent-lax3-1.**.fbcdn.net/v/t1.0-9/16786_4619263932387_1124849705_n.jpg?_nc_cat=104&_nc_eui2=AeHXSiRA3McTXqmbMoFNsN5Dkfi5ZTfJTxBtF-3CjBY7cVgxBkWcPgqIBQcwAHq6YJs7hRrHfVM8p8qLDNiItPWbeOeDVJQXKHScJcAsP8-nbw&_nc_pt=1&_nc_ht=scontent-lax3-1.**&oh=3fcc19c8dd8871bd7959508e1bf342fd&oe=5D5A58A2
 
Last edited:

ZRX61

Well-known member
Joined
Aug 15, 2006
Messages
28,716
Location
Solar Blight Valley, SoCal
2nd application of JB:


https://scontent-lax3-1.**.fbcdn.net/v/t1.0-9/557342_4619311693581_1146331073_n.jpg?_nc_cat=105&_nc_eui2=AeF0VJrIHiAoj_iKyZAFZvcjNXkrqKRr2-ARaEJ3B89kO0Hh6vkZ4-UzIjNZYd05eq6ss52NKk4A5tSHSW-41AM_7k0vSqS7hC82-8YKn-SCxA&_nc_pt=1&_nc_ht=scontent-lax3-1.**&oh=61417fbacd5cb81d054fac6264b8bc39&oe=5D68C785
 
OP
M

MCMDave

Member
Joined
Apr 13, 2019
Messages
23
Location
Dawson, PA
That looks good. I think that's the right way to handle this thing. Have you ever gone looking for paints at a larger auto parts store? If you're like me, you better take a leak before facing that wall.
 

ZRX61

Well-known member
Joined
Aug 15, 2006
Messages
28,716
Location
Solar Blight Valley, SoCal
Staring at the cage of paint doesn't always work out. I ended up with this alarmingly bright metallic green Athol...


Luckily I traded it to a lawyer & didn't have to look at it again.


https://scontent-lax3-1.**.fbcdn.net/v/t1.0-9/67465_1532186237374_5244950_n.jpg?_nc_cat=108&_nc_ht=scontent-lax3-1.**&oh=0a5600f01abade0a0c36c8ee4a17fe7a&oe=5D5AAE80
 

johnxman

New member
Joined
Aug 8, 2021
Messages
3
Someone from Garage Journal had a spare center bolt he salvaged from a Rock Island 74. We hoped it would fit, but it would only thread a turn before stopping. After deciding I didn't have the tools to measure or cut, I took the parts to a nearby machine shop. Two weeks later, and he had the parts fitting. He said it required only for the female threads to be re-cut.

I really like how this is looking, and I've only done preliminary wheel wire brushing so far. I purchased a gray hammered paint that's a bit darker than the original battleship gray, but I'm thinking about torching the parts, and applying boiled linseed. As you can see, it's pretty banged up. I'd be appreciative to read your thoughts.

20190515_121113%202.jpg

20190515_123042%202.jpg

20190515_123120%202.jpg
Hi there, I have the same problem ... Missing center bolt for my 574. Do you remember what bolt you gave to the machinist to modify for this? and do you have the name/number of the machinist? i'd like to have him do the same for me if possible. feel free to DM if you like. thanks.
 

johnxman

New member
Joined
Aug 8, 2021
Messages
3
I would like to report that I have "solved" the missing centerbolt problem in my Rock Island 74. The bolt that is needed is a 7/8"-14 thread hex head bolt, 1 1/2" long. However, the bolt also needs a sleeve/bushing approximately 1/2" thick and 1.25" wide (o.d.) to ride just above the bolt head. This bushing ensures that the upper body of the vice rotates smoothly with no slop. Since i didn't have a handy machinist to make a special bolt/bushing, i went to McMaster Carr and got a bolt (part no. 92620A920) together with some "hard fiber washers" (pack of 10 -- part no. 96100A157) which have i.d. 7/8" and o.d. 1.25". I ended up using about 8 of the washers around the bolt. i then put a modest amount of axle grease between the vice parts, and bolted them together using the bolt/washer sandwich. It went together smoothly and snugly, and it now rotates perfectly and locks down securely. problem solved. The folks at McMaster CArr were incredibly helpful in finding this solution. (note that the picture i'm attaching of the bolt is actually the 2" long version. this is too long. get the 1.5" to avoid cutting it down.)
 

Attachments

  • IMG_4840.JPG
    IMG_4840.JPG
    453.3 KB · Views: 14
  • IMG_4841.JPG
    IMG_4841.JPG
    536.7 KB · Views: 14

Mr. Wonderful

Well-known member
Joined
Jan 15, 2018
Messages
1,774
Location
Pacific Northwest
johnxman,

you sure brought back an old thread. Thank you though! My 574 needs the same piece and I was not looking forward to trying to find a replacement. Double thanks for including the part number!
 
Last edited:
To avoid these ads, REGISTER NOW!
Top Bottom