To avoid these ads, REGISTER NOW!

Rotary SPO9 2 post lift vibrates when loaded

600SL

Well-known member
Joined
Apr 26, 2012
Messages
1,794
Location
Connecticut
Just installed a used Rotary SPO9-400 lift. Works perfectly with no car on it, but once a loaded it really shutters bot up and down. One thing I noticed is that the carriage slides appear to be aftermarket, based on the white color. The original Rotary parts appear to be black. The Rotary slides are $320 for a set of 8, the aftermarket slides are available for $68 for all 8. I'm wondering if these aftermarket slides are just inferior and causing this problem.

Video of noise:

Genuine Rotary slider blocks:
1742420392810.png

White aftermarket slider blocks:
1742420219931.png
 
To avoid these ads, REGISTER NOW!
OP
6

600SL

Well-known member
Joined
Apr 26, 2012
Messages
1,794
Location
Connecticut
Cables and pulleys are all lubricated. There is no mention of lubrication in the manual for the slides but one lift installer recommends I try Mobil 1 synthetic grease and nothing else? I will have some Mobile 1 in tomorrow.
 
OP
6

600SL

Well-known member
Joined
Apr 26, 2012
Messages
1,794
Location
Connecticut
Is the fluid aerating? Did you use fresh fluid or what was in the system previously?
How do I know if the fluid is aerating. Fluid is fresh. Don't have any symptoms previously Its the first time I used it.
 

finn

Well-known member
Joined
Mar 27, 2005
Messages
16,305
Location
The UP, God's country
How do I know if the fluid is aerating. Fluid is fresh. Don't have any symptoms previously Its the first time I used it.
Take the cap off the reservoir and look inside while you’re operating it if it’s a black tank or metal.

If it’s an opaque / semi transparent tank, you can probably tell just by looking at the tank.
 

adsinnott1

Well-known member
Joined
Feb 16, 2021
Messages
136
Location
Kentucky
I greased the insides of my carriage where the slider block ride with regular red n' tacky grease. No issues. I also replaced mine with aftermarket blocks as they quit manufacturing the OE blocks.
 
OP
6

600SL

Well-known member
Joined
Apr 26, 2012
Messages
1,794
Location
Connecticut
Another clue. I measured the play in the sliding blocks by prying the carriage left to right with a screw driver. Right side is moving just under 0.2" left side moves 0.1".

 
OP
6

600SL

Well-known member
Joined
Apr 26, 2012
Messages
1,794
Location
Connecticut
The Mobil 1 grease worked but I believe in light of the play I saw in post #9, this is only a band aid and I will have to replace the sliding. blocks.
 

Scotto

Well-known member
Joined
Apr 8, 2008
Messages
1,001
Location
South Jersey
The Mobil 1 grease worked but I believe in light of the play I saw in post #9, this is only a band aid and I will have to replace the sliding. blocks.
I have an old Rotary SPOA88 and it looks like it uses the same slider blocks as yours (FJ7360). Mine is bad - at different points of going up and down, only 1 carriage side locks into place because it's so twisted the locking "dog" isn't lined up.
Any idea HOW to change the slider blocks? I can't even see them on my lift - do you need to remove the whole carriage to see them?
 

Fuelie

Member
Joined
Mar 1, 2025
Messages
10
Location
Minnesota
I have an old Rotary that I love! I have seen them do this if the cables aren't adjusted properly.
Tom
 
OP
6

600SL

Well-known member
Joined
Apr 26, 2012
Messages
1,794
Location
Connecticut
I have an old Rotary SPOA88 and it looks like it uses the same slider blocks as yours (FJ7360). Mine is bad - at different points of going up and down, only 1 carriage side locks into place because it's so twisted the locking "dog" isn't lined up.
Any idea HOW to change the slider blocks? I can't even see them on my lift - do you need to remove the whole carriage to see them?
Slider blocks require removal of the top cross bar which requires disconnection of the safety circuit, removal of both balance cables, hydraulic line and safety latch cable. Then remove both column extensions. Carriage gets pulled straight up which requires a crane of some sort at least 13' high.

The service guy I spoke to says the carriage weighs 300Lb, But I measured up the carriage and calculated out ~125Lb. I plan on doing this with my neighbors Kabota back hoe if it will go that high. Otherwise I have other schemes that I will post as I get to them.
 

Scotto

Well-known member
Joined
Apr 8, 2008
Messages
1,001
Location
South Jersey
Slider blocks require removal of the top cross bar which requires disconnection of the safety circuit, removal of both balance cables, hydraulic line and safety latch cable. Then remove both column extensions. Carriage gets pulled straight up which requires a crane of some sort at least 13' high.

The service guy I spoke to says the carriage weighs 300Lb, But I measured up the carriage and calculated out ~125Lb. I plan on doing this with my neighbors Kabota back hoe if it will go that high. Otherwise I have other schemes that I will post as I get to them.
That's what I figured, but was hoping there was an easier way, hah. Thanks for the info!
That's not too heavy - I think I'll be able to rig something up with my front-end loader. I really should have checked out the blocks before I put the lift up (got it used).
 

dave*99

Well-known member
Joined
May 5, 2009
Messages
4,269
Location
Coastal NJ
Slider blocks require removal of the top cross bar which requires disconnection of the safety circuit, removal of both balance cables, hydraulic line and safety latch cable. Then remove both column extensions. Carriage gets pulled straight up which requires a crane of some sort at least 13' high.

The service guy I spoke to says the carriage weighs 300Lb, But I measured up the carriage and calculated out ~125Lb. I plan on doing this with my neighbors Kabota back hoe if it will go that high. Otherwise I have other schemes that I will post as I get to them.
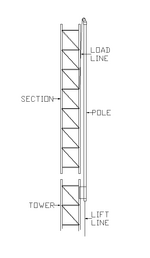
You could try a Gin pole. Bolt a pipe to the holes where the lift extensions were attached. Rig a pulley atop the pole and hoist the carriage straight up. They are used to assemble antenna towers similarly.

1742586938484.png
 
To avoid these ads, REGISTER NOW!
OP
6

600SL

Well-known member
Joined
Apr 26, 2012
Messages
1,794
Location
Connecticut
You could try a Gin pole. Bolt a pipe to the holes where the lift extensions were attached. Rig a pulley atop the pole and hoist the carriage straight up. They are used to assemble antenna towers similarly.

1742586938484.png
I was thinking something just like that if the Kabota doesn't work. I could get 4 2"x3" studs those will fit right into the sides of the beams. The last 5 or so ft above the columns could be screwed to a 2" x 12" for stability. The a block of wood could be placed across the top.
 

dave*99

Well-known member
Joined
May 5, 2009
Messages
4,269
Location
Coastal NJ
I was thinking something just like that if the Kabota doesn't work. I could get 4 2"x3" studs those will fit right into the sides of the beams. The last 5 or so ft above the columns could be screwed to a 2" x 12" for stability. The a block of wood could be placed across the top.
I suspect 1 piece of 4x4 would be convenient and more than adequate to carry the load. Actually the post is largely in compression. It’s vertical. So you don’t need much. Very little bending moment. But as you said it has to match up to the mounting point. .

Maybe a pair of vertical 2x4 on the column mounting holes and a cross piece for the pulley is adequate.
 
Last edited:
OP
6

600SL

Well-known member
Joined
Apr 26, 2012
Messages
1,794
Location
Connecticut
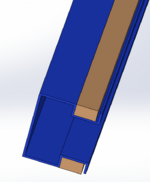
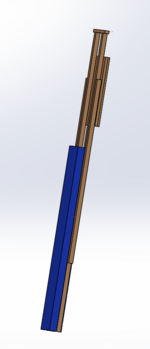
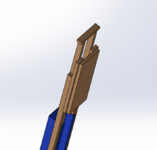
It gets complex pretty quick but hears what I came up with so far. 2x3 fit into the columns as shown in picture 2. 2x3 seem to only be available in 8 ft lengths so need to be spliced. Challenge is that the cross bar on top needs to be about 5' above the column to allow 3 ft space for the carriage and an additional 2 ft for a come along. If you just use a pulley you will be putting 2 times the load on the wood columns but you can bring the cross bar down to about 3' 6". Worst case is you bring the crossbar down to just over 3' and use a threaded rod to jack the carriage. That would be a lot of wrenching about 3 ft of it but if you have a low ceiling, might be the only option. I added a 2x12 to the back of one side to stiffen up the extended 2x3's that 2x 12 needs to be spaced off the 2x3s to allow clearance for the carriage. There needs to be about 1 ft of space at each end of the 2x12 to allow room for the arm fittings at the bottom and access to operate a come along handle up top. I may opt for the threaded rod method. Its long but with shorter extensions a lot safer. And if you lift and block the carriage up in 6" increments, you can spin the nut up quickly but carefully.

Also you will need to put spacers at the bottom to hold the 2x3's off the hydraulic line or remove the hydraulic line from the cylinder. A piece of channel would be best for this.

You will definitely need to be careful with this. And a pro with the right equipment id highly advisable. And keep in mind this will only be able to lift the carriage up enough to replace the sliders. You will not be able to completely remove the carriage out of the lift.

If you have access to good steel 2 pieces of 2 1/2" square tubing would be the best. Or even 3" round pipe.
1742605924377.png
1742606139111.png
1742605991938.png
 

finn

Well-known member
Joined
Mar 27, 2005
Messages
16,305
Location
The UP, God's country
Are you absolutely certain the carriage has to be removed? The sliders on my Advantage four posts slipped in during assembly, and, I think, can be easily serviced.
 
OP
6

600SL

Well-known member
Joined
Apr 26, 2012
Messages
1,794
Location
Connecticut
I'd consider disassembling the lift, unbolting it from the floor and knocking it over. Probably faster and safer.

I might since I have everything else apart at that point only problem is that I would have to lift the columns about 2" to get them off the studs.
 
OP
6

600SL

Well-known member
Joined
Apr 26, 2012
Messages
1,794
Location
Connecticut
I started making the tool out of wood and then I found some 3" x 1.5" rectangular tube I had lying around. The 3" fit right in nicely on one side of the column but I had to mill it down 0.025" on each side to get it to fit on the other side. Fortunately I have a milling machine so all was well. I was able to just use 2 4' pieced and bolt them in with the two screws that hold the column extensions in place. Those screw holes are threaded so I drilled the top one to 3/8" and as accurately as I could I drilled the bottom one 6.5" below it to 13/32". This way the screws just pass through the holes and cold it captive. I was also able to put a nut on the bottom hole for safety but really un necessary due to the tight fit in the column.

A threaded rod will be used to jack the carriages out. Its a slow process requiring about 450 turns to get the carriage clear but very stable and safe.

Sorry its not letting me post pictures today.
 
Last edited:
OP
6

600SL

Well-known member
Joined
Apr 26, 2012
Messages
1,794
Location
Connecticut
Able to import the pictures into Word and save as a PDF
 

Attachments

  • Carrige Removal Assembly.pdf
    655.2 KB · Views: 11

Scotto

Well-known member
Joined
Apr 8, 2008
Messages
1,001
Location
South Jersey
It looks like that'll do the trick. That's going to be a ALOT of turns!! Could you put a spot weld on the bottom nut to the housing and then double nut the top so you can use an impact wrench to spin the threaded rod?
I wish we were closer so I could borrow your rig so I can do mine, ha!
 

adsinnott1

Well-known member
Joined
Feb 16, 2021
Messages
136
Location
Kentucky
My .02
Option 1: Lay the columns down and slide the carriage out. I did this when replacing the slider blocks before installing my used lift.
Option 2: Raise the carriage out of the column with an engine crane. I just had to do this last week to repair one of the locks (a stopper tab had come off and no longer kept it unlocked, I had to hold the manual lock release all the way down). I removed the arms, raised the carriage to the highest position and set it on the lock, undid the cables enough to allow the one carriage to slide all the way out the top, and used a 2x4/ strap to push the carriage out with the engine crane.
 
OP
6

600SL

Well-known member
Joined
Apr 26, 2012
Messages
1,794
Location
Connecticut
It looks like that'll do the trick. That's going to be a ALOT of turns!! Could you put a spot weld on the bottom nut to the housing and then double nut the top so you can use an impact wrench to spin the threaded rod?
I wish we were closer so I could borrow your rig so I can do mine, ha!

In the end I double nutted the top and ran it down with an impact. But I had to do it in 2 steps because in order to connect the threaded rod I had to use a 4ft+ rod to catch the carriage with it resting on the top ratchet stops. Then the rod bottoms out so you have to prop the carriage with a two by four and switch to a shorter 3' rod. If you have a helper you can just manually push up the carriage and have your helper place the 2 x 4. Then you can go right to a 3' threaded rod. You also need to make sure you have the 2 x 4 in place when you let the carriage down otherwise there will be a big noise.

Not two difficult to make this. If you don't have a milling machine and your 3" rectangle doesn't fit you could use 2.5" with shims to tighten them or just make them out of wood and pre drill and use lag bolts.
 

Scotto

Well-known member
Joined
Apr 8, 2008
Messages
1,001
Location
South Jersey
Did you end up getting the slides changed out? It fix the side-to-side play in the carriage?
Also how much carriage was left in the tower when you did the lower slides?
I'm going to go with wood most likely for doing mine.
 
OP
6

600SL

Well-known member
Joined
Apr 26, 2012
Messages
1,794
Location
Connecticut
Did you end up getting the slides changed out? It fix the side-to-side play in the carriage?
Also how much carriage was left in the tower when you did the lower slides? Thanks!

Yes slides are changed, play is gone and lift works smooth. To get the lower slides out the carriage need to come completely out. You need about 1 ft clearance above your lift to get the carriages out using this method. Otherwise you will have to take the columns down.
 

BobnCO

Well-known member
Joined
Apr 2, 2023
Messages
209
I’m annoyed by this thread! I have the same older lift, put up used a few months ago, should have done this prior to erecting as well. : )
 
OP
6

600SL

Well-known member
Joined
Apr 26, 2012
Messages
1,794
Location
Connecticut
I’m annoyed by this thread! I have the same older lift, put up used a few months ago, should have done this prior to erecting as well. : )

Same here. I debated doing this but didn't want to start fixing anything until I had the chance to evaluate things. I also had no idea how to check things out without the lift installed. But if I knew what I did in post #9 at the time I probably could have got the lift cheaper and would have done it before putting it up. But I will say having the lift columns mounted helps with the shimming. I was able to leave the hydraulic lines connected and test each carriage with the shims installed. If I just put them in on the ground I probably would have been too tight. Its probably beast to have a couple of helpers available stand the columns up and shim until the carriage wont come down under its own weight then remove a shim.

Also I will add. I paid $2250 for this lift. With painting installation and refurbishment it came up to $3325. That more than 1/2 the cost of a new Rotary and about $500 more than a new Atlas and I still have a leak I need to fix. After all the work involved I think I would have gone with the new Atlas or at least waited until I found a good Rotary for under $1500
 
To avoid these ads, REGISTER NOW!
Top Bottom