To avoid these ads, REGISTER NOW!

Router table build

jtbinvalrico

Well-known member
Joined
Jan 2, 2010
Messages
1,375
Location
Tampa FL
Just put the final touches on my router table build. It began life as a really simple bench-top thing I made out of some spare wood. I later added a stand that I welded up out of an old bedframe. The router is a basic Cman unit I've had for about 15 years.

The router is mounted very simply, with some recessed machine screws through the top. I picked up a router speed control unit from HF for $18....it controls the router very nicely. The bottom box is filled with 140 lbs of concrete, which makes the whole thing very stable.
177_0880.jpg
177_0881.jpg
177_0882.jpg
177_0883.jpg
177_0884.jpg
177_0886.jpg
177_0887.jpg
 
To avoid these ads, REGISTER NOW!
OP
J

jtbinvalrico

Well-known member
Joined
Jan 2, 2010
Messages
1,375
Location
Tampa FL
The back of the fence has a standard sized port for a shop vac.....but I'm about to wrap up a whole-shop dust system, so I'll be sizing that port up for the new system :beer:
 

Mudman

Member
Joined
Jun 8, 2011
Messages
10
This thing is sweet! How much would you say it cost to make? I'd love to make something similar.
 
OP
J

jtbinvalrico

Well-known member
Joined
Jan 2, 2010
Messages
1,375
Location
Tampa FL
Glad you like it.....The build is really quite easy. I guesstimated a lot of my measurements and specs by looking at the ones sold in the big box stores. Using those as examples answered a lot of questions I had as I made it.

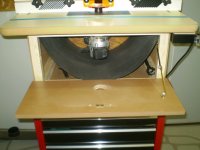
Start with a top. I used good old 3/4" plywood because I had it lying around.......in fact, most of it was extra wood just lying around. Your router table top needs to be perfectly flat and solid. There's a number of ways to do this, including buying prefab ones, or making your own. Mine is simply one piece. If I was going to go the extra distance, I'd glue together at least two pieces of 3/4" mdf, and then plan on topping it with some melamine for a super slick surface.....I skipped all that because I was building on the cheap and I was confident in the flatness of my top.

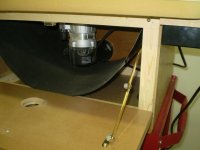
You'll need to mount your router to this top. My router is a standard 1/4" collet Cman router. My research told me you can spend a lot on mounting a router to a table......and if you are already working with a $400 top, you probably should. But, if you are building on the cheap, here's how: I located a hole, I think it was about 1 1/2" or so, in the middle of the top. Next, figure out where you need to drill the three holes to mount the router. Then countersink these from the top. You'll need to head to the hardware store to get flat-topped machine screws of the proper length. More advanced methods use plates you can drop in to accommodate different setups.....I'm not more advanced. ;)

You need a fence. Again, you can spend more hundreds on this......if you want, but at this point, following my plan has you committed to an air of cheapness that is permeating your shop. A fence does need to be rigid. I made mine with more extra plywood......mdf might be a better bet. It's easy, make a big "L" the width of your top and brace it thoroughly. Cut a space in there for the bit to spin in and build a box over the back with a hole sized for your favorite vacuum attachment. Again, researching the ones at the stores can aid in planning the moving fences. Bottom line, recess some bolts into those fence faces to keep a smooth face. I used simple wingnuts and washers to make my fence totally adjustable. Want to change the profile on the outfeeding fence? Just add some washers between it and the primary fence.

Put lots of paint or clear coat on these parts, sand them super smooth, and then rub them down with some Johnson's paste floor wax.

You can make your cabinet however you like. Consider height. Make sure it will accommodate your router. Cut an opening in the front of sufficient size that you can reach in there and manipulate the collet to change bits. Then you can get fancy and mount a clear lexan door. :D

That speed controller from HF was slick at only $18. The next big improvement was the addition of 140 pounds of concrete to make it more solid.

Total cost excluding the router:

Plywood: Free
Bedframe: Free
Concrete: $8
Lexan window: $4
HF speed controller: $18
Paint: really? who doesn't stock black paint in their shop anyway
A few bucks in hardware.

Let me know if you need any close-up shots of anything. :beer:
 

Mudman

Member
Joined
Jun 8, 2011
Messages
10
Wow thanks! I actually like the way yours looks even better than a complete one. And it's always fun buildong your own things.

Close up shots would be awesome! You did a fantastic job of building this table, I would have never guess it was made out of just plywood and bed rails.
 

djjsr

Well-known member
Joined
Sep 4, 2006
Messages
4,796
Location
In the cornfields
If you find that your vacuum doesn't quite get enough of the dust, think about putting a 4" hose in the back of your box. I spent a few days experimenting with a few different ideas and ended up with a simple system that catches about 98% of everything.

This has not been cleaned ............... ever.
 

Attachments

  • Pa020311.jpg
    Pa020311.jpg
    51.7 KB · Views: 76
  • Pa020315.jpg
    Pa020315.jpg
    62.8 KB · Views: 74
  • Pa020314.jpg
    Pa020314.jpg
    61.3 KB · Views: 73
  • Pa020317.jpg
    Pa020317.jpg
    53.4 KB · Views: 72
OP
J

jtbinvalrico

Well-known member
Joined
Jan 2, 2010
Messages
1,375
Location
Tampa FL
As requested, some close-up shots:

Here's the top nekkid, not wearing it's fence:
178_0907.jpg

Machine screws simply countersunk into the top, a basic hole for the bit, note the absence of inserts:
178_0908.jpg

Inside the box....router bolts up to the bottom:
178_0911.jpg

The lexan door set-up....a magnet keeps it closed:
178_0912.jpg

Welded up bedframe complete with locking casters from HF on sale for $2 each:
178_0913.jpg178_0915.jpg

(continued)
 
OP
J

jtbinvalrico

Well-known member
Joined
Jan 2, 2010
Messages
1,375
Location
Tampa FL
Here's some fence details. Keeping it super simple, you can use whatever means necessary to mate the parts up and make them adjustable....I used simple wingnuts and washers:
178_0916.jpg
View attachment 141845
178_0918.jpg
178_0920.jpg
178_0921.jpg
178_0922.jpg
178_0924.jpg
Have a look at djjsr's setup he posted above....it's a great example of how you can scale this thing up.....In fact I'm going to steal his idea of porting the cabinet and that "U" shaped thingy in the box.....slick.

The cool thing about router tables is that you can upgrade any single part at any time. So you can build something simple, learn along the way, then add things like T-tracks. For example, if I were to come across the right size piece of steel or aluminum, I'd probably make a new top with it. :beer:
 

kc-steve

Well-known member
Joined
Jun 22, 2010
Messages
4,240
Location
Kansas City
That's some GREAT STUFF all you guys have posted. I've been looking around at router tables for a long time but never pulled the trigger. Like you, I have an old 1.5 horsepower Craftsman I bought in the 1980s and probably haven't used it a dozen times. But I might start using it after building a nice table like the ones shown yet most of the pleasure would be in building one. :D

Thanks, :beer:
Steve
 
Last edited:

wolflrv

Well-known member
Joined
Jun 7, 2011
Messages
304
Location
Savannah, TN
That's a great setup!! And priced right too!! I've been looking at Rockler's router table top setup with fence for a year now. It's normally $200, but currently on sale for $150 with free shipping, but it's still just too much to spend right now, with everything else I need for the shop.

I'm definitely stealing your idea of setting up the slots and using wingnuts to make the tracks!! Thanks a ton!! You just saved me $150 bucks and let me use my router in the meantime until I can afford a better setup!!
 
To avoid these ads, REGISTER NOW!

Mudman

Member
Joined
Jun 8, 2011
Messages
10
Thanks again jtbinvalrico,

I will be referencing this thread a lot when I get my Router. Still saving up for a nice one.
 

Michael T

Member
Joined
Oct 24, 2011
Messages
22
Location
Indiana Dunes
If you find that your vacuum doesn't quite get enough of the dust, think about putting a 4" hose in the back of your box. I spent a few days experimenting with a few different ideas and ended up with a simple system that catches about 98% of everything.

This has not been cleaned ............... ever.
Sorry so late with the post reference this thread...

What type of vacuum are you using for that router table? And I admire that whole setup. I recently bought a Craftsman 1 3/4 hp router and a matching table on sale ($99.00...hard to pass it up), and already I've discovered deficiencies, some of which I think I can fix with your designs.

Thanks for thinking outside the box, and for sharing with us in GJ.
 

98TJ

Well-known member
Joined
May 31, 2011
Messages
1,034
Location
Honolulu, HI
Some good ideas here. I've been shopping for a router table but for what I do I seriously doubt I'll need a fence. For that reason I've been looking at a JessEm unit and building the table myself.

http://www.jessemdirect.com/Rout_R_Lift_II_p/rout-r-lift ii.htm

They have more expensive models but I think that model would be fine for my use. For the price of some of the tables on the market you can get a nice setup that allows you to adjust it from the top of the table.
 

djjsr

Well-known member
Joined
Sep 4, 2006
Messages
4,796
Location
In the cornfields
What type of vacuum are you using for that router table? And I admire that whole setup. I recently bought a Craftsman 1 3/4 hp router and a matching table on sale ($99.00...hard to pass it up), and already I've discovered deficiencies, some of which I think I can fix with your designs.

Thanks for thinking outside the box, and for sharing with us in GJ.


I use a normal dust collection system like the one pictured below only I have a cheaper version from Menards. I connected the 4" diameter hose to a manifold I made from pvc pipe and it connects to the router table as well as a table saw, belt sander and miter saw. It works well for the table saw and router table, not so well for the miter saw but it's better than nothing.

399392428.jpg
 

mdbeck1

Well-known member
Joined
Mar 7, 2010
Messages
2,297
Location
Norman, OK
Some good ideas here. I've been shopping for a router table but for what I do I seriously doubt I'll need a fence. For that reason I've been looking at a JessEm unit and building the table myself.

http://www.jessemdirect.com/Rout_R_Lift_II_p/rout-r-lift ii.htm

They have more expensive models but I think that model would be fine for my use. For the price of some of the tables on the market you can get a nice setup that allows you to adjust it from the top of the table.

Add an incra jig to that router raising jig and go to work. I've got one of the cheap ones and love it.
 
OP
J

jtbinvalrico

Well-known member
Joined
Jan 2, 2010
Messages
1,375
Location
Tampa FL
The vacuum port you see there is a standard shop vac size....of course you could adapt that up to 4" or more to include it in a full-size dust collection system. Be sure to steal the good idea that djjsr had for porting the cabinet and including it in the vac system.

The really cool thing about router tables is that any of the higher grade accessories you get for it can be used later or incorporated into a higher end table....that's true for fences, lifts, plates and inserts, speed controls, miter inserts, etc.

Start basic, and expand from there. I'm already planning to redo some of this table with mdf and then I'm gonna laminate it myself. :beer:
 

mdbeck1

Well-known member
Joined
Mar 7, 2010
Messages
2,297
Location
Norman, OK
When you say "jig" do you mean fence? :headscrat

"Incra Jig" is the name of it. It's a precise alignment tool to get the fence aligned. I did the 30 second search on Yahoo and found one of the template books at this URL: http://www.woodcraft.com/Product/20...eference-Guide-with-Templates-Model-MTL2.aspx. The jig is on the bottom of the cover. It mounts to the top of your router table. The positioning device has two pieces with "teeth" or "racks" that mesh together for a 1/128" (?) positioning. I mounted the "bench side" on a board that spans my router table and clamp it in place. Then you move the upper section to the proper settings. The templates in the book help you set them correctly. Once I get the fence set I clamp it in place as well.

On the upper part of the book you see a bunch of box corners. ALL of those are possible with a good set of carbide cutters and the Incra system. My first major project with this tool included sliding dovetails that were 6 feet long (in Maple). The jig made it simple. However variances in the wood made it hard to slide the boards together when I glued them. Since then I limit the sliding dovetails to less than two feet in length.

You can also make "sliding dovetails in dovetails". The first ones I saw I thought they were ball bearing sliders. They had cut the dovetails then waxed the wood. I have made those as well and I'm not a master woodworker. Take a look at the system and decide for yourself.

There are competitors out there. One that comes to mind is Omni-jig. They are still a precision measuring/placing system.


This is not a beysmeyer type fence. This is just a device used to adjust the placement of the fence. Since it has the dual racks on it your measurements are very repeatable.

Oh, and I purchased mine years ago and it was $40.00 if I remember correctly.
 

mdbeck1

Well-known member
Joined
Mar 7, 2010
Messages
2,297
Location
Norman, OK
Incra's website: http://incra.com/

I don't see the one that I have. It looks like a fiberglass toy (kind of like the Incra Gauge) but I was amazed. You can also make your own wooden hinges with it. I haven't had time to do that yet.
 

BigRed001

New member
Joined
Nov 9, 2011
Messages
2
Here is the router table I build a couple years ago. I used an Incra fence and router plate. Both the fence and the cabinet are attached through a "T" to my dust collector.
RouterTable1s.jpg
 
Last edited:
To avoid these ads, REGISTER NOW!
Top Bottom