To avoid these ads, REGISTER NOW!

S4 Blackhawk Jack assembly

84scrambler

Well-known member
Joined
Nov 2, 2008
Messages
185
Location
Livermore Ca.
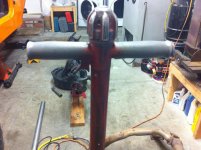
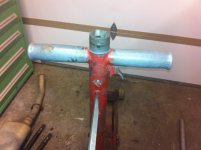
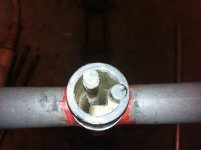
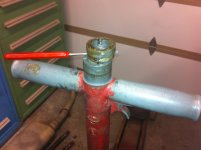
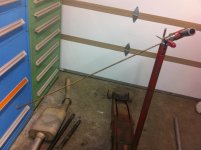
I just bought an S4 in pretty descent shape. It seems only two things do not work properly, the light and the trigger for the handle position. I wanted to fix these issues and I started by going after the battery compartment. It looks like the batteries I found in the handle are as old as the jack. I removed a good amount of it picking away with a screwdriver and hammer but there is still a lot left.
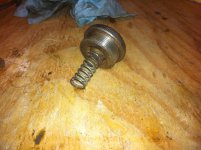
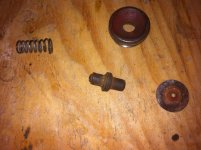
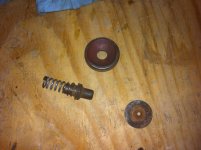
I was trying to figure out how to remove the handle so that I can work on it a little easier. Anybody know how to remove it? I removed the two screws and I can get the handle to spin and act loose. Do I have to remove the linkage at the bottom of the shaft? I can see a hole at the base of the handle, is this some sort of pin I need to mess with? Thanks for any help..
 
To avoid these ads, REGISTER NOW!

CRTDI

Well-known member
Joined
Jan 11, 2010
Messages
1,533
I can probably help you, but your going to have to promise to post some pics of your new acquisition. :) We would especially like to see some nice detailed pics of the light system components.

You have to remove the control knob first. Locate the small hole at the base of the knob. While rotating the control knob look into the hole, you will see a high spot or shiny spot appear. When you get the hole lined up with this spot,(this is a spring loaded detent mechanism) insert a punch and press inward, while pressing inward slowly and carefully lift up on the knob, once past the detent remove the punch, again slowly lift up and be prepared to catch the detent stop, (careful don't loose it, it's very small) the spring may or may not come out with it.

After you have the knob removed, you will need to remove the now exposed control knob collar, this is held on with a single pin, carefully remove this with an appropriately sized punch.

Lastly, after you have the control knob collar removed, look down into the handle, you will see a slotted collar, (this adjusts and holds the trigger within the "T" handle) remove this with a slotted screwdriver.

Now, if you already have the handle screws out, the handle will simply lift off at this point. While slowly lifting the "T" handle up and off, hold onto the trigger as this will fall to the floor if you are not careful.

Be very careful with the "T" handle assy, it is a weak point on these jacks, it's very common to find these with one side broken off due to rough handling.

An illustrated parts list might be helpful for you to understand what you're supposed to be looking for. You'll find a copy of one for your jack within this hydraulic repair PDF manual.

http://www.megaupload.com/?d=6G1XU9XP

Good Luck!!
 
OP
8

84scrambler

Well-known member
Joined
Nov 2, 2008
Messages
185
Location
Livermore Ca.
Thanks for all of the info and the link. I'll be sure to take pictures as I disassemble the handle. I downloaded and found the S4, its a bit hard to make out the numbers but if I stare at it long enough I should be able to figure out what everything is.
I'll work on it over the weekend and show the results then. In the mean time I took some pictures after I rolled it into the garage. I picked it up for $100 which I don't think is to bad for a 4 ton model.
 

Attachments

  • IMG_0265.jpg
    IMG_0265.jpg
    145.5 KB · Views: 168
  • IMG_0263.jpg
    IMG_0263.jpg
    148.5 KB · Views: 157
  • IMG_0262.jpg
    IMG_0262.jpg
    146.1 KB · Views: 150
  • IMG_0261.jpg
    IMG_0261.jpg
    146.7 KB · Views: 150

CRTDI

Well-known member
Joined
Jan 11, 2010
Messages
1,533
Even if it needs rebuild kit, you've got yourself a lot of good old U.S.A. jack goodness for a 100 bucks. :thumbup:
 
OP
8

84scrambler

Well-known member
Joined
Nov 2, 2008
Messages
185
Location
Livermore Ca.
So I got home this evening and decided to mess with the Jack. I followed your instructions CRTDI and everything came apart smoothly. I took a bunch of pictures as I worked through the handle. The only difference was that I didn't have to undo the screw holding on the trigger lever as mine wasn't attached to the adjustment pin down below.
This allowed me to get the handle onto the work bench and pick out the rest of battery crud that was in the handle. There was no wire running in mine so I will have to figure out all the little things I need to wire it up at a future date. I was able to hook up the finger trigger wire (which was sort of a pain because I couldn't pull the main tube off, its soaking in WD-40 and will meet its fate at a later time) and finished reassembling the entire handle back together.
I am going to do a load test by leaving my jeep jacked up overnight. Hopefully it wont leak down. The jack did pump slower with weight on it then what I was expecting but then again my only comparison is my 3 year old jack. Is this normal for this Jack (it probably took about 3 or 4 pumps to get the rear of my jeep up a couple of inches)?
 

Attachments

  • Picture 006.jpg
    Picture 006.jpg
    145 KB · Views: 138
  • Picture 022.jpg
    Picture 022.jpg
    144 KB · Views: 128
  • Picture 019.jpg
    Picture 019.jpg
    140.2 KB · Views: 151
  • Picture 013.jpg
    Picture 013.jpg
    146.5 KB · Views: 152
  • Picture 027.jpg
    Picture 027.jpg
    146.7 KB · Views: 139

CRTDI

Well-known member
Joined
Jan 11, 2010
Messages
1,533
Good work on getting your handle removed and the battery compartment cleaned out!! Now for my disclaimer--I am NOT a hydraulic jack expert. Please use my advice as you see fit, but please proceed with caution.

With the extra pumps to get the load up, I'm suspecting that you may have some small leakage. If you don't see any leaks or if you notice some relatively small leaks after your load test, you could try tightening the external compression nuts on the pump and the ram actuators. If the internal packings are still serviceable within the hydraulic unit, tightening of the compression nuts might help your issue.

There is normally a special tool used for the compression nuts. You could use a punch and hammer, but be careful, these nuts are made from a soft alloy material and can be easily damaged.

Thanks for taking the time to post pics.
 

dnroe

Well-known member
Joined
Nov 4, 2010
Messages
113
Location
Easley, SC
Scrambler,

Congrats on the new S4! I too have an all original S4 that pumps really quickly until you get a load on it and it is then a little slower than my other 3 cheap 3 ton jacks. I know these have a dual piston design that lifts quickly until loaded but I feel like mine is slower than it should be. I could understand it being slow if it was super easy to push but mine takes a decent amount of lever pull when lifting. How much effort does yours take when it gets a load on it? I did the same overnight load test and had no leaks whatsoever. Hopefully someone can fill us in on if that is normal or not. Your jack looks really nice. Mine has more rust and paintloss so I will be redoing it in the near future. I dont have the light on mine but it does have alloy sideplates. The only thing I dont like about mine is it is much less maneuverable than my other shorter desing jacks. But I can overlook that with the satisfaction that I get using a 50 year old jack that has never been rebuilt and doesnt leak a bit. Oh and the $40 purchase price doenst hurt either.:D
 
OP
8

84scrambler

Well-known member
Joined
Nov 2, 2008
Messages
185
Location
Livermore Ca.
So good news on the jack, it didn't leak down overnight. My jack goes up much like dnroe describes, it pumps up really quickly and then once there is a load it slows down. Its hard to gauge how hard it is to pump up. I can pump it up with one hand but I have to use some muscle, its a lot more convenient to use both hands. I guess if I had to put a number on it I was probably pushing down about 30-40 lbs of force to get it to lift about 1500-2000 lbs.

Anybody else with an S4 have similar experience?

dnroe, I checked out your post and I like that Jack. It looks in similar shape to mine and should restore nicely. Let me know if you run across replacement rear wheels for these jacks, one of my rear wheels has some damage.

CRTDI, I'll hold off on adjusting the nut as the jack didn't leak overnight or show signs of fluid anywhere. I'll keep this option in mind when I start having issues or if I find out that this jack isn't performing like it should and again thanks for the info.
 
OP
8

84scrambler

Well-known member
Joined
Nov 2, 2008
Messages
185
Location
Livermore Ca.
CRTDI,
I took a few pictures of the switch. Let me know if you want more pictures or a detailed description. The round flat looking disc is what I found after digging out the two batteries. I believe there should be a metal button centered on this and a wire soldered to the backside and exiting out of the hole.
 

Attachments

  • IMG_0295.jpg
    IMG_0295.jpg
    147 KB · Views: 117
  • IMG_0296.jpg
    IMG_0296.jpg
    145.5 KB · Views: 99
  • IMG_0297.jpg
    IMG_0297.jpg
    143.4 KB · Views: 104
  • IMG_0301.jpg
    IMG_0301.jpg
    145.9 KB · Views: 91
  • IMG_0302.jpg
    IMG_0302.jpg
    144.4 KB · Views: 101
  • IMG_0306.jpg
    IMG_0306.jpg
    129.5 KB · Views: 107

CRTDI

Well-known member
Joined
Jan 11, 2010
Messages
1,533
scrambler, Thanks for posting these pics.

I believe you're correct about the disc, there should be a small button contact point, with a wire attached to it.

I've personally only seen one of these switch housing on a jack. And the one I saw appeared to be plastic. Your switch housing and button assy. appear to be metal, can you confirm this for me please?
 
OP
8

84scrambler

Well-known member
Joined
Nov 2, 2008
Messages
185
Location
Livermore Ca.
I will check out the switch tonight and let you know. I don't believe everything is metal. I think the smaller sleeve is some sort of plastic but I will confirm it all tonight, I will look at each part more closely, clean them, and then check to see if they are magnetic or not.
 
To avoid these ads, REGISTER NOW!
OP
8

84scrambler

Well-known member
Joined
Nov 2, 2008
Messages
185
Location
Livermore Ca.
CRTDI,
I looked over all of these pieces in more detail and checked to see what was magnetic and not. Everything on in the switch assembly is metal except for the sleeve piece. Looking at post #10, the top right picture, the piece in the middle is what is plastic and everything else around it metal. I looked up the plastic piece and it's the light switch button bushing (S4.370 item #68).
 

CRTDI

Well-known member
Joined
Jan 11, 2010
Messages
1,533
CRTDI,
I looked over all of these pieces in more detail and checked to see what was magnetic and not. Everything on in the switch assembly is metal except for the sleeve piece. Looking at post #10, the top right picture, the piece in the middle is what is plastic and everything else around it metal. I looked up the plastic piece and it's the light switch button bushing (S4.370 item #68).

Thanks for looking into this. I'm relieved that it's not an all plastic assy. I now have higher hopes of actually finding one of these for mine.

Of course now, I'm wondering why every single jack that I've come across (except for one with a partial switch intact) never has one installed. I used to think it was because they were made of plastic, and they just got brittle and broke off over time. Maybe now it's because acid leaking from some old forgotten batteries just corrodes them off the handle. :headscrat
 

tractornut3

Member
Joined
Jan 16, 2013
Messages
11
Looking in to buying a S4 blackhawk owner says light assembly is gone,lens is stil there.Any help on where to get one.
 

469 runner

Well-known member
Joined
Jan 5, 2006
Messages
353
Location
North Carolina
I also have that jack. It does take more effort pumping when the saddle contacts the load, and takes several pumps to raise a few inches. I think this is perfectly normal for these jacks. A great tool. Mine too has never been rebuilt, belonged to my grandfather, he used it on his farm to change tractor tires. Still works great and no leaks.
 

dayradebaugh

Member
Joined
Jul 10, 2018
Messages
24
Location
KS
A newbie here in KS just bought a Blackhawk S4 DELUXE (got the headlight) for $30!!. It's all frozen up with sludge, but power unit out apart. I had my hydraulics shop look at it. They've got $90 in it, and say it needs a new kit for $180, plus another $180 to put it back together, putting me at $450 repair.

Can a garage monkey like me tackle this job? Is there a good place to get a cheaper kit? I've rebuilt a jack before.

Thanks
 
To avoid these ads, REGISTER NOW!
Top Bottom