
You are using an out of date browser. It may not display this or other websites correctly.
You should upgrade or use an alternative browser.
You should upgrade or use an alternative browser.
Saving a Craftsman Tool Chest
- Thread starter Zeeman
- Start date
smokeyburb
Well-known member
Looking forward to the pics. I love seeing the creativity in how each person makes modifications to suit individual needs.
Sent from my SCH-I545 using Tapatalk
Sent from my SCH-I545 using Tapatalk
dirt_dobber
Well-known member
fantastic work. I love every bit of this restoration.
smokeyburb
Well-known member
Now I need to get serious about finishing my 6D box. It only needs cleaning and paint, nothing serious.

Sent from my SCH-I545 using Tapatalk
Sent from my SCH-I545 using Tapatalk
I know you guys are probably tire of my pictures by now, so here comes some more.
This is how I'm organizing that tall middle drawer. I made a small, removable socket tray, and converted an old Craftsman bit holder to put my deep well stuff on. Only 1/4 drive will go in this drawer.

There are holes to hold most of the taller stuff: 3 ratchets, 2 breaker bars, 3 extensions.
It was dark when I was putting the last coat on, and I picked up a can of red by mistake. I just painted over it with gray, and that's why the top looks funky.


The drawer has plenty of clearance to shut with the gray socket tray in position, but I can remove it easily to take it to the job.
Looking very neat and that is a pretty cool idea with that deep drawer. I do not think anyone has issues of your picture posting, 13 pages strong and lots on interest. I know I keep an eye on updates. That box was a lost cause for sure and I have been sure impressed!!!
Farmer J.
Well-known member
Yes.That's a really clever solution!
Keep the pics coming! This has been a highlight of my GJ browsing over the last two months.
Keep at it Zeeman.. we keep tuning in for the next instalment...! Lovely quality restoration you do, and interesting ideas too.
Username already in use
Well-known member
Clever use of the Machinist's handbook drawer. You've done a fantastic job of rehabbing a box that I would have passed on. Kudos to you! It's looking great.
smokeyburb
Well-known member
Looking sweet Zeeman!
Sent from my SCH-I545 using Tapatalk
Sent from my SCH-I545 using Tapatalk
BobsurUncle
Well-known member
I noticed this in the pics from when you first started the project. But I gotta ask.
With all that work, why didn't you remove the pop rivets in the bottom corners?
With all that work, why didn't you remove the pop rivets in the bottom corners?
Great question Bob. I was wondering if anyone would notice. I debated removing them, and went back and forth on keeping them or leaving them. I sort of wanted to leave a small reminder of all the rivets that were in the chest when I began the project (over 25 I know). Then I thought it would look better with the corners welded. I was ready to paint and hadn't made my mind up yet, so I just left them. There you go. I might go back and do it one day, who knows?
You got love the detail on older boxes, metal badging with alignment pins, not plastic **** or stickers ...
old is gold, think i'll be looking for couple old top boxes with small drawers (make one big topbox from 2 small) and give them a clean and paint and use them for odd and ends storage and nostalgia ...
old is gold, think i'll be looking for couple old top boxes with small drawers (make one big topbox from 2 small) and give them a clean and paint and use them for odd and ends storage and nostalgia ...
StillTooManyHobbies
Well-known member
Zeeman, that is a fantastic job. Just finished all 13 pages and your level of effort is second to none.
You got love the detail on older boxes, metal badging with alignment pins, not plastic **** or stickers ...
old is gold, think i'll be looking for couple old top boxes with small drawers (make one big topbox from 2 small) and give them a clean and paint and use them for odd and ends storage and nostalgia ...
No stickers for sure, but Craftsman did put a plastic version of the same metal badge on some of their stuff. I'm not sure what year was plastic and what year was metal.


Stuart in MN
Well-known member
Looks great!
txvwnut
Well-known member
That box turned out great.
Tynee
Well-known member
Outstanding. You gonna make the portable 2-drawer look that good, too?
Lookin4'67Galaxieconv
Well-known member
Wow! Very impressive! Awesome job!
Zeke
Well-known member
No. You have talent, they are TV hacks.Not sure about that Graveyard Cars. Never seen it. Should I check it out?
Farmer J.
Well-known member
Well Done! Your tool chest restoration is an inspiration.
555
Well-known member
Great job! Absolutely an amazing display of craftsmanship and determination to bring this box back to life!
Regards,
John
Regards,
John
vettex2
Banned
looks better than new
Garage&Beer
Well-known member
Wow, nicely done. You can treasure that for a long time.
StillTooManyHobbies
Well-known member

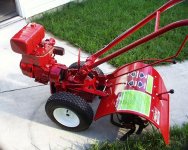
TooMany Hobies, That is a nice looking T-B. Did you restore it? I have restored the old Troy-Bilt one time in its life. Here is the short story: My mom bought it, and had it shipped to my father for a 20th anniversary wedding present. He used it some, and then gave it to me when I was in my 20's. I used it every year since it was new (1978) to make a garden. Last year I just had too much going on to make a garden, so it sat there lonely. I guess the last time it looked as nice as yours pictured was around 2000. At that time, I just took most of it apart, and painted it. Nothing was really wrong with it. Some time later, I contacted Troy-Bilt. I wanted to use their service where for 150 bucks you could send it to them, and they would make it like new again. Guess what? They lied. Since it had been bought out by MTD (I think), they no longer provided that service. We went round and round over the issue, but I knew I was not going to win. Anyway, this turned out to be more than a short version. I replaced the axle seals a while back, and now I need to do the rear transmission seal. I hope to have a scaled down garden this year, but I doubt I'll take on a restoration just yet. Tell me about your Horse.
StillTooManyHobbies
Well-known member
Yes, I rebuilt and restored it about 10 years ago. It's a 1976 model with the Tecumseh 6 hp engine. My friend George T. (now passed on) needed engine help on his Troybilt. I went over and helped him out, and he asked if I wanted a Troybilt too, but it will need some work. I said sure! He showed up later that day with a pickup load of parts, including 2 engine blocks, and various other parts to assemble a complete tiller, except for tines. He had purchased this one just for the tines, and did not need the rest. The shifter shaft seal was bad, as was the brass drive gear for the tines. I took it completely apart, cleaned and painted everything rustoleum red which is a shade lighter than the original red, bought a bunch of new parts, including tines, and decals as needed, and reassembled it. The engine block was fine, carb needed cleaned, added a fuel filter. Tossed some steel nuts in the gas tank and shook it a lot to clean out the rust. Wheels were painted with oil-base white house trim paint. It does a great job, but is overkill for my 15x20 garden. It's a lot dustier and dirty now, but still on the job and I feel good when I use it. I use it in the spring, then drain the gas and put it away till the next spring.
Attachments


You did a great job. I did not take as good of care mine. It sat outside with only a plastic bin to cover the engine. Space is at a premium at my house. Mine has the Kohler engine, and it's still going strong. It smokes a little, and I've had to rebuild and clean the carb a few times. The only complaint I have is the recoil. The spring broke, and I fixed it, but it's a little finiky. The recoils are pretty expensive, so I'll just keep it like it is for now. My garden is big. I use my tractor to disk it first, then the Horse does the final prep and keeps the middles weeded. Looking at yours sure makes me want to get mine to look that good. I know you are proud, especially since it was your friend's.