To avoid these ads, REGISTER NOW!

Saylor-Beall Rebuild

OP
J

jonathan75

Well-known member
Joined
Mar 27, 2013
Messages
1,451
Location
NC
Schrader has a PDF on their website you can download for colors & specs... Though honestly I think either will be okay.

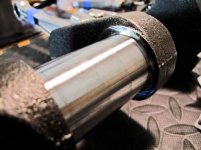
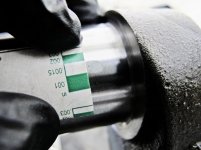
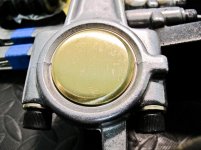
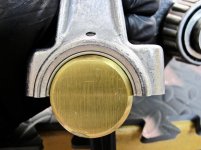
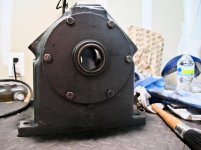
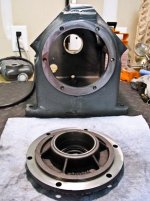
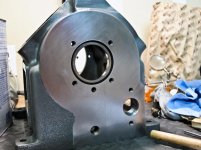
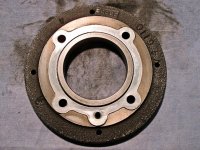
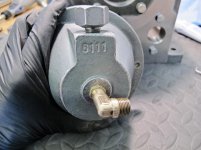
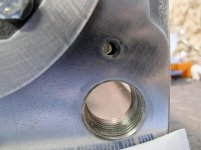
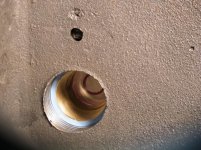
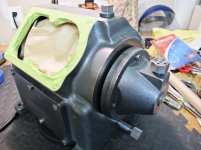
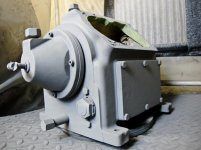
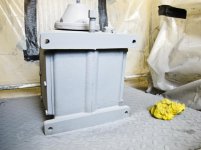
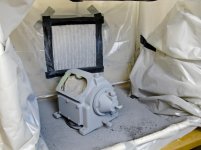
Tape up the gasket surfaces.

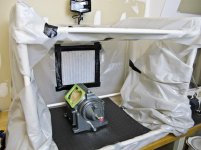
Are you planning on assembling and painting it in one shot, or painting each part individually then assembling?

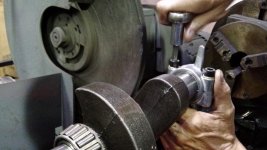
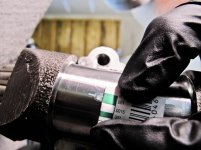
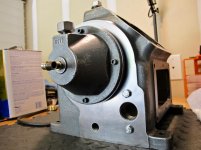
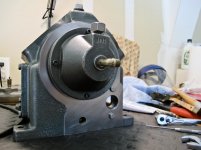
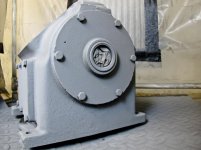
I will paint all the parts first then put them together. I may do a touch up overall paint when it is all together but too much of the pump is hidden when it is assembled to paint it properly. I think it will look better if I do one piece at a time. Since I have the new gaskets I will scan and print them and use the paper printout to cover up the gasket surface for painting.


Thanks for the link. Great idea!

Enjoyed reading your build! You do good work! I will "lurk" :)

Thanks for watching!

Hm.... I'm to lazy to build something just for tightening a belt from time to time. Every time I need to tighten a compressor belt I take a small jack (I have one I forgot to put back in my truck before i traded it in woops) I sit it between the motor and the pump and turn it with a screwdriver. once I am happy with how tight the belt is I tighten the motor and remove the jack. Takes all of 3 minutes maybe to get it out set the belt and put it back.

Would be cool if they all came with adjusters though, and for the price you would almost think more would....

Do you mean a regular scissor jack?

You could also get 4 sprockets and thread the inside to match your all thread, then extend the wood blocks so it'll touch the full length of the motor as well as the pump. Thread the sprockets onto the all thread like Zrexxer did with the nuts, then check to see if the wood blocks are parallel. Then install some bicycle chain onto the sprockets so that turning one will turn the other. Hook up a motor with two opposite rotation output shafts and stick a couple of sprockets on the end. Voila, electrical belt tensioner that will ensure the pulleys are perfectly collinear...

Or you could just stick with bolts and all thread.

I probably would need to see pictures.
 
To avoid these ads, REGISTER NOW!
OP
J

jonathan75

Well-known member
Joined
Mar 27, 2013
Messages
1,451
Location
NC
Red or orange normally denotes a higher temp compound.By the Schrader book the orange core is good for 300 degrees and 250PSI.Both much higher than standard tire core

Thanks for finding that out for me. I will use the new Orange one then.
 

mayday0017

Well-known member
Joined
Oct 20, 2010
Messages
1,715
Location
Houston Texas
Do you mean a regular scissor jack?
.

You can use a regular scissor jack too, but the one I happen to use is a cheap bottle jack. So long as it fits between the motor and the pump it works the same. If you do end up using a scissor jack, I use to cheat with them too and put the rod in my drill so it would become an electric jack :)
 

gayler

Well-known member
Joined
Sep 22, 2011
Messages
3,272
Location
Lakin Kansas
Just a quick update tonight. I got more parts in today and was going through and making sure I had everything and doing test fittings. But I was working in the garage so late that I don't have time to post all the pictures.

But I do want to ask a question and share a video I took. My bearing opening on the end of the rod is 1.540 with the new oversized bearings and the crankshaft is 1.543. Will this be a issue? It makes it a little tight.

<iframe width="560" height="315" src="http://www.youtube.com/embed/SdSRvZjM8DI" frameborder="0" allowfullscreen></iframe>

I think they turned your crank wrong. It should not be tight. You'll need to check specs on bearing clearance, but I would think it should have a clearance of .001-.0015 or so.
 
OP
J

jonathan75

Well-known member
Joined
Mar 27, 2013
Messages
1,451
Location
NC
You can use a regular scissor jack too, but the one I happen to use is a cheap bottle jack. So long as it fits between the motor and the pump it works the same. If you do end up using a scissor jack, I use to cheat with them too and put the rod in my drill so it would become an electric jack :)

I don't have a bottle jack so I will try the scissor from my trunk. Just hope it is long enough.

I think they turned your crank wrong. It should not be tight. You'll need to check specs on bearing clearance, but I would think it should have a clearance of .001-.0015 or so.

I think they did it right. I don't know why it is so tight. But I did tell them to do it to the high side of the spec but 20 under so that could be why I am too close. Never thought I would be too tight. But I found out from Air-Flo today that it should be .0015 min.

The blown rod may be out of round. It should fall over of it's own weight.

The machine shop checked that. It will also stand up on its own.
 
OP
J

jonathan75

Well-known member
Joined
Mar 27, 2013
Messages
1,451
Location
NC
So I found out today from Ken at Air-Flo that the bearing clearance should be .0015 to .0025. I stopped the guess work and picked up some Plastigage from Autozone. This time I used my two new rods and matched every rod up to its own position on the crankshaft. Every test I did torqued to spec shows that I am at .001 which is too tight. If I put the Plastigage at the center of the bearing it will be .001 but if I put it on one of the sides it shows .0015. But I think you should test at the center of the bearing. There was only one rod that came in at .0015 at the center of the bearing and that was the rod for the High Pressure right side piston.

What is the best way to fix this?
 

Attachments

  • IMG_7845-1.jpg
    IMG_7845-1.jpg
    67.8 KB · Views: 77
  • IMG_7817-1.jpg
    IMG_7817-1.jpg
    64.4 KB · Views: 82
  • IMG_7809-1.jpg
    IMG_7809-1.jpg
    71 KB · Views: 65
  • IMG_7805-1.jpg
    IMG_7805-1.jpg
    80.4 KB · Views: 80
Last edited:
OP
J

jonathan75

Well-known member
Joined
Mar 27, 2013
Messages
1,451
Location
NC
Here is a video of my latest test after using Plastigage.

<iframe width="560" height="315" src="http://www.youtube.com/embed/z6vooLww2TM" frameborder="0" allowfullscreen></iframe>
 

Blacklisted

Well-known member
Joined
May 8, 2012
Messages
64
Location
San Diego
So I found out today from Ken at Air-Flo that the bearing clearance should be .0015 to .0025. I stopped the guess work and picked up some Plastigage from Autozone. This time I used my two new rods and matched every rod up to its own position on the crankshaft. Every test I did torqued to spec shows that I am at .001 which is too tight. If I put the Plastigage at the center of the bearing it will be .001 but if I put it on one of the sides it shows .0015. But I think you should test at the center of the bearing. There was only one rod that came in at .0015 at the center of the bearing and that was the rod for the High Pressure right side piston.

What is the best way to fix this?

I think you need the machine shop take another .0005 off the crank, that would put you at the min on all but the one that was @.0015 that one would be .0020 and still in spec. Unless someone has a better idea, it's been forever that I have built an engine but I think that is the correct thing to do.
 
OP
J

jonathan75

Well-known member
Joined
Mar 27, 2013
Messages
1,451
Location
NC
I think you need the machine shop take another .0005 off the crank, that would put you at the min on all but the one that was @.0015 that one would be .0020 and still in spec. Unless someone has a better idea, it's been forever that I have built an engine but I think that is the correct thing to do.

I just got off the phone with the crank guy. He said they can polish it for me and get that .0005 off it. Hopefully I can find some time to bring it by today. They will do it while I wait! :) I really hope they will let me watch.
 
Last edited:
OP
J

jonathan75

Well-known member
Joined
Mar 27, 2013
Messages
1,451
Location
NC
Today was a busy day so I couldn't work on the compressor much. Finally after everything settled down my Son fell asleep in my arms so I was stuck until I could put him in bed.

But I did manage to drop off the crank at the machine shop since I had a work appointment near by. Because of the work appointment I couldn't stay but I did get a couple of pictures when I got back and he was testing. James said he polished the crank and showed me what he used. It was a belt that is turned by a motor and he held the crank by hand and turned it. :wtf:

I really hope he is good because that does not sound very accurate. The crank did not look as good as it did the first time I got it back and had the polish point marks on it this time. I know if I did it by hand the crank would probably end up looking like a egg or a square. But I guess I will find out tomorrow when I do the Plastigage test again. When I tested it at the shop by turning it did not feel much different then last night after oiled up but I have no idea what .0005 feels like.

Edit: Update, they made it look like an egg! I took it to another machine shop today and they said they screwed it up with their sloppy hand polishing holding it in the air. My crankshaft is not round at all!
 

Attachments

  • DSC_1706-1.jpg
    DSC_1706-1.jpg
    71.8 KB · Views: 189
  • DSC_1707-1.jpg
    DSC_1707-1.jpg
    73.3 KB · Views: 180
Last edited:

9GUY9

Well-known member
Joined
Oct 12, 2009
Messages
248
Location
Mankato, MN

CNGsaves

Well-known member
Joined
Sep 26, 2012
Messages
13,233
Location
KS and OK
Today was a busy day so I couldn't work on the compressor much. Finally after everything settled down my Son fell asleep in my arms so I was stuck until I could put him in bed.

But I did manage to drop off the crank at the machine shop since I had a work appointment near by. Because of the work appointment I couldn't stay but I did get a couple of pictures when I got back and he was testing. James said he polished the crank and showed me what he used. It was a belt that is turned by a motor and he held the crank by hand and turned it. :wtf:

I really hope he is good because that does not sound very accurate. The crank did not look as good as it did the first time I got it back and had the polish point marks on it this time. I know if I did it by hand the crank would probably end up looking like a egg or a square. But I guess I will find out tomorrow when I do the Plastigage test again. When I tested it at the shop by turning it did not feel much different then last night after oiled up but I have no idea what .0005 feels like.

Think you might be Over-Worried about the crank bearings . . . this is still an air compressor that will just chug along at low RPM. ;)

5 ten-thousandth's isn't much at all. Many moons ago helped my dad overhaul our Ford 9N tractor and same "tight bearing" problem happened on a couple races. My job was manually running some emory paper on those bearing races for several minutes and just kept the friction surface moving around in circular pattern - - ie the manual method of what your machine shop did to your air compressor crank !!

I'd venture to say your compressor will turn out just fine !!:thumbup:
 
OP
J

jonathan75

Well-known member
Joined
Mar 27, 2013
Messages
1,451
Location
NC
Think you might be Over-Worried about the crank bearings . . . this is still an air compressor that will just chug along at low RPM. ;)

5 ten-thousandth's isn't much at all. Many moons ago helped my dad overhaul our Ford 9N tractor and same "tight bearing" problem happened on a couple races. My job was manually running some emory paper on those bearing races for several minutes and just kept the friction surface moving around in circular pattern - - ie the manual method of what your machine shop did to your air compressor crank !!

I'd venture to say your compressor will turn out just fine !!:thumbup:

Thanks for the feedback, your probably right. But it was just like Clint Eastwood getting a straight razor shave from the man with shaky hands. It was just like that. Made me a little nervous. He kept dropping things too. It could of been just because I was around. Maybe when he works alone things were a little more smooth.
 
OP
J

jonathan75

Well-known member
Joined
Mar 27, 2013
Messages
1,451
Location
NC
Here is a short video I did this morning testing the rods on the Crankshaft.

<iframe width="560" height="315" src="http://www.youtube.com/embed/E8XImPSQbX8" frameborder="0" allowfullscreen></iframe>
 
To avoid these ads, REGISTER NOW!
OP
J

jonathan75

Well-known member
Joined
Mar 27, 2013
Messages
1,451
Location
NC
This morning I did the Plastigage test. The second bearing in tested fine but the rest are very close to between the marks of .001 and .0015. I think I will just run with it and see what happens.

After I saw how close it was to being right I tried to clean up the bearings again and smooth it out a little with some 0000 steel wool. It had no effect.
 

Attachments

  • IMG_7871-1.jpg
    IMG_7871-1.jpg
    83.1 KB · Views: 73
  • IMG_7870-1.jpg
    IMG_7870-1.jpg
    84.4 KB · Views: 66
  • IMG_7861-1.jpg
    IMG_7861-1.jpg
    87.2 KB · Views: 70
  • IMG_7860-1.jpg
    IMG_7860-1.jpg
    88 KB · Views: 78
  • IMG_7856-1.jpg
    IMG_7856-1.jpg
    74.1 KB · Views: 74
  • IMG_7852-1.jpg
    IMG_7852-1.jpg
    123.1 KB · Views: 66
OP
J

jonathan75

Well-known member
Joined
Mar 27, 2013
Messages
1,451
Location
NC
Check out this brass hammer I got on Amazon. It fits perfectly in the rod opening for the bearings. I got the brass hammer to work on the air compressor but this was a interesting surprise. It did help me seat the bearings being such a good fit.

TEKTON 3192 32-oz. Fiberglass Brass Hammer
http://amzn.com/B000NPUK66
 

Attachments

  • IMG_7883-1.jpg
    IMG_7883-1.jpg
    67.5 KB · Views: 57
  • IMG_7879-1.jpg
    IMG_7879-1.jpg
    105.9 KB · Views: 61
  • IMG_7877-1.jpg
    IMG_7877-1.jpg
    66.9 KB · Views: 62
  • IMG_7876-1.jpg
    IMG_7876-1.jpg
    92.1 KB · Views: 64
  • IMG_7875-1.jpg
    IMG_7875-1.jpg
    91.7 KB · Views: 63
  • IMG_7872-1.jpg
    IMG_7872-1.jpg
    81.4 KB · Views: 72
OP
J

jonathan75

Well-known member
Joined
Mar 27, 2013
Messages
1,451
Location
NC
I should be ready to start painting the pump in the morning. Everything I am putting back on the pump right now are without gaskets. It is just to cover up the gasket surface and paint the parts at the same time. The jugs are not ready yet so I will tape up the top first. After the paint drys I will take the parts back off. Tomorrow will be a primer coat and maybe do some final coats of the Saylor Beall Green as well.
 

Attachments

  • IMG_7902-1.jpg
    IMG_7902-1.jpg
    88.9 KB · Views: 33
  • IMG_7900-1.jpg
    IMG_7900-1.jpg
    65.1 KB · Views: 34
  • IMG_7895-1.jpg
    IMG_7895-1.jpg
    105.5 KB · Views: 41
  • IMG_7892-1.jpg
    IMG_7892-1.jpg
    63 KB · Views: 36
  • IMG_7891-1.jpg
    IMG_7891-1.jpg
    94.3 KB · Views: 40
  • IMG_7889-1.jpg
    IMG_7889-1.jpg
    149.3 KB · Views: 31
  • IMG_7888-1.jpg
    IMG_7888-1.jpg
    111.7 KB · Views: 34
OP
J

jonathan75

Well-known member
Joined
Mar 27, 2013
Messages
1,451
Location
NC
Here is a short video demonstrating why it takes me so long to rebuild my air compressor.

<iframe width="560" height="315" src="http://www.youtube.com/embed/LFCcCHYKeD8" frameborder="0" allowfullscreen></iframe>
 
OP
J

jonathan75

Well-known member
Joined
Mar 27, 2013
Messages
1,451
Location
NC
That's not too bad. If you were going to be real ****, you'd grind all the casting seams smooth too.

I thought about that but it would take away from its natural beauty and rugged good looks. Every casting seam is unique to each machine and is more or less a finger print.
 

EOC_Jason

Well-known member
Joined
Jun 25, 2012
Messages
11,388
Location
Bentonville, AR
What about polishing the crank with some 4000-8000 grit sandpaper? You can get that at your auto parts store. Cut into long strips and just go around it till it's a nice polish.

Let someone else say, "Yeah that's a good idea" or "NOOOOOO that will ruin it!" before attempting... I've never had to mess with a crank like that...

I do have a friend with a machine shop, and sometimes when the parts are just a smidge oversized they will chuck it in a lathe and get on it with various grades of sandpaper to take what material off they need then to give it that final polish.
 
OP
J

jonathan75

Well-known member
Joined
Mar 27, 2013
Messages
1,451
Location
NC
What about polishing the crank with some 4000-8000 grit sandpaper? You can get that at your auto parts store. Cut into long strips and just go around it till it's a nice polish.

Let someone else say, "Yeah that's a good idea" or "NOOOOOO that will ruin it!" before attempting... I've never had to mess with a crank like that...

I do have a friend with a machine shop, and sometimes when the parts are just a smidge oversized they will chuck it in a lathe and get on it with various grades of sandpaper to take what material off they need then to give it that final polish.

I am going to see what happens. It is very close to being right at spec. Maybe I will get some more feed back on it before final assembly.
 
OP
J

jonathan75

Well-known member
Joined
Mar 27, 2013
Messages
1,451
Location
NC
As you can see in the first picture the oil sight glass gasket I got won't work. The rebuild kit came with extra parts for every model of 707 with the changes they made but for some reason you don't get a correct oil sight glass gasket. So you either have to buy a new sight glass from Saylor Beall just to get the gasket or Home Depot may give you one off a drain pan kit. Home Depot also gave me the nut which worked out great because the replacement sight glass I got does not have a ring around it to support the gasket. So when you tighten it the gasket will crush in. I would rather have a nice round washer but it is hard to find local in such a big size and I really wanted to get started on painting. So keep in mind that the "complete kit" from Air-Flo it does not come with a oil sight glass gasket for all modern 707 pumps.

The new sight glass needed a little polish. Not all the extra glue would come off but some did. And to protect it during painting I used garage sale stickers.
 

Attachments

  • IMG_7952-1.jpg
    IMG_7952-1.jpg
    84 KB · Views: 64
  • IMG_7923-1.jpg
    IMG_7923-1.jpg
    69.9 KB · Views: 68
  • IMG_7914-1.jpg
    IMG_7914-1.jpg
    66.4 KB · Views: 67
  • IMG_7912-1.jpg
    IMG_7912-1.jpg
    87.7 KB · Views: 70
  • IMG_7909-1.jpg
    IMG_7909-1.jpg
    59.8 KB · Views: 69
  • IMG_7908-1.jpg
    IMG_7908-1.jpg
    61.2 KB · Views: 71
  • IMG_7725-1.jpg
    IMG_7725-1.jpg
    79.9 KB · Views: 79
OP
J

jonathan75

Well-known member
Joined
Mar 27, 2013
Messages
1,451
Location
NC
I started to use thread sealant and finalize some parts that go on the pump that will be painted. I heard good things about this Permatex one so that is what I used on the smaller connections.
 

Attachments

  • IMG_7946-1.jpg
    IMG_7946-1.jpg
    88 KB · Views: 54
  • IMG_7944-1.jpg
    IMG_7944-1.jpg
    83.8 KB · Views: 55
  • IMG_7939-1.jpg
    IMG_7939-1.jpg
    77.8 KB · Views: 53
  • IMG_7938-1.jpg
    IMG_7938-1.jpg
    83.9 KB · Views: 53
  • IMG_7934-1.jpg
    IMG_7934-1.jpg
    66.3 KB · Views: 51
  • IMG_7931-1.jpg
    IMG_7931-1.jpg
    70.6 KB · Views: 49
  • IMG_7928-1.jpg
    IMG_7928-1.jpg
    83.3 KB · Views: 58
OP
J

jonathan75

Well-known member
Joined
Mar 27, 2013
Messages
1,451
Location
NC
For the sight glass I used a thicker sealant from Home Depot. The guy in plumbing recommended it so I thought I would use it on the part with the most play. The hole is NPT but not tapered so you have to seal it well. It is called Rector-Seal Tru-Blu.
 

Attachments

  • IMG_7964-1.jpg
    IMG_7964-1.jpg
    138.8 KB · Views: 70
  • IMG_7959-1.jpg
    IMG_7959-1.jpg
    92.5 KB · Views: 72
  • IMG_7956-1.jpg
    IMG_7956-1.jpg
    76 KB · Views: 68
  • IMG_7955-1.jpg
    IMG_7955-1.jpg
    59 KB · Views: 61
  • IMG_7952-1.jpg
    IMG_7952-1.jpg
    84 KB · Views: 59
OP
J

jonathan75

Well-known member
Joined
Mar 27, 2013
Messages
1,451
Location
NC
I started to tape everything up and prep for painting. I pulled out my garage sale Lazy Susan that I got years ago. It will really help with painting to move this heavy pump around. This one is made in Italy so hopefully it can take the weight.

Here you can also see my home made paint booth. Just PVC pipe, Air Filters and 6 Mill plastic with a little duct tape.
 

Attachments

  • IMG_7979-1.jpg
    IMG_7979-1.jpg
    77.6 KB · Views: 117
  • IMG_7975-1.jpg
    IMG_7975-1.jpg
    93.6 KB · Views: 97
  • IMG_7973-1.jpg
    IMG_7973-1.jpg
    67.2 KB · Views: 87
  • IMG_7969-1.jpg
    IMG_7969-1.jpg
    91.5 KB · Views: 89
  • IMG_7968-1.jpg
    IMG_7968-1.jpg
    93 KB · Views: 92
  • IMG_7965-1.jpg
    IMG_7965-1.jpg
    115.9 KB · Views: 96
OP
J

jonathan75

Well-known member
Joined
Mar 27, 2013
Messages
1,451
Location
NC
The Self Etching Primer is on. It is some really weird stuff. When it comes out there are some strings like lint on it as well. At first I thought I did a really bad job of cleanup and missed a lot of fibers. But after I cleaned up and sprayed the second coat it happened again. It also drys very fast and is more like a powder then anything else. Very strange stuff.
 

Attachments

  • IMG_8005-1.jpg
    IMG_8005-1.jpg
    65.6 KB · Views: 68
  • IMG_8003-1.jpg
    IMG_8003-1.jpg
    71.6 KB · Views: 67
  • IMG_7999-1.jpg
    IMG_7999-1.jpg
    84.2 KB · Views: 66
  • IMG_7995-1.jpg
    IMG_7995-1.jpg
    70.2 KB · Views: 69
  • IMG_7991-1.jpg
    IMG_7991-1.jpg
    84.1 KB · Views: 68
  • IMG_7986-1.jpg
    IMG_7986-1.jpg
    49.7 KB · Views: 68
  • IMG_7981-1.jpg
    IMG_7981-1.jpg
    79.9 KB · Views: 68
OP
J

jonathan75

Well-known member
Joined
Mar 27, 2013
Messages
1,451
Location
NC
Last pictures for a few days. I can't work on the Air Compressor until Thursday night or Friday because of my work responsibilities.
 

Attachments

  • IMG_8006-1.jpg
    IMG_8006-1.jpg
    61.3 KB · Views: 60
  • IMG_8007-1.jpg
    IMG_8007-1.jpg
    73.1 KB · Views: 53
  • IMG_7990-1.jpg
    IMG_7990-1.jpg
    92.3 KB · Views: 72
Last edited:

porschedude996TT

Well-known member
Joined
Oct 28, 2007
Messages
2,384
Location
Santa Maria, California
This is how a crankshaft is finish ground on most IC engines.


What about polishing the crank with some 4000-8000 grit sandpaper? You can get that at your auto parts store. Cut into long strips and just go around it till it's a nice polish.

Let someone else say, "Yeah that's a good idea" or "NOOOOOO that will ruin it!" before attempting... I've never had to mess with a crank like that...

I do have a friend with a machine shop, and sometimes when the parts are just a smidge oversized they will chuck it in a lathe and get on it with various grades of sandpaper to take what material off they need then to give it that final polish.
 
To avoid these ads, REGISTER NOW!
Top Bottom