To avoid these ads, REGISTER NOW!

Saylor-Beall Rebuild

OP
J

jonathan75

Well-known member
Joined
Mar 27, 2013
Messages
1,451
Location
NC
Yeah, I know I sound a little over cautious. It comes from having a "Type A" personality & over 30 years of HVAC/Facilities Maintenance Management. You should have seen how much of a meticulous zealot I was when I was the crew chief for our race car. :eyecrazy:
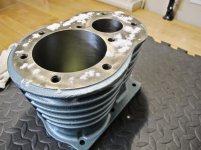
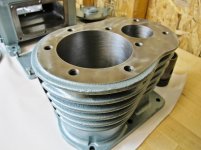
I'm completely on board with the idea of giving the compressor a second life. I absolutely love getting old things back into operating condition, even if I don't completely restore them. I just really like the way things were made back then. Heck, my lawn sprinkler is a 60's Craftsman tractor style traveling sprinkler I rescued from a garbage can at a swap meet. I use it all summer.
Also, I realize you aren't doing anything that is electrically unsafe, but just FYI, by code the breaker is not allowed to be used as a disconnect. There has to be a manually operated switch other than the breaker.

Tommy

I really thought you could. It does list it in the NEC and it is within line of sight and less then 50 feet.

The disconnecting means for the motor controller and/or the motor must be a [430.109(A)]:

A listed horsepower-rated motor-circuit switch.
A listed molded-case circuit breaker.
A listed molded-case switch.
Listed manual motor controllers marked “Suitable as Motor Disconnect.”
 
To avoid these ads, REGISTER NOW!
OP
J

jonathan75

Well-known member
Joined
Mar 27, 2013
Messages
1,451
Location
NC
I got a lot of cleanup done today. A scrap guy came this morning and hauled off probably 500 pounds of junk and I filled up seven contractor grade 42 gallon trash bags! So I am starting to get some more room back in the garage to work. A New year is around the corner and I want a fresh start!

In other news I found most of my missing sockets from my first Craftsman set from almost 20 years ago. Only missing one socket now.
 

EOC_Jason

Well-known member
Joined
Jun 25, 2012
Messages
11,388
Location
Bentonville, AR
I really thought you could. It does list it in the NEC and it is within line of sight and less then 50 feet.

The disconnecting means for the motor controller and/or the motor must be a [430.109(A)]:

A listed horsepower-rated motor-circuit switch.
A listed molded-case circuit breaker.
A listed molded-case switch.
Listed manual motor controllers marked “Suitable as Motor Disconnect.”

That's basically what I was told too... Either the circuit breaker must be accessible as specified, or else you have to put a disconnect by the device.

Sometimes it makes sense to put a disconnect next to a device anyhow if you don't always want it powered. I'm always leery about throwing a circuit breaker, I've seen what happens when they decide to explode.

My compressor plugs into I think a 30A socket directly below the breaker panel. I usually throw the lever on the pressure switch when I'm not using it. I've also seen people leave their compressors on and they have an air leak or a line bursts so the compressor decides to run constantly all night or weekend....
 
OP
J

jonathan75

Well-known member
Joined
Mar 27, 2013
Messages
1,451
Location
NC
I have been working hard on cleaning out the garage so I have more room to work. I cleaned out the storage shed too so I could move junk out of the garage. Making progress, since now I can actually walk in the garage and not hop!

I trashed A LOT of stuff that I collected over the years. Sentimentality went into the trash!
 

Attachments

  • DSC_2727-1.jpg
    DSC_2727-1.jpg
    98.2 KB · Views: 38
  • DSC_2756-1.jpg
    DSC_2756-1.jpg
    45.2 KB · Views: 46

madoc1

Well-known member
Joined
Dec 11, 2012
Messages
1,242
Location
spicewood, tx
I am loving this thread. also with the others, your crank is now round so it will be good to go. the pin holes are not a problem in my opinion. have rebuilt numerous sbc s and some cranks were not as good as yours!:D
 
OP
J

jonathan75

Well-known member
Joined
Mar 27, 2013
Messages
1,451
Location
NC
Am I the only one that is curious what is in all those trash bags? Anything good?

Actually there is a lot of good stuff in those bags. I just got tired of dealing with it and trashed everything I don't use. No more delays in trying to sell this or that or saying one day I may use it. The big stuff I gave to the scrap guy and the small stuff all went in the bags. I only can fit two bags a week in my trash can. Anyone can come to the side of my house and take it for free if they want.

That's all the 'evidence' in those bags!

It contains evidence that I collect too much junk. :)

I am loving this thread. also with the others, your crank is now round so it will be good to go. the pin holes are not a problem in my opinion. have rebuilt numerous sbc s and some cranks were not as good as yours!:D

I am working on cleaning the garage right now. I should be able to get started again soon. Thanks for the feedback on the crank. Tomorrow I will get started at 5am.
 
OP
J

jonathan75

Well-known member
Joined
Mar 27, 2013
Messages
1,451
Location
NC
Here are the results of my efforts today. A before and after of the floor cleaning. After everything dries I wil move my work benches back and start setting up all the Saylor Beall parts on the tables.
 

Attachments

  • IMG_2750-1.jpg
    IMG_2750-1.jpg
    72.9 KB · Views: 59
  • IMG_2745-1.jpg
    IMG_2745-1.jpg
    99.5 KB · Views: 57
  • IMG_2755-1.jpg
    IMG_2755-1.jpg
    66.1 KB · Views: 60
  • IMG_2719-1.jpg
    IMG_2719-1.jpg
    94.1 KB · Views: 59
  • IMG_2717-1.jpg
    IMG_2717-1.jpg
    129.1 KB · Views: 65
  • IMG_2711-1.jpg
    IMG_2711-1.jpg
    112.6 KB · Views: 72
Last edited:

Todd.Brock

Well-known member
Joined
Jul 15, 2008
Messages
4,250
Location
Cincinnati
I may have missed it or forgotten, but did you find a motor to power this beast? I remember it being a twin cylinder, so it will take a 10 or 7.5 at a min. ?
I was reading your wiring and breaker selection of 6/3 and 50 amps. That would lend itself to a 7.5 hp motor??
 
OP
J

jonathan75

Well-known member
Joined
Mar 27, 2013
Messages
1,451
Location
NC
I may have missed it or forgotten, but did you find a motor to power this beast? I remember it being a twin cylinder, so it will take a 10 or 7.5 at a min. ?
I was reading your wiring and breaker selection of 6/3 and 50 amps. That would lend itself to a 7.5 hp motor??

I have a 7.5 hp ready and waiting.
 

madoc1

Well-known member
Joined
Dec 11, 2012
Messages
1,242
Location
spicewood, tx
when you get that beast running, you might look into soda blasting vs. sand blasting. not much to cleanup since you can just wash it away. essentially baking soda.
 
OP
J

jonathan75

Well-known member
Joined
Mar 27, 2013
Messages
1,451
Location
NC
Flash Rust!

Help! I got flash rust. I cleaned my garage floor on half my garage and the humidity levels got really high, I forgot to remove the plastic bag covering my parts to protect from over spray and it rusted the hell out of my nice clean and painted parts. I did have a film of oil on all the parts but it only seemed to make it into a thick rust paste!

What do I do to fix this with out hurting the painted parts? Also my crankshaft is very bad and even when I tried to wipe some of the rust off it is very bumpy and not smooth anymore. :(

Right now I have the heater and fan on full blast trying to dry the garage out. It was up to almost 70% humidity at the highest point.
 

Attachments

  • DSC_2816-1.jpg
    DSC_2816-1.jpg
    89.1 KB · Views: 58
  • DSC_2815-1.jpg
    DSC_2815-1.jpg
    73 KB · Views: 72
  • DSC_2814-1.jpg
    DSC_2814-1.jpg
    74 KB · Views: 64
  • DSC_2813-1.jpg
    DSC_2813-1.jpg
    73.8 KB · Views: 64
  • DSC_2812-1.jpg
    DSC_2812-1.jpg
    83.7 KB · Views: 67
  • DSC_2811-1.jpg
    DSC_2811-1.jpg
    71.7 KB · Views: 50
Last edited:
OP
J

jonathan75

Well-known member
Joined
Mar 27, 2013
Messages
1,451
Location
NC
Before I went to bed I got it down to 43% humidity by using the heater and fan on full blast. This morning after having to turn it off all night it was back up to 52% but the heat is on again and drying everything out right now. I still don't know how to handle the rust on the crankshaft. Usually I would sand rust off but I don't know if that will take any material off the crank by doing that just to get the rust off or not? What is the best way to gently remove rust?
 

Gridleak

Member
Joined
Aug 29, 2011
Messages
7
Location
Georgia
Hi Jonathan! What about taping up the painted parts around the rust spots and use a dremel with a small wire brush to remove the rust? The tape will keep the rust residue off of the painted areas. As far as the crank, I cannot believe it is pitted in this short period of time. What about trying 0000 steel wool to buff it out. May take time but it beats altering the clearances on the journals.
 

EOC_Jason

Well-known member
Joined
Jun 25, 2012
Messages
11,388
Location
Bentonville, AR
I think evapo-rust is safe for paint? Maybe check into that.

Fine steel wool? Or like 2000 or 4000 grit sandpaper? Maybe use some apple cider vinegar, but that might mess up your paint.

For parts with no paint (like the crank), I would look into something you can soak it in overnight. The parts with paint will be kind of tricky and hopefully someone can chime in.
 

CNGsaves

Well-known member
Joined
Sep 26, 2012
Messages
13,233
Location
KS and OK
Fine steel wool sprayed with WD-40 for the bare steel. Wipe down when done, then lightly oil.

Need to clear out some space INSIDE the house to store all your pristine parts to compressor once you get them painted !!
 
To avoid these ads, REGISTER NOW!
OP
J

jonathan75

Well-known member
Joined
Mar 27, 2013
Messages
1,451
Location
NC
Thank you for all the tips. I ended up using white vinegar and some baking soda. The white vinegar really does a good job with rust! I also used some 2000 grit sandpaper, sponge, WD-40 and something called Rust Eater when I ran out of WD-40. Everything looks great again!

When I leave town I will have my wife run the heater a few hours a day to keep things dry.
 

Attachments

  • IMG_2994-1.jpg
    IMG_2994-1.jpg
    94.7 KB · Views: 42
  • IMG_2992-1.jpg
    IMG_2992-1.jpg
    69.2 KB · Views: 41
  • IMG_2991-1.jpg
    IMG_2991-1.jpg
    92.6 KB · Views: 47
  • IMG_2989-1.jpg
    IMG_2989-1.jpg
    85.3 KB · Views: 39
  • IMG_2988-1.jpg
    IMG_2988-1.jpg
    79.1 KB · Views: 45
  • IMG_2986-1.jpg
    IMG_2986-1.jpg
    79.3 KB · Views: 42
Last edited:
OP
J

jonathan75

Well-known member
Joined
Mar 27, 2013
Messages
1,451
Location
NC
Here are some after pictures.

I have the bench cleaned off and ready for parts now. The plastic table I was using couldn't take the weight and started too look like it was going to break soon.
 

Attachments

  • IMG_3007-1.jpg
    IMG_3007-1.jpg
    95.2 KB · Views: 40
  • IMG_3005-1.jpg
    IMG_3005-1.jpg
    109.8 KB · Views: 44
  • IMG_3004-1.jpg
    IMG_3004-1.jpg
    71.2 KB · Views: 36
  • IMG_3001-1.jpg
    IMG_3001-1.jpg
    97.5 KB · Views: 41
  • IMG_2998-1.jpg
    IMG_2998-1.jpg
    115.9 KB · Views: 39
  • IMG_2997-1.jpg
    IMG_2997-1.jpg
    91.3 KB · Views: 34
  • IMG_2995-1.jpg
    IMG_2995-1.jpg
    89 KB · Views: 43
OP
J

jonathan75

Well-known member
Joined
Mar 27, 2013
Messages
1,451
Location
NC
Some more before and after. I wanted to get the motor off the floor too. It is too exposed to moisture and dirt down there.
 

Attachments

  • IMG_3016-1.jpg
    IMG_3016-1.jpg
    146 KB · Views: 44
  • IMG_3015-1.jpg
    IMG_3015-1.jpg
    148.6 KB · Views: 42
  • IMG_3012-1.jpg
    IMG_3012-1.jpg
    82.1 KB · Views: 46
  • IMG_3010-1.jpg
    IMG_3010-1.jpg
    94.6 KB · Views: 29
  • IMG_3009-1.jpg
    IMG_3009-1.jpg
    81.2 KB · Views: 28
OP
J

jonathan75

Well-known member
Joined
Mar 27, 2013
Messages
1,451
Location
NC
Now the motor is off the floor and everything is safer with a nice coating of Rust Eater. I hope between the Rust Eater and having my wife run the heater when I am out of town will keep the rust away. I really need to get this finished so I won't need to worry about rust.

That bucket of chain is like a dog leash! I don't want to cut it so I just pull out what I need.
 

Attachments

  • IMG_3028-1.jpg
    IMG_3028-1.jpg
    105.1 KB · Views: 44
  • IMG_3026-1.jpg
    IMG_3026-1.jpg
    113.4 KB · Views: 56
  • IMG_3025-1.jpg
    IMG_3025-1.jpg
    125.7 KB · Views: 57
  • IMG_3023-1.jpg
    IMG_3023-1.jpg
    63.6 KB · Views: 54
  • IMG_3022-1.jpg
    IMG_3022-1.jpg
    70.8 KB · Views: 54
  • IMG_3020-1.jpg
    IMG_3020-1.jpg
    90.9 KB · Views: 50
  • IMG_3017-1.jpg
    IMG_3017-1.jpg
    113.8 KB · Views: 61
Last edited:

EOC_Jason

Well-known member
Joined
Jun 25, 2012
Messages
11,388
Location
Bentonville, AR
Where did you get that can of Rust Eater? I tried searching for it online and it seems to have disappeared.

Another thing you can do (or try as a comparison maybe with some pieces of scrap metal) is use a heavier oil to coat them like motor oil.
 
OP
J

jonathan75

Well-known member
Joined
Mar 27, 2013
Messages
1,451
Location
NC
Hi Jonathan! What about taping up the painted parts around the rust spots and use a dremel with a small wire brush to remove the rust? The tape will keep the rust residue off of the painted areas. As far as the crank, I cannot believe it is pitted in this short period of time. What about trying 0000 steel wool to buff it out. May take time but it beats altering the clearances on the journals.

I ended up using 2000 grit sandpaper on the crank. I figured being wet with oil and sanding at the same time it shouldn't really take anything off to alter the clearance. I would of used steel wool but I couldn't find it after cleaning my garage. But the pitting is not from the rust it is from when it was welded up and taken back down. Just some voids.

I think evapo-rust is safe for paint? Maybe check into that.

Fine steel wool? Or like 2000 or 4000 grit sandpaper? Maybe use some apple cider vinegar, but that might mess up your paint.

For parts with no paint (like the crank), I would look into something you can soak it in overnight. The parts with paint will be kind of tricky and hopefully someone can chime in.

I used 2000 grit and white vinegar. I was surprised how well the vinegar worked!

Fine steel wool sprayed with WD-40 for the bare steel. Wipe down when done, then lightly oil.

Need to clear out some space INSIDE the house to store all your pristine parts to compressor once you get them painted !!

My son would play with it and loose all the parts if I kept it in the house.

Or better yet, put that pump back together!!!

Yes, I really do need to finish it.

Where did you get that can of Rust Eater? I tried searching for it online and it seems to have disappeared.

Another thing you can do (or try as a comparison maybe with some pieces of scrap metal) is use a heavier oil to coat them like motor oil.

The Rust Eater was sold at Auto Zone I believe. I found it in my chemical closet. I don't belive it is sold any longer but no worries because I think it is the same as WD-40. No big loss.

The motor oil failed me so I just used Rust Eater or WD-40 on it this time.
 
OP
J

jonathan75

Well-known member
Joined
Mar 27, 2013
Messages
1,451
Location
NC
They didn't want the second motor back?

The one that UPS drop kicked and the shaft was sticking through the box? My neighbor saw the UPS driver drop it off the back of his truck too. The big boom sound it made startled him.

I think they just did a claim on it. It probably cost more to ship it back then the profit margin so it is not worth it.

The top cover is still cracked and broken but I guess I will use it for parts. Actually my "good one" is making a squeaking noise when I rotate the shaft. I wonder if when it is running full speed it won't be noticeable?

Does anyone know what kind of lube to use in those Zerk fittings on the front and rear of the motor? I wonder if I give it a few squeezes of lube if the squeaking would go away? I don't want to pull the back cover off the check it out because I never worked on a motor before and don't want all the guts on my lap. But the noise is coming from the back.
 
Last edited:
OP
J

jonathan75

Well-known member
Joined
Mar 27, 2013
Messages
1,451
Location
NC
Just found this post online (Look at bottom of post). This guy warns not to grease but I am not sure how to fix that noise if you don't. But I think he may of just went a little crazy with the lube.

I just found a grease guide from Exxon and they say to grease Baldor Motors. It is a great read! Save this PDF for future reference. Attached are a couple of pictures from it. But it looks like you need to remove a plug on the bottom and grease until it comes out. Might be better to do while running and put the plug back after the extra finishes coming out. If you have too much it will go everywhere inside the motor.

http://www.hollandindustrial.com/PDF Files/Guide to Electric Motor Lubrication Exxon.pdf

"I have a Bader with a 2HP Baldor. It has 2 grease fitting on top of the motor, 1 fore and 1 aft.

After I greased it 2-3 times the motor started acting weird, not stopping properly, etc.

I took it to my local Baldor repair shop. It cost me $60 for them to tell me the motor had sealed bearings and couldn't be greased and the grease I pumped in fouled some internal motor switches causing the problems.

I would first check with Baldor about your motor.

Al P."
 

Attachments

  • Baldor Grease.jpg
    Baldor Grease.jpg
    141.4 KB · Views: 38
  • Exxon Baldor Grease Guide.jpg
    Exxon Baldor Grease Guide.jpg
    80.2 KB · Views: 55
Last edited:
OP
J

jonathan75

Well-known member
Joined
Mar 27, 2013
Messages
1,451
Location
NC
Yesterday I went to Northern Tool since it is right next to the market my Wife wanted to go to. I needed to pick up some more WD-40 since I ran out after using the same can for 5 years.

While I was there I looked at the rust remover and found this stuff called "The Must for Rust". The employee didn't recommend it so I immediately purchased it. Don't ask, just something I discovered to do the exact opposite of what employees say.

Anyway, I get it home and it works great. The rust comes right off or you let it sit a while and it will covert it to black. Now that is the part I don't like. If you have something shinny that you want to keep shinny don't leave it on the item. Wipe it off and put something else on it. But for things you don't care about or will paint later on just keep it on after you clean it and let it dry on top and it will protect for 12 months they say. I sprayed some on my crank and the next thing I knew when I turned around it started to look like ****. I guess the stuff found some rust left to convert and it will stain the metal. It might polish out but I don't know. Just if you want to keep something shinny and nice looking I don't recommend this stuff but if it is something you will paint later on or don't care about just spray away.

This works great!

http://www.krudkutter.com/index.php?option=com_products&task=product&pid=17&Itemid=65

http://amzn.com/B000F6UHDY

or 9.99 at Northern Tool
 

Attachments

  • DSC_2833-1.jpg
    DSC_2833-1.jpg
    52.3 KB · Views: 29
Last edited:
OP
J

jonathan75

Well-known member
Joined
Mar 27, 2013
Messages
1,451
Location
NC
I fixed the noise from my new motor. Here is a before and after so you can hear it.

<iframe width="560" height="315" src="//www.youtube.com/embed/TzyRoBZStP0" frameborder="0" allowfullscreen></iframe>
 
OP
J

jonathan75

Well-known member
Joined
Mar 27, 2013
Messages
1,451
Location
NC
Here are some pictures to help anyone else they may have this problem. Just remove the four bolts that holds on the back plate.

Gently tap on the cover with a soft blow hammer.

Pull back the rear cover.

Disconnect the wires from switch making note of location.
 

Attachments

  • IMG_3040-1.jpg
    IMG_3040-1.jpg
    113.8 KB · Views: 93
  • IMG_3039-1.jpg
    IMG_3039-1.jpg
    67.1 KB · Views: 73
  • IMG_3037-1.jpg
    IMG_3037-1.jpg
    62 KB · Views: 81
  • IMG_3035-1.jpg
    IMG_3035-1.jpg
    96.1 KB · Views: 61
  • IMG_3034-1.jpg
    IMG_3034-1.jpg
    88.3 KB · Views: 62
OP
J

jonathan75

Well-known member
Joined
Mar 27, 2013
Messages
1,451
Location
NC
Rub some grease found inside on the outer edge of the disk that activates the switch and put a little grease on the nubs that touch the disk.

Put back together making sure the wavy washer stays in place.

Note that I also spread the grease on the face of the bearing a little bit and put just a thin film on the outside of the bearing where it rusted. That part does not move but I put some lube just to stop the rust and to ease assembly.

The switch disk would pull back from the switch after it got up to speed and the noise would of gone away during operation. But on start up and shutdown it would of been irritating so I that is why I fixed it.
 

Attachments

  • IMG_3041-1.jpg
    IMG_3041-1.jpg
    98.6 KB · Views: 55
  • IMG_3042-1.jpg
    IMG_3042-1.jpg
    128.6 KB · Views: 56
  • IMG_3043-1.jpg
    IMG_3043-1.jpg
    90.3 KB · Views: 57
  • IMG_3049-1.jpg
    IMG_3049-1.jpg
    103.3 KB · Views: 50
  • IMG_3050-1.jpg
    IMG_3050-1.jpg
    92.5 KB · Views: 57
Last edited:
OP
J

jonathan75

Well-known member
Joined
Mar 27, 2013
Messages
1,451
Location
NC
Here is a video showing how the switch works.

<iframe width="420" height="315" src="//www.youtube.com/embed/39nflq5XbBA" frameborder="0" allowfullscreen></iframe>
 
OP
J

jonathan75

Well-known member
Joined
Mar 27, 2013
Messages
1,451
Location
NC
The manufacturer of the switch that was making the noise in my Baldor motor got back to me. Looks like they have seen this noise issue before but only after it was running a while. From what they said a little lube fixes it and that is okay to do.

Dear Jonathan,

I have heard of this with another motor manufacturer. This application was a bit different, but the squeak began to happen after the motor has been tested for many cycles. Their solution was to add a lubricant to the surface of the disk. The squeak is not normal, but the lube has been used as an effective solution.

Thank you,
Torq Corporation
 
OP
J

jonathan75

Well-known member
Joined
Mar 27, 2013
Messages
1,451
Location
NC
Just for everyone's information....the blue grease is Mobil Polyrex EM.It is specifically made for electric motors and is oem for Baldor motors.I got it for my Baldor rebuild from Zoro http://www.zorotools.com/g/00018898/k-G2179353/ It is very good grease for this application and not expensive.

Thank you for the link. I saw this grease mentioned in the above lube guide I posted before in the PDF link. I was not sure where to buy it. But I don't think I will need any for a while. It looks like it is very easy to over grease and mess up that switch inside. Also I found no removable plug on the bottom of my motor. It just has a hole for the grease to leak out of.

^Is that grease available locally?

I wonder if you can purchase the grease from the nearest Authorized Baldor Motor repair facility? I found one near my house. They were very helpful over the phone. They told me if I ever brought my motor in for repair I would just get a new one. Baldor won't pay them to work on such a small motor and they would just scrap it.
 
OP
J

jonathan75

Well-known member
Joined
Mar 27, 2013
Messages
1,451
Location
NC
I sent Torq my pictures and video link. They said I used more grease then usual on the switch. They said just to be careful because if it gets on the contacts it will cause trouble.


"Dear Jonathan,

Thank you for the pictures and the video. The nubs (buttons) have a curved surface to them, but they do have a recess at the point of the rivet creating an edge at the center. A resulting score on the spool is normal. The wear will settle in. The amount of lubricant is a bit more than I have seen in the past, but still good. You may have to be careful to make sure the lubricant does not get "flung" between the contacts of the stationary switch for the first few starts.

Thank you,
Torq"
 
To avoid these ads, REGISTER NOW!
Top Bottom