To avoid these ads, REGISTER NOW!

School me on hammer handles

1930

Well-known member
Joined
May 18, 2011
Messages
2,808
Location
Florida
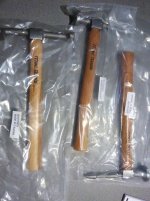
The top two macks are old but have not seen a ton of use, I bought them new, not sure why they broke, I dont abuse my tools. Sure I smacked handle a few times but never repeatedly.

I wonder if Mack will warranty them ( assuming I could find a jobber )

Bottom is a plomb I believe, I know NOTHING about hammer handle replacement....where to find a good one, what sizes I need to consider, proper installation procedures.

I have others Id like to NOT throw out so any help with this would be appreciated.
 

Attachments

  • Picture 050.jpg
    Picture 050.jpg
    150.6 KB · Views: 211
To avoid these ads, REGISTER NOW!

woody 73

Well-known member
Joined
Apr 14, 2009
Messages
11,546
Location
The Great State Up North
Good news for you (unless they changed the rules on me), Mac should (key word) have replacement handles and Proto should also have replacement handles for your plomb.

Do a google search for both their phone #'s and give them a call today, hope that helps you out.
 
OP
1

1930

Well-known member
Joined
May 18, 2011
Messages
2,808
Location
Florida
Cant beat that, called Mac and they told me they replace the handles free of charge regardless of abuse, I only pay the shipping there!
 

rick carpenter

Well-known member
Joined
Jan 20, 2011
Messages
3,786
Location
Huntsville, East Texas
If you cain't get warranty handles, make a note of the lengths you want and go to as close to an old-timey hdwr store you can find, like an Ace or a True Value that has their stuff piled one on top of the other. They're more likely to have replacement handles than a too organized big box store. Bring the heads with you so you can match the size correctly. I would clean the heads leaving as much original finish as possible and wax them rather than restore to like new.

I like to find handles with the tongue just a little thicker than the hole. Start by shaving down the tongue but with a taper til it fits into the head but say 1/8" short. Then put the head on "kinda" tight and at the right attitude. You should see the taper coming out the bottom of the head. Then scribe a line 1/8+" to the shape of the bottom of the head, pull the head off, then cut the shoulder where the taper was. As far as how thick to make the tongue, you'll have to consider the wedges you're going to use and size the tongue accordingly. Always sneak up to the right size. You'll want the wedgeless tongue to fit "kinda" snug to the head at the shoulder, again though, depending on the wedges. Strip off the factory finish and put your own on if you want. I use a little bit of stain and then a couple of coats of boiled linseed oil making sure to thin a little bit of BLO separately and drip it on the tip of the tongue and the wedges. Assemble but don't hammer the wedges in all the way. Let the handle dry/adjust to the BLO for maybe a week then finish driving in the wedges. (If you have to take it to the grinder and grind off a little of any protruding tongue or wedges then no big deal just don't scar up the head.) Then drip some more thinned BLO down the tongue. Let dry. Fondle proudly. Use. Add more BLO a few months later and be sure to specify who it goes to in your will.

EDITED: "heads" now instead of "handles" in first paragraph.
 
Last edited:
OP
1

1930

Well-known member
Joined
May 18, 2011
Messages
2,808
Location
Florida
If you cain't get warranty handles, make a note of the lengths you want and go to as close to an old-timey hdwr store you can find, like an Ace or a True Value that has their stuff piled one on top of the other. They're more likely to have replacement handles than a too organized big box store. Bring the heads with you so you can match the size correctly. I would clean the handles leaving as much original finish as possible and wax them rather than restore to like new.

I like to find handles with the tongue just a little thicker than the hole. Start by shaving down the tongue but with a taper til it fits into the head but say 1/8" short. Then put the head on "kinda" tight and at the right attitude. You should see the taper coming out the bottom of the head. Then scribe a line 1/8+" to the shape of the bottom of the head, pull the head off, then cut the shoulder where the taper was. As far as how thick to make the tongue, you'll have to consider the wedges you're going to use and size the tongue accordingly. Always sneak up to the right size. You'll want the wedgeless tongue to fit "kinda" snug to the head at the shoulder, again though, depending on the wedges. Strip off the factory finish and put your own on if you want. I use a little bit of stain and then a couple of coats of boiled linseed oil making sure to thin a little bit of BLO separately and drip it on the tip of the tongue and the wedges. Assemble but don't hammer the wedges in all the way. Let the handle dry/adjust to the BLO for maybe a week then finish driving in the wedges. (If you have to take it to the grinder and grind off a little of any protruding tongue or wedges then no big deal just don't scar up the head.) Then drip some more thinned BLO down the tongue. Let dry. Fondle proudly. Use. Add more BLO a few months later and be sure to specify who it goes to in your will.
Thanks for taking the time to make this post, detailed and direct, appreciated.
 
To avoid these ads, REGISTER NOW!

georgiadave

Well-known member
Joined
Dec 13, 2007
Messages
425
Location
Marietta, Georgia
You have gotten some good advice in the prior posts. I will add; try to get handles with grain that is parallel to the direction of strike. Like a wooden baseball bat. Try to avoid twisted grain. Sometimes a handle is not fully seasoned, especially if you buy directly from a handle supplier. If you can let the handle season for a few months, it surely won't shrink after being hung on the head.
 
OP
1

1930

Well-known member
Joined
May 18, 2011
Messages
2,808
Location
Florida
Thanks guys, Dave the grain comment was something I had heard from the past as well, thanks for bringing that up.
 

theoldwizard1

Well-known member
Joined
Feb 22, 2011
Messages
43,246
Location
SE MI
The Video by Mr. Hardware is right on !

One other little thing I like to do is mix up a little bit of epoxy and let it run into and gaps between the head and the handle from the top. This epoxy will NOT glue the head to the handle ! It will just take up the space between the 2 so that the head will not move when you strike something.

If you have a big gap, start over with a bigger handle and whittle it down to make a snug fit.
 
OP
1

1930

Well-known member
Joined
May 18, 2011
Messages
2,808
Location
Florida
Found one other Mac hammer that needed a handle that isnt pictured above, sent them off minus the handles themselves to save on shipping and this is what I received back from Mac.

Mixed feelings on this for prob. obvious reasons, ( triple click on image to enlarge ) Im sure the metal in these heads isnt near the quality of the old hammer heads I sent and Im uncertain the handles are what we might consider here in the states as a quality hardwood.

Also did not send off two identical hammer heads, apparently one of the style heads was discontinued and so they just sent me two of whatever they had in stock.

Havent quite figured out if I should be grateful for this surprise or pissed! Im leaning toward pissed off though since this isnt what they ( customer service representative ) told me would be done and I dont like people making decisions for me when it comes to how MY property is handled!!

Any guesses on what the handles might be formed from?
 

Attachments

  • Picture.jpg
    Picture.jpg
    144.2 KB · Views: 64
Last edited:

tube_guy

Well-known member
Joined
Jan 21, 2009
Messages
749
Yeah, as soon as I read that Mac was going to replace the handles, I thought this is what they would end up doing. Pretty unlikely that Stanley is going to have a person here in the US replacing hammer handles. If it were me, I wouldn't be too happy, but I'm sure some people might be delighted with some brand new hammers after sending them old used tools.
 
OP
1

1930

Well-known member
Joined
May 18, 2011
Messages
2,808
Location
Florida
Took them out of the bag this A.M and right away I got the feeling of a poorly designed hammer, no ergonomics to the handle, poor balance and the wood finish reminds me of something I might expect from Harbor freight.

Whats done is done though, Im over it.

Stuck them in my drawer and will let the estate sale make a few bucks when Im gone.
 

Roberts210

Well-known member
Joined
Dec 21, 2015
Messages
3,177
Location
Missouri
I've made my own handles for many years. Flame hardened Hickory makes the very strongest handles--you'll find it hard to break one. Most handles I've seen for sale are, if American, made from oak, which is not a great choice for a handle. The handles coming out of the Far East are gin-u-wine ****. Making a hammer handle from a piece of Hickory and flame hardening it takes some time, but the results are well worth it. Some Amish places sell these handles--the Amish are no fools when it comes to good tools.
 

rick carpenter

Well-known member
Joined
Jan 20, 2011
Messages
3,786
Location
Huntsville, East Texas
Edited from my earlier reply in December (#10) to reflect better hafting methods...

If you cain't get warranty handles, make a note of the lengths you want and go to as close to an old-timey hdwr store you can find, like an Ace or a True Value that has their stuff piled one on top of the other. They're more likely to have replacement handles than a too organized big box store. Bring the heads with you so you can match the size and tongues correctly. I would clean the heads leaving as much original finish as possible and wax them rather than restore to like new.

I like to find handles with the tongue just a little thicker than the hole. As you're test fitting, make sure the head goes on the handle the same way each time. Start by shaving down the tongue but with a taper at the shoulder til it fits into the head but say 1/4" short. You should see the taper coming out the bottom of the head. You'll want the tongue extending out of the head on top by 1/4" or more when done. [Don't bother with my earlier suggestion on scribing a line and cutting a step into the shoulder. It's not necessary.] As far as how tight to make the tongue at this point, you'll have to consider the wedges you're going to use and size the tongue accordingly. Always sneak up to the right size. You'll want the wedgeless tongue to fit "fairly" snug to the head at the shoulder before it's finally seated, again though, depending on the wedges.

Strip/sand off the factory finish and put your own on. I use a little bit of stain and then a couple of coats of boiled linseed oil. Dunk the tongue into an open container of BLO along with the wedge for a day or so. Assemble by putting the head on as far as you can by hand, hold it upside down, and firmly pound the end of the handle with a mallet which drives the handle tightly into the head. Put the wooden wedge in but don't hammer it in all the way. Let the handle dry/adjust to the BLO for maybe a week then finish driving in the wedge. Cut the protruding tongue so that it extends maybe 1/8+" on top and add a metal wedge if you use one.

Fill a metal jar lid to nearly the top with BLO and situate the hammer upside down so that the protruding tongue sits in the oil. Let it soak for several days, making sure to drip a bunch of oil into the eye from the shoulder as often as you think about it. Let dry. Fondle proudly. Use. Add more BLO to the handle a few days later then every so often. Be sure to specify who it goes to in your will.
 
To avoid these ads, REGISTER NOW!
Top Bottom