To avoid these ads, REGISTER NOW!

Sears Craftsman/Beach Toolbox Restore

freebo86

Well-known member
Joined
Jun 19, 2015
Messages
362
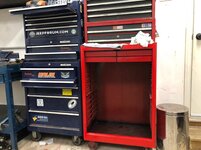
So I picked up this set of toolboxes up last week on the local classifieds for a real good price. May have been a spontaneous purchase as now I will need to readjust my layout in my garage to make this all fit . But I already figured out a plan however more on that later.

attachment.php


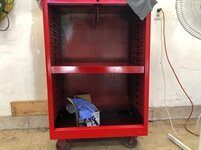
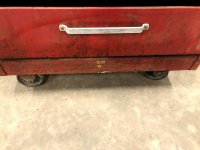
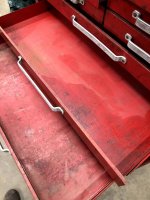
The bottom box is a Beach ( I am in Canada) which was made by Beach Industries back in the day in Ontario. The unit shows its age, the metal is still good, not many dings. The main front piece that folds and closes the entire box has a dent. But all other drawers do not have any dents and slide somewhat smoothly, with the exception of one slide which is bent. The drawers use traditional slides.

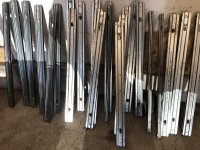
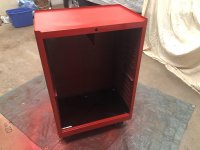
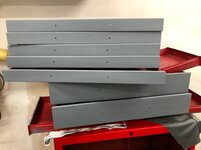
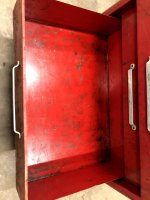
I don't intend to a full repaint of everything but what I want to do is paint 3 and top side of the cabinet and front faces of the drawers. I drilled out the handle rivets to pull those off also.
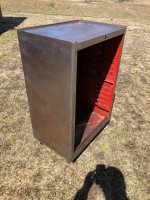
Bottom unit.
attachment.php


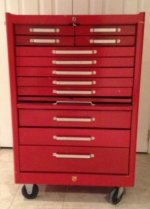
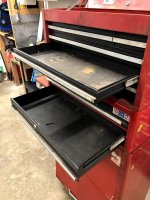
The two top units are Sears Craftsman boxes which appear to be from the same area. They have some stickers etc. on them.

attachment.php

attachment.php
 

Attachments

  • IMG_2359.jpg
    IMG_2359.jpg
    114 KB · Views: 90
  • IMG_2337.jpg
    IMG_2337.jpg
    156.4 KB · Views: 1,080
  • IMG_2338.jpg
    IMG_2338.jpg
    139.1 KB · Views: 1,073
  • IMG_2348.jpg
    IMG_2348.jpg
    110 KB · Views: 1,094
  • IMG_2349.jpg
    IMG_2349.jpg
    107.7 KB · Views: 72
  • IMG_2350.jpg
    IMG_2350.jpg
    98.4 KB · Views: 1,078
  • IMG_2354.jpg
    IMG_2354.jpg
    92.2 KB · Views: 75
To avoid these ads, REGISTER NOW!
OP
F

freebo86

Well-known member
Joined
Jun 19, 2015
Messages
362
My plan of of attack is to tackle the large cabinet first. I've pulled all the drawers out, hit the drawers with degreaser and washed them off. They look a bit better, there is no major rust on any of the drawers and they are all sturdy except the one that has some rust in the tray area.

The large cabinet I sprayed with degreaser, plan tomorrow is to wash and then run a wire wheel over the cabinet and get any paint and rust of it. Then wash off again and clean with acetone in order to prep for primer.

Any recommendations on which red color? The Rustoleum Sunrise Red seems to be a recommendation around here, however looking online it doesn't appear to be a color I can get my hands on in Canada.

attachment.php

attachment.php


This is the bottom of the large cabinet, going to get this cleaned up and apply some rust converter on.
attachment.php


attachment.php
 

Attachments

  • IMG_2383.jpg
    IMG_2383.jpg
    121.3 KB · Views: 1,021
  • IMG_2374.jpg
    IMG_2374.jpg
    57.6 KB · Views: 1,011
  • IMG_2373.jpg
    IMG_2373.jpg
    69.7 KB · Views: 1,026
  • IMG_2372.jpg
    IMG_2372.jpg
    89.2 KB · Views: 1,027
  • IMG_2363.jpg
    IMG_2363.jpg
    137.2 KB · Views: 45
  • IMG_2362.jpg
    IMG_2362.jpg
    74.6 KB · Views: 47
  • IMG_2361.jpg
    IMG_2361.jpg
    94.1 KB · Views: 45

M635_Guy

Well-known member
Joined
Dec 5, 2019
Messages
4,334
Location
NC
Ah - so it doesn't matter that your name (probably) isn't Daryl... ;)

Are you going to do any bondo work to it?

Looking forward to progress pix!
 
OP
F

freebo86

Well-known member
Joined
Jun 19, 2015
Messages
362
Ah - so it doesn't matter that your name (probably) isn't Daryl... ;)

Are you going to do any bondo work to it?

Looking forward to progress pix!


Hehe, no my name is not Daryl. Am I missing something, lol? Or you just saying due to the name on the box?

I wasn’t planning on doing bondo work. For a couple of reasons, time and money. Not sure if it actually needed and if it would be worth it? The holes you see in the side of the cabinet are for the tray that came with it which I removed for the time being.


Sent from my iPhone using The Garage Journal mobile app
 

Alex in Canada

Well-known member
Joined
Oct 18, 2013
Messages
135
Location
Ottawa, Ontario, Canada
That's a nice set you got there! Where in Canada are you located? I've always wanted a large Beach roller like that. Probably will buy one, one day.

What did you pay, if you don't mind me asking?
 
OP
F

freebo86

Well-known member
Joined
Jun 19, 2015
Messages
362
That's a nice set you got there! Where in Canada are you located? I've always wanted a large Beach roller like that. Probably will buy one, one day.

What did you pay, if you don't mind me asking?

Thanks! I actually seen your thread as I was doing some research on how to restore these things, your's turned our amazing! You went the whole nine yards and even used a HVLP gun to paint yours!

I paid $150 for the entire set. Originally it was the large cabinet and the top section, the guy wanted $200 but lowered it to $150. Once I got there he threw in that middle (2 drawer) section in for free basically. I did have to make an hour drive to pick these up but gas is cheap now :p I'm down in Atlantic Canada.

Made some progress yesterday. Cleaned up the entire cabinet inside and out, stripped the pain and applied a coat of Primer on it, still drying in the pictures. Originally I though the bottom piece was rusted of the cabinet turned out it was just caked on dirt/mud. Cleaned out the sliders inside the cabinet as well.

I started cleaning the sliders last evening and even after letting them soak for over 2 days in water with soap they were still sticky and grimy. Pulled out the Paint Thinner last night and within minutes noticed that it was working much better. So hopefully should have those cleaned up this evening.

Next order of business is pulling all the door handles by drilling the rivets out and stripping the paint of the front faces of the drawers. Also, the little handles have a lot of grime within the groves so should be fun cleaning those.

attachment.php

attachment.php


attachment.php

attachment.php
 

Attachments

  • IMG-2413.jpg
    IMG-2413.jpg
    149.2 KB · Views: 856
  • IMG-2412.jpg
    IMG-2412.jpg
    147.4 KB · Views: 863
  • IMG-2415.jpg
    IMG-2415.jpg
    94.5 KB · Views: 852
  • IMG-2416.jpg
    IMG-2416.jpg
    133 KB · Views: 858

lilredex

Well-known member
Joined
Apr 29, 2006
Messages
5,956
Location
Toronto
Looks good, and that is a fair deal at $150. Those could be all Beach pieces judging from that handle under that Autolite sign. To find a step up box deeper than 12" is rare.

The side holes are for handles and the fold up tray, you have. The handles looked the same as the front ones.

Sunrise Red is still around, but you have to really look. My last two tins came from Walmart in Watertown N.Y. last time there.

You going to make that missing drawer?
 

Attachments

  • Beach - Export 1B - B87.jpg
    Beach - Export 1B - B87.jpg
    99.1 KB · Views: 102
  • Beach Heavy Duty Boxes.jpg
    Beach Heavy Duty Boxes.jpg
    109.7 KB · Views: 107
  • Beach B89.jpg
    Beach B89.jpg
    78.5 KB · Views: 101
OP
F

freebo86

Well-known member
Joined
Jun 19, 2015
Messages
362
Looks good, and that is a fair deal at $150. Those could be all Beach pieces judging from that handle under that Autolite sign. To find a step up box deeper than 12" is rare.

The side holes are for handles and the fold up tray, you have. The handles looked the same as the front ones.

Sunrise Red is still around, but you have to really look. My last two tins came from Walmart in Watertown N.Y. last time there.

You going to make that missing drawer?

Sharp looking box! I actually picked up Rustoleum Apple Red from the Store yesterday, due to the situation I'm trying to minimize travelling around stores lol but need this project wrapped up.

The missing drawer is not actually missing, it's the one that was jammed shut and the slider quite a bit bent. I managed to get it out prior to taking that picture. It is in fact a complete unit. Guess its a B89 unit by your picutres. Would be nice to get my hands on the Beach emblem as its completely gone from the unit.

How did you redo those handles? I noticed the rivets are not traditional rivets, but some call them Tubular Rivets?
 
Last edited:

lilredex

Well-known member
Joined
Apr 29, 2006
Messages
5,956
Location
Toronto
They are tubular rivets, and I've never removed any, just worked around them when necessary.
 

alinc100

Well-known member
Joined
May 26, 2013
Messages
3,027
Location
Dearborn,MI
Read this thread yesterday and last night while binge watching Schitts Creek I spied these 2 Beach toolboxes . There is one to Eugene Levy's right in this pic and one on the backwall behind the desk as the scene evolves.I only know of one other garage with 2 of these puppies. (hint:it's my garage) . You folks in Canada have got it so good. I'm just lucky to be 15 miles from the Detroit/Windsor crossing.
Schitt22e.jpg
 
Last edited:

lilredex

Well-known member
Joined
Apr 29, 2006
Messages
5,956
Location
Toronto
Easy if you use Windows Live Photo Gallery. Open picture from your computer file and Edit, organize or share is on upper left corner and that allows you to add or remove sunshine or just remove shadows, etc......great tool that is part of windows.
 
OP
F

freebo86

Well-known member
Joined
Jun 19, 2015
Messages
362
Little more progress, didn't get out yesterday to put some red on the cabinet as its just too windy. And my garage is such a mess at the moment and I wouldn't dare get overspray on my Jeep. There is a couple of coats of paint drying on the cabinet as we speak.

In the meantime I used the time to clean the sliders and handles. The paint thinner did an amazing job. Simply and very effective.

attachment.php


attachment.php


attachment.php


attachment.php
 

Attachments

  • IMG-2503.jpg
    IMG-2503.jpg
    154.8 KB · Views: 785
  • IMG-2502.jpg
    IMG-2502.jpg
    156.6 KB · Views: 780
  • IMG-2505.jpg
    IMG-2505.jpg
    150.8 KB · Views: 786
  • IMG-2504.jpg
    IMG-2504.jpg
    74.4 KB · Views: 779
OP
F

freebo86

Well-known member
Joined
Jun 19, 2015
Messages
362
The weather is nice, however way too windy outside these days. Decided to just move things inside and cover up and put on my mask and go to town. The cabinet is finished basically took 2.5 cans. Way more than I had anticipated. It's looking pretty nice, a few dings but those are in areas that are not too noticeable once the cabinet is in place. Plus, adds some battle scars to tell its history :)

Question, going forward with still a quite a few items left to be painted. Would you guys recommend I switch over to buying the rustoleum in a quart and then reducing with acetone/mineral spirits? Reason I ask is for cost savings at the rate I'm going I see that I will need a fair bit more cans to finish this project off.

I do have a compressor (25gal) with a gun, I know the compressor size is maybe not ideal and I wouldn't try painting a car with it but for what I am doing could it suffice? Would it be more cost effective to go this route? I'm assuming I could get the Rustoleum paint matched?
 

Attachments

  • IMG-2510.jpg
    IMG-2510.jpg
    62.8 KB · Views: 89
  • IMG-2511.jpg
    IMG-2511.jpg
    135 KB · Views: 94
  • IMG-2512.jpg
    IMG-2512.jpg
    121.8 KB · Views: 95
Last edited:

LNKMK8

Well-known member
Joined
Feb 6, 2013
Messages
1,191
Location
Overland Park, KS
Paint looks great! That Craftsman middle box is an amazing find! I'd love to come across one for my 1979 stack. Not sure I have seen a 2 drawer middle from that time period before.
 
To avoid these ads, REGISTER NOW!

Alex in Canada

Well-known member
Joined
Oct 18, 2013
Messages
135
Location
Ottawa, Ontario, Canada
Thanks! I actually seen your thread as I was doing some research on how to restore these things, your's turned our amazing! You went the whole nine yards and even used a HVLP gun to paint yours!

I paid $150 for the entire set. Originally it was the large cabinet and the top section, the guy wanted $200 but lowered it to $150. Once I got there he threw in that middle (2 drawer) section in for free basically. I did have to make an hour drive to pick these up but gas is cheap now :p I'm down in Atlantic Canada.

$150 for those is a pretty good deal, congrats! And thank you, it was a lot of work but turned out real nice and still looks great.

You're doing a great job restoring yours and I'm excited to see the end product!
 

The Cobbler

Super Moderator
Staff member
Joined
Oct 24, 2013
Messages
25,884
Location
Niagara Region, Ontario, Canada
The weather is nice, however way too windy outside these days. Decided t....
I do have a compressor (25gal) with a gun, I know the compressor size is maybe not ideal an.....
your compressor would be fine for that project . I use a spray gun a lot for painting. you can get better coverage, wider fan and better results on bigger stuff like that.
 
OP
F

freebo86

Well-known member
Joined
Jun 19, 2015
Messages
362
your compressor would be fine for that project . I use a spray gun a lot for painting. you can get better coverage, wider fan and better results on bigger stuff like that.


Thanks! So I primed the doors and they turned out good. Next I grabbed my gun to get it setup, well this gun has been sitting forever needless say it’s busted. It was an old gun and after looking at it closer I believe it was a LVLP.

Went out and grabbed a new HVLP gun from Princess Auto ( Canadian Harbour Freight) this appears to be the same gun everyone raves online about for cheap. Finally got some time tonight to get things lined up so hopefully tomorrow I’ll be able to spray the red. At the same time I picked up a 3M 60923 cartridge for my mask to protect against vapor& organics, preciously all I had was a 2097 (p100) filter. This setup cost me more upfront than buying spray bombs but the gun I’ll have for future projects and to save me money so I don’t mind spending on tools. Am I the only one with this train of thought? ;)

Curious, I started another thread but is this the Rustoleum that gets thinned 15-20% and sprayed? The videos I’ve seen guys are showing Rustoleum cans that say Protective Enamel on the can while this does not?

More updates in the coming days as long as this is the right paint and the spraying goes smooth!

9d15dff9d1576b5d145cad325f1e171d.jpg
b89e306c79ed0ed68c3d53b7d0a8e9d3.jpg
e2a4bc28deca543b5e32b594218a6a2b.jpg


Sent from my iPhone using The Garage Journal mobile app
 

Attachments

  • 9d15dff9d1576b5d145cad325f1e171d.jpg
    9d15dff9d1576b5d145cad325f1e171d.jpg
    57.6 KB · Views: 8
  • b89e306c79ed0ed68c3d53b7d0a8e9d3.jpg
    b89e306c79ed0ed68c3d53b7d0a8e9d3.jpg
    77 KB · Views: 8
  • e2a4bc28deca543b5e32b594218a6a2b.jpg
    e2a4bc28deca543b5e32b594218a6a2b.jpg
    51.8 KB · Views: 8
OP
F

freebo86

Well-known member
Joined
Jun 19, 2015
Messages
362
You need an oil based paint, not a latex. Entirely different product.


Thanks. Yah found this out as well. So looks like now the cabinet colour Gloss Apple Red is not available in quart sized oil based, fml.

Now I’m looking at the Tremclad line of paints as I can’t find any other Rustoleum Oil Based Enamel..


Sent from my iPhone using The Garage Journal mobile app
 

The Cobbler

Super Moderator
Staff member
Joined
Oct 24, 2013
Messages
25,884
Location
Niagara Region, Ontario, Canada
being in Canada, you can look at the Home Hardware line of paint too, it is very good quality, and better priced than Tremclad. a good guy on the paint counter can adjust the colour too .
I like to use laquer thinner in oil base paints .
 
OP
F

freebo86

Well-known member
Joined
Jun 19, 2015
Messages
362
being in Canada, you can look at the Home Hardware line of paint too, it is very good quality, and better priced than Tremclad. a good guy on the paint counter can adjust the colour too .
I like to use laquer thinner in oil base paints .


Thanks Cobbler. Looked at price difference Tremclad vs. beauty tone price difference is approx $1.

Doing more reading looks like us Canadians the closest we can get our hands is the Tremclad Rust Paint that is somewhat equivalent to
The Rustoleum Stop Rust/Protective Enamel

My issue now is the color match. Gonna have to take this latex can back and see if they can match the Tremclad to the Apple Gloss Red. If not I may just go with the Tremclad Fire Red and see how close it looks.


Sent from my iPhone using The Garage Journal mobile app
 
OP
F

freebo86

Well-known member
Joined
Jun 19, 2015
Messages
362
Alright some progress today. After visiting Home Depot etc. and coming to the conclusion that the color I used in spray bomb is not available in their quart size oil base I had to switch colours.

Ended up going with Gloss Fire Red it’s Beauti-Tone brand which is another hardware store and Tremclad carries the same color in their line up as well.

Had a chance to shoot a good couple of coats on the drawers, the color is not 100% as to be expected but I think it will be close enough. I laid one of the drawers inside the cabinet to get an idea. Happy with the HVLP performance too first time using this style gun.

May do one more light coat on these tomorrow and call it good. The inside of the drawers will be cleaned off a bit and liner installed so discard the inside condition.

4df277dcf4c1d52794f6fb86c7217f2a.jpg
539161dd0f087f9cc654cd7b0df0d428.jpg
9d99248fb4ef125a8cc47a263e167f85.jpg
8164c1c0da05b7d0ebe5184ed40e9fc1.jpg
6e3ba8441658534f81ba5566633b3651.jpg


Sent from my iPhone using The Garage Journal mobile app
 

Attachments

  • 6e3ba8441658534f81ba5566633b3651.jpg
    6e3ba8441658534f81ba5566633b3651.jpg
    74.7 KB · Views: 7
  • 9d99248fb4ef125a8cc47a263e167f85.jpg
    9d99248fb4ef125a8cc47a263e167f85.jpg
    135 KB · Views: 8
  • 8164c1c0da05b7d0ebe5184ed40e9fc1.jpg
    8164c1c0da05b7d0ebe5184ed40e9fc1.jpg
    79.3 KB · Views: 7
  • 539161dd0f087f9cc654cd7b0df0d428.jpg
    539161dd0f087f9cc654cd7b0df0d428.jpg
    116.2 KB · Views: 8
  • 4df277dcf4c1d52794f6fb86c7217f2a.jpg
    4df277dcf4c1d52794f6fb86c7217f2a.jpg
    90.4 KB · Views: 7

The Cobbler

Super Moderator
Staff member
Joined
Oct 24, 2013
Messages
25,884
Location
Niagara Region, Ontario, Canada
looking good!
practice will go along ways .
Some of your paint looks like it has orange peel , it's a fine line between getting it to flow & getting runs... you need enough paint to flow out, but not so much to get runs. thinner can also help with that . acetone is pretty fast , maybe experiment with a bit of mineral spirits and acetone . as said previously, I prefer lacquer thinner over acetone.
your project looks great !
 

bubinga

Well-known member
Joined
Jul 26, 2014
Messages
12,744
Location
Bridgeport Ohio. (Across River From Wheeling WV)
looking good!
practice will go along ways .
Some of your paint looks like it has orange peel , it's a fine line between getting it to flow & getting runs... you need enough paint to flow out, but not so much to get runs. thinner can also help with that . acetone is pretty fast , maybe experiment with a bit of mineral spirits and acetone . as said previously, I prefer lacquer thinner over acetone.
your project looks great ![/QUOTE]

Is Lacquer thinner slower right?
Yes it does!
 

Zeeman

Well-known member
Joined
Mar 21, 2016
Messages
1,185
Location
Bartow County Georgia
For the handles, you can use any chrome polish. I've used Neverdull, Mothers, etc. I don't think wax will do much as far as shine goes.
 
OP
F

freebo86

Well-known member
Joined
Jun 19, 2015
Messages
362
Alright made some progress tonight, the large cabinet is done with the exception of handles and drawer liners.

In order to get these cabinets to fit I had to take my 2x4foot tables and basically Frankenstein to 1.25-1.5 tables. The extra length in table only had me keep stuff and collect junk on the table tops. Worked out well actually and I gained some width space towards the back of the garage, as the tables are 25” deep while the cabinets are only 16” for the blue and 18” for the Beach. Would be nice to cut the tables down to 16 or 18 but I’m worried that wouldn’t be deep enough..

So couldn’t wait but installed a few of the drawers and the side shelf to see how it looks. Tomorrow hopefully the rest of the drawers go in and then the handles. After that we tackle the middle and top box.

b933e2ec60ac2c2a3d1d90e05c93f24d.jpg
a1d3fb8ed45e5ade3042f078d5eec969.jpg

So this was my original setup. Took a bit of time to dismantle all the stuff and get rid of the shelving and paper dispenser.
d7e2fb13c0f238c82c41acc72dd7334e.jpg
01ffca975c23fab830899959c4807a4e.jpg

This is how it will end up. Need to finish the table and fasten a couple of support braces and put all my stuff back. Will finish the big cabinet completely before moving onto the two smaller boxes. Going to remove the casters and clean them up as the overspray is bothering me.

bf7042048de7bff427e0f47434a4e4b2.jpg


Sent from my iPhone using The Garage Journal mobile app
 

Attachments

  • b933e2ec60ac2c2a3d1d90e05c93f24d.jpg
    b933e2ec60ac2c2a3d1d90e05c93f24d.jpg
    102 KB · Views: 8
  • bf7042048de7bff427e0f47434a4e4b2.jpg
    bf7042048de7bff427e0f47434a4e4b2.jpg
    119.8 KB · Views: 8
  • 01ffca975c23fab830899959c4807a4e.jpg
    01ffca975c23fab830899959c4807a4e.jpg
    119.3 KB · Views: 8
  • d7e2fb13c0f238c82c41acc72dd7334e.jpg
    d7e2fb13c0f238c82c41acc72dd7334e.jpg
    107.1 KB · Views: 9
  • a1d3fb8ed45e5ade3042f078d5eec969.jpg
    a1d3fb8ed45e5ade3042f078d5eec969.jpg
    84.1 KB · Views: 7
OP
F

freebo86

Well-known member
Joined
Jun 19, 2015
Messages
362
More progress tonight on the lower cabinet. Lubed up all sliders and had to straighten a couple of them as well as they were not sliding at all. All drawers slide nice now with the exception of one it will need more work.

IMG_2567.jpg

Decided to install the handles back and basically finish the bottom section to 90%. What is missing is the cover piece that folds on itself and stows in the open void. That piece will get painted on the next round when I do the two top pieces, also this piece had a good kink in the front face that I will have to straighten prior to paint.

Also, I need to source some liner material. For the lower cabinet I need approx. 26 sq-ft. Anyone have any recommendations for something that’s cost effective? I don’t want to spend a fortune.


IMG_2569.jpg
IMG_2570.jpg
IMG_2571.jpg


Sent from my iPhone using The Garage Journal mobile app
 

bubinga

Well-known member
Joined
Jul 26, 2014
Messages
12,744
Location
Bridgeport Ohio. (Across River From Wheeling WV)
More progress tonight on the lower cabinet. Lubed up all sliders and had to straighten a couple of them as well as they were not sliding at all. All drawers slide nice now with the exception of one it will need more work.

IMG_2567.jpg

Decided to install the handles back and basically finish the bottom section to 90%. What is missing is the cover piece that folds on itself and stows in the open void. That piece will get painted on the next round when I do the two top pieces, also this piece had a good kink in the front face that I will have to straighten prior to paint.

Also, I need to source some liner material. For the lower cabinet I need approx. 26 sq-ft. Anyone have any recommendations for something that’s cost effective? I don’t want to spend a fortune.


IMG_2569.jpg
IMG_2570.jpg
IMG_2571.jpg


Sent from my iPhone using The Garage Journal mobile app

looks great!
:beer::beer::beer:
 
To avoid these ads, REGISTER NOW!
Top Bottom