To avoid these ads, REGISTER NOW!

Shed Build 11'x8' / design advice

ejot

Well-known member
Joined
Apr 12, 2019
Messages
137
Location
New York
It's getting colder and I'd like to start building this weekend. Behind on learning the calculations.
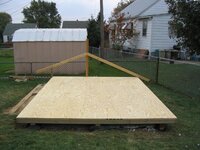
The site has 5" of level gravel and corners staked out.
My background is technical but I have zero building design experience. I do have some construction experience.

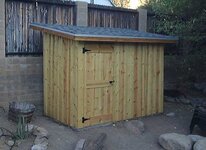
Shed is 10'8"x 8'. Walls 88.5" tall. 4/12 roof pitch with rafters spanning the long way.
Contents aim to be: push mower, very small riding mower, 2-3x bicycle, generator, garden tools
Wishlist is a vaulted ceiling with no rafter ties and a wide door opening.

I am curious if my framing design is sound.
Local snow load 40lb.
Door opening is 97.5" wide by 75.5" tall.
Floor joists and rafters are 2x6's, 16 on center.
Walls 2x4's, 16 on center.
Ridge beam is (2X) 8' 2x10's with 1/2" ply laminated between. Supported on the ends by 4x4 uprights.
Door header is (2X) 2x12's with the same lamination. Running the length of the long wall.
My 4x4 skids are 62-1/4" on center.
Sitting on leveled patio pavers.

shed frame.jpg

I will box in the floor joists with two boards to cap the ends, instead of how shown.
Should I have more skids?
My floor sheets should run the other way right?
Will it fall down? Is it overbuilt? (Or, what other info is needed?)
Thanks.
 
To avoid these ads, REGISTER NOW!

FordTruckWench

Well-known member
Joined
Jan 8, 2015
Messages
539
Location
California
Door opening is 97.5" wide by 75.5" tall.

So nominally an 8' wide by 6' tall door. Have you figured out what you're doing for a door? Homemade swing out double door? Garage style roll-up?

Also, your load path goes nicely from the roof, to ridge beam, to 4x4 posts, to door header, to studs, to floor, and, ... screech, um, a single 2x6 floor joist spanning quite a distance. So perhaps double up this first joist. Back wall is OK as the roof load comes right down onto the middle paver.
 
OP
E

ejot

Well-known member
Joined
Apr 12, 2019
Messages
137
Location
New York
Homemade swing out double door is exactly the plan there.

Hadn't actually registered any concern over the frontmost floor joist because the load seems concentrated near the outer two skids, outside the door opening. That said, I'm with ya here. I will double up that joist.
 

jkuro

Well-known member
Joined
Apr 28, 2009
Messages
552
Here are a few suggestions:
Use pressure treated 4x4 skids, floor joists and decking. Put plastic sheathing under your decking. Add some soffit and ridge vents. Use 3/4-inch tongue and groove decking. Turn decking and stager joints. Extend rafters tails for a longer overhang, soffit.
 

69charged

Well-known member
Joined
Sep 20, 2007
Messages
469
Location
carberry, manitoba
I built mine almost exactly the same way. Different size though. I went 12" on center on floor joists, so I could put what ever I wanted in there without worry of the floor sagging in anywhere. For the extra cost of a few boards, it was a no brainer for me. I was keeping my quad and side by side in there. The only other thing I wish I did was have more overhang over the doors. When it rains, or snows, it gets in the doors, no matter what I try do to waterproof. Mind you, its a shed. So I maybe didn't work as hard at it either. Mine are also homemade swing out double doors.4B108F23-333C-4A56-9199-85C582B1256A.jpeg
 

FordTruckWench

Well-known member
Joined
Jan 8, 2015
Messages
539
Location
California
Hadn't actually registered any concern over the frontmost floor joist because the load seems concentrated near the outer two skids, outside the door opening. That said, I'm with ya here. I will double up that joist.

Would your original configuration be fine? Yes - this is just a little shed. But your ridge beam and header are a bit overbuilt - you might as well complete the overbuilt load path. The condition I'd worry about is if the lumber warps and the inboard jack stud ends up carrying the roof load.

One more change: Put a short single top plate under the header on each side. This way you don't have to toenail the studs to the header. This piece also helps with assembly - it holds the inboard jack stud in place before you install the header.
 

engineer2

Well-known member
Joined
Dec 13, 2009
Messages
11,803
Location
Chicago burbs
Your wall and roof design looks fine. A big door is always better. Looks like 3/4 plywood flooring. On my shed I attached the walls to the foundation and then put the flooring in. Logic was to be able to replace any damaged flooring. I used 2x6's butted together instead of plywood. The inspector was happy about that. Less puddling of snow melt too.
 

Hank11

Well-known member
Joined
Aug 19, 2019
Messages
1,152
Location
Tennessee
I'd pull the beams on the end under the floor about 6-12 inches and let the floor joists sit on top and cantilever the 6-12 inches. That will keep your "foundation" protected and dryer. It will also take the load from the roof and door header straight down to the ground, which might be as valuable as the protection. With the beams pulled back you can make a nice edge with the siding and the shed just floats in the air.

I would also add shear panels to the two little short front walls. You could set in plywood fillers when you frame by building the two front walls with a rabbet for the plywood, then standing them up. Or frame it up and them add plywood glued and screwed/nailed. Either way make some allowance for air movement. Drill some big hole saw holes to let it vent, Or cut some ports with your circular saw or jigsaw.

I'd also make it 12' wide just to fully use up three sheets of floor material. Huber AdvanTech is the floor you want, IMO.
 

gagecalman

Well-known member
Joined
Feb 5, 2020
Messages
194
Location
MD
Go to a lot that sells sheds and see how they're built.
Already stated:
  • It's a small shed. You're overbuilding it. That's ok but lumber is still too much.
  • Use 3/4-inch tongue and groove decking. Extend rafters tails for a longer overhang.
  • Make it 8' X 12' if you can. Less waste.
You don't need a beam and ridge pole. Use scrap plywood for plates and make trusses.
Use three 4x4x12' PT runners on padio blocks and 2x4x8' PT floor joists. I did mine and it's plenty strong after 20 years.
If you don't use tongue and groove for the floor put some blocking under the joints that don't fall on a joist.
Make sure the floor is level. You can't plumb walls if the floor's not level.
You can do a double top plate. I didn't because my rafters are over the wall studs.
Here's a few pics of my 10'x12' saltbox that I built 20 years ago. The plywood "trusses" are from the 12'x16' that I built 25 years ago and it's still great.
 

Attachments

  • Our shed 12'x16' 001.jpg
    Our shed 12'x16' 001.jpg
    164.8 KB · Views: 70
  • Sheds_19.jpg
    Sheds_19.jpg
    179 KB · Views: 63
  • Sheds_17.jpg
    Sheds_17.jpg
    156.9 KB · Views: 52
  • Sheds_10.jpg
    Sheds_10.jpg
    174.1 KB · Views: 51
  • Sheds_09.jpg
    Sheds_09.jpg
    238 KB · Views: 50
  • Sheds_06.jpg
    Sheds_06.jpg
    199.3 KB · Views: 52
  • Sheds_05.jpg
    Sheds_05.jpg
    260.3 KB · Views: 63

Slednut

Well-known member
Joined
Dec 20, 2012
Messages
2,550
Location
Washington state
Homemade swing out double door is exactly the plan there.

Hadn't actually registered any concern over the frontmost floor joist because the load seems concentrated near the outer two skids, outside the door opening. That said, I'm with ya here. I will double up that joist.
I built a shed last summer and made double doors, the frames are 1x2" channel iron. The two doors together are 6' wide and 8' high, the shed is 10x20x10'.
 

Attachments

  • New shed17.jpg
    New shed17.jpg
    169.9 KB · Views: 60
  • New shed19.jpg
    New shed19.jpg
    100.9 KB · Views: 56
  • New shed9.jpg
    New shed9.jpg
    158.1 KB · Views: 62
Last edited:

mikester

Well-known member
Joined
Dec 27, 2007
Messages
2,536
Location
small town NY
Thats a pretty small shed. I just got rid of one that was 8x12. They fill up pretty fast when you start putting mowers and equipment inside.
The new one thats coming is a 10x14. I wish I could have gone to a 10x16 but it would have needed an inspection by the building department.
 

Attachments

  • IMG_6558.jpg
    IMG_6558.jpg
    479.9 KB · Views: 69
To avoid these ads, REGISTER NOW!

rayra

Well-known member
Joined
Dec 1, 2014
Messages
4,724
Location
Escaped from Los Angeles
I'd suggest a sloped 'shed' style roof, a lot simpler to frame and you can add plex panes on the high side for natural light. If you aren't going for a steep roof and don't have snow load concerns.

This shed was 6x10, used 3 sheets for the 8x12 roof, so no cutting. The right end was a fully opened with a pair of doors, as well as the 36" door facing the back of the house.
 

Attachments

  • shed06.jpg
    shed06.jpg
    53.2 KB · Views: 57
  • shed09.jpg
    shed09.jpg
    76 KB · Views: 63
  • shedinterior04-040909.jpg
    shedinterior04-040909.jpg
    47.9 KB · Views: 72
OP
E

ejot

Well-known member
Joined
Apr 12, 2019
Messages
137
Location
New York
Appreciate every reply. All valuable.

Would prefer larger overall dimensions and deeper soffits. But due to various considerations and limitations I am going to stick with existing plan on those points. Will just put simple vents on the gable ends.

Morning was rainy but it did clear up and I was able to get all my decking materials. Got the pavers leveled and skids laid out. Took forever but got everything pretty dead on. Went with 4x6 pressure treated landscaping timbers. 4x4 stock was low and only ugly ones left, these were only add'l $5 ea. The outer runners are pulled in 8" vs the model, discussed below.

skids.JPG

Here are a few suggestions:
Use pressure treated 4x4 skids, floor joists and decking. Put plastic sheathing under your decking. Add some soffit and ridge vents. Use 3/4-inch tongue and groove decking. Turn decking and stager joints. Extend rafters tails for a longer overhang, soffit.
Thanks. Checking these boxes except for the soffit/ridge mods and tongue and groove. I will have the full perimeter of each flooring panel supported and nailed.

The only other thing I wish I did was have more overhang over the doors. When it rains, or snows, it gets in the doors, no matter what I try do to waterproof.
Will add some overhang on the door end. Good call. I like your rustic/recycled siding.

One more change: Put a short single top plate under the header on each side. This way you don't have to toenail the studs to the header. This piece also helps with assembly - it holds the inboard jack stud in place before you install the header.
For sure! I realized this one too when I was looking back over the design.

Your wall and roof design looks fine. A big door is always better. Looks like 3/4 plywood flooring. On my shed I attached the walls to the foundation and then put the flooring in. Logic was to be able to replace any damaged flooring. I used 2x6's butted together instead of plywood. The inspector was happy about that. Less puddling of snow melt too.
Yes, 3/4 PT ply, running the other way with staggered joints instead of as shown.
Finished flooring probably down the road.
Interesting idea on the fully removeable floorboards.

I'd pull the beams on the end under the floor about 6-12 inches and let the floor joists sit on top and cantilever the 6-12 inches. That will keep your "foundation" protected and dryer. It will also take the load from the roof and door header straight down to the ground, which might be as valuable as the protection. With the beams pulled back you can make a nice edge with the siding and the shed just floats in the air.

I would also add shear panels to the two little short front walls. You could set in plywood fillers when you frame by building the two front walls with a rabbet for the plywood, then standing them up. Or frame it up and them add plywood glued and screwed/nailed. Either way make some allowance for air movement. Drill some big hole saw holes to let it vent, Or cut some ports with your circular saw or jigsaw.

I'd also make it 12' wide just to fully use up three sheets of floor material. Huber AdvanTech is the floor you want, IMO.
Great ideas. I laid out the skids today and pulled the end ones in by 8". Reduces the joist spans too. I will add the vented inner panels when I do the front walls.
Full 12' wide would be nicer. But with how I want it to line up symmetric about my garage center and where the property line is, going with the existing design. Wish I had shopped more carefully for the flooring but should be ok.

You don't need a beam and ridge pole. Use scrap plywood for plates and make trusses.
Here's a few pics of my 10'x12' saltbox that I built 20 years ago
Had seen a few builds with the same roof span as mine doing exactly that. Was just a bit uneasy about the walls wanting to spread with heavy snow, so the extra $40 seemed like good insurance. And I like the look a bit more.
Your saltbox build is super clean and that lifespan is impressive. Nicely done.

I built a shed last summer and made double doors, the frames are 1x2" channel iron. The two doors together are 6' wide and 8' high, the shed is 10x20x10'.
Sweet build! Love the extra height!

Thats a pretty small shed. I just got rid of one that was 8x12. They fill up pretty fast when you start putting mowers and equipment inside.
The new one thats coming is a 10x14. I wish I could have gone to a 10x16 but it would have needed an inspection by the building department.
I'd fill up whatever size I built, LOL. I stressed over the size forever. Lots of factors.

I'd suggest a sloped 'shed' style roof, a lot simpler to frame and you can add plex panes on the high side for natural light. If you aren't going for a steep roof and don't have snow load concerns.

This shed was 6x10, used 3 sheets for the 8x12 roof, so no cutting. The right end was a fully opened with a pair of doors, as well as the 36" door facing the back of the house.
Great looking little shed! I defintely looked into a single slope roof but it just wasn't quite working out for my dimensions and snow load.
 
Last edited:
OP
E

ejot

Well-known member
Joined
Apr 12, 2019
Messages
137
Location
New York
Some showers again in the morning but held off rest of the day, always looked threatening.
The deck frame is tacked together. Level anywhere anyhow I put my 4' level. Diagonals are within 1/16". It is square respective to the garage within 1/8" and centered on the garage within 1/4", best I can tell.

deck frame.jpg

Have one significant issue. One paver I had to build up material underneath, instead of digging it down... back right corner... It settled 1/4". You can see the shim between joist and skid. But it is not treated wood and would rot. I have a couple ideas to fix. What do folks think here?

Frame is just lightly toe screwed into the skids temporarily. How should I connect it. Would like to see if I could get some straight counterbore holes thru the 2x6s and put 6" timberloks every other joist.

I screwed the joist rim boards because I did not want to mess up my alignment by hammering.

My cantilever is 6" ...not 8" as previously said.
 

Natty Bumppo

Well-known member
Joined
Dec 8, 2019
Messages
368
Location
Savoy, MA
Have one significant issue. One paver I had to build up material underneath, instead of digging it down... back right corner... It settled 1/4". You can see the shim between joist and skid. But it is not treated wood and would rot. I have a couple ideas to fix. What do folks think here?

Replace it with a composite or plastic shim.
 

mike93lx

ALLIANCE MEMBER
Joined
Dec 9, 2013
Messages
37,577
Location
Richmond, VA
Some showers again in the morning but held off rest of the day, always looked threatening.
The deck frame is tacked together. Level anywhere anyhow I put my 4' level. Diagonals are within 1/16". It is square respective to the garage within 1/8" and centered on the garage within 1/4", best I can tell.

deck frame.jpg

Have one significant issue. One paver I had to build up material underneath, instead of digging it down... back right corner... It settled 1/4". You can see the shim between joist and skid. But it is not treated wood and would rot. I have a couple ideas to fix. What do folks think here?

Frame is just lightly toe screwed into the skids temporarily. How should I connect it. Would like to see if I could get some straight counterbore holes thru the 2x6s and put 6" timberloks every other joist.

I screwed the joist rim boards because I did not want to mess up my alignment by hammering.

My cantilever is 6" ...not 8" as previously said.
Toe nails are plenty. Are the skids fastened down?

The weight of the shed will keep them in place, but if you are looking for real uplift protection, you need to anchor the whole thing to the ground.

If the stone is already settling, you didnt compact it enough. I'd stop and address that before you move on
 
Last edited:

Hank11

Well-known member
Joined
Aug 19, 2019
Messages
1,152
Location
Tennessee
Put a steel shim between the paver and the beam. (not where you have it now between the beam and the joist)
 

ipgenie

Well-known member
Joined
Jan 29, 2020
Messages
561
Location
Idaho
I built a small shed like that a few years ago and anchored it down with some steel fence posts that were left on the property when we bought it. If the shed ever has to be moved it'll be a pain because I just drove them down 5' into the ground near each corner and fastened them to the beams before laying the floor. I'd just have to jack it up and then cut or unfasten the fence posts from below before moving.
In my case I really didn't need to anchor it down but I figured I'd do it anyway just because.
 

FordTruckWench

Well-known member
Joined
Jan 8, 2015
Messages
539
Location
California
Have one significant issue. One paver I had to build up material underneath, instead of digging it down... back right corner... It settled 1/4". You can see the shim between joist and skid. But it is not treated wood and would rot. I have a couple ideas to fix. What do folks think here?

Pick up the frame, carry it out of the way, reset the skid, and bring the frame back. You might need a helper or two.

This problem may continue in the future. You may have to lift the (completed) shed with a jack, slide a paver out, and add stone material.
 
OP
E

ejot

Well-known member
Joined
Apr 12, 2019
Messages
137
Location
New York
Had some unexpected interruptions but do have a little progress. Unfortunately behind schedule but so it goes.

Jacked up the right side of the deck and reset the back paver with more fill packed down. Now solid and level.

Wavered on this but finally decided the door was too short and redesigned the header so the bottom of it is at wall height. And added the front overhang.
The header/ front wall connection will be further reinforced.
header1.pngheader2.png

Maybe I should have notched the end of the header instead of cutting it square off, so it could tie down into the side wall top plate. But I didn't think of it.

header3.png

One of these 2x12's was 3/16" narrower at one end than the other. Didn't notice that at the lumber yard, just checked for warp and twist.
Had to be careful how I referenced dimensions so as to be blind to the board width.

The walls all went up square, level, and without much drama. I sided the back wall when it was laying flat. Should have done them all like this.

Forgot to shorten the side walls by the thickness of paneling, to face the front walls with inner panels before putting them up.

Got all the rafters cut and notched. So much more work than it seemed like it would be. Got the ridge beam assembled too. Hopefully comes together quick from here.

Don't seem to have snapped an overall progress pic since this one,,

3walls.png
 
Last edited:
OP
E

ejot

Well-known member
Joined
Apr 12, 2019
Messages
137
Location
New York
Case anyone interested to see how this has progressed,,

Welp, it was a mad dash to get a shingles on this thing last year and the last roofing nail went in Nov 30.
Spent the winter in prime and with two tarps tightly sealing the inner and outer door openings ... too cold to build the doors!

Reconsidered @jkuro suggestion for a ridge vent and after some research settled on installing one instead of gable end vents, very pleased with it.
Now need to fit vents into the soffits which will be a bit of a pain with the boards already installed, oh well.

Had meant to match shingles to the garage's but I bought gray and the garage must be (faded) black. Actually pleased with the contrast.
This past weekend got the doors built and hung and front wall/doors in final color.
Lots of finishing to complete.

Backing up a bit...

Plenty of reclaimed lumber in the project that I'd collected when 2x4's were $10/pop.
Thought the exposed factory inventory labels were a nice touch on the right wall.

IMG_5302.JPG

IMG_5366.JPG

Wanted to fully prime & paint the upper siding before mounting the overhang, but man, cold weather and tight schedule and painting supplies were short at the wrong time ... it just didn't happen.

See how perfectly flat that drip edge is. Well, that went on at about 30°F.
IMG_5370.JPG

Aaand here's how it looks now once it hit 85°F :LOL:
IMG_5831.JPG

About 5min before I started cutting wood for the doors, checked my CAD and realized the doors would have hit the fascia by about 1/4" instead of being able to open 180degrees. Offset the top of the door frame down by a 2x4 and reduced the planned door height by the same. Phew!

That tiny Cman riding mower is slated for a full rebuild... maybe around 2027, haha.

Tolerance errors on the door frame and doors stacked up worse than expected and squeezed my right door gap. Just going to route a bigger gap between the trim pcs and install thinner weatherstripping on that side. Still need to get right door closing a bit better and install upper/lower latches. And finish painting. And trim. And 4pgs of notes worth of little finishing jobs.

IMG_5838.JPG

Overbudget and behind schedule ... But on the whole, quite pleased. Very appreciative of the advice received here. Thanks again. I will post up final pics once complete.
 
To avoid these ads, REGISTER NOW!
Top Bottom