To avoid these ads, REGISTER NOW!

Shed Build 12 x 16

James Aiello

Well-known member
Joined
May 8, 2007
Messages
125
Location
50 miles West of Chicago IL
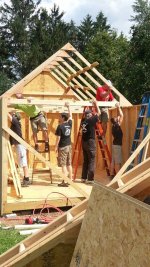
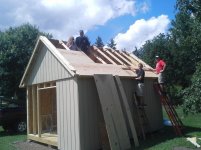
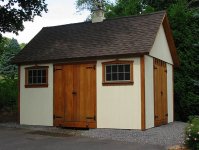
So after talking about it for years..... I'm building my shed!
I'm broke so it will be done the cheapest way I can manage. It will be 12x16 with 8' walls, two windows and a double door.
I bought plans from "Better Barns" online. Really liked the way the shed looked,
kinda like a old barn.

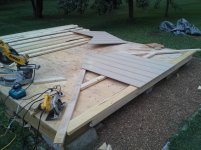
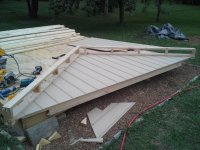
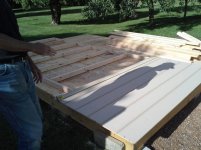
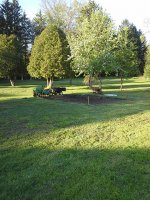
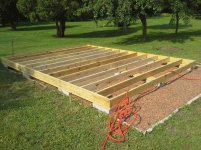
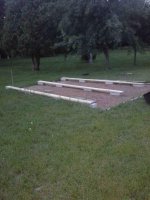
I have started with digging down 4" for the gravel. The shed will sit on cement blocks and they will sit on a bed of gravel. I'm going to have the gravel under the whole shed.

So my first question is about the vapor barrier.. should I put it down first then gravel or put weed block, gravel and then vapor barrier?
 

Attachments

  • 2017_4.jpg
    2017_4.jpg
    87.9 KB · Views: 423
To avoid these ads, REGISTER NOW!
OP
J

James Aiello

Well-known member
Joined
May 8, 2007
Messages
125
Location
50 miles West of Chicago IL
That was my first thought .... then I started reading a bunch of books.. they
recommended a vapor barrier. I think your right.. but I do have a bunch of vapor barrier so it will not be cost issue.

thanks
James
 
OP
J

James Aiello

Well-known member
Joined
May 8, 2007
Messages
125
Location
50 miles West of Chicago IL
Progress with removing topsoil. Thank God I don't do this for a living.. sore for two days...

I attached three pictures One before I started
2nd half way into the dirt removal
3rd with all loose dirt removed.

Previous owner had a water line out to the middle of the yard for the garden. Thats a old hose real stand in the first picture.
I'm going to use this line for water inside the shed. It will be turned off from inside the house in the winter.

p_mori7;
I agree with you and that is what I thought would happened if I put a vapor barrier on first. But I did see some barriers on top of gravel.
 

Attachments

  • site1.jpg
    site1.jpg
    109.8 KB · Views: 302
  • site2.jpg
    site2.jpg
    76.9 KB · Views: 313
  • site3.jpg
    site3.jpg
    86.3 KB · Views: 320

zcar751

Well-known member
Joined
Apr 15, 2013
Messages
831
Location
Knoxville, TN
You might want to change the roof to a gambrel style then you could have a great storage area for a relatively small extra expense.
 
OP
J

James Aiello

Well-known member
Joined
May 8, 2007
Messages
125
Location
50 miles West of Chicago IL
zcar751;
I agree but I just don't like the look, I may be doing a dormer on the back side down the road if I need more storage. This roof is steep 10/12 so I don't think I will get that much more usable space, unless I go almost vertical on the bottom half of the roof.

thnks for the tip

james
 

jrfiero

Active member
Joined
Dec 8, 2010
Messages
25
Location
Arlington, VA
Garden hose supply, drain ??

I have a garden hose feeding half a kitchen stainess sink in my wife's potting shed, as you're planning.

My drain just dumps on the gravel under the shed, so no vapor barrier for me! No weed block either, they don't grow well in the dark.

Sounds good - you doing a pressure treated base with regular lumber above?

Jonas
 
OP
J

James Aiello

Well-known member
Joined
May 8, 2007
Messages
125
Location
50 miles West of Chicago IL
Jonas,

Yes PT floor and joists.. then just reg construction above.
To be honest I have not thought about draining the water yet... Maybe run pvc under floor along a joist then out the back side into a pit of gravel, deeper then the rest of the bed of gravel.
I was thinking of a slop sink.. may check craigslist for some old used one.
 

theoldwizard1

Well-known member
Joined
Feb 22, 2011
Messages
43,138
Location
SE MI
Make certain its sits up high enough that light and air get underneath. If not, racoons, skunks, opossums, etc. will find it a nice home !
 
OP
J

James Aiello

Well-known member
Joined
May 8, 2007
Messages
125
Location
50 miles West of Chicago IL
Made some progress with my shed build..

I have about 3" of gravel with a weed block down first.
Then added 4"x8"x16" cement blocks.. got them all level.

Added sill 3 plates 2"x8"x16' Squared and leveled the sill plates.

Put up the rim joists and squared and leveled them too.
Then added the joists.
 

Attachments

  • 20130623_164234.jpg
    20130623_164234.jpg
    151.5 KB · Views: 616
  • 20130619_204636.jpg
    20130619_204636.jpg
    135.7 KB · Views: 526
  • 20130619_203932.jpg
    20130619_203932.jpg
    139.4 KB · Views: 519
OP
J

James Aiello

Well-known member
Joined
May 8, 2007
Messages
125
Location
50 miles West of Chicago IL
I also made a tool cart out of my yard trailer and tractor.
 

Attachments

  • 20130623_164242.jpg
    20130623_164242.jpg
    152.4 KB · Views: 414
  • 20130623_164301.jpg
    20130623_164301.jpg
    149.7 KB · Views: 441
  • 20130623_171707.jpg
    20130623_171707.jpg
    148.1 KB · Views: 353
OP
J

James Aiello

Well-known member
Joined
May 8, 2007
Messages
125
Location
50 miles West of Chicago IL
I have the floor down. But first i tied the joists together, about 1/3 in made a row. Then another 1/3 made a row. Framing gun made this job a breeze.
Gluded before putting down each board then screwed them down.
Need to make another wood run for next weeked end but at the same time Im getting a used playgound set for my little girl.

Plans call for me to make the trusses first so I will do that then the walls.
 

bowanna03

Well-known member
Joined
Mar 2, 2009
Messages
111
Great job!!! Keep the pic's and updates comin!!! I am interested in doing the same. How much is it going to cost you? I would love to buy the saem plans too.
 

CNGsaves

Well-known member
Joined
Sep 26, 2012
Messages
13,233
Location
KS and OK
Looks like you're building a good quality shed.

Curious if you're adding any "Dead-man" anchors or any other form of tie-down to keep the whole thing from blowing away during a windstorm??
 
To avoid these ads, REGISTER NOW!

nolimits76

Well-known member
Joined
Jul 11, 2013
Messages
959
Location
Oklahoma
Looking good. I like the way the finished product will work. Really like those doors quite a bit. Gives it a bit of character vs the cheapo barn/sheds I typically see in people's backyard.

Subscribed. :)
 

mrgm

Well-known member
Joined
Dec 13, 2010
Messages
199
Location
TX
I too will be building a shed. Im gona learn a lot from this one. :)
 
OP
J

James Aiello

Well-known member
Joined
May 8, 2007
Messages
125
Location
50 miles West of Chicago IL
Bowanna: Looks like it will come in at about 2k for materials. I got the gravel for free.

CNGsaves: I would like to add some sort of Dead man tie down.. will have to look into it. Will be putting hurricane tie downs on the trusses.

whitefeather: That is the reason I went with this design. Old barn look to it.
I was thinking about using solid core doors with cedar t/g on the outside.

Macattak: Yes water will be nice. its about 75-90 feet from the house.
I just got my sink. Stainless and came with faucets too. $30

thnks for the interest. Picts coming soon..
 
OP
J

James Aiello

Well-known member
Joined
May 8, 2007
Messages
125
Location
50 miles West of Chicago IL
Pics from the truss build.

Picked up a ton of wood, could have used just the truck but I figured having the trailer made it much more safe for anyone following me.

My box of assorted nails, real handy on a job like this. May make one for screws. Hell I think I make one for all of my different hardware.

Making the gussets is the most time consuming part of making the trusses.
Made the first truss then outlined it on the shed floor so the rest all matched.
Hope this works.
 

Attachments

  • 2013-07-20 12.03.43.jpg
    2013-07-20 12.03.43.jpg
    141.6 KB · Views: 328
  • 2013-07-14 16.22.29.jpg
    2013-07-14 16.22.29.jpg
    143.4 KB · Views: 331
  • 2013-07-20 12.03.342.jpg
    2013-07-20 12.03.342.jpg
    150.8 KB · Views: 379
OP
J

James Aiello

Well-known member
Joined
May 8, 2007
Messages
125
Location
50 miles West of Chicago IL
Finished all the trusses today except for one end piece. Last weekend I spent more time setting up a umbrella and fan to keep me cool.. mid to high 90s
Today? 69 maybe... no sun. Bit chilly but made for nice working weather.

So the material list that came with the plans was short 7 2x4x10s Whats up with that? So back to the store....

The end trusses are bit more tricky.. they will have siding and overhang.
They weight a ton all together. Still need to add t/g cedar trim to the underside of the overhangs.

Tomorrow I hope to finish the last truss and start on the walls. I hope to get it water tight by the end of Aug.
 

Attachments

  • 2013-07-27 15.06.472.jpg
    2013-07-27 15.06.472.jpg
    150.6 KB · Views: 272
  • 2013-07-27 15.06.192.jpg
    2013-07-27 15.06.192.jpg
    145.3 KB · Views: 245
  • 2013-07-27 16.48.292.jpg
    2013-07-27 16.48.292.jpg
    146.7 KB · Views: 270

sparelman

Member
Joined
Aug 23, 2012
Messages
9
Location
Virginia
Can't wait to see it all finished. It looks like it is coming along nicely. I have to replace a metal shed that was blown off it's foundation during a freak windstorm last month. This is giving me some ideas and inspiration.
 
OP
J

James Aiello

Well-known member
Joined
May 8, 2007
Messages
125
Location
50 miles West of Chicago IL
I can't wait till its done...

Finished up two walls today and the last truss.
If you are going to build a shed like mine, or any shed really I highly recommend getting some kind of nail gun. Nails are pricey but it makes
the job go some much faster and way easier then swinging.

Will post pictures Tomorrow.
 
Last edited:
OP
J

James Aiello

Well-known member
Joined
May 8, 2007
Messages
125
Location
50 miles West of Chicago IL
Building the wall on the floor.. worked out nice putting the siding on while its on the ground.. made it all nice and square.. Just a tad bit heavy. Also had to work around my water pipe..

I had some helpers, they are taking a dancing break. She said the shed is my new bathroom.. I don't know why??

Walls up!!!
 

Attachments

  • 2013-07-29 06.35.28.jpg
    2013-07-29 06.35.28.jpg
    150 KB · Views: 275
  • 2013-07-29 06.35.42.jpg
    2013-07-29 06.35.42.jpg
    150.2 KB · Views: 307
  • 2013-07-28 18.12.50.jpg
    2013-07-28 18.12.50.jpg
    150.9 KB · Views: 388
  • 2013-07-28 17.24.00.jpg
    2013-07-28 17.24.00.jpg
    143.8 KB · Views: 293

jdelaune

Member
Joined
Aug 3, 2012
Messages
16
Looks like a great looking shed. I am very interested in your build because I need to do a similar shed in a few months and I hope mine will turn out as nice. I can't wait to see more pictures.
 

nsnrider

Active member
Joined
Dec 2, 2010
Messages
36
glued and screwed? that is going to be one strong shed.

I am planning on building a shed also in the near future?

did you have to get a permit for a shed that size?
 
OP
J

James Aiello

Well-known member
Joined
May 8, 2007
Messages
125
Location
50 miles West of Chicago IL
I did not need a permit in my area.. Township.. up to 200 sq ft. Mine comes in at 192 I think...
Its on cement blocks so it can be moved if needed.

This weekend was a huge jump forward... it was like a amish barn raising!
Had two walls up on Sat morning, by Sunday night had all wall and roof sheeting done.
 

Attachments

  • 954650_10201768083309380_200938667_n.jpg
    954650_10201768083309380_200938667_n.jpg
    111.7 KB · Views: 348
OP
J

James Aiello

Well-known member
Joined
May 8, 2007
Messages
125
Location
50 miles West of Chicago IL
We put the gable end in before the 4th wall went in.. Put it in upside down that way we just rolled it up into place. Worked real well. Used 2x4x10 to hold into place then nailed it down.. Will go back and screw them all in nice and tight.
The trusses we just walked in and put up nice and easy.. they were like balsa wood compared to the gable ends.
Toe nailed those in place, will go back and use hurricane ties those in place.

Some of the walls had to be lag bolted down to get ride of some of the warping..
Pick out nice wood but got wet a bit and warped. Had to use a pipe wrench a couple times just to twist them into shape so I could nail them.

The whole shed was flimsy until we put up the wall panels on the very last wall... now its rock solid.. cool.

Roof sheeting went up without any issues.. not perfect but will get the job done. 1/2" 4ply plywood. 5/8 may have been better but would have been real heavy.

Next is roof paper then one course of shingles upside down around the edges.
Then shingles.. that should be fun... its a 10/12 so no standing on the roof..

Also the doors .. t/g cedar planks with the bracing inside. screwed and glued.

Trim.. Also rough cut cedar 1x4"

I will be cutting and framing in two windows one side and will have a transom window on one gable end.
 

polexican23

Banned
Joined
Jun 11, 2013
Messages
2,168
Location
burbs-Illinois
Thats gotta be fun/interesting dealing with the aldercreatures and the greedy rooftop owners.

Ricketts seems like a mellow guy to deal with all that stuff. Any cool photos or details you can send me of the stadium??
 
To avoid these ads, REGISTER NOW!
Top Bottom