

You are using an out of date browser. It may not display this or other websites correctly.
You should upgrade or use an alternative browser.
You should upgrade or use an alternative browser.
Shed Build Construction
- Thread starter D45
- Start date
QwikKotaTx
Well-known member
It's a shed not a high rise apartment. And from what I can see the rafters are in line with the studs. So a double top plate is not needed.
This is what I did, haphazardly. My Dad builds houses and pointed it out after the fact. I just got lucky I went 24" OC with studs and rafters. Not a big deal and no snow load here. 2x6 floor joists would have been my main wish but the height for lean to shape under my garage overhang prevented it. I can barely walk in there now on the short side as is. Over and done. Time to move on!
Danno1
Well-known member
I think one of the BEST things I did for this shed was to double layer the floor with PT plywood
5/8" PT for the base and then 1/2" PT for the top
Not only are the gaps overlapped, but it is rock solid and will last a very, very long time
Back around post 10-15 you said 1 layer was rock solid enough. What made you change your mind?
.
I am thinking about adding a simple "lean to" style roof off the side of this with a simple leveled deck to keep things up off the ground
This would be a storage area of bulk items like a trailer for my mower, wheel barrow, pull behind spreader.....things that
I would attach some posts to the 4x4 fence posts and make it real simple, yet real solid
Maybe a small section for firewood
Just to give it a roof to protect from the environment
CJ7VFR
Well-known member
You mean something similar to this?
Jim

Jim
captain14
Well-known member
Any protection from wind driven rain? I have a 6 by 6 "porch" on the rear (north) of my garage to cover/protect my man door and thinks get damp after hard rain.
Bumping this up a tad.......I bought four, rectangular panel vents to get some added airflow in the loft areas (it is very hot up there in the summer)
I want to add two of these vents to the front and then two vents to the back, as high up as possible
https://www.menards.com/main/buildi...07-c-13256.htm?tid=7840343787398219209&ipos=2
The paneling on the shed is only like 3/8" thick, so after I cut out the rectangular holes for theses, what will be the best way to mount them?
They obviously have 6 holes for a screw or nail, but the paneling is not thick enough to hold......small bolt and nut? Seal it all up with some brown caulk?

Suggestions?
I want to add two of these vents to the front and then two vents to the back, as high up as possible
https://www.menards.com/main/buildi...07-c-13256.htm?tid=7840343787398219209&ipos=2
The paneling on the shed is only like 3/8" thick, so after I cut out the rectangular holes for theses, what will be the best way to mount them?
They obviously have 6 holes for a screw or nail, but the paneling is not thick enough to hold......small bolt and nut? Seal it all up with some brown caulk?
Suggestions?
Last edited:
csp
Well-known member
A screw in each hole only has to hold 1/6 of the weight of the vent. Not sure why you think otherwise. 
captain14
Well-known member
Can you mount some of the PVC trim inside to give more depth for the screws to bite into?
RickP
Well-known member
I'd add a rectangular piece of treated wood trim screwed to the outside of the shed for each vent hole -- similar to how your door trim looks. You can apply plenty of caulk to the back of the trim pieces before mounting them and the caulk won't be visible. Then it should be pretty easy to screw the vent to the trim pieces. It's a little more work, but I think it would help give the installed vents a really clean appearance.
Trey T
Well-known member
Where did you buy the roll-up door?
Trey T
Well-known member
Thanks for the detail response, D45
marty_p
Well-known member
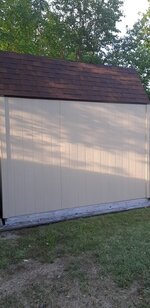
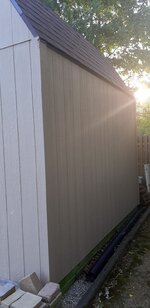
A very nice and well-built shed, sir. 
It reminds me a lot of a 12'x16'x8' with 6' tall gambrel loft that a friend and I built at my in-laws.
It reminds me a lot of a 12'x16'x8' with 6' tall gambrel loft that a friend and I built at my in-laws.
Rhyno
Well-known member
Bumping this up a tad.......
Suggestions?
I'd return them and get something that adds control to the flow....
I just installed 2 of these in my cheap, but resurrected shed. I made a cardboard template and from the inside, I placed and positioned the template and drilled 4 holes at the corners. I drew a straight lines to connect the holes, grabbed the jig saw. I positioned the template, so that 3 of the vent's 4 corners could be drilled and screwed into some studs. So far, they work great, I can control the air flow and seal it off when the snow and wind start blowing.
Both of the vents are as high as possible, with the flaps adjusted near 50%.
It works great, and was close to $10 for both...

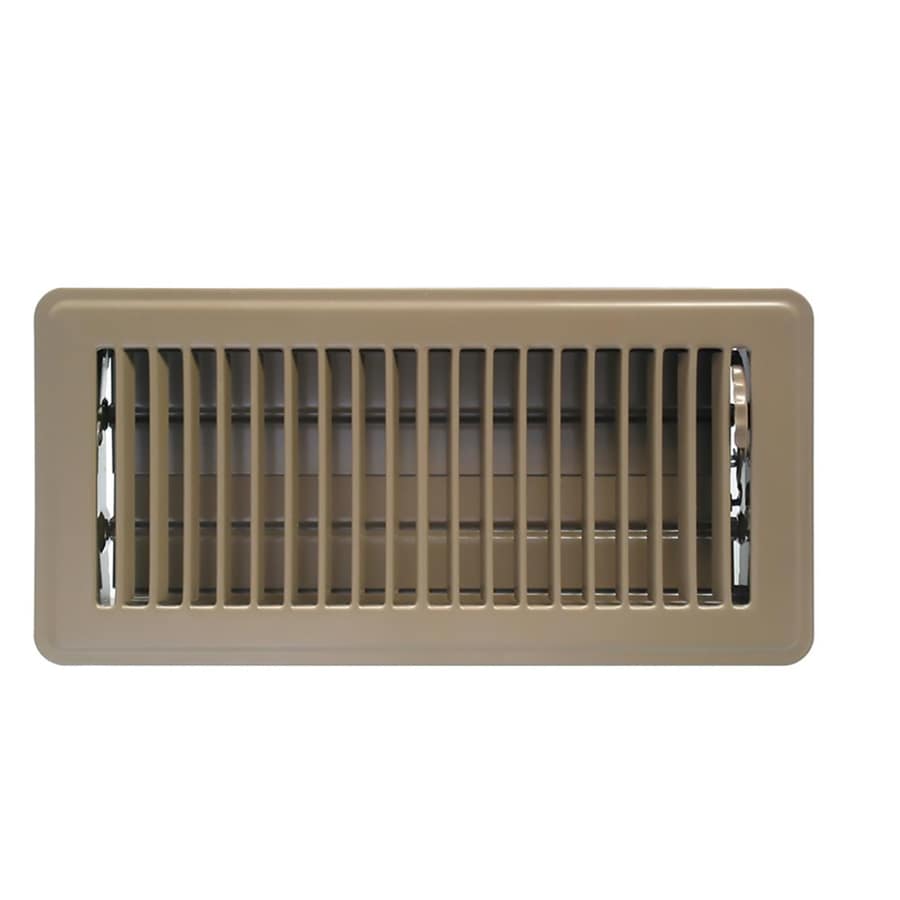
https://www.lowes.com/pd/Accord-Ven...in-x-4-0-in-Actual-11-48-in-x-5-51-in/3260573
Accord Ventilation 101 Series Painted Steel Floor Register (Rough Opening: 10.0-in x 4.0-in; Actual: 11.48-in x 5.51-in)
Rhyno
Well-known member
Those look to be interior residential vents
Also, no screen to keep bugs out
Yes, on both......
These have air flow control and the same bug control that your purchase appears to have.
Either way, screen material is cheap.....
good luck....
.


ShumanSS6.0
Well-known member
Great build D45 and that color appears to be holding up well after nearly three years. Vents will help a lot, roll up door is slick too. Any further plans on the lean to?
Thirdyfivepickup
Well-known member
Hello fellow NWI guy. I'm starting my plans for building a shed for my yard stuff and misc junk. I had initially planned on doing something small with a flat roof but your build has me wanting to do a similar style with a high roof to get more junk out of my garage. Very nice!
reader2580
Well-known member
The siding needs a fresh coat of paint...……...the finish did not nearly as long as I expected
Suggestions?
Sherwin-Williams Duration
xtremek
Well-known member
Power wash it first? To get off the flaking stuff.
nadogail
Well-known member
I've used my method in the past and its rock solid
No need for two layers of plywood
This shed will only be for pool storage items, tree stands, and all my lawn and landscape storage
I have my 1,000 sq foot shop for everything else
As you said;it's only a Pool Storage Shed, it's only a Pool Storage Shed, it's only a Pool Storage Shed.
SmartSide 3/8 in. x 4 ft. x 8 ft. Siding Panel
$24.75 per panel
http://www.homedepot.com/p/SmartSid...Siding-Panel-27874/100055901?N=5yc1vZaripZ2wi
Should I just use this 3/8" panel or should I order the 7/16"
This stuff is now $43.52 per sheet!!!
Anyways, going to be painting the shed this month
The color has faded quite a bit
Finally got around to painting the shed
Sherwin Williams colored matched the paint exactly, its spot on the same
Used around 1-3/4 gallons of Sherwin Williams Exterior Super Paint
It's a very thick paint that coated everything very very well
See how it holds up, but I would not hesitate to use this paint again
Total cost with some misc supplies was $105
xtremek
Well-known member
Pics, or it didn't happen. lol
captain14
Well-known member
Did you apply one coat or two this time around?
I believe the original job was two coats?
Has the lean-to you mentioned before placed on “ indefinite hold”?
I believe the original job was two coats?
Has the lean-to you mentioned before placed on “ indefinite hold”?
Haven't thought more about the lean to, but I would still like to
The original siding was primed and painted when it was purchased, so this is the first paint job since the shed was built in 2014
Mostly just did one coat since the exterior paint was very thick and covered everything very well
A few areas did receive two coats back to back, but it was mostly not needed

xtremek
Well-known member
The pics came in nice. Now that you've proven yourself to do professional level work, I have about 2500 sqft of buildings that needs painting. Feel free to drop by. I'll even provide food and libations.