
Bought this place about 2 years ago. The detached shop had been put up in two phases and looked like this when I got it. The photo is one I got from the seller, so all the junk in/around was his:

Notice that the carport has a half-wall that was open above. There is actually another room that runs the width of the back of the building, which, BTW, is 40x40.
This is one from the side showing the old compressor shed. That's our RV hanging out of the carport.

Unfortunately I didn't take any pictures of the inside of this thing before I began....what the former owner had done was to put some styrofoam insulation up, covered by a sheet of drywall, and then drive drywall screws right thru the R Panels. If you walked too close, it'd tear a ditch in your skin.
After much consideration, including entertaining demo'ing the thing and starting over, I decided to rip off all the existing siding, and just reskin the damn thing. The roof was good, except for the whirlybirds and the cooler jack, so I pulled and replaced those sheets also.
For the carport area, we just covered the wall from ground to eaves, and then guttered the entire building. On the front of the carport, we installed a 12x10 overhead, along with a commercial 48" man door. For comparison, here's the "old" exterior again:
Followed by the new exterior:

Quite a difference. Notice the cooler installed on the roof of the compressor shed. It's ducted straight thru to the opposite side, as you'll see in the interior pics.
Ok, now we had an intact, new, pretty skin. But some challenges on interior finish. Particularly that block half-wall. This pic shows how we framed from the block up to the eaves, and also shows how we did the balance of the interior. We took steel studs, cut tabs a couple of inches from the ends, and bent them out before screwing directly to the girts. Enabled batting to slide in like wood studs.

Another pic showing the copper for air lines, as well as an exterior hose bib, along with outlets for 110 and 220. Note the small number of sheets of rock ready to go up.

At this point, we pulled wire for outlets every 8 feet, speaker wire for all three rooms, cable for TV, and put multiple compressed air (copper!) bibs in every room. The back room, which is 10 ft deep by 34 wide was designated for storage. To maximize this, we posted in a mezzanine and installed pull down stairs for access. Looking up into this area here:

You can see the stairs at the far end. Here's a shot looking up the stairs:

Another showing some of the storage:

The room that was the carport is 25 wide by 35 deep. This is a pic from the man door looking back. Note the evaporative cooler ducting, the large access to the back storage room, and, of course the Race Deck flooring. Actually, it's MotoFloor from Costco. I used laminate floor padding under all the tiles, and this has worked great to eliminate the 'clicking' as you walk.
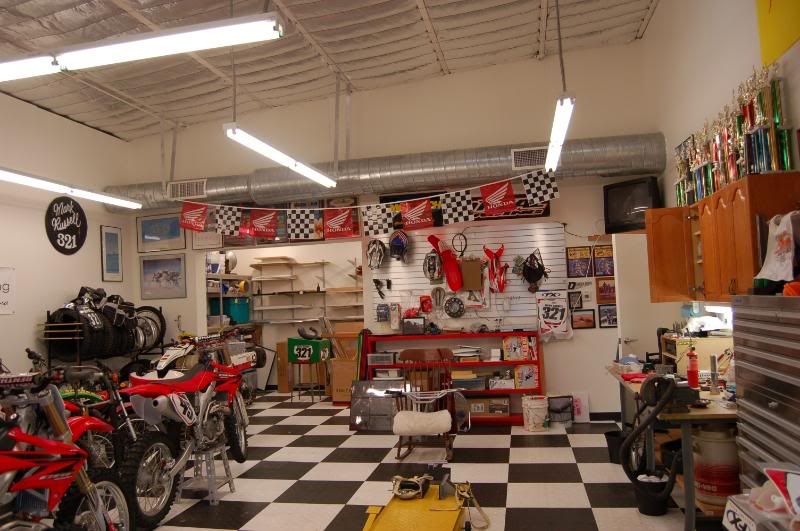
Another shot looking at the old kitchen cabs I used from the main house remodel. You can also see some of the slat wall I put up for wall storage. Got a bunch of this for free when a buddy was pulling tons of it out of a big commercial remodel he was doing. You'll see more in the following shots of the woodworking room....

Here's one looking back at the man door:

Ok, here's a few shots of the woodworking room. I haven't finished the setup in here yet. Just got the machines spread out and slat wall up. Several boxes even left to unpack in here, along with doing the dust collection system.


The lighting is all 4' tandem T-8's, 48 feet worth in each room. Walls are semi-gloss white. The ceiling is batting, with aluminum laid under wire supports. I don't recall what they called this, but it sure turned out good from both a functional as well as an aesthetic standpoint.
My thanks to everyone on here for their great ideas and suggestions, even though they weren't necessarily directed to me. I don't think a shop is ever really finished, but at some point I felt like I needed to take some pics and post them to pay homage to those that have gone before me. Or something like that.....
MR
Notice that the carport has a half-wall that was open above. There is actually another room that runs the width of the back of the building, which, BTW, is 40x40.
This is one from the side showing the old compressor shed. That's our RV hanging out of the carport.
Unfortunately I didn't take any pictures of the inside of this thing before I began....what the former owner had done was to put some styrofoam insulation up, covered by a sheet of drywall, and then drive drywall screws right thru the R Panels. If you walked too close, it'd tear a ditch in your skin.
After much consideration, including entertaining demo'ing the thing and starting over, I decided to rip off all the existing siding, and just reskin the damn thing. The roof was good, except for the whirlybirds and the cooler jack, so I pulled and replaced those sheets also.
For the carport area, we just covered the wall from ground to eaves, and then guttered the entire building. On the front of the carport, we installed a 12x10 overhead, along with a commercial 48" man door. For comparison, here's the "old" exterior again:
Followed by the new exterior:
Quite a difference. Notice the cooler installed on the roof of the compressor shed. It's ducted straight thru to the opposite side, as you'll see in the interior pics.
Ok, now we had an intact, new, pretty skin. But some challenges on interior finish. Particularly that block half-wall. This pic shows how we framed from the block up to the eaves, and also shows how we did the balance of the interior. We took steel studs, cut tabs a couple of inches from the ends, and bent them out before screwing directly to the girts. Enabled batting to slide in like wood studs.
Another pic showing the copper for air lines, as well as an exterior hose bib, along with outlets for 110 and 220. Note the small number of sheets of rock ready to go up.
At this point, we pulled wire for outlets every 8 feet, speaker wire for all three rooms, cable for TV, and put multiple compressed air (copper!) bibs in every room. The back room, which is 10 ft deep by 34 wide was designated for storage. To maximize this, we posted in a mezzanine and installed pull down stairs for access. Looking up into this area here:
You can see the stairs at the far end. Here's a shot looking up the stairs:
Another showing some of the storage:
The room that was the carport is 25 wide by 35 deep. This is a pic from the man door looking back. Note the evaporative cooler ducting, the large access to the back storage room, and, of course the Race Deck flooring. Actually, it's MotoFloor from Costco. I used laminate floor padding under all the tiles, and this has worked great to eliminate the 'clicking' as you walk.
Another shot looking at the old kitchen cabs I used from the main house remodel. You can also see some of the slat wall I put up for wall storage. Got a bunch of this for free when a buddy was pulling tons of it out of a big commercial remodel he was doing. You'll see more in the following shots of the woodworking room....
Here's one looking back at the man door:
Ok, here's a few shots of the woodworking room. I haven't finished the setup in here yet. Just got the machines spread out and slat wall up. Several boxes even left to unpack in here, along with doing the dust collection system.
The lighting is all 4' tandem T-8's, 48 feet worth in each room. Walls are semi-gloss white. The ceiling is batting, with aluminum laid under wire supports. I don't recall what they called this, but it sure turned out good from both a functional as well as an aesthetic standpoint.
My thanks to everyone on here for their great ideas and suggestions, even though they weren't necessarily directed to me. I don't think a shop is ever really finished, but at some point I felt like I needed to take some pics and post them to pay homage to those that have gone before me. Or something like that.....
MR
Last edited:


 Why do you want to race Buickfarmer ?
")