To avoid these ads, REGISTER NOW!

Shop secrets

rmack898

Well-known member
Joined
Jan 23, 2007
Messages
3,163
Location
Honu Grove NE Florida
I did a search for shop tips/tricks in this forum and didn't see anything.

Shop secrets are those little things that are so simple, and make an otherwise difficult task, easy. At the first shop I worked at when I was 17, there was an old guy named Artie that always had a trick up his sleeve for getting a difficult job done. I can't even begin to remember how many things he taught me, but all the little tid bits of knowledge he passed on to me have made me a better mechanic/machinist/fabricator. I'm always eager to pass on what I've learned over the years to others that I work with like Artie did with me.

So here's a shop secret that I got from a guy named Ray on the PM forum about 10 years ago.
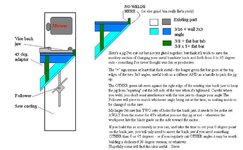
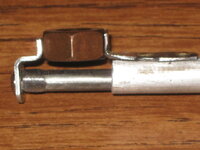
If you have a horizontal band saw in your shop, you need to make this little tool.

Find a piece of large sch 40 or 80 pipe. 4" pipe would work but 6" would be better. Slice off a 1" piece off the pipe. Drill a 3/4" hole through the wall of the 1" slice of pipe, and then cut the slice in half with the cut going right through the center of the 3/4" hole. Now the tool is complete.

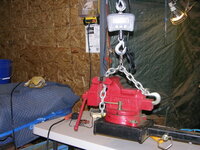
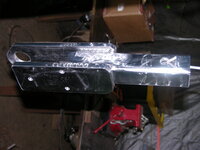
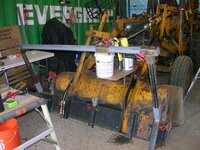
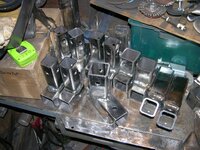
Your new tool is used to cut short pieces on the band saw that will not fit in the vise. The side of the tool with the half of 3/4" hole is used for round stock. Pictures are worth than my rambling words so here's how it works.
In the last picture, I'm cutting a 3/4x1" piece of aluminum that is 2" long in half on an Ellis 1800

Please add any shop secrets you have to this thread.
tempImageMHpxUn.jpg
tempImageJhcBdj.jpg
tempImageKYyhxG.jpg
 
To avoid these ads, REGISTER NOW!

dzahm

Well-known member
Joined
Oct 14, 2019
Messages
208
Location
NC
very cool- havent seen this before - stealing it for my garage too!!
 

stinkity stoink

Well-known member
Joined
Apr 8, 2007
Messages
731
Location
New Jersey
I hope this thread takes off. I can’t think of anything good to add to it though. lol
maybe I will get enlightened today in the garage.
 

MushCreek

Well-known member
Joined
Jan 14, 2015
Messages
9,768
Location
Upstate South Carolina
I made extended jaws for my saw so I can grip small pieces closer to the blade. Just a couple chunks of thick steel, bolted to the jaws with flat-head machine screws. I like the above idea. I usually just hunt around for a similar size piece of scrap to keep the jaws parallel. For wider pieces, I use the step parallels from my mill. For small pieces, sometimes the down pressure of the blade wants to tip the piece into the gap. I put a thin piece of scrap under the piece I'm cutting to prevent that. I spent much of my career using horizontal bandsaws. I currently have a Kalamazoo 824. Yes, it will cut a 24" wide piece! It's too big, really, but it's a nice heavy-duty unit, and I picked it up cheap. I put it on wheels, and have a space to park it.

I'll add a tip. Ever try to turn down thin plastic rod in a lathe? The problem is that it's so flexible, it wants to push away from the cutter. What I do is take a chunk of steel that fits your lathe tool post and drill a hole the same size as the plastic stock. On the outboard side, mill a slot to hold a lathe bit, and put in a couple set screws to hold the blade. If you're going to do a lot of this kind of work, you could make an adjustable slide to move the lathe bit. I usually just do trial and error to get the desired size. The hole through the fixture holds the stock steady right next to the bit, so no deflection. You can turn down a very long piece with this set-up. I've also used one to turn down thin metal stock, too. Note- You have to set it to turn down to the finished size in one pass.
 

Bessy

Well-known member
Joined
Dec 18, 2012
Messages
994
Location
Ontario, Canada
Ever try to turn down thin plastic rod in a lathe? The problem is that it's so flexible, it wants to push away from the cutter. What I do is take a chunk of steel that fits your lathe tool post and drill a hole the same size as the plastic stock. On the outboard side, mill a slot to hold a lathe bit, and put in a couple set screws to hold the blade. If you're going to do a lot of this kind of work, you could make an adjustable slide to move the lathe bit. I usually just do trial and error to get the desired size. The hole through the fixture holds the stock steady right next to the bit, so no deflection. You can turn down a very long piece with this set-up. I've also used one to turn down thin metal stock, too. Note- You have to set it to turn down to the finished size in one pass.
Do you have any photos of what you're referring to? :headscrat I think I get it, but a visual would be super helpful!
 

BukitCase

Well-known member
Joined
Apr 11, 2017
Messages
1,075
Location
Oregon
These days I use my old 580b for anything over about 50 lbs, or sometimes just use a hand truck - I've developed a "tinker toy" system, consists (so far) of about 40 "adapters", all based on 2" receiver parts such as els, tees, 45's, all in various combos of male/female - the system's evolved as I needed other "helping hands", and some of the "toys" have gotten a bit heavy - so about 10 years ago I "upgraded" the loader bucket by removing the two HF receiver hitches and replacing them with 7 (not a typo)

All the stuff I use these days is full 1/4" wall 2.030" ID bulk tubing for receivers, and 1/4" wall 2" OD tube for inserts. Due to the heavier "toys" the new bucket receivers got a real handy mod -

I milled off about 1/2" of just the top wall of the receivers, and will do the same to any future receivers on benches and weld tables - you can see this in the first pic (and the last one) -

What this does is to NOT make you get a heavy toy perfectly aligned before some of the weight is supported - you just rest the very end of the male insert on the "*******" part, then you can concentrate on getting the REST of the shank aligned WITHOUT having to support all the weight yourself.

One of my inserts is a 6" vise, done LONG before Wilton came out with their version - downside is, it weighs 100 lbs (about 60 lbs above my "willingness" these days...

Also notice in that last pic - the center receiver is mounted to a piece of 10" heavy channel that spans between the two loader mounts, and is full welded - 2 purposes; one, prior to the change that bucket had a slight wow in it - about a dozen heavy clamps and a couple 6' pry bars held the channel firm against the bucket while I welded it 100% - this gives me a solid center lift point when I'd rather not mess with 2 chains pulling sideways.

Also note that 5 of the 7 receivers can be used from front. rear, or BOTH; only ones that're front ONLY are the two in line with loader arms, the pin bosses interfere with rear inserts.

Anyway, check out the bucket pic - this receiver mod even makes light weight stuff easier/quicker to insert - last pic is a handful of "fittings" raising the second half of a container roof (ALSO built with 2" tubing, but .120" wall)... Steve
 

Attachments

  • DSCN2190.JPG
    DSCN2190.JPG
    498.8 KB · Views: 414
  • DSCN2218.JPG
    DSCN2218.JPG
    277.2 KB · Views: 382
  • DSCN2221.JPG
    DSCN2221.JPG
    307.1 KB · Views: 353
  • DSCN2689.JPG
    DSCN2689.JPG
    352.9 KB · Views: 349
  • DSCN2690.JPG
    DSCN2690.JPG
    407.3 KB · Views: 372
  • DSCN2768.JPG
    DSCN2768.JPG
    445 KB · Views: 448
Last edited:

BukitCase

Well-known member
Joined
Apr 11, 2017
Messages
1,075
Location
Oregon
Nope - had an accident when I was 19, docs wanted to fuse 3 or 4 lower vertebrae - when I found out the downside, I opted out. Taught myself how to do what the chiropractor did when things got out of place, been doing it occasionally for 58 more years...

Fast forward to now - I'm 77, living on 10 acres, NEVER have enough covered/enclosed space, two tractors + the backhoe, several 6' wide implements including box blade, regular blade, tiller, soil pulverizer, flail mower - I maintain a 32x50' garden, about 400' of gravel driveways, about 200' of privacy hedge, trim or remove any trees that get obnoxious...

All while trying NOT to lose any MORE mobility.

I have (and use) MIG, TIG, Stick, O/A and plasma, mill, and a complete cabinet level wood shop.

I have enough things going on at any given time, that if a job takes too long, causes me pain, or just pisses me off I tend to "re-invent" it - the "tinker toys" allow me to cobble up a TEMPORARY solution to a multitude of jobs - to date, those include (mini) logging, moving 20' bundles of steel for projects, moving heavy implements, full units of lumber/siding, only needing to handle tree trimmings ONCE (when they're cut), driveway maintenance, burying dead pets, keeping brush/weeds down on 2 pastures (built a sprayer with 12' boom AND a 50' hose reel/wand spot sprayer) - pretty sure I forgot another dozen or so...

If I find myself "assembling" a particular "toy" more than 3 or 4 times, it goes on the FAB list and eventually becomes a single plug-in item.

In MY mind (and that's the ONLY one I gotta live in :LOL:) most of the stuff I do isn't so much "addiction" as it is "Work smart, not hard"... Steve
 
To avoid these ads, REGISTER NOW!

dkmc

Well-known member
Joined
Jan 20, 2008
Messages
949
Location
NYS--Upstate in the corn fields
That's quite an impressive and inventive system. You could probably build a business around that concept.

These days I use my old 580b for anything over about 50 lbs, or sometimes just use a hand truck - I've developed a "tinker toy" system, consists (so far) of about 40 "adapters", all based on 2" receiver parts such as els, tees, 45's, all in various combos of male/female - the system's evolved as I needed other "helping hands", and some of the "toys" have gotten a bit heavy - so about 10 years ago I "upgraded" the loader bucket by removing the two HF receiver hitches and replacing them with 7 (not a typo)

All the stuff I use these days is full 1/4" wall 2.030" ID bulk tubing for receivers, and 1/4" wall 2" OD tube for inserts. Due to the heavier "toys" the new bucket receivers got a real handy mod -

I milled off about 1/2" of just the top wall of the receivers, and will do the same to any future receivers on benches and weld tables - you can see this in the first pic (and the last one) -

What this does is to NOT make you get a heavy toy perfectly aligned before some of the weight is supported - you just rest the very end of the male insert on the "*******" part, then you can concentrate on getting the REST of the shank aligned WITHOUT having to support all the weight yourself.

One of my inserts is a 6" vise, done LONG before Wilton came out with their version - downside is, it weighs 100 lbs (about 60 lbs above my "willingness" these days...

Also notice in that last pic - the center receiver is mounted to a piece of 10" heavy channel that spans between the two loader mounts, and is full welded - 2 purposes; one, prior to the change that bucket had a slight wow in it - about a dozen heavy clamps and a couple 6' pry bars held the channel firm against the bucket while I welded it 100% - this gives me a solid center lift point when I'd rather not mess with 2 chains pulling sideways.

Also note that 5 of the 7 receivers can be used from front. rear, or BOTH; only ones that're front ONLY are the two in line with loader arms, the pin bosses interfere with rear inserts.

Anyway, check out the bucket pic - thisreceiver mod even makes light weight stuff easier/quicker to insert - last pic is a handful of "fittings" raising the second half of a container roof (ALSO built with 2" tubing, but .120" wall)... Steve
 

BukitCase

Well-known member
Joined
Apr 11, 2017
Messages
1,075
Location
Oregon
Thanks DK; yeah, I probably could - but at 77, even WITH all my sneakiness just keeping my little 10 acre patch half-*** under control is enough - Right now, as long as I can still crawl up into a tractor seat I can FAKE the rest - REALLY not interested in going to an OF home before they "pat me in the face with a shovel" :evil: ... Steve
BTW, I have TONS more pics of different operations using the "toys", if there's enough interest I can post more...
 

Feralghoul88

Well-known member
Joined
Feb 10, 2019
Messages
151
Location
Kentucky
I work in overhead cranes, and one tip ive picked up that didnt really occur to me until i started was how helpful it is to have a good set of wedges and cribbing. I took a 2x2x18" piece of cold rolled square stock and cut it up into three wedges, one 2" thick to 1/4" x 18" and two 1 3/8" down to like 1/8" with the rest of the stock. grind them relatively smooth, and polish if you really want to go the extra mile. With these simple wedges one man can lift many thousands of pounds with a simple 3lb mini sledge. There are of course other things you can do with them like remove stuck pulleys or split things. Picking really heavy things up and then just tapping the wedge side to side or from the opposite side will get them back out.

I love things like this, especially tips that fall into the category of "old timer" knowledge. I frequently work alone and dont like for things that should be done with two people to slow me down, sometimes knowing the ways old timers would have done something before modern hydraulics, fancy winches and multi-thousand dollar equipment means the difference between getting something done and not at all.
 

BukitCase

Well-known member
Joined
Apr 11, 2017
Messages
1,075
Location
Oregon
OK, here goes - thought I'd start with one that might be of interest to just about anybody with a horizontal bandsaw -

1. I first posted the drawing maybe 10 years or so ago -

2. Looks like this when done

3. Note the little tab that goes UNDER the vise jaw - without it, the adapter will ride up.

4. Also note the little angled tab just to the left of the jaw pivot bolt (see the green arrow) - without this, the whole adapter will "squirt out" of the vise jaws when you try to tighten them.

Finally, I didn't quite do this on the first one I did, but should have - when you build one of these, do NOT cut the 45 degree side off on the end closest to the blade - instead, LEAVE it a bit long, and AFTER you have everything else welded up THEN mount the adapter in the saw vise, make sure tightening the vise does NOT cause the adapter to move - THEN, assuming your saw ALREADY cuts straight and doesn't WANDER, clamp the adapter in the vise and cut the excess off (This piece is the blue green one on the sketch)

Doing it this way gives you an EXACT reference point to know where the point of your 45 degree cut is gonna be. Makes life MUCH easier when doing mitered corners... Steve

Oh, here's the bigger version on my Jet 8x12 - I DID remember to cut this one LAST...
 

Attachments

  • 45Adapt01.JPG
    45Adapt01.JPG
    149.9 KB · Views: 312
  • DSCN1545.JPG
    DSCN1545.JPG
    114.1 KB · Views: 272
  • DSCN1546.JPG
    DSCN1546.JPG
    114.8 KB · Views: 231
  • DSCN1549b.jpg
    DSCN1549b.jpg
    190.2 KB · Views: 223
  • JetSawBase-15.JPG
    JetSawBase-15.JPG
    255.8 KB · Views: 259

BukitCase

Well-known member
Joined
Apr 11, 2017
Messages
1,075
Location
Oregon
Next -
1. Where most of the toys live - so far I've only done 6 extenders (all 1/4" wall 2" tube, drilled for 5/8" pins - 2 are 30", 2 48", and 2 6 footers.

2 - the vise that convinced me to do the "step" mod to all receivers -

3 - Base for 1500# 120 volt winch

4 - painted

5 - Assembled - can be either single or double line. Runs off small inverter genny that sits on a rear fender of 580B

6 - Bucket set up for bulb replacement, 15' yard lights (iffy neighbors - told 'em I just needed a better sight pattern at nite)
 

Attachments

  • DSCN2875.JPG
    DSCN2875.JPG
    392.1 KB · Views: 259
  • DSCN2901.JPG
    DSCN2901.JPG
    474.6 KB · Views: 232
  • DSCN3130.JPG
    DSCN3130.JPG
    251.4 KB · Views: 211
  • DSCN3132.JPG
    DSCN3132.JPG
    239.4 KB · Views: 194
  • DSCN3135.JPG
    DSCN3135.JPG
    278.7 KB · Views: 204
  • DSCN3142.JPG
    DSCN3142.JPG
    528.2 KB · Views: 217
Last edited:

BukitCase

Well-known member
Joined
Apr 11, 2017
Messages
1,075
Location
Oregon
Next - 2nd bucket curl cylinder rebuild
1 - Wide shot - these tend NOT to wanna come out, doing it under pressure is messy/expensive...

2 - Rod's out, 3/4 ton comealong helps it "come along" (wonder if that's where they got that name?):evil:

3 - Rod in the vise - the little ones piston bolt a little over 400 ft lbs, hence the solid vise mount

4 - tube bender in the vise, extend tube and fittings were leaking -

5 - Back together, zoom in to see the new tube/fitting...

Only 5 more cylinders to rebuild, all on the hoe - biggest one's piston bolt torque spec is 1200 ft lbs - my way will be my 200# bouncing on the end of a 6' cheater bar - to get it loose, it'll be the 1" impact @ 175 PSI -

You'll only ignore torque settings on hydraulics ONCE, it's a whole lotta NOT fun to extract an un-attached piston from the wrong end of a cylinder ... Steve
 

Attachments

  • DSCN3261.JPG
    DSCN3261.JPG
    512.9 KB · Views: 209
  • DSCN3271.JPG
    DSCN3271.JPG
    500.9 KB · Views: 175
  • DSCN3272.JPG
    DSCN3272.JPG
    518.6 KB · Views: 162
  • DSCN3275.JPG
    DSCN3275.JPG
    375.2 KB · Views: 157
  • DSCN3290.JPG
    DSCN3290.JPG
    516.6 KB · Views: 203

BORING HOP YARD

Well-known member
Joined
Jan 13, 2007
Messages
1,101
Location
Boring Oregon
Lots of good information BukitCase, I have made similar "tinker toys" for my rotisserie.
I have mounted whole body's, frames, cabs and sometimes doors, each one requires a different set up to attach to the rotisserie.
Thanks for sharing, everyone!
 

Monza Harry

Well-known member
Joined
Dec 29, 2018
Messages
1,433
Location
Windsor ON
I really thought this would have had more traction as a thread. I have a couple to share.
When finding center of an odd/difficult shaped items in a Vee Block, center can be found by leaving your dial test indicator at one height and rotate until you have even contact on each face.
You may also note that I don't use "zero" I use 10 as when rotating the indicator I find it easier to differentiate 9 and 11 from +/- 1 remember your perspective is shifted 180° from side to side [or back to front this is easiest for confusion from my experience]. Harry
 

Attachments

  • 20220413_202408.jpg
    20220413_202408.jpg
    172.7 KB · Views: 143
  • 20220413_202414.jpg
    20220413_202414.jpg
    242.2 KB · Views: 176
Last edited:

bonneyman

Well-known member
Joined
Apr 22, 2010
Messages
8,792
Location
Desert SW
While working at Ace Hardware it was a pain to remove the stand-up displays that were attached to the upright supports of the aisles. If it was attached with bolts and nuts you couldn't get down the center support to hold the nut while you unscrewed the bolt. Saw a tool made for this purpose, but I needed one at least 12" long. So I made it. Aluminum tubing and a steel rod with some sheet metal. Cost me a few bucks worth of material and 2 hours in the shop. Can hold bolts from #8 up to 9/16", and can fit into a 3/4" black iron pipe. Kinda crude but works like a charm.

I call it "Vise on a stick". lol
 

Attachments

  • IMG_5307.JPG
    IMG_5307.JPG
    99.9 KB · Views: 179
  • IMG_5309.JPG
    IMG_5309.JPG
    107.4 KB · Views: 156
  • IMG_5303.JPG
    IMG_5303.JPG
    100.7 KB · Views: 146
  • IMG_5305.JPG
    IMG_5305.JPG
    84.5 KB · Views: 142
Last edited:

ArkTinkerer

Well-known member
Joined
Dec 29, 2010
Messages
369
I work in overhead cranes, and one tip ive picked up that didnt really occur to me until i started was how helpful it is to have a good set of wedges and cribbing. I took a 2x2x18" piece of cold rolled square stock and cut it up into three wedges, one 2" thick to 1/4" x 18" and two 1 3/8" down to like 1/8" with the rest of the stock. grind them relatively smooth, and polish if you really want to go the extra mile. With these simple wedges one man can lift many thousands of pounds with a simple 3lb mini sledge. There are of course other things you can do with them like remove stuck pulleys or split things. Picking really heavy things up and then just tapping the wedge side to side or from the opposite side will get them back out.

I like wedges but make them in pairs and multiple pairs is preferred. You place the pair opposing each other and slide them together to get a flat surface that is infinitely adjustable. Pulling the two sides together with a clamp is even more powerful and less prone to slipping. I've cut scrap into opposing wedges and used it to force dents out of square tubing and channels for trolleys.
 
To avoid these ads, REGISTER NOW!
Top Bottom