To avoid these ads, REGISTER NOW!

Show off your sheet metal fab projects

NASTYZEN

Well-known member
Joined
Jun 11, 2010
Messages
2,823
Location
St-Colomban,Que. Canada
Thanks for the comments guys. Littletoes, the wagon gate was my work, I think Nastyzen had just quoted my post. He does the killer work on aluminum bodied cars made from scratch.....:bowdown: Oh to be an apprentice.....wax on, wax off.. :bounce:


Got it put back together this morning. They even had matching yellow caulking at the bus dealership to seal everything up...


Picture043.jpg


Picture044.jpg


Picture045.jpg

Look's great Robert.:thumbup:
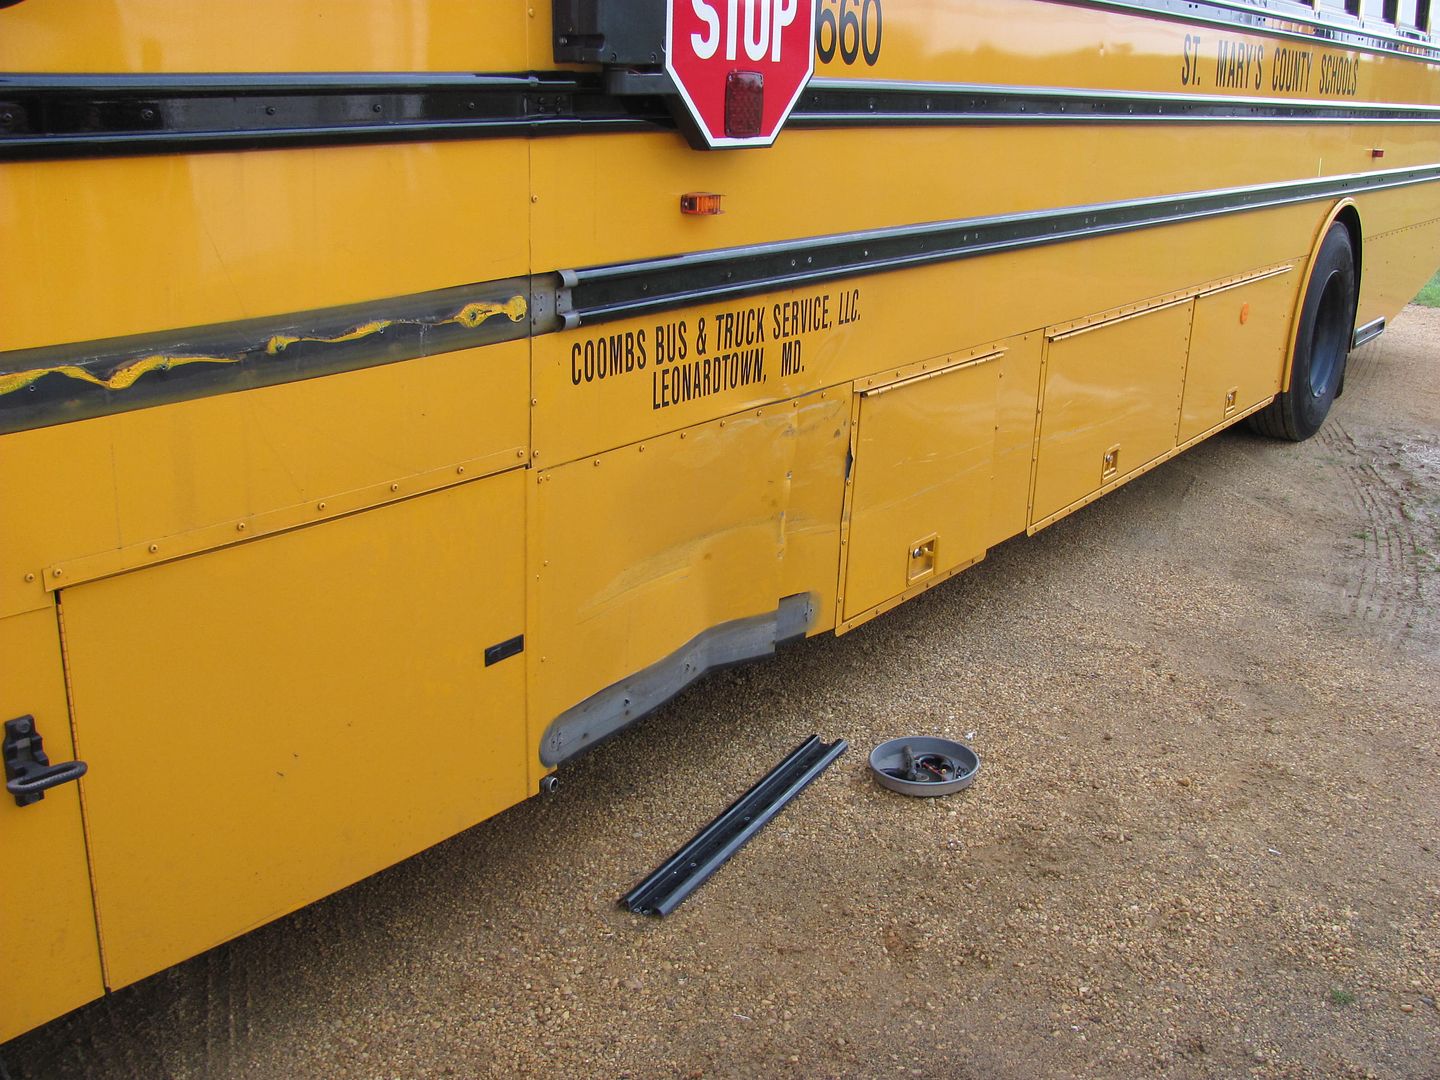
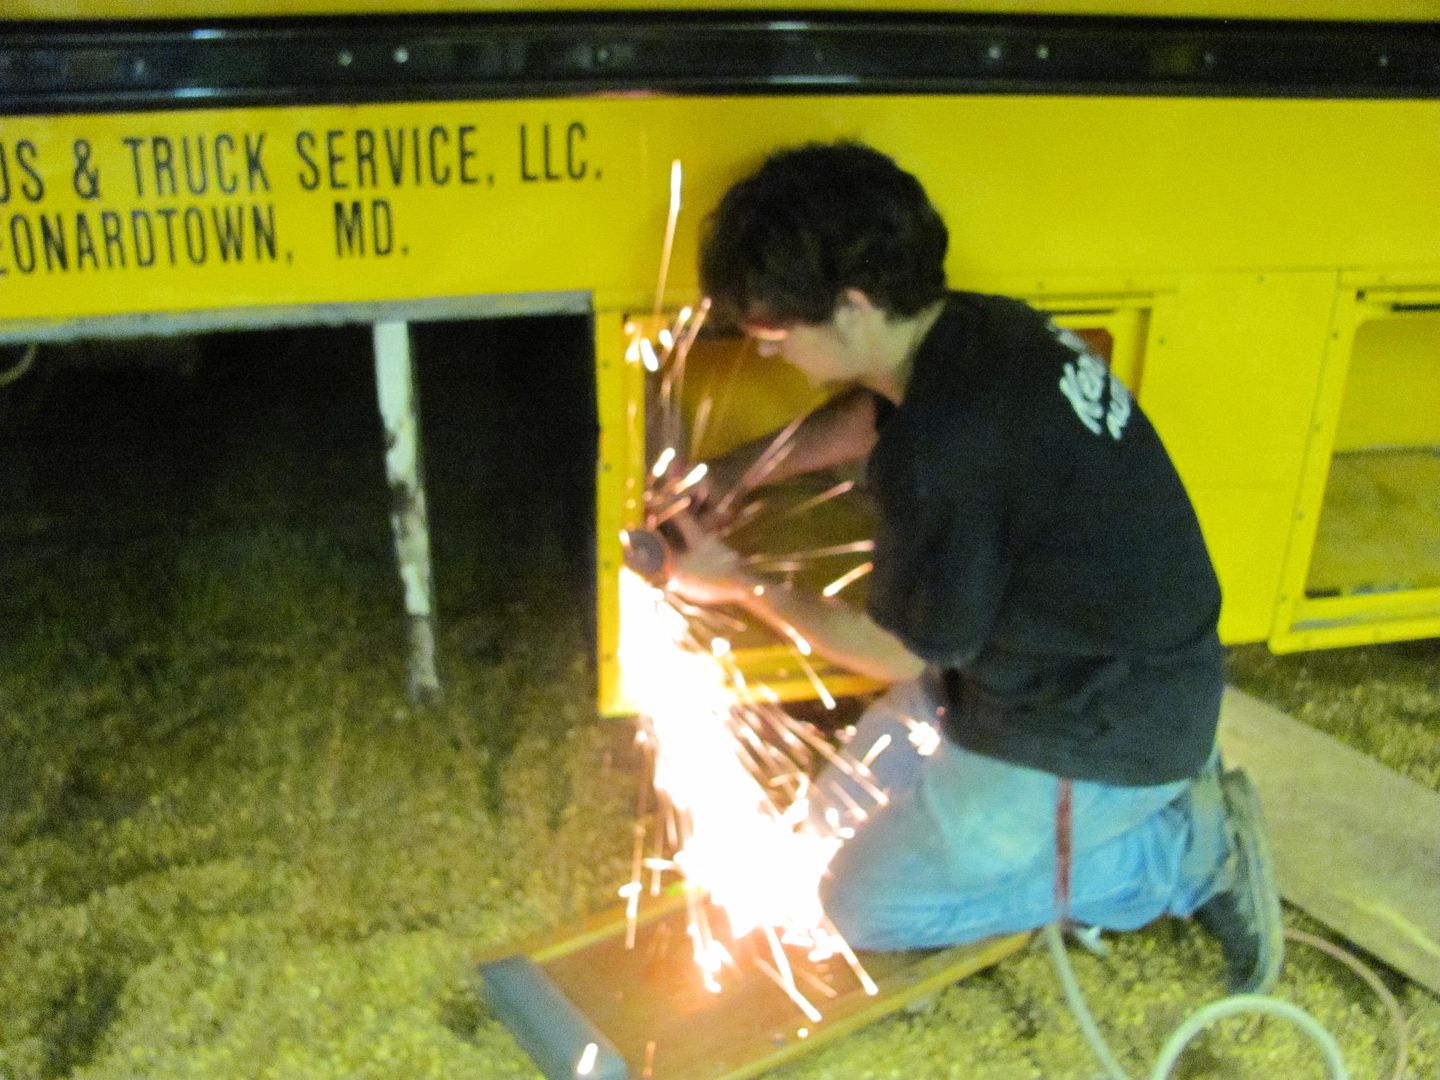
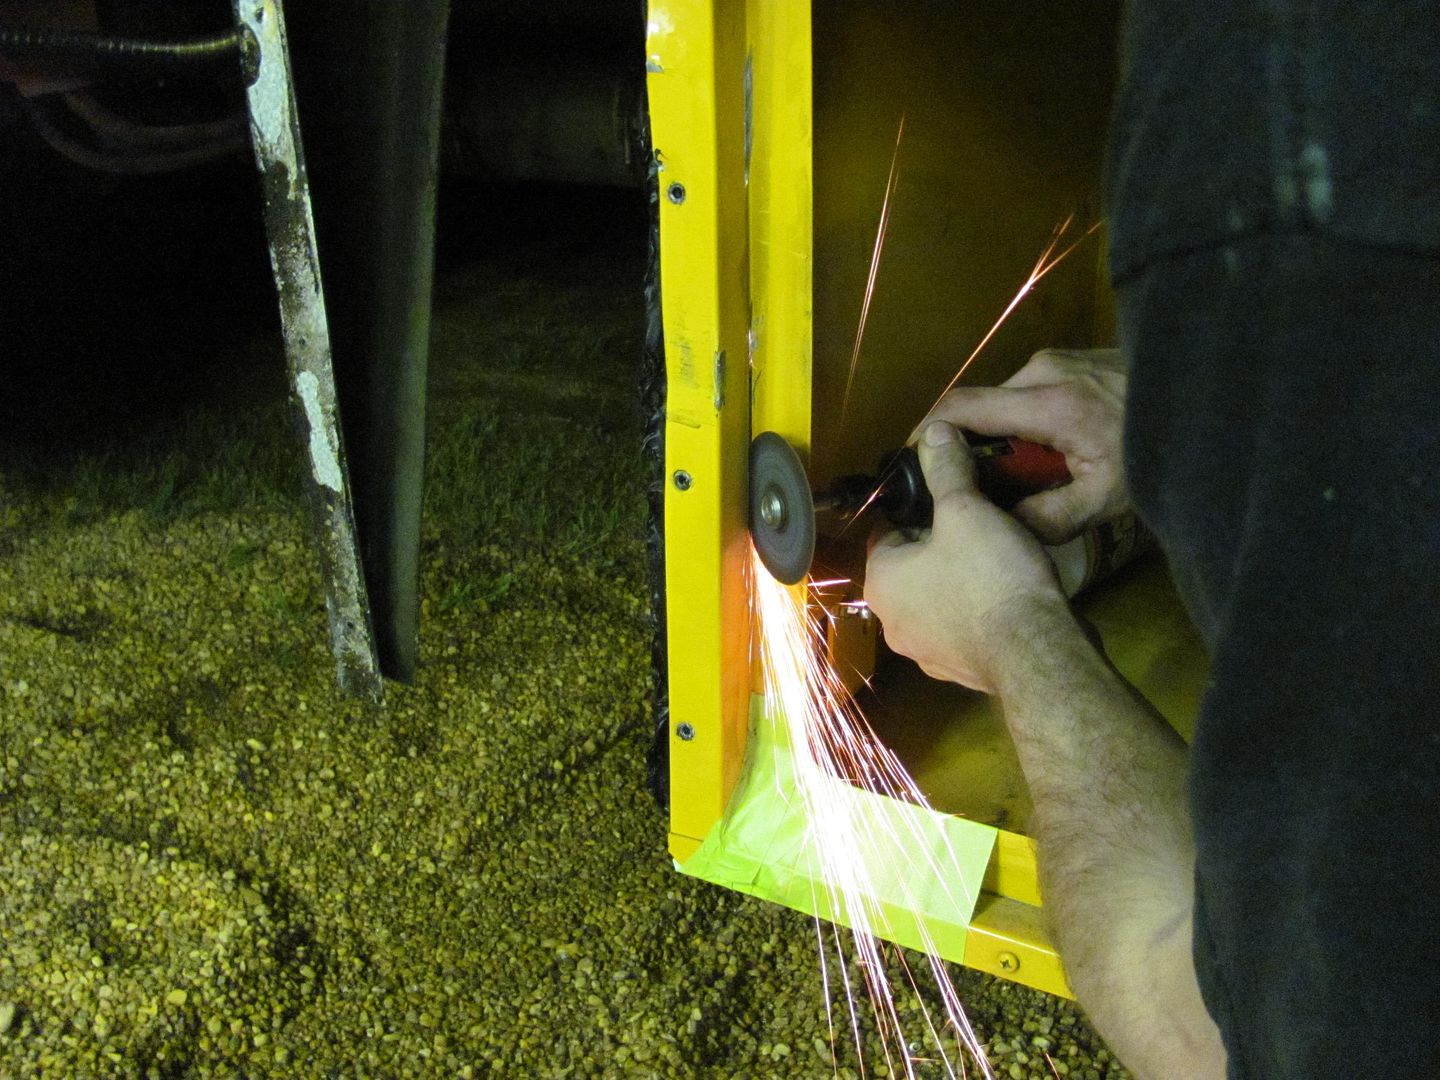
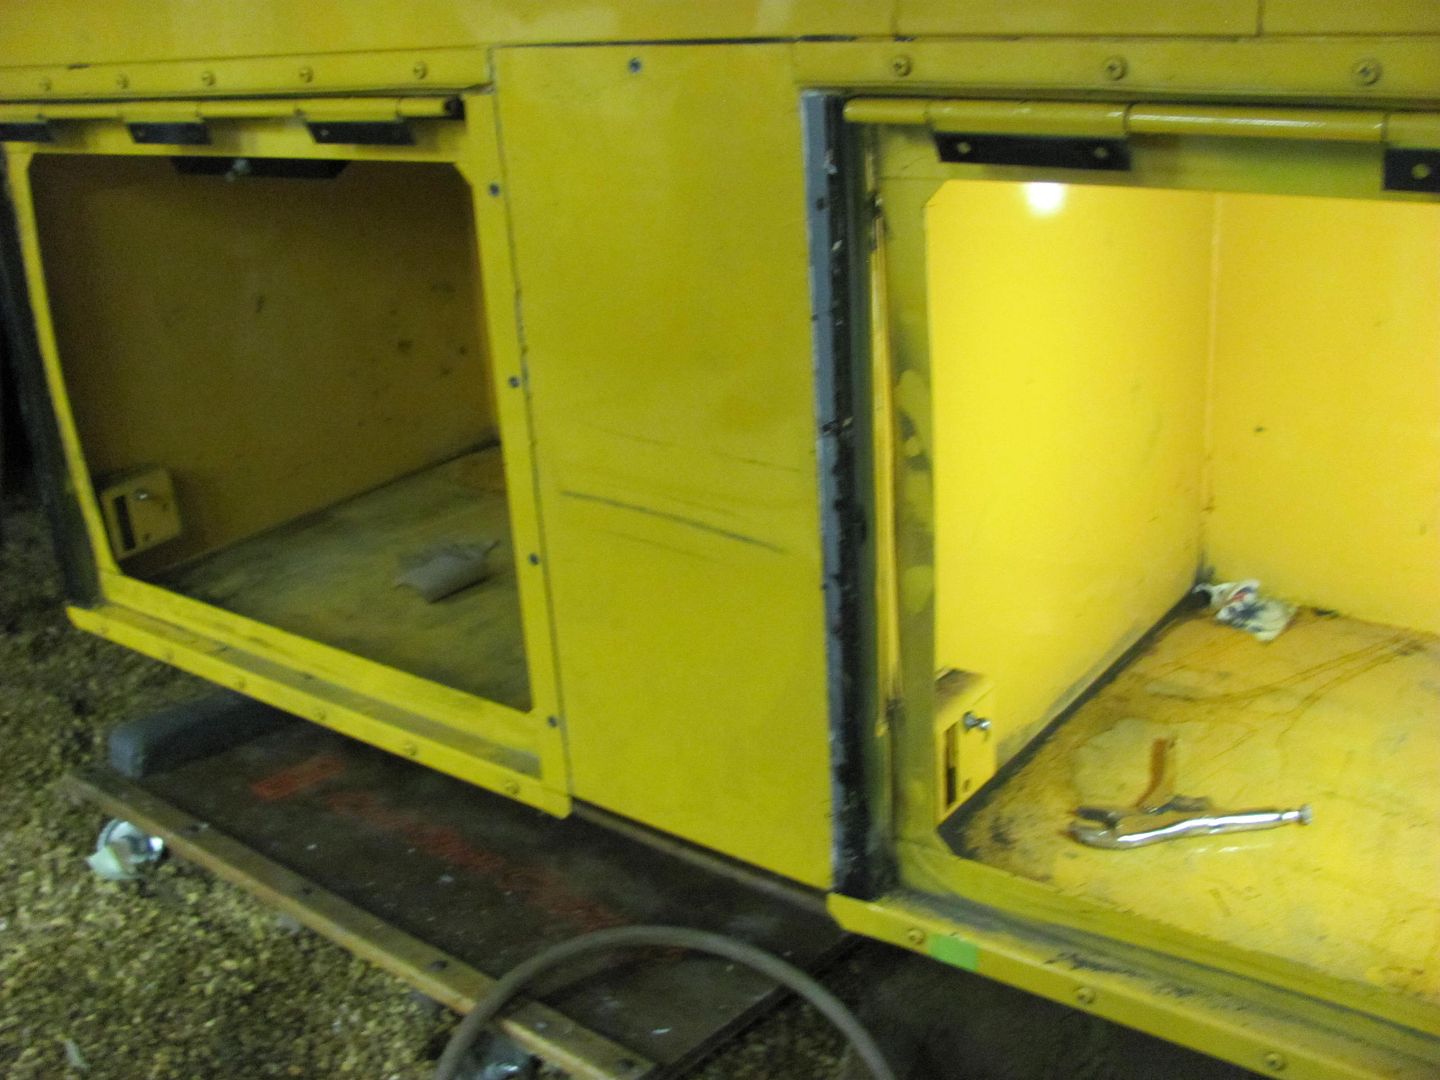
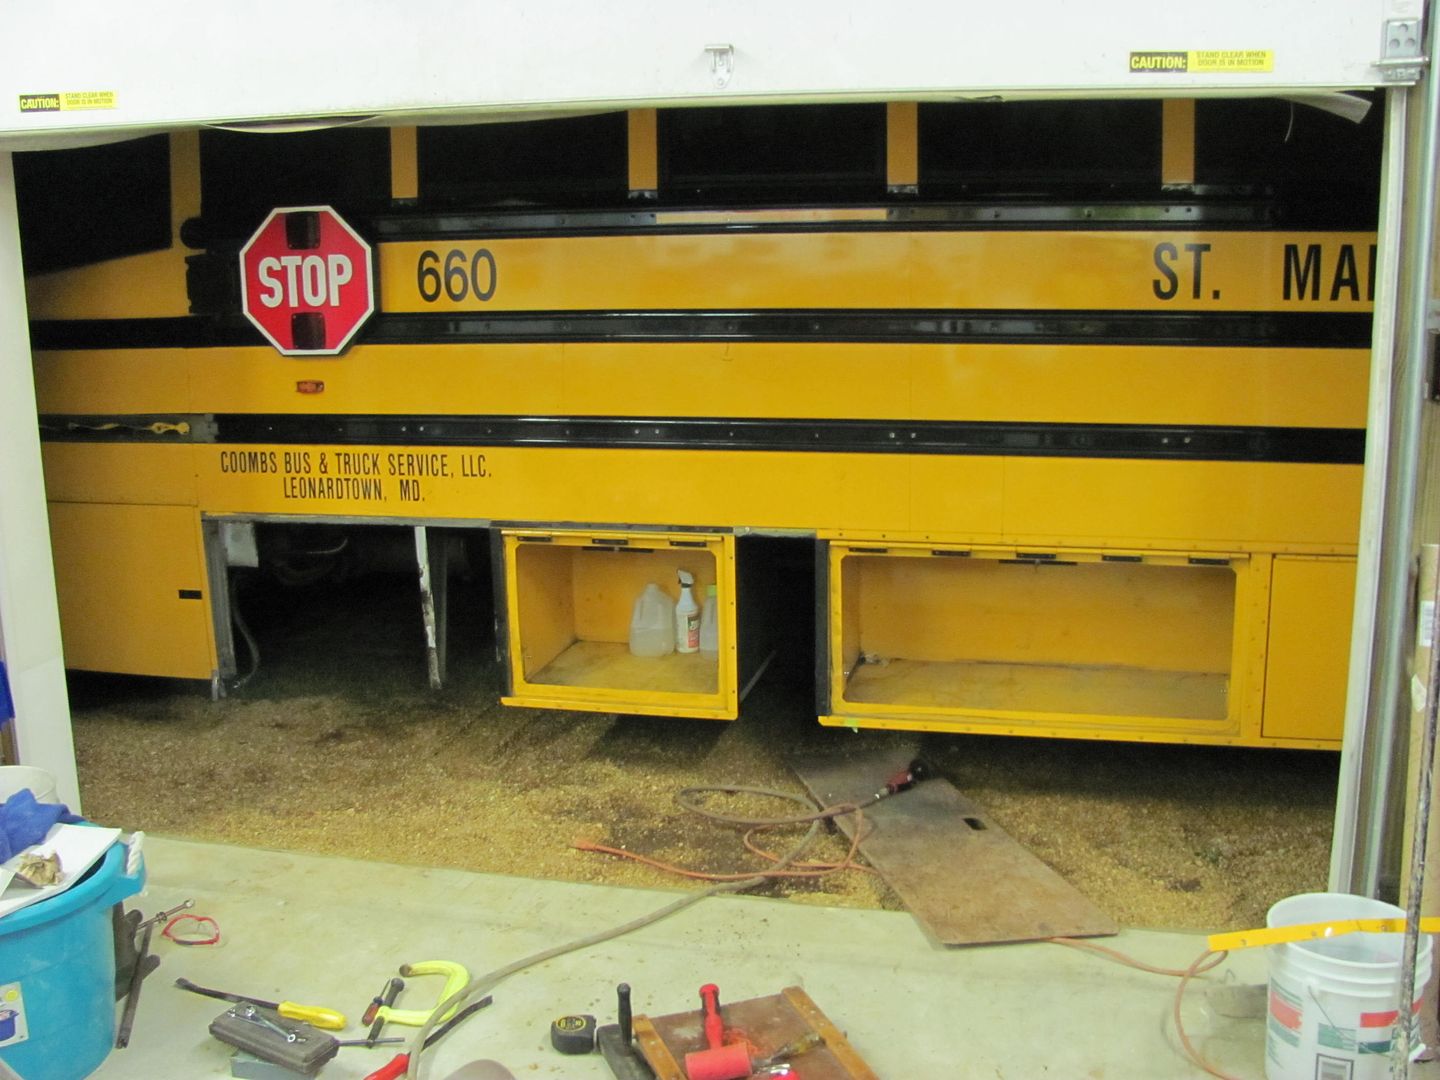
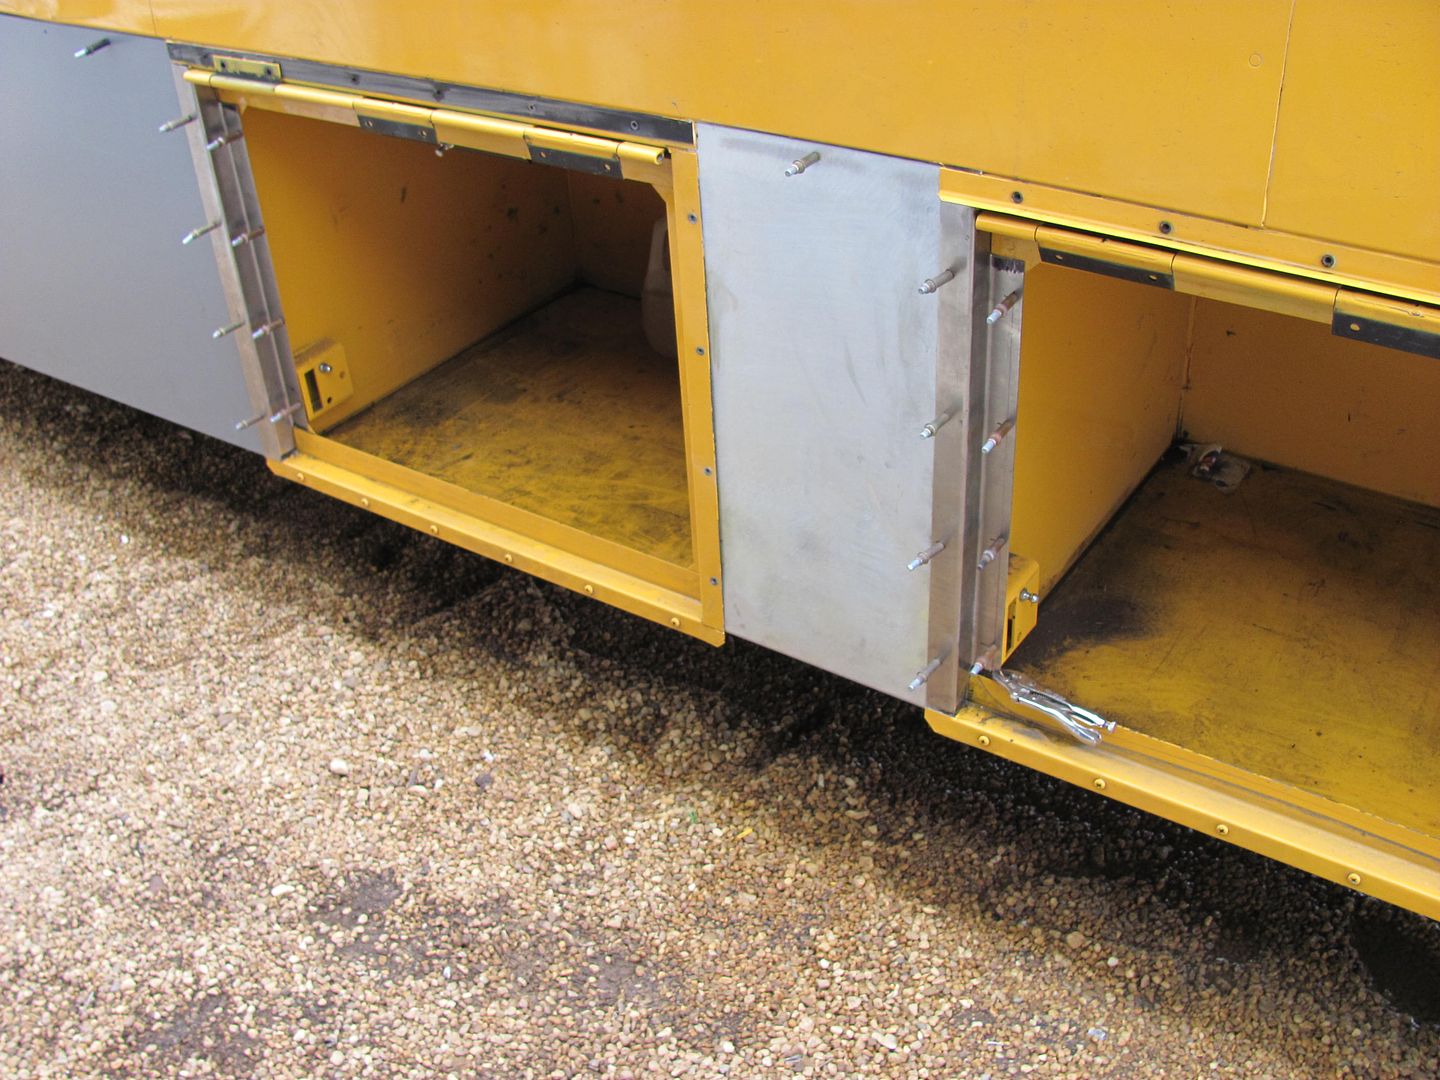
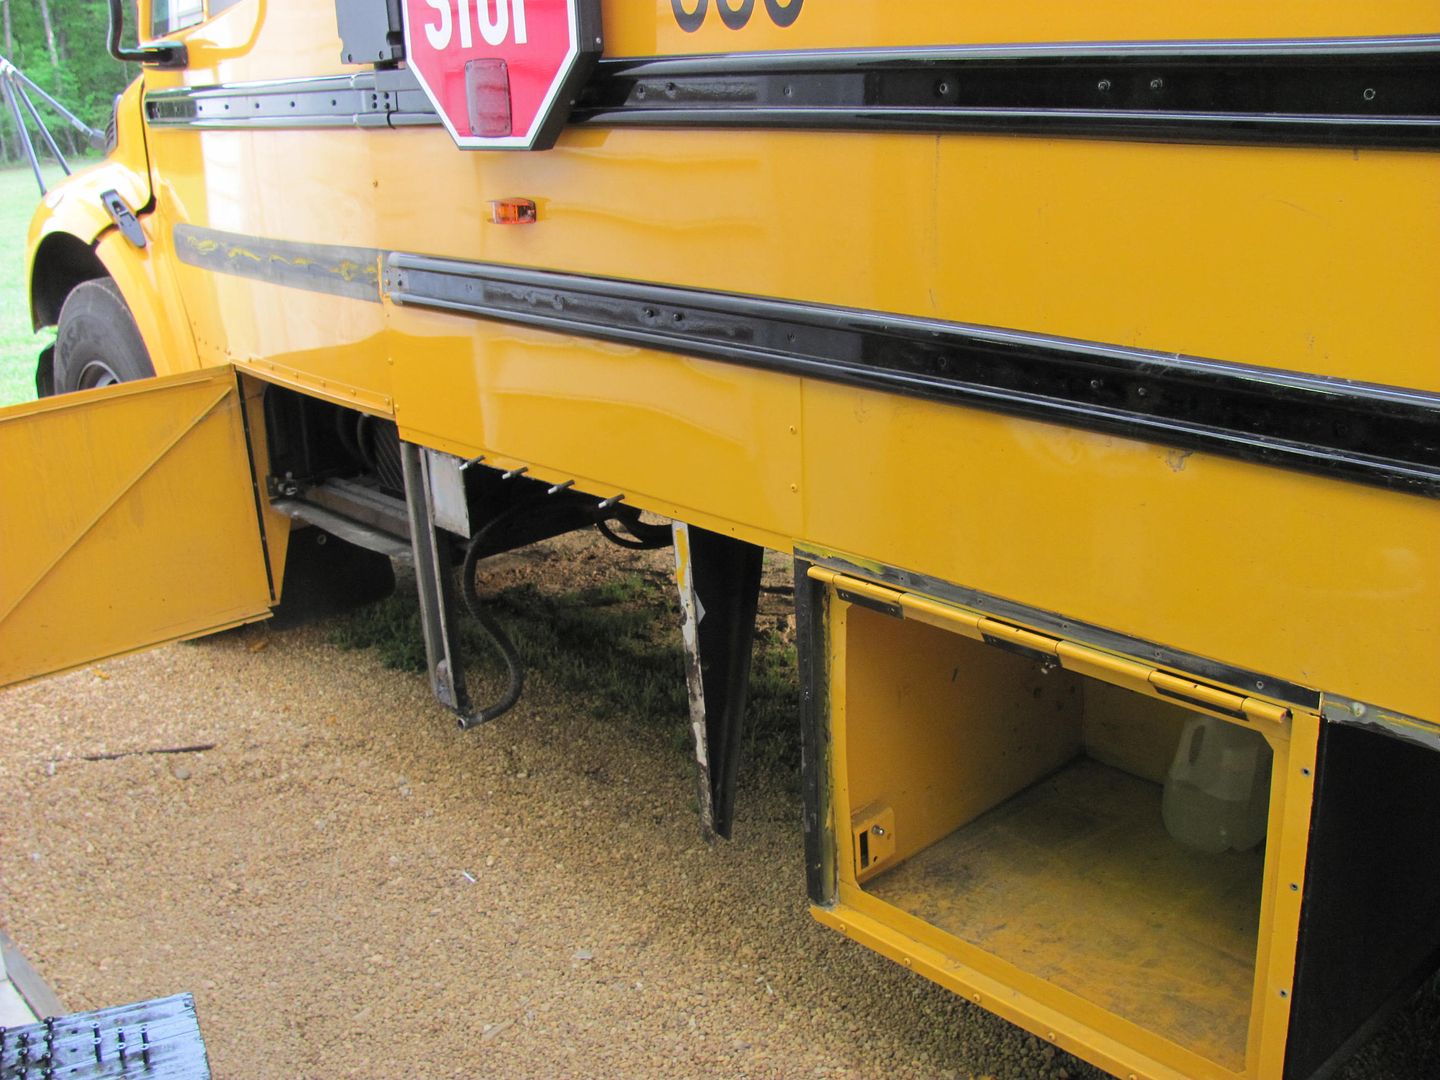
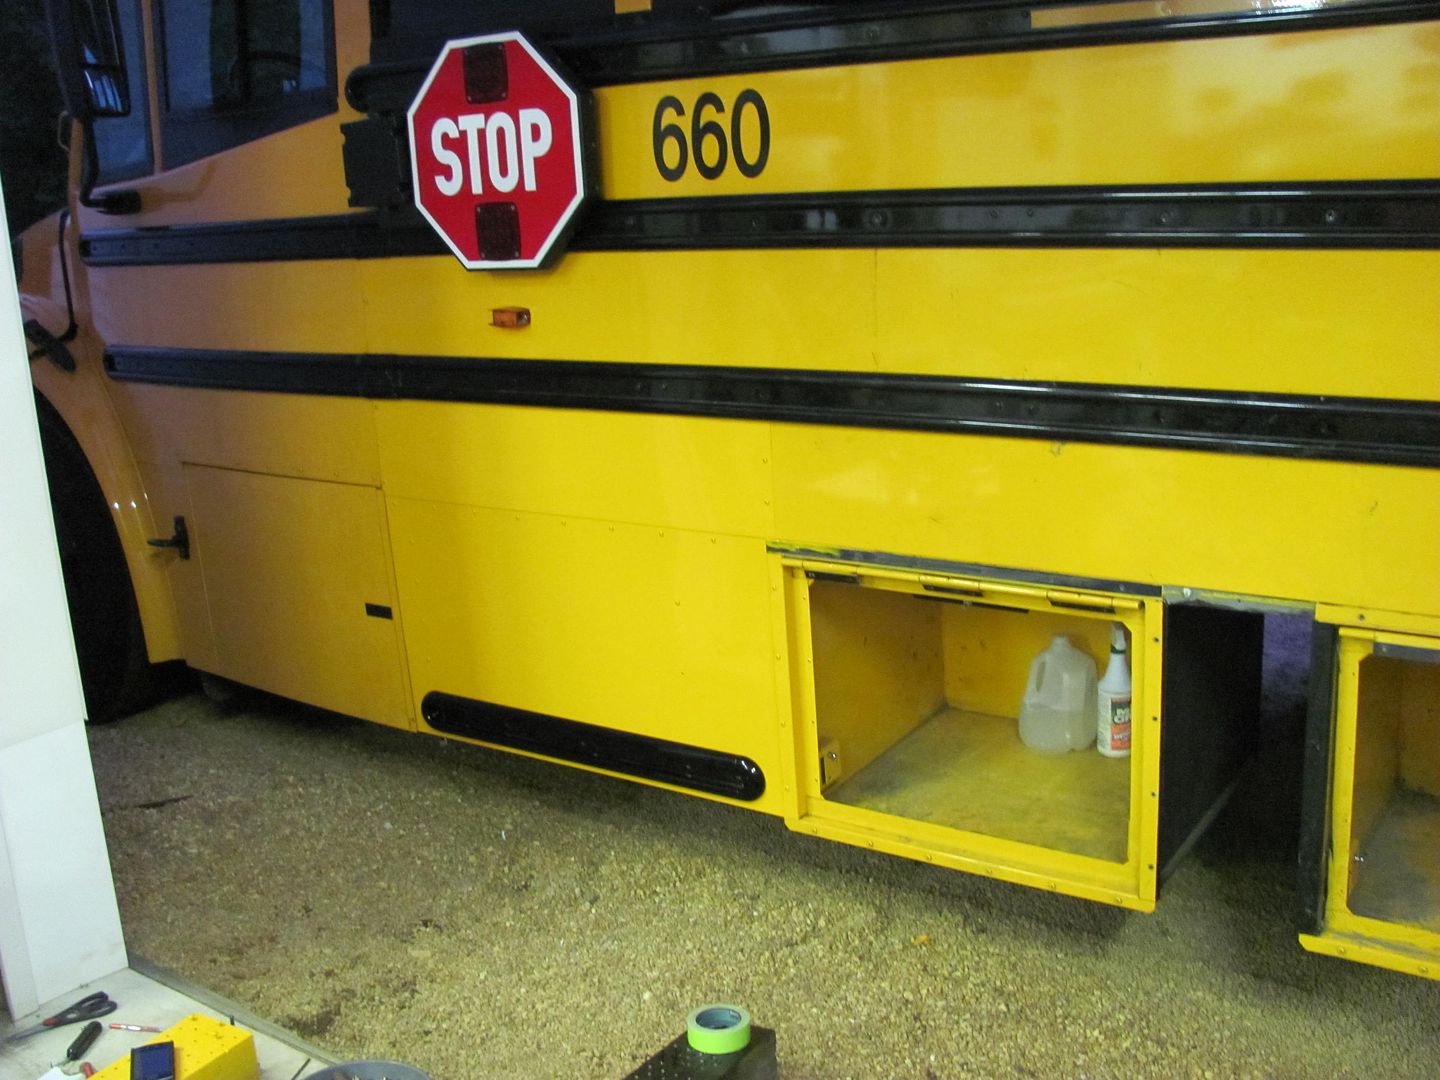
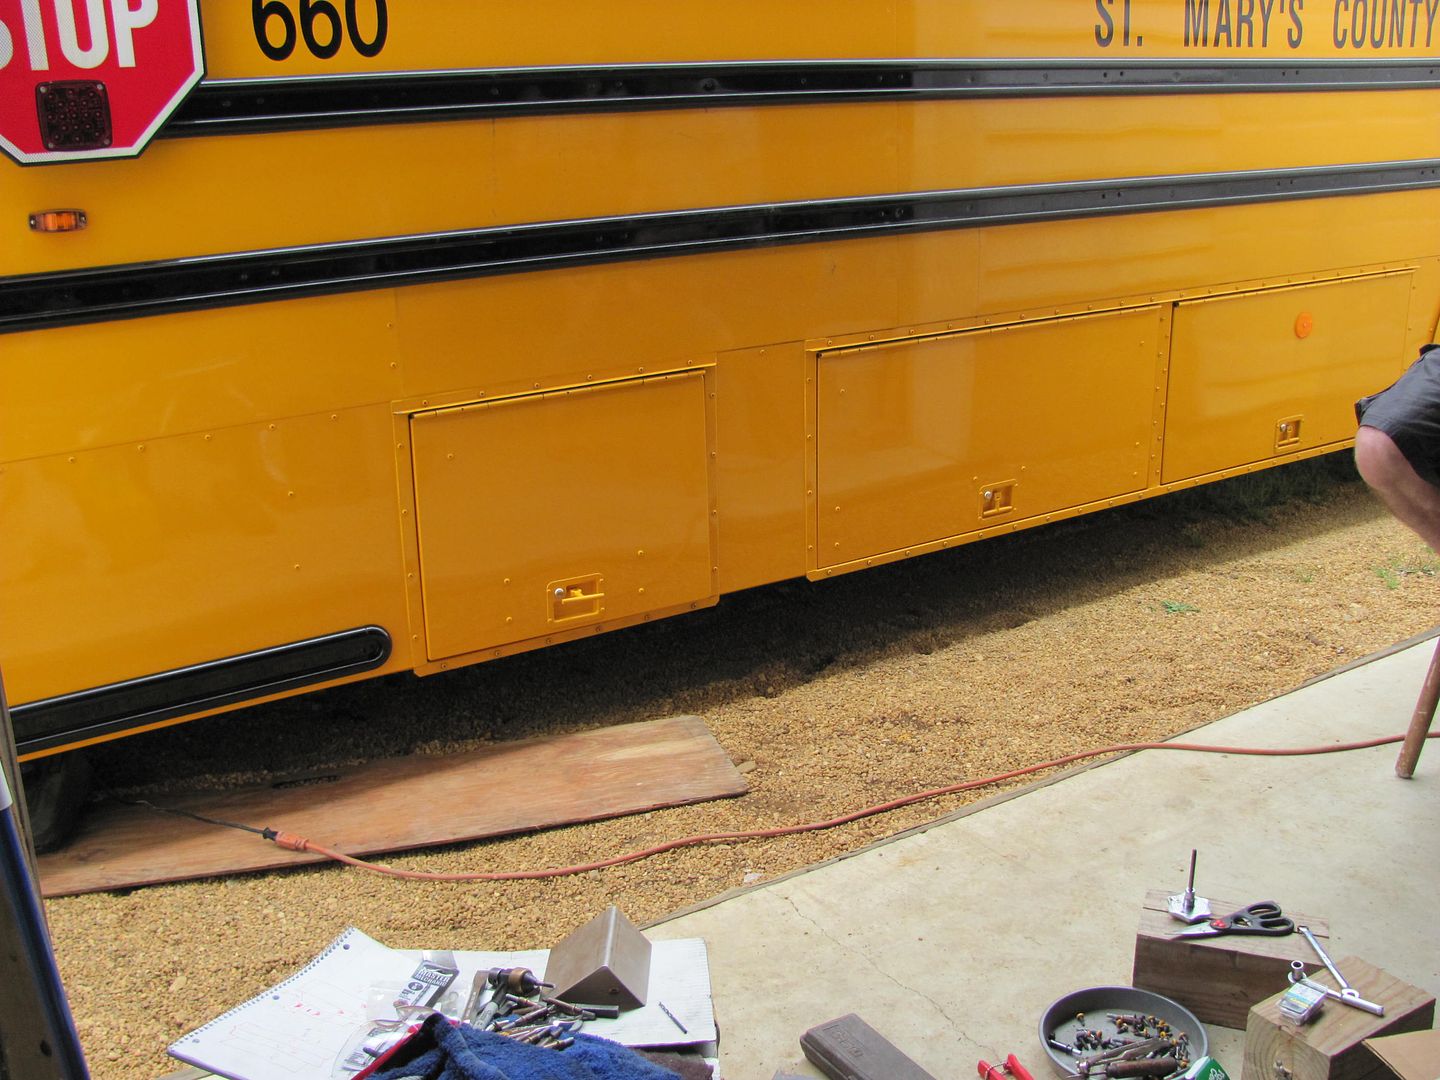
Nice fix for the bus.Who fixed the house damage?
 
To avoid these ads, REGISTER NOW!

NASTYZEN

Well-known member
Joined
Jun 11, 2010
Messages
2,823
Location
St-Colomban,Que. Canada
Oh well... I might not have the talent that some of you have here! :O
But here's my parts done with sheet metal...

A pair of 10 gallons aluminium fuel tank...

-First I cutted the sides and bottom...
photo0596n.jpg


-Then I pressed the sides and worked them straight with crimpers...
photo0597.jpg


-Folded the bottom to match the sides...
photo0599e.jpg


-All ready for soldering...
photo0598n.jpg


-Soldering done...built the baffle and inserted it in...
img3494p.jpg


-All done with top and filler neck! Also pressure tested and no leaks! :)
img3496qt.jpg

Falcon, you sure do have talent by the looks of your tank's.They sure turned out nice.
You mentioned soldering?I'm curious as to what product you used for your project.Utectic,Aladin or other? Also, how do you seal the top part?
Thank's for taking the time to post.Show us some more please.:)
 

MP&C

Well-known member
Joined
Oct 21, 2009
Messages
4,403
Location
Leonardtown, MD
Oh well... I might not have the talent that some of you have here! :O
But here's my parts done with sheet metal...

A pair of 10 gallons aluminium fuel tank...

-First I cutted the sides and bottom...

-Then I pressed the sides and worked them straight with crimpers...

-Folded the bottom to match the sides...

-All ready for soldering...

-Soldering done...built the baffle and inserted it in...

-All done with top and filler neck! Also pressure tested and no leaks! :)


Carl, for us non-AP types, are those auxiliary fuel tanks or main tanks? I take for granted based on the shape they sit inside/on top of the wings. How much range on avg do you get from the 20 gallons? Oh...nice work, by the way.
 
Last edited:

NASTYZEN

Well-known member
Joined
Jun 11, 2010
Messages
2,823
Location
St-Colomban,Que. Canada
Replacement tub for a March 77-B.Formula Atlantic race car.
Built sometime around 2003-2004.

miscprojects25.jpg


miscprojects24.jpg


miscprojects23.jpg


miscprojects20.jpg


Not the same car but this is what it's supposed to look like when all the parts are together.

77march77bformatlanticd.jpg


77march77bformatlanticd.jpg

:beer:
 

NASTYZEN

Well-known member
Joined
Jun 11, 2010
Messages
2,823
Location
St-Colomban,Que. Canada
:eek: Thats a lot of riveting!

LOL!
Yes it was!Several hundred and it was also glued with structural adhesive,witch made for a gooey friggin mess.:sad:
On the good side,they are all pop rivets.
I'm restoring three Lola T-360 tubs right now and half the rivets are those purple solid ones.Wonder how that will go at assembly time with the darn glue.
 

ibedayank

Well-known member
Joined
Feb 2, 2011
Messages
2,619
Location
Columbia TN
LOL!
Yes it was!Several hundred and it was also glued with structural adhesive,witch made for a gooey friggin mess.:sad:
On the good side,they are all pop rivets.
I'm restoring three Lola T-360 tubs right now and half the rivets are those purple solid ones.Wonder how that will go at assembly time with the darn glue.

hope ya have elbow lenght rubber gloves and lots of em
 

falconflyer04

Well-known member
Joined
Nov 20, 2009
Messages
91
Location
Quebec, Canada
Falcon, you sure do have talent by the looks of your tank's.They sure turned out nice.
You mentioned soldering?I'm curious as to what product you used for your project.Utectic,Aladin or other? Also, how do you seal the top part?
Thank's for taking the time to post.Show us some more please.:)


Thanks Nastyzen,

For the soldering part, since those are aircraft fuel tanks, we send them to our soldering technician to be sure the welds are perfect. I would have to inform myself about the exact soldering procedure!

As for the sealing part, there is two part to this... First when I received the tank back from soldering, they go through a deep cleaning with alumiprep to make sure all surfaces are free of any contaminants. Then, the interior joints on the bottom and sides gets a nice coat of PRC / Pro-seal aerospace sealant.
While this sealant dries, the top are cut and prepared by installing the filler neck.
Finally, a nice coat of sealant is applied on all joints of the top skin to the bottom of the tank and everything is riveted in place with solid shank rivets!


Carl, for us non-AP types, are those auxiliary fuel tanks or main tanks? I take for granted based on the shape they sit inside/on top of the wings. How much range on avg do you get from the 20 gallons? Oh...nice work, by the way.

Those are main tanks for a Bushcaddy R-80 aircraft and yes they sit inside the wings close to the fuselage.
The approximate range with an Rotax 912ULS 100hp engine at 75% cruise is close to 4 hours of flight or ~350nm.
Thanks!
 
Last edited:

colt zantop

Well-known member
Joined
Apr 20, 2006
Messages
5,422
Location
michigan
it looks like a mix...the smaller pieces look like tig and the larger square tubing looks to be stitch mig.....AWESOME WELDS!!!
 

muibubbles

Well-known member
Joined
Apr 24, 2009
Messages
685
Location
nj
no where close to any of you pros but heres mine... its a chair i designed for a school project... its actually my first project using sheet metal... or metal for that matter

DSC_0078.jpg

DSC_0079.jpg

DSC_0101.jpg

DSC_0113.jpg

DSC_0125.jpg

DSC_0134.jpg

DSC_0148.jpg

DSC_0151-1.jpg


more pics and version 1 of the chair can be seen on my site..
http://muibubbles-design.com/index.php?/juxor-v20/
still need to add the inset panels then upholster the seat cushions and paint..
 
Last edited:

MP&C

Well-known member
Joined
Oct 21, 2009
Messages
4,403
Location
Leonardtown, MD
Those look like some seats you'd find in an airport....turned out nice!


The next bus showed up tonight. The insurance company finally accepted responsibility for their insured (who ran directly into the side of a BIG YELLOW BUS) so we are finally OK to fix it. .....after 3-1/2 weeks. And I get people asking me why I don't do insurance work....:rolleyes:


Picture047.jpg


Picture048.jpg


With a booth only large enough for a car, the trick is to make all the repair pieces so they can be bolted or riveted on. The front flanges of the luggage boxes seen above will be cut out to the inside bend, and a repair piece made to replace it. This will allow us to keep the original door gaps, instead of covering the damaged piece altogether and having the gaps tighten.


Picture053.jpg


Picture054.jpg


Picture055.jpg


The area where the name is located was left rather wavy, and since that panel goes all the way up to and under the windows, we will cut it behind the rub strip just above and make a replacement for the lower section only.


Picture011.jpg


Where we left off in the disassembly this evening, more disecting tomorrow...


Picture057-1.jpg


This repair should also present the opportunity to do a demo on torch shrinking an aluminum door skin to remove the stretch......
 
Last edited:

nonhog

Well-known member
Joined
Nov 6, 2007
Messages
2,449
Location
Arizona (Tucson)
Love this thread and thanks to those posting in it. Maybe I'll try my hand at
messing up some sheet metal and post it. Don't hold your breath. :thumbup:
 
To avoid these ads, REGISTER NOW!

littletoes

Well-known member
Joined
Nov 9, 2010
Messages
1,244
Location
NE Washington
Love all the pics, thanks for taking the time!

What are all the "pins" that you use to hold on the sheets??? Think I've seen them before, but have never known what they are.
 

muibubbles

Well-known member
Joined
Apr 24, 2009
Messages
685
Location
nj
Thanks for the comments!

kinda off topic but do you guys have any suggestions/ tips to welding THIN sheet metal and prevent it from warping? i used 20 ga mild steel and did 1" stiches every 6" away but stll got warp..
 

NASTYZEN

Well-known member
Joined
Jun 11, 2010
Messages
2,823
Location
St-Colomban,Que. Canada
Thanks for the comments!

kinda off topic but do you guys have any suggestions/ tips to welding THIN sheet metal and prevent it from warping? i used 20 ga mild steel and did 1" stiches every 6" away but stll got warp..

No miracles I'm afraid.Stitching helps ,as mentioned by others. I have a 3/8 thick by 12 in. long piece of copper I clamp my work too to draw most of the heat away.Any time you weld something it will shrink and warp,all you can do is think ahead and try to control it.
 

muibubbles

Well-known member
Joined
Apr 24, 2009
Messages
685
Location
nj
Love all the pics, thanks for taking the time!

What are all the "pins" that you use to hold on the sheets??? Think I've seen them before, but have never known what they are.

me either... the link didnt help much either but i found this video..
basically a clamp to fit into pop rivet holes.. awesomeness
 

ng8264723

Well-known member
Joined
Aug 28, 2006
Messages
732
Location
Oakham MA
In regars to the tailgate. I PM'ed you and asked on thread what are you doing for a skin. Did you miss those questions?
thanks
Chris
 

MP&C

Well-known member
Joined
Oct 21, 2009
Messages
4,403
Location
Leonardtown, MD
Sorry Chris, I must have missed your post... We got a skin for the tailgate from Jay Hammond Chevy Parts. I think it is made by CARS Inc, so anyone who carries tri-five chevy parts should be able to get one..
 

ZTFab

Well-known member
Joined
Jan 6, 2008
Messages
397
Location
Upland, CA
How do you get those welds to look like that.............is it mig or tig

Practice.....lots of it!!! :)

it looks like a mix...the smaller pieces look like tig and the larger square tubing looks to be stitch mig.....AWESOME WELDS!!!

Thanks. :beer:

Correct, the shock tabs were TIG and everything else was MIG but it was all done continuous, short circuit transfer mode, no pulsing or "stitch" welding.
 

MP&C

Well-known member
Joined
Oct 21, 2009
Messages
4,403
Location
Leonardtown, MD
Parts painted Friday afternoon....


Picture075.jpg


Re-assembly Saturday night/Sunday morning....


Picture076.jpg


Picture078.jpg


Picture079-1.jpg


All ready for school tomorrow....


Picture081-1.jpg
 

ALWX65

Well-known member
Joined
Jan 13, 2010
Messages
104
Practice.....lots of it!!! :)


Thanks. :beer:

Correct, the shock tabs were TIG and everything else was MIG but it was all done continuous, short circuit transfer mode, no pulsing or "stitch" welding.

I understand pulse and stitching but could you explain "short circuit transefer mode" or point me in the direction of videos or reading material.

ALW
 

ZTFab

Well-known member
Joined
Jan 6, 2008
Messages
397
Location
Upland, CA
I understand pulse and stitching but could you explain "short circuit transefer mode" or point me in the direction of videos or reading material.

ALW


No problem ALW.

In GMAW (Gas Metal Arc Welding) there are 3 basic transfer modes.

Short Circuit
Globular
Spray

These modes describe the way in which the electrode is deposited onto the parent metal. Essentially,high(er) voltage (and corresponding wire speed) deliver different transfer modes.

Most, if not all MIG welding that is done is short circuit transfer as Globular tends to cause lots of spatter and is hard to control in out position welding and Spray Transfer is for thick materials since it requires voltages above 27 volts and shielding gas with less than 15% CO2 content.

Here is a video that shows the difference in transfer modes. Take special note to the sound difference as the voltage and wire speed are adjusted to change the transfer mode.

Short Circuit will sound like frying bacon, Globular transfer deepens in tone and is more sporadic, and finally true Spray transfer will only make a slight hissing sound.


Hope that helps.
 

wiz56

Banned
Joined
Apr 20, 2008
Messages
31
Location
Wichita, Kansas
No problem ALW.

In GMAW (Gas Metal Arc Welding) there are 3 basic transfer modes.

Short Circuit
Globular
Spray

These modes describe the way in which the electrode is deposited onto the parent metal. Essentially,high(er) voltage (and corresponding wire speed) deliver different transfer modes.

Most, if not all MIG welding that is done is short circuit transfer as Globular tends to cause lots of spatter and is hard to control in out position welding and Spray Transfer is for thick materials since it requires voltages above 27 volts and shielding gas with less than 15% CO2 content.

Here is a video that shows the difference in transfer modes. Take special note to the sound difference as the voltage and wire speed are adjusted to change the transfer mode.

Short Circuit will sound like frying bacon, Globular transfer deepens in tone and is more sporadic, and finally true Spray transfer will only make a slight hissing sound.


Hope that helps.

I don't know about the rest of you but that video didn't help to explain the method of the beads that were shown. The tig is not a problem for me but the mig would seem to be a cold weld. I have a Miller SP 350 how would you set it up for the beads shown??
 

olddude13

Member
Joined
Apr 28, 2011
Messages
7
Location
Solon
Here's my bike project i finished last spring
 

Attachments

  • IMG_9689.jpg
    IMG_9689.jpg
    152.6 KB · Views: 160
  • IMG_9690.jpg
    IMG_9690.jpg
    151.4 KB · Views: 152
  • IMG_9691.jpg
    IMG_9691.jpg
    147.8 KB · Views: 147
  • IMG_9693.jpg
    IMG_9693.jpg
    144.9 KB · Views: 145

olddude13

Member
Joined
Apr 28, 2011
Messages
7
Location
Solon
more shots of bike
 

Attachments

  • IMG_0328.jpg
    IMG_0328.jpg
    146.3 KB · Views: 144
  • IMG_0329.jpg
    IMG_0329.jpg
    147.4 KB · Views: 118
  • IMG_0323.jpg
    IMG_0323.jpg
    145.8 KB · Views: 197

ZTFab

Well-known member
Joined
Jan 6, 2008
Messages
397
Location
Upland, CA
I don't know about the rest of you but that video didn't help to explain the method of the beads that were shown. The tig is not a problem for me but the mig would seem to be a cold weld. I have a Miller SP 350 how would you set it up for the beads shown??

That video and my explanation were about different transfer modes, specifically Short Circuit Transfer as ALW asked about, not about my welding technique(s) for the MIG welds I've shown.
 
To avoid these ads, REGISTER NOW!
Top Bottom