
You are using an out of date browser. It may not display this or other websites correctly.
You should upgrade or use an alternative browser.
You should upgrade or use an alternative browser.
Show off your sheet metal fab projects
- Thread starter Jim Stabe
- Start date
csp
Well-known member
Why is it that all of your posts are spamming us to use these rivets?
NASTYZEN
Well-known member
Couple years back a policeman came to me for updates to his VW dunebuggy. He wanted me to make it safer for his family.
I made a roll cage, nerf bars and proper seat belt anchor points. Also a bit of sheet work.


I made a roll cage, nerf bars and proper seat belt anchor points. Also a bit of sheet work.
ZTFab
Well-known member
Cool project NZ.
Reminds me of something that would have been on the old Monkees TV show.")
Reminds me of something that would have been on the old Monkees TV show.
ZTFab
Well-known member
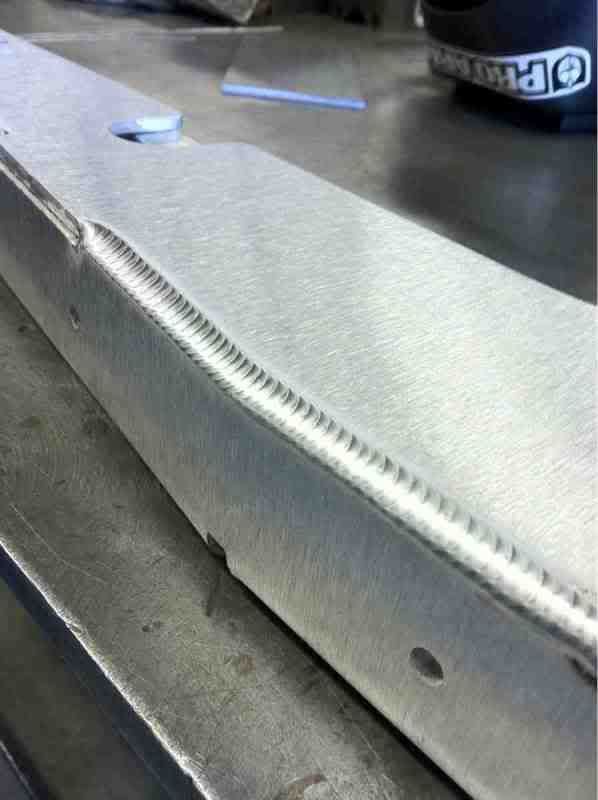
Here's a prototype piece I'm building at work.
It's a trailing arm guard for a Polaris XP UTV.
.190" 5052 Aluminum, TIG welded with on a Miller Dynasty 300SD.
Sorry for the single pic....can't show much more of it until we get it closer to release. (we've had companies copy our products many times).
It's a trailing arm guard for a Polaris XP UTV.
.190" 5052 Aluminum, TIG welded with on a Miller Dynasty 300SD.
Sorry for the single pic....can't show much more of it until we get it closer to release. (we've had companies copy our products many times).
ZTFab
Well-known member
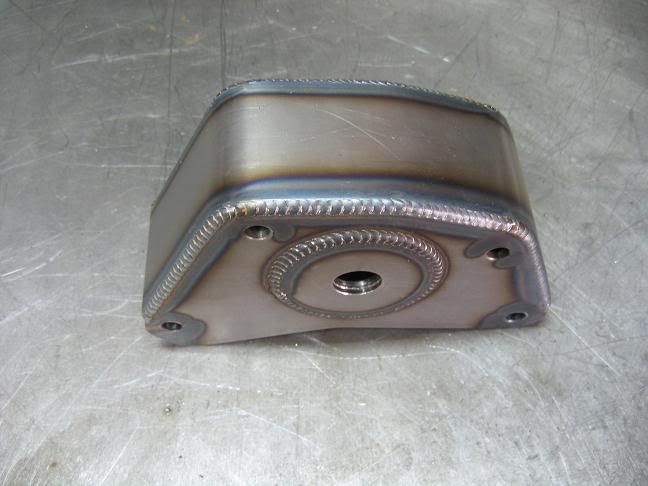
Here's another piece I did a few years back...
It's a radiator mount for a Super Comp dragster. 14ga Cold Rolled Steel with .190" aluminum for the back piece.
Built to use the existing wing mounts on the car that weren't being used anymore.


It's a radiator mount for a Super Comp dragster. 14ga Cold Rolled Steel with .190" aluminum for the back piece.
Built to use the existing wing mounts on the car that weren't being used anymore.
onelochevy
Well-known member
man those welds are beautiful.
TOOL MASTER
Well-known member
- Joined
- Apr 25, 2011
- Messages
- 458

NASTYZEN
Well-known member
Here's another piece I did a few years back...
It's a radiator mount for a Super Comp dragster. 14ga Cold Rolled Steel with .190" aluminum for the back piece.
Built to use the existing wing mounts on the car that weren't being used anymore.
Nice job on the dragster.
 Awesome welds you robot you!
MP&C
Well-known member
Here's a prototype piece I'm building at work.
It's a trailing arm guard for a Polaris XP UTV.
.190" 5052 Aluminum, TIG welded with on a Miller Dynasty 300SD.
Sorry for the single pic....can't show much more of it until we get it closer to release. (we've had companies copy our products many times).
Awesome weld....exceptional consistency!
ZTFab
Well-known member
NASTYZEN
Well-known member
Here's a prototype piece I'm building at work.
It's a trailing arm guard for a Polaris XP UTV.
.190" 5052 Aluminum, TIG welded with on a Miller Dynasty 300SD.
Sorry for the single pic....can't show much more of it until we get it closer to release. (we've had companies copy our products many times).
ZTFAB,Please excuse those who generate flak for they know not what they are f%$/"/"$%? talking about. I've seen hundreds of welders work, and by far your work stands out as exceptional! I can only dream of welding like that.
.065 dia. Alu. filler rod melts quickly and it's really difficult to keep up with the fusion puddle speed. I wonder how you do it?
NASTYZEN
Well-known member
The skill and craftsmanship are amazing. Where did you all learn to work sheet metal like that. Are there and tips and tricks for a beginner.
Josh
As for the welding skills involved,you should ask ZTFAB how he does it.

For fabbing tips, measure twice cut once, plan ahead and make cardboard templates, If you are unsure of how something will turn out, make a test on some offcuts first.
There are also sheet metal tutorials on youtube. Make friends with an old metal guy.Oh and you could also ask for some advice here.
Hope this helped a little.
ZTFab
Well-known member
The skill I am seeing in this thread is truly awe inspiring, and ZTFab, I have been around craftsman of all walks all of my life and NEVER in my entire 39 years on this planet have I seen such BEAUTIFUL Welding done by HAND.
ZTFab
Well-known member
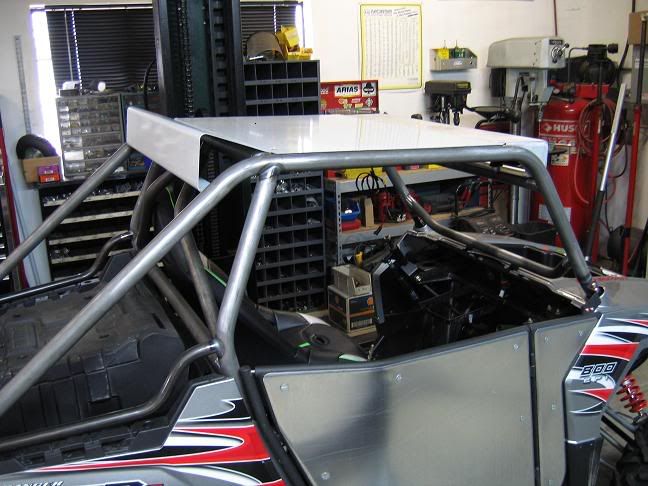
Let's get this thread back on track....
Here's some of the Aluminum wings that I built for the Polaris RZRs that I posted earlier.
All .050" 3003
Here's how they start...
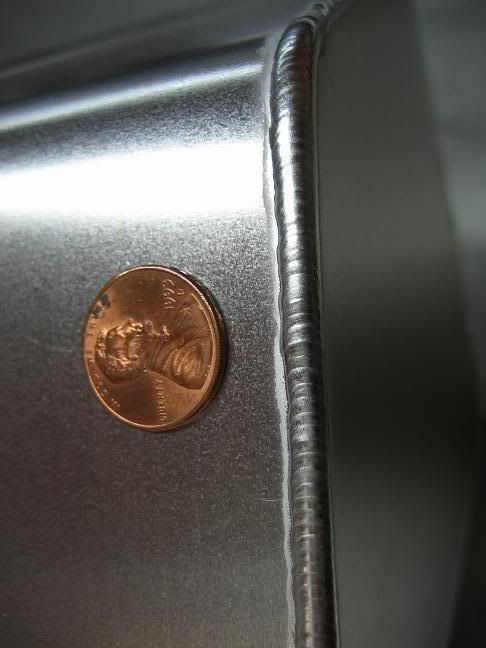
I make a cap for the ends....
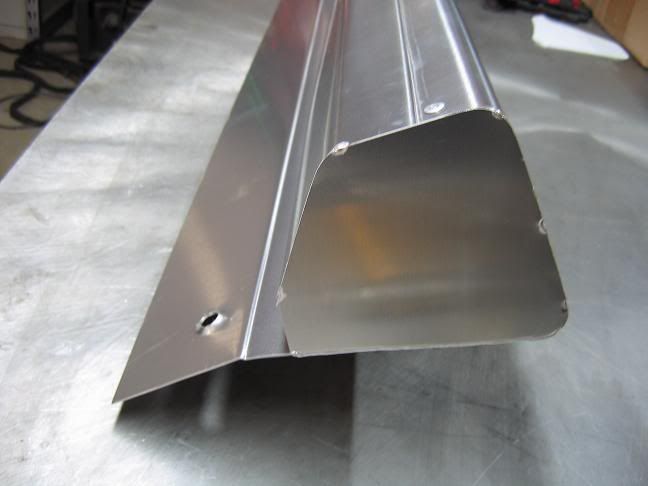
Then weld them up using .045" filler....

Here's how they look on the car....

Here's some of the Aluminum wings that I built for the Polaris RZRs that I posted earlier.
All .050" 3003
Here's how they start...
I make a cap for the ends....
Then weld them up using .045" filler....
Here's how they look on the car....
Let's get this thread back on track....
Here's some of the Aluminum wings that I built for the Polaris RZRs that I posted earlier.
All .050" 3003
Here's how they start...
I make a cap for the ends....
Then weld them up using .045" filler....
Looks good as always
NASTYZEN
Well-known member
Here is a different kind of wing. It is for a 77 March Formula Atlantic car. I restored it using the same techniques used by March at the time.


ZTFab
Well-known member
Now that's a wing!!!
Nicely done.
Nicely done.
Let's get this thread back on track....
Here's some of the Aluminum wings that I built for the Polaris RZRs that I posted earlier.
Those things being raced ? Or did somebody just want some serious work done on it ? It's awesome work.
ZTFab
Well-known member
Those things being raced ? Or did somebody just want some serious work done on it ? It's awesome work.
Thanks Eric.
No, these ones aren't being raced, just overbuilt play toys.
Travis E.
Well-known member
We're still waiting to see your work, wiz.
...and did that NADCAP certification teach you how to use your welder yet?
Oh, What?!
NASTYZEN
Well-known member
Before this thread gets a tire in a rut again....here's a project I delivered last week.


They are a set of A-arms for a formula ford. Built out of round .058 D.O.M. steel tubing. But round equals drag.So we crush it a little.


Then all the bits get put together in a jig.

I use .032 mig wire as a filler and use T.I.G. to weld it all up.

Not as pretty as ZT'S but I'm only human.


This is how I form the gusset skin in the vise with a hammer block .


These are nuts to hold in the outer spherical bearings from falling out.I cheated and used my cnc mill.

They are a set of A-arms for a formula ford. Built out of round .058 D.O.M. steel tubing. But round equals drag.So we crush it a little.
Then all the bits get put together in a jig.
I use .032 mig wire as a filler and use T.I.G. to weld it all up.
Not as pretty as ZT'S but I'm only human.
This is how I form the gusset skin in the vise with a hammer block .
These are nuts to hold in the outer spherical bearings from falling out.I cheated and used my cnc mill.
Travis E.
Well-known member
Nice work NASTYZEN. Did you make the die to "crush" the tubing?
blue dog
Banned
I am no pro fabricator by any means, but i have been doing my own stuff years, but you guys are true craftsmen and i would feel privileged to have you fab and tig for me any day. gentleman.
gentleman.NASTYZEN
Well-known member
Nice work NASTYZEN. Did you make the die to "crush" the tubing?
It was the first thing I machined with my Do all mill. 1 1/2``dia. endmill,lean the head over 40 or so degrees. There you go, mill an ellipse in the x axis.
Iron-Iceberg
Well-known member
Nastyzen, Ive seen tube like that, but I never seen anyone make some. Way cool thanks for the pics.
ZTFab
Well-known member
Ok...back to welding and fab....
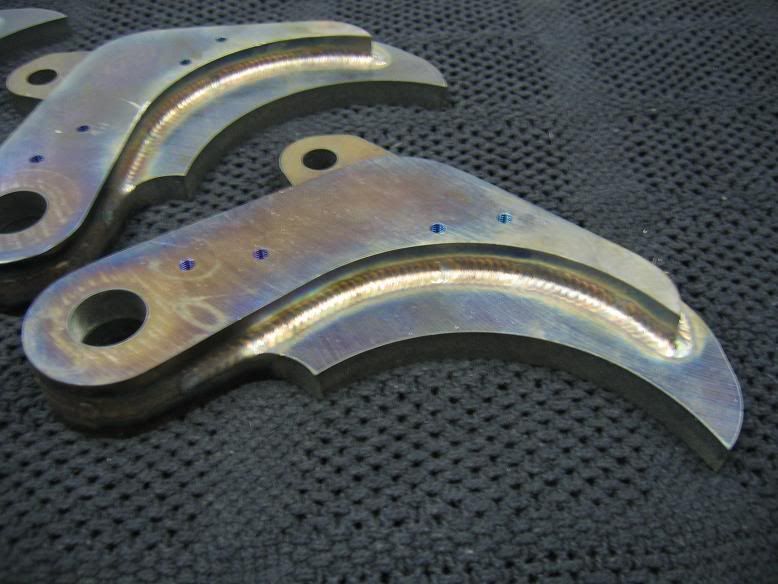
Here are some pieces that I used to do for a Rescue Equipment manufacturer.
These are the cutting blades for a "jaws of life" style cutter.
S7 tool steel and S7 filler. Multi-pass weld, Pre-heat, interpass temp monitoring, peening, and controlled cooling rate.
S7 is an air hardening steel and if not closely monitored and heated/cooled correctly it will crack like peanut brittle.
After I got done with the welding they went on to annealing, machining, blanchard grinding, heat treat, and coating before assembly.
Please excuse Wiz... He is gone... Forever.
NASTYZEN
Well-known member
Bye bye wiz....That mean I won't get anymore PM's from him complaining and trying to put down ZT's welds??
ZT ,your welds are sick! You can't be human and lay em down like that!? If I was capable of jealousy I would be green with envy.
ZT ,your welds are sick! You can't be human and lay em down like that!? If I was capable of jealousy I would be green with envy.
VegasBruce
Well-known member
Please excuse Wiz... He is gone... Forever.
Thank you.
There is way to much great work here to have this thread killed.
PCO6
Well-known member
Does this mean we won't get to see his employees' welding?Please excuse Wiz... He is gone... Forever.
Last edited:
ZTFab
Well-known member
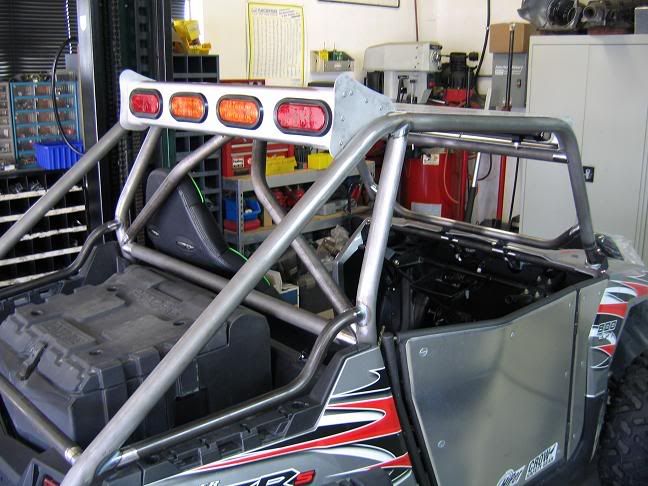
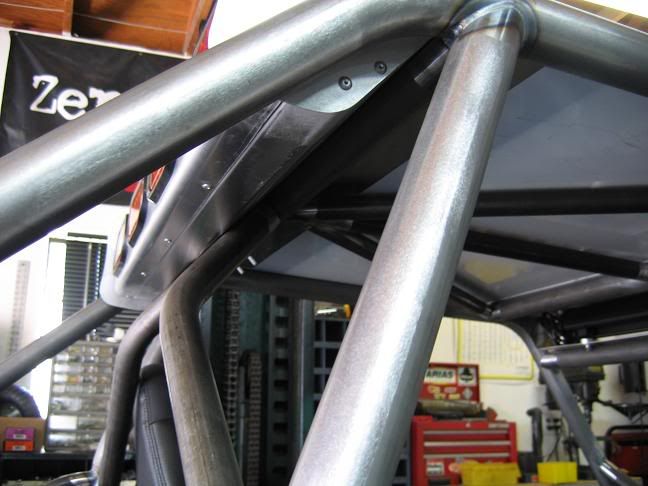
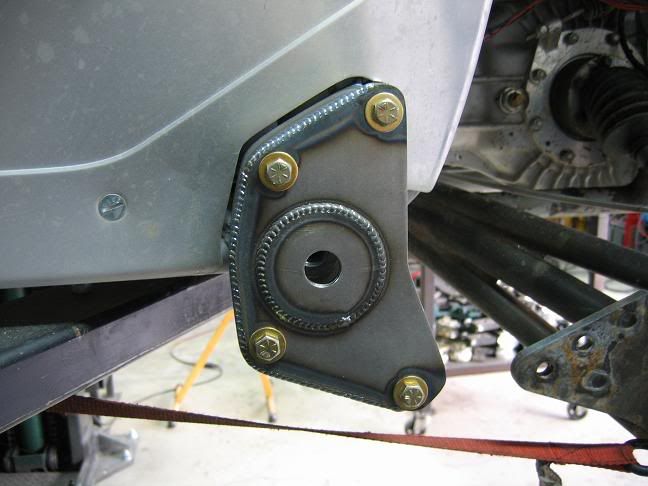
Here are some pieces I made for my buddies Chenowth Explorer Dual Sport desert car. These are the spring plates that go on the end of the rear torsion housing and are setup for coil-overs, basically eliminating the torsions just providing a pivot point for the trailing arm.
The originals were made by another shop (that is now out of business for obvious reasons). They failed on the second trip with the car.
I re-did them using 3/16" Cold rolled Steel for the main plates, 11ga CRS for the cap and laminate washer. I also made them a double-shear mount rather than single.
The originals:


Where they mount:


The new ones:


The originals were made by another shop (that is now out of business for obvious reasons). They failed on the second trip with the car.
I re-did them using 3/16" Cold rolled Steel for the main plates, 11ga CRS for the cap and laminate washer. I also made them a double-shear mount rather than single.
The originals:
Where they mount:
The new ones:
MP&C
Well-known member
Beautimous! That thing certainly ought to fly.
NASTYZEN
Well-known member
That should keep it from tearing out again.Wonder what will let go now?
NASTYZEN
Well-known member
Customer needed a shorter and safer roll bar for his 79 Shadow F1 historic race car. The original was .065 Stainless steel tubing.
The replacement is .095 thick 4130 Cro-moly steel tubing and plate ,TIG welded.


F.I.A. approved.
The replacement is .095 thick 4130 Cro-moly steel tubing and plate ,TIG welded.
F.I.A. approved.
ZTFab
Well-known member
Thanks guys.
Nothing Yet...I built these in December of '09 for his car and we've been through two riding seasons with no failures or signs of problems.
That should keep it from tearing out again.Wonder what will let go now?
Nothing Yet...I built these in December of '09 for his car and we've been through two riding seasons with no failures or signs of problems.
Zeke
Well-known member
I just spent at least a half hour reading this thread from post #1. I have dabbled in many of the processes shown here as a hobbyist. I'm afraid I'm a bit of a kludge by comparison. But, having tried makes me appreciate what I've seen even more.
However, you guys are so good at your craftsmanship that I'm afraid a lot of GJ members won't post here for fear of being embarrassed.
So, let me open the gates to others that struggle along and show you something I did several years ago in the beginning of my foray into metal work and car restoration (or mostly rust repair as many have pointed out is the bulk of the work).
This is the lower portion of the rear quarter of a Porsche 911. It's a common rust repair that comes with replacing the rockers, lock post and sills (already done).

This is the worst pic and it shows every flaw in the work. When finished, it looked fine and painted out well. You can see I missed the radius that matched the door. I was able to save that with a little more work with a hammer and filing a bit off the door. the door was from another car ad Porsche doors don't always fit the same anyway.
The piece is rolled to fit the body contour. Then I formed the flange. I had read about a trick and I did it. I cut a slot in the end of a 1/2" steel dowel that fit over the thickness of the sheet metal and cut it to the depth of the flange.
By slipping it around the inner circle and bending a degree or two at a time, eventually you will get your 90 degrees. I remember that winter and my carport/shop was wet 24/7. The rust looked like that overnight even with Ospho. But I got 'er done and went of to some interesting "rustoration."
So you guys that are just readers here, post up some stuff. The guys that are the best in the business would be the last guys to criticize you and I know that.
However, you guys are so good at your craftsmanship that I'm afraid a lot of GJ members won't post here for fear of being embarrassed.
So, let me open the gates to others that struggle along and show you something I did several years ago in the beginning of my foray into metal work and car restoration (or mostly rust repair as many have pointed out is the bulk of the work).
This is the lower portion of the rear quarter of a Porsche 911. It's a common rust repair that comes with replacing the rockers, lock post and sills (already done).
This is the worst pic and it shows every flaw in the work. When finished, it looked fine and painted out well. You can see I missed the radius that matched the door. I was able to save that with a little more work with a hammer and filing a bit off the door. the door was from another car ad Porsche doors don't always fit the same anyway.
The piece is rolled to fit the body contour. Then I formed the flange. I had read about a trick and I did it. I cut a slot in the end of a 1/2" steel dowel that fit over the thickness of the sheet metal and cut it to the depth of the flange.
By slipping it around the inner circle and bending a degree or two at a time, eventually you will get your 90 degrees. I remember that winter and my carport/shop was wet 24/7. The rust looked like that overnight even with Ospho. But I got 'er done and went of to some interesting "rustoration."
So you guys that are just readers here, post up some stuff. The guys that are the best in the business would be the last guys to criticize you and I know that.