To avoid these ads, REGISTER NOW!

Show Us Your Drill Press Vises

gatewaysysop

Well-known member
Joined
Nov 11, 2008
Messages
3,290
Location
Arizona
Thought it might be fun to devote a thread to drill press vises in particular. :cool:

Some of these I've had for a long while and others are more recent acquisitions:

Craftsman.PNG
Craftsman 2.25", acquired with a few witness marks but otherwise very nice condition. Good for the smaller stuff.


Reed DP35.PNG
Reed DP 35, 3.5" vise. Pretty well used and more than few pecks from the last owner(s), but the ways are in perfect shape, as are the jaws. My favorite of the bunch, it also has the largest (and beefiest, acme thread) lead screw of the group.


Yost D2.PNG
Yost 2D, 4.75" with square threads, circa 1955, acquired nearly spotless save for one tiny peck mark. A bit too big for the small stuff, but I couldn't pass this one up. Would like to find its 1D, 3.5" cousin, but no dice as of yet.


Simplex.PNG
Simplex V-90, 3.5" with square threads, circa 1940. The lead screw isn't as large as the Reed, but this guy is notably heavier and built like an absolute tank.

Let's see what everyone else is using. Gotta be some more cool ones out there. ;)
 
To avoid these ads, REGISTER NOW!

Mr. Wonderful

Well-known member
Joined
Jan 15, 2018
Messages
1,771
Location
Pacific Northwest
craftsman-dp-vise-jpeg.2021492
drill press vise.jpegdrill press vise2.jpeg
Here's my two. first one is a craftsman heritage. The second I'm not sure. I saw it for sale mounted to a similar craftsman DP but I haven't found anything about it.
 

Attachments

  • craftsman dp vise.jpeg
    craftsman dp vise.jpeg
    79.9 KB · Views: 1,121

MichaelP

Well-known member
Joined
Jul 27, 2009
Messages
934
Location
IL/WI border
For most drilling tasks I use Float-Lock (the one on the left). The yellow Morton Multivise on the right is used for odd shapes requiring non-parallel jaws. The rest gets drilled in Heinrich vises of different sizes (see previous post).

P.S. The drill marks on the Float-Lock came with the used vise. I had to machine the aluminum block with its T-handle bolt and T-nut for the table slot: the seller didn't have them. If your table doesn't have a slot, just drill and thread a hole in the table.
IMO, Float-Lock is the best clamping system specifically designed for drill presses. You release the T-handle that allows the shaft to slide in and out and permits block to rotate (or even slide along the slot if you have one). Then you clamp your part using the front handle, position the clamped part, tighten the T-handle and drill away.
 

Attachments

  • Drill press vises.jpg
    Drill press vises.jpg
    1.1 MB · Views: 153
Last edited:

dutchgray

Well-known member
Joined
Sep 28, 2014
Messages
6,465
Location
Dorset. England.
This is what is currently on my big 1 1/4" gear head drill.
20231230_143816.jpg
The green one is approx 4 1/4" wide jaws and is Russian or Eastern European made.
The blue one is what we call a "Nippy" type. They were sold by many manufacturers, that one is a Jones and Shipman branded and 3 1/2" wide jaws. Newly acquired and in very good order, I'm not sure it has ever been used. I have several of this style.

Heavy work I use an old and very rough milling vice or clamp to the table directly.
 

Oregon rock crusher

Well-known member
Joined
Jun 28, 2016
Messages
1,907
Location
West of Salem
I was cleaning up a mess of chips this afternoon so I snapped a picture of the vises that are handy work holders for the drill presses. The drill table has in no order a 3" Enron and a 3" Cardinal. Also a 4" Sheldon, a 5" Reed, and a 6" Palmgren. The Tall jaw 5" isn't marked. The Base plate has a little Wilton and a 6" Palmgren. The green vise isn't marked but was on the table when I got the drill. I mostly just hold the vise by hand on the smaller drill presses. When using the big drill I always bolt the vises down tight or bolt the work to the table. Sometimes I use two vises at the same time for awkward work holding. Ed.
 

Attachments

  • IMG_4155.jpg
    IMG_4155.jpg
    771.2 KB · Views: 102
  • IMG_4154.jpg
    IMG_4154.jpg
    854.4 KB · Views: 93
  • IMG_4153.jpg
    IMG_4153.jpg
    886.1 KB · Views: 97

jmarkwolf

Well-known member
Joined
Jan 15, 2013
Messages
1,813
Location
Southeast Michigan
I was cleaning up a mess of chips this afternoon so I snapped a picture of the vises that are handy work holders for the drill presses. The drill table has in no order a 3" Enron and a 3" Cardinal. Also a 4" Sheldon, a 5" Reed, and a 6" Palmgren. The Tall jaw 5" isn't marked. The Base plate has a little Wilton and a 6" Palmgren. The green vise isn't marked but was on the table when I got the drill. I mostly just hold the vise by hand on the smaller drill presses. When using the big drill I always bolt the vises down tight or bolt the work to the table. Sometimes I use two vises at the same time for awkward work holding. Ed.
Wanna part with that 3in Cardinal?
 

Oregon rock crusher

Well-known member
Joined
Jun 28, 2016
Messages
1,907
Location
West of Salem
Wanna part with that 3in Cardinal?
I'm holding onto that one. About the only thing I don't love about the little Cardinal 3b is that I have to back up the work with a sacrificial spacer due to lack of gap between the guide rails. So far I've avoided pock marking it. The speed vise and the little Enron get used more than all the rest put together because the smaller work pieces are difficult to hold onto without a vise. Ed.
 
To avoid these ads, REGISTER NOW!

jmarkwolf

Well-known member
Joined
Jan 15, 2013
Messages
1,813
Location
Southeast Michigan
Recently picked up an addition to my Cardinal Speed vise collection:

The middle vise is a 4in one that I inherited from my Dad and have been using for almost 60 years, on the 15in drill press that I also inherited from my dad and still use frequently.

The bigger of the 3 vises I found at a local pawn shop and paid $30 a few years back and replaced the jaws and screw. I use this vise on my 20in drill press.

The smaller of the the 3 vises is a 3in I found recently on Facebook Marketplace. I use this to hold smaller parts I'm fiddle farting around with on my work bench.
 

Attachments

  • Cardinal Speedvises (3).jpg
    Cardinal Speedvises (3).jpg
    170.5 KB · Views: 70
Last edited:

Beerhippie

Well-known member
Joined
Oct 13, 2023
Messages
9,748
Location
Far NE Oregon
What I'm hoping for is a vise I can drill through. The center guide rod of the Shopfox really limits its uses. Bigger would be better, too.
 

11b30b4

Well-known member
Joined
Jul 16, 2020
Messages
1,029
Location
GA
Like the Night King raising the dead,

full


I resurrect this thread.🪄

Here are a couple of crappy ChiCom Drill Press Vises.

full


This is a Shars 4” Cross Slide, I love it.

full


Palmgren 3” QV30 Quick Vise

full


Palmgren 4” Ground Drill Press Vise (I had to fabricate a new lead screw for it).

full


2 ½” Tilt Vise Made in Japan, not sure on manufacturer (stamped 2 25 on bottom of vise body)

full


And my favorite of them all is the AMF 15-8 Float Lock Vise

full


Carry on…
 

RTM

Well-known member
Joined
May 13, 2019
Messages
13,139
Location
SF Bay Area
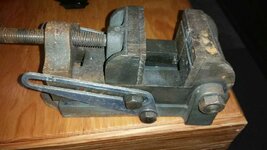
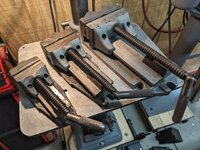
Here is one I just rehabbed. There were several surprises along the way, detailed below. The vise looks to have originally been a dark blue, a few patches of color here and there. The only markings are a No 4 and a W in a diamond, both on the removable handle**. Got it at an estate sale back in April 2023, along with some other heavy goodies. It was dirty with an obviously oily residue covered in dust. for $10, I grabbed and went. Back then, it seemed unusually heavy, but I didn't look too closely, the price was right. @Outlawmws, you asked about this a while back, here it finally is.

The whole pictorial diary is here, for those who want to see all the details.


Now, a year plus later, I finally had the time, space and energy to clean it up. I started by scraping off all the accumulated **** on any surface I could, and running twine thru the screw, I removed the jaws, which came out quite easily. I could see a bunch of **** under the jaws, and realized on my other decent sized vise, that falls out easily. So I flipped it over, and was immediately perplexed.

PXL_20240622_233355027-X2.jpg
There was a solid plate on the bottom, with 7 big (3/8-16) flat head bolts holding it on. Of course, for something this big, I wanted to haul out my Perfect Handle Heavy Duty screwdriver, but it was a bit too big, so I had to step back to a 12" Stanley 100. That worked OK on the easy ones, but needed to get some more force applied. Unfortunately I did not have any drag link sockets small enough to work on this, so I had to step down to my 3/8" Vessel Impact Wrench, with the biggest flat head bit, and it seemed puny. But, by preloading the wrench, I was able to make fairly quick work of removing the screws. Couple of them had been cut off, so I took care to note their locations. Once I go them out and removed the plate, the real circus began.
PXL_20240623_000650670-X2.jpg

Not only was there a pile of **** on the plate & under the jaws, the holes holding the plate on were not drilled evenly. And oh dear, there is a crack at the bottom end of the frame. Turns out the shortened screws were required to stop the screw from interfering with the dynamic jaw sliders. Moving carefully around the coils of metal, I quickly found out that they had not deburred the holes, so lots of places to take a bite of my fingers. I started to move the dynamic to disengage it from the base, and the base separated into 2 pieces.
PXL_20240623_001508661-X4.jpg

This explains the bottom plate, 1/2" thick, and 7# of steel. It had done a fine job of holding the base together, until I decided to screw with it. Hoping at this point I can get it back together.

So everything went into the Simple Green batch in waves, starting with all the little stuff that I had removed early, the jaws screws, etc. A 24 hour soak had them looking pretty good, but when I wiped off the jaws they almost looked chromed. There was a boatload of metallic swarf in the bath, as I wisely used a magnet to pull them out, rather then randomly poking about in the brown residue. All of the screws and their mating holes got cleaned up with a tap and die, one of the dynamic slide bolts was especially fouled up, took some time with a thread file and a thread plate to get it cleaned up well enough for a die. after several days, all the pieces were through the SG bath, and looking decent.

PXL_20240628_045201629-X2.jpg

Gave each of the cast iron pieces a coat of boiled linseed oil, and the non sliding faces. Noticed that the jaw faces had a bit of a copper hue to them, which I think is the SG impacting the chrome a bit. Made me look harder at the jaws, realized the faces may have been cut from a chrome or nickel plated bar, as the face looked nothing like the edges.
PXL_20240629_212139883-XL.jpgPXL_20240629_212142474-XL.jpg

Got it all back together Sunday evening, while the BLO wasn't fully cured but we lost our sun, so may be a few more weeks curing, and I didn't want pieces scattered about waiting. But everything together the jaw faces were a bit of a bear, as the first two times I put them together, they didn't match up great (more thoughts of homemade jaw faces), but eventually were acceptable. Getting all the screws for the base into position was a little exciting, as of course they were not drilled square, so tightening had to happen in a certain order. once I added the broken piece, and its three anchor screws, it again to 2-3 tries to get the gap minimized, all the screw heads below the plate surface.

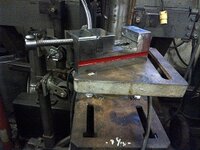
Once it was all together hit it with some dry lube on the screw, the sliding surfaces, and put some into the oiler reservoir. Hadn't seen this initially, it was so covered over with dirt. But a quick press down, and it accepts lube. Once the BLO is dry, I will add some oil to that reservoir. I then cranked the jaws open and closed a few times, spreading the lube around. I then grabbed a 5/8" double square socket, and ran it back and forth a few dozen times with a drill. Its not quite perfect, bit of a sticky spot in the middle, but not enough to make a Craftman NexTec drill stall. One thing I did not do, was punch out the pin holding the handle into the base. Couldn't get a good grip on things, so blew it off, as the handle spun easily. Once the mass was fully assembled, two taps with an 8 oz BP hammer, and the tapered pin popped right out. Gave it a bit of a degunk, and tapped it back in.


PXL_20240701_035820434-X2.jpgoPXL_20240701_040114506-X2.jpg

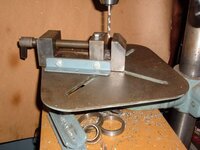
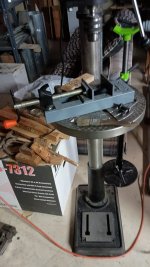
with a 4.5" (expanded to 4.75") jaw width, 3" of opening, and 32# of dead weight with the handle, I think it will be more than sufficient for my cheap little Taiwanese Shop Fox drill press. The house it came from had a Canedy Mfg 6' tall one in the garage that I had to pass on for fear it would tip my house over. (Even at 24# without the plate, a heavy beast)

So, follow on question, does anyone know who might have made this? That finished area above where the screw exits the dynamic jaw seems a bit unique, and it was blue originally. Thanks

Edit** Williams made a #4 handle, about this size and shape. Guess that won’t help define the vise yet.

 
Last edited:

isb cornbinder

Well-known member
Joined
Nov 3, 2010
Messages
7,073
Location
Pacific South West, BC, Canada
The red stripped mini vice is shop made. I got the BURKE on CL. The rotary vice works well
 

Attachments

  • Milling a square hole.jpg
    Milling a square hole.jpg
    933 KB · Views: 47
  • flat belt drive pulley on the mill.jpg
    flat belt drive pulley on the mill.jpg
    78.1 KB · Views: 31
  • Home made 1.75~ vice.jpg
    Home made 1.75~ vice.jpg
    1 MB · Views: 28
  • BURKE VICE 2.jpg
    BURKE VICE 2.jpg
    42.6 KB · Views: 28
  • BURKE VICE 1.jpg
    BURKE VICE 1.jpg
    46.3 KB · Views: 23
  • USA BURKE VICE 4.jpg
    USA BURKE VICE 4.jpg
    47.7 KB · Views: 21
  • Home made vice 1.75~ (2).jpg
    Home made vice 1.75~ (2).jpg
    25.5 KB · Views: 28

chucktee

Member
Joined
Jul 31, 2017
Messages
13
Location
North Alabama
This Wilton came with the 1960s 15" Rockwell/Delta drill press I bought and restored several years ago.
Wilton.jpg

This vise came from an estate sale a few years ago. No markings on it, but I think it's a Palmgren.

Palmgren.jpg

And this one came from an estate sale a little earlier this year. No markings, and I don't have any guesses so far as to who made it.

Unknown-1.jpg

It has a rounded end opposite the screw which almost suggests it ought to have been a tilting vise at one time, but I don't see any place where it would have attached to a base.

Unknown-2.jpg

The screw has been a little chewed up inside the moving jaw by the set screw, so the movement--especially opening--is a little rough. Someone saw fit to get a washer jammed on the screw for some reason. Guess I'll figure out what to do about all of that sooner or later.
 

Snip's

Well-known member
Joined
Apr 29, 2017
Messages
1,850
Location
Ohio
My AMF Mity 7 float lock vise...(y) Such a satisfying invention...
And my Chinesium Wilton disappointment purchase...(n)

IMG_4111.jpg
 
OP
G

gatewaysysop

Well-known member
Joined
Nov 11, 2008
Messages
3,290
Location
Arizona
Finally have a couple more to share:

  • Yost 1D that I finally got around to doing a light cleanup on (kudos to weare138 for selling it to me!):
yost1.PNG

yost2.PNG
  • After a long search, I finally landed a Morton Multivise in the 3.5" size that I've been after. This one was basically NOS condition, just needed some light cleanup to remove a few decades of shelf wear:
morton1.PNG

morton2.PNG
 

Beerhippie

Well-known member
Joined
Oct 13, 2023
Messages
9,748
Location
Far NE Oregon
I thought I'd posted this here, but it seems there area few drill press vise threads floating around.

The first yard (actually, shop) sale of the so-far slow season was pretty much right across the street from my cabin a few weeks ago. As it was Friday and I had a while before I needed to be at work, I stopped in. I wasn't first there, and some of the goodies had been picked, but I found a few things to bring back.

Among them was this vise:

54417979495_20f2cb677a_o.jpg

When I asked how much, the gal running the sale told me it was broken and I could have it for free. I'm pretty sure she was referring to the half-nut as "broken".

After a thorough cleaning, I realized she might have been a little closer to the mark than I'd thought:

54418579690_5cecb51cb3_o.jpg

54418385294_118d2fbf91_o.jpg

The "random pattern of shame".

I rattle-canned it with some Rusto Hammered Light Blue I had left over from a project a few years back and realized I had to do something about all the holes.

54418884600_838bc55222_o.jpg

JB Weld to the rescue!

54420779070_ba5f95a6ff_o.jpg

54419539332_93e6a1e40a_o.jpg

54420588614_65a1412fff_o.jpg

54420832449_aea29a8f0a_o.jpg

It was pretty much done by then, but I wanted less-marring jaw plates and some way to clamp it to my DP table.

54461084960_c244deebe9_o.jpg

1/4" 6061 plate--now it's done.
 
OP
G

gatewaysysop

Well-known member
Joined
Nov 11, 2008
Messages
3,290
Location
Arizona
And... I have another to share. :rocker:

This was one of my unicorns, a 3.5" Columbian 1523-½, circa 1959. Really dig the styling on this one, for some reason. There were two versions of the 3.5" model, this one being the nicer one with acme lead screw and removable jaws. I probably paid too much, but who hasn't?

As arrived:

PXL_20251129_185252197.jpg

After some light cleanup:

PXL_20251204_032500909.jpgPXL_20251204_032742320.jpg
 

mikegt4

Well-known member
Joined
Sep 12, 2005
Messages
3,268
Location
sw ohio
I have the ubiquitous 2" tilting vice that has been shown several times in this thread. I found it to be too restrictive for most of my needs so I made one that can go up to 8" or so wide to address clamping larger parts. I started with a sliding clamp that I saved when I scrapped a HF abrasive cut off saw (worst tool that I have ever bought) and mounted it on a 12" long piece of 4" channel. I made the jaws from 1-1/2" angle, one on the clamp and the other bolted to the channel. I drilled/tapped holes in several places so that I could move the fixed angle iron to multiple places to accommodate every width from zero to 8". I also cut out an opening down the center of the channel for a retaining plate under the sliding angle iron to keep it down on the channel. It has been working great for a couple of years.
 

Attachments

  • IMG_20251207_145645882.jpg
    IMG_20251207_145645882.jpg
    450.7 KB · Views: 14
To avoid these ads, REGISTER NOW!
Top Bottom