
You are using an out of date browser. It may not display this or other websites correctly.
You should upgrade or use an alternative browser.
You should upgrade or use an alternative browser.
Show us your welding projects
- Thread starter neonnblack
- Start date


That is some large rebar.
1.25" I got it at the local scrap yard.
zmotorsports
ALLIANCE MEMBER
The very beginning of my current welding project

I have plenty left to do

It has been a few years since I have welded. Hopefully I pick it back up quick. Wish me luck, I need it!
Sean
Looks like fun project.
Details?
Looks like fun project.
Details?
It is for sure a fun project! It is a 1993 Lexus SC400 with a 5.3 LS, single 76mm turbo, backed by a TH400. It has its challenges, but that is also part of the fun!
Sean
shortykorte
Well-known member
It is for sure a fun project! It is a 1993 Lexus SC400 with a 5.3 LS, single 76mm turbo, backed by a TH400. It has its challenges, but that is also part of the fun!
Sean
Always liked the early SC400....and a LS. Sweet!
Sent from my iPhone using The Garage Journal mobile app
brawls43
Well-known member
LS and SC is a great combo! The old 1UZ was a nice engine, but not very modification friendly.
zmotorsports
ALLIANCE MEMBER
It is for sure a fun project! It is a 1993 Lexus SC400 with a 5.3 LS, single 76mm turbo, backed by a TH400. It has its challenges, but that is also part of the fun!
Sean
Sounds awesome. You had me at LS.

Brent T
Well-known member
I recently moved to a "hidden winch" setup on my old XJ. No one makes a bumper to go along with this, so I made my own. Turned out ok for a novice effort.


zmotorsports
ALLIANCE MEMBER
I recently moved to a "hidden winch" setup on my old XJ. No one makes a bumper to go along with this, so I made my own. Turned out ok for a novice effort.
Nice job on the bumper. I think it turned out great.
Bigblue&Goldie
Well-known member
Great looking bumper! Where you at in AZ?
Brent T
Well-known member
Great looking bumper! Where you at in AZ?
Thanks!
I'm in Glendale out near the Stadium.
Here it is after paint.

Last edited:
Always liked the early SC400....and a LS. Sweet!
Sent from my iPhone using The Garage Journal mobile app
Thanks, same here!
LS and SC is a great combo! The old 1UZ was a nice engine, but not very modification friendly.
They are actually very mod friendly from a stand point of handling power. There is just very little aftermarket support. Stock bottom ends on the early ones can do 800 HP reliably. Far less easy to do road side repairs though if I had a problem on Drag Week!
Sounds awesome. You had me at LS.
LOL thanks!
If you guys want to check out the whole build,
https://www.thechicagogarage.com/fo...ngs/166397-broke-ef-turbo-ls-sc400-build.html
Sean
Brent T
Well-known member
More bugs:
Nice work on the Cutlery. Here's some I've been working on when I'm bored.


FishingMan
Well-known member
Brent t nice work on the silverware art. Im stealing the ideas. Silverware is alot easier to find than horseshoes.
Brent T
Well-known member
Brent t nice work on the silverware art. Im stealing the ideas. Silverware is alot easier to find than horseshoes.
Thanks. Seems kinda silly, but people seem to like this stuff. I just started a couple months ago. A guy who works for me makes a lot of cutlery and yard art and he got me started.
BD1
Well-known member
I do silverware artwork too. If anyone wants to try it , I buy my silverware at Goodwill. Ten cents each.
Attachments
-
 30CEAF0B-DCCE-44A9-B0A8-6B201F731747.jpg70.2 KB · Views: 146
 -
 38AE4617-A22E-4297-973A-C325ECD1966D.jpg73.7 KB · Views: 153
 -
 59BA6ED2-C387-4317-97D2-75B47CAB861F.jpg80.7 KB · Views: 153
 -
 18186A3B-2814-4694-9ED3-98E4F221AF78.jpg54.9 KB · Views: 143
 -
 73CEA143-4B0C-4A72-88FA-033A7837AC5A.jpg78.1 KB · Views: 147
 -
 DC98EF21-15E6-4B39-8D52-1C7586B8F392.jpg70.6 KB · Views: 143
 -
 458F2196-60E1-4DAF-A7A5-DFFC2BA8EF36.jpg168.5 KB · Views: 134
Brent T
Well-known member
I do silverware artwork too. If anyone wants to try it , I buy my silverware at Goodwill. Ten cents each.
Same here. Goodwill and Salvation Army.
Nice work!
FishingMan
Well-known member
The one of the boat is right up my alley. Came out awesome
thejimmy
Well-known member
Brent t nice work on the silverware art. Im stealing the ideas. Silverware is alot easier to find than horseshoes.
+1 good stuff, also BD1
Last edited:
BD1
Well-known member
@BD1, Your work is what inspired me to try it myself. I see you are still doing it. Thanks for sharing.
Thanks guys ! Ndr1968 and Brent T , great clean work !!! That's how it should be. I always try to hide the welds.
I have a cheap HF buffer I use for polishing the silverware. Had it for years and still going.I normally don't buy cheap tools but for $35 it's hard to pass up for this light stuff.
Yes I'm still doing it.
") That second picture I made for a cute female hygienist. She recently graduated and I was impressed with her professionalism. So I figured I'd make it for her. She loved it along with the office people.
That second picture I made for a cute female hygienist. She recently graduated and I was impressed with her professionalism. So I figured I'd make it for her. She loved it along with the office people.I'm still doing horseshoe stuff and yard art. Especially now that it's winter by me.
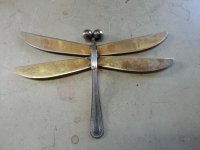
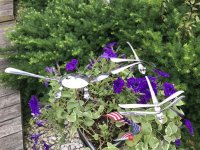
I sold lots of dragonflies at art/craft shows. For the eyes, I drill holes and plug weld on the backside. It has a cleaner look and can add heat marks / color too.
Brent T
Well-known member
Thanks guys ! Ndr1968 and Brent T , great clean work !!! That's how it should be. I always try to hide the welds.
I have a cheap HF buffer I use for polishing the silverware. Had it for years and still going.I normally don't buy cheap tools but for $35 it's hard to pass up for this light stuff.
Yes I'm still doing it.
I'm still doing horseshoe stuff and yard art. Especially now that it's winter by me.
I sold lots of dragonflies at art/craft shows. For the eyes, I drill holes and plug weld on the backside. It has a cleaner look and can add heat marks / color too.
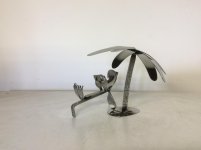
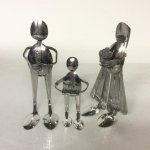
Your work looks much better than mine. I'm just getting started, mostly copying items I've seen online. The guitar player was my first "original" project. I think I'll do a bassist and drummer and maybe a lead singer down the road. It's kind of addictive once you get started and doesn't cost much. Finding out certain kinds of silverware work better for certain projects than others. I still burn holes through things quite often, but getting better. I haven't done any grinding or polishing on anything I've done yet. I've been wondering if I can get rid of some of the heat discoloration with a little work. Looking at your pics, I see where I have some room for improvement.
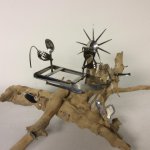
I just finished a drill press restoration and needed a mobile base. I haven't picked up the tig torch in a while but it seems to have turned out OK. Works and rolls better than I expected it to!
View media item 88761
View media item 88762
View media item 88763
View media item 88764
View media item 88761
View media item 88762
View media item 88763
View media item 88764
sqznby
Well-known member
Very nice s14, you did a great job, nicely done.
BD1
Well-known member
Your work looks much better than mine. I'm just getting started, mostly copying items I've seen online. The guitar player was my first "original" project. I think I'll do a bassist and drummer and maybe a lead singer down the road. It's kind of addictive once you get started and doesn't cost much. Finding out certain kinds of silverware work better for certain projects than others. I still burn holes through things quite often, but getting better. I haven't done any grinding or polishing on anything I've done yet. I've been wondering if I can get rid of some of the heat discoloration with a little work. Looking at your pics, I see where I have some room for improvement.
Thanks. Choosing the right silverware helps. I have a huge assortment in stock because each piece is different. I'll share the way I found out to be the easiest. It can be extremely difficult to prevent burn through or discoloration. Each piece is a little different but same principle. This maybe easiest to view on tablet or laptop.
I add a piece of silverware sometimes to weld too like on the turkey. The turtle and skier, I leave handle on and weld to it. Welding directly on the shell will discolor it and possibly burn through as you know.
I also use a clamp from a battery charger for a ground. I add 10 gauge stranded wire to clamp and other bare end I stick inside copper tubing. Pound or press flat and stick that into ground clamp. This should definitely help. Let me know if I can help.
Attachments
-
 A8EF1D57-4DC3-4844-AB04-AB82103AE3A2.jpg76.4 KB · Views: 171
 -
 342C0553-87E8-41DB-BC46-C5EBEC9524DA.jpg70.2 KB · Views: 165
 -
 842B4AC7-F572-4986-932C-6B1530C15435.jpg81.6 KB · Views: 149
 -
 C05CDB8F-273D-4BD4-94CE-FB7A324700E4.jpg90.7 KB · Views: 164
 -
 DADDAC6F-D11A-4CEA-B68A-2ABA0A665874.jpg127.7 KB · Views: 151
 -
 32A40476-161F-4298-BC3A-98CD982F9AFB.jpg106 KB · Views: 159
Brent T
Well-known member
Thanks. Choosing the right silverware helps. I have a huge assortment in stock because each piece is different. I'll share the way I found out to be the easiest. It can be extremely difficult to prevent burn through or discoloration. Each piece is a little different but same principle. This maybe easiest to view on tablet or laptop.
I add a piece of silverware sometimes to weld too like on the turkey. The turtle and skier, I leave handle on and weld to it. Welding directly on the shell will discolor it and possibly burn through as you know.
I also use a clamp from a battery charger for a ground. I add 10 gauge stranded wire to clamp and other bare end I stick inside copper tubing. Pound or press flat and stick that into ground clamp. This should definitely help. Let me know if I can help.
Thanks BD1 that's helpful seeing the back side of those. I appreciate it.
FishingMan
Well-known member
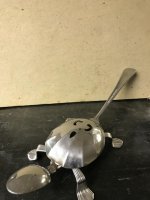
That turtle is cool.
BD1
Well-known member
That turtle is cool.
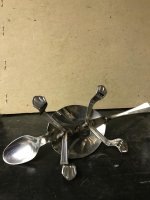
Thanks, there is a 1/8" hole in the underside for a 1/8" rod. With rod added it can be placed in a potted plant or stuck in ground.
That long tail can be used as a drink stirrer. I sold a few like that.


Thanks. Choosing the right silverware helps. I have a huge assortment in stock because each piece is different. I'll share the way I found out to be the easiest. It can be extremely difficult to prevent burn through or discoloration. Each piece is a little different but same principle. This maybe easiest to view on tablet or laptop.
I add a piece of silverware sometimes to weld too like on the turkey. The turtle and skier, I leave handle on and weld to it. Welding directly on the shell will discolor it and possibly burn through as you know.
I also use a clamp from a battery charger for a ground. I add 10 gauge stranded wire to clamp and other bare end I stick inside copper tubing. Pound or press flat and stick that into ground clamp. This should definitely help. Let me know if I can help.
As I said, BD1 your work is inspiring. Mine falls more in the category of "fa_ting around" but it's very enjoyable just the same. Mine just goes out in the elements anyway so I don't do much polish or finish at all except maybe for a quick rattle can clear coat to make them resist corrosion a little while.
I have found that, often, the hardest part is finding enough matching pieces of silverware to complete any one item. I have been known to buy cheap Walmart pieces @ 50 cents apiece to do some of mine.
Thanks for sharing the underside of "Mister Turtle"! You can see how I burned through trying to steal your idea when I first saw it.
Attachments


thejimmy
Well-known member
Thanks for sharing the underside of "Mister Turtle"! You can see how I burned through trying to steal your idea when I first saw it.
Why not TIG weld using silicon bronze filler, this would help prevent burn through
acer66
Well-known member
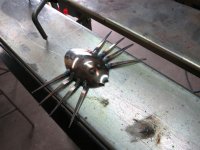
Yeah. These are from my "bug" phase.
Very cool.
Boosted1
Well-known member
Krang,
Those brackets look very beefy.
Any installed pics?
Those brackets look very beefy.
Any installed pics?
pennsylvaniaboy
Well-known member
- Joined
- May 28, 2014
- Messages
- 417
Oh no doubt the frame will remain rock solid forever. With everything triangulated it's a strong as it gets. That's why I just wondered if the fire pan played nice. Also did you make provisions for water drainage. When I built our fire pit I cast a 1-1/4" schedule 40 galvi drain into the center. Then after I placed the fired box in forced the center down about a 1/4" then welded the transition. Btw, the pit (for lack of a better term) is a 3 course high 8" split face block with brick cap, one of those forever projects. To date she won't hold water so at least that part turned out good
What gauge is that?
BD1
Well-known member
''Thanks for sharing the underside of "Mister Turtle"! You can see how I burned through trying to steal your idea when I first saw it.[/QUOTE]
No problem. That's why I wanted to post it. I'll get a picture of the sun I did on another fishing scene. By keeping the handle of the piece longer makes it easier for sure. Welding to it also avoids discoloration.
There's endless creativity with silverware. Goodwill is my go to place . Anytime I drive by there I have to stop . That skier I did has wood handles I cut off of silverware. Only two I saw so the skier was made. Just like your fancy dragonflies wings.
What gauge is that?
The firebox is 11ga.
Btw guys, I dig the silverware figures. What an awesome job you guys do.
BD1
Well-known member
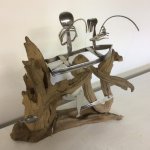
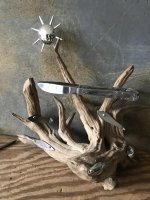
Here's another fishing driftwood in progress.
Tacking each fork tine to the spoon would have discolored it. I didn't want that effect here. So I used added another short piece to weld to. It makes it easier for sure.
Tacking each fork tine to the spoon would have discolored it. I didn't want that effect here. So I used added another short piece to weld to. It makes it easier for sure.
Attachments

Brandon_oma#692
Well-known member
I like the silverware projects. Currently I have an old AC forney stick welder. With the correct type of rods is this something I can do? If so what do I need? Thanks