
You are using an out of date browser. It may not display this or other websites correctly.
You should upgrade or use an alternative browser.
You should upgrade or use an alternative browser.
Show us your welding projects
- Thread starter neonnblack
- Start date

Slednut
Well-known member
Made these for my project car, some sheet metal work and some welding. I really don't have any sheet metal tools except hammers and dollies. Used a vice and some channel iron to make the bends.
Attachments
EXBRONCO
Member
EXBRONCO
Member

TTA89
Well-known member


Hobb
Member
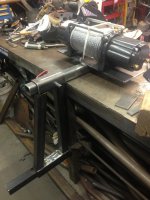
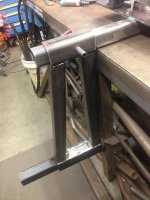
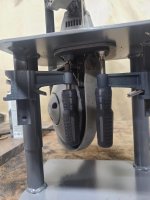
Thought I would share my stand for my portaband saw. My first full welding fab build. Inspired by youtube and built with a few personal tweaks Definitely learned a few things along the way. Cost my 12 bucks in materials plus some scrap pipe I had laying around. Only thing I might change is the location of the right side clamp to be behind the blade so there is no torque on the plate. Disregard the 2 drilled holes. Originally I was going to screw the saw to the plate but decided to use clamps to make install/removal easier.
Attachments


MrSurly
Well-known member
Good Stuff, that
Sent from my iPhone using Tapatalk
Sent from my iPhone using Tapatalk
DavidR8
Well-known member
Just finished my cart up as well!
That’s a good looking cart!
Sent from my iPhone using Garage Journal
larry4406
Well-known member
Thought I would share my stand for my portaband saw. My first full welding fab build. Inspired by youtube and built with a few personal tweaks Definitely learned a few things along the way. Cost my 12 bucks in materials plus some scrap pipe I had laying around. Only thing I might change is the location of the right side clamp to be behind the blade so there is no torque on the plate. Disregard the 2 drilled holes. Originally I was going to screw the saw to the plate but decided to use clamps to make install/removal easier.
I like the clamp idea.
shortykorte
Well-known member
Nice carts. [emoji106]
Great idea on the cables for bandsaw.
Sent from my iPhone using Garage Journal
Great idea on the cables for bandsaw.
Sent from my iPhone using Garage Journal
Duker
Well-known member
Just finished my cart up as well!
I like the carts but I like that view even better! [emoji106]
Sent from my iPad using Tapatalk Pro
Old Man Roger
Well-known member
Right! Looks like a mural..lolI like the carts but I like that view even better! [emoji106]
Sent from my iPad using Tapatalk Pro
Hobb
Member
Thanks larry so far its working awesome for me. been ripping through some tubing for my welding cart build to get the welder off my bench shelf.
sberry
Banned
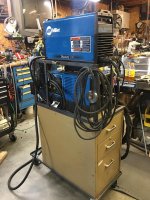
We take it that yellow thing on the cart has a 20A breaker on it?Made a welding cart
So, maybe this has been considered but this is a bit for others doing something similar. If that 4 way came with a 12 cord and plug then it may not have additional protection like a common generic strip does. The plug that came listed on it allowed it to be plugged to 20, the rest of it and stuff connected to it depends on the premise circuit breaker. If its on a 30 or 50 needs additional ocpd.
Those kind of carts are my favorite, some salvage some mod. All that **** is so slow and tedious to build anymore I try to avoid it. Not to mention the cost.
Last edited:
ClappedOutBport
Well-known member
- Joined
- Mar 30, 2016
- Messages
- 998
A little Edison fuse would do.
sberry
Banned
The OP is newer here so we don't know details, maybe he did this etc. Agree a fuse would work. they make a little 2 space panel too. A breaker is ideal if a guy is running motors or other welding equipment, grinders and such a fuse probably be just fine.
C91x
Well-known member
Had a lyon tool cart from the 40s or 50s that I got for free. Decided to make one cart big enough for 2 of my 3 welders and the little plasma cutter. Used some 1x1 and 1x2 to basically build a frame around the cart used my lathe to round off some 1/2" nuts to use as inserts for the casters. Also built a hold for the tig torch.... I kept breaking Pyrex cups with the torch dangling 


Sent from my SM-G960U using The Garage Journal mobile app
Sent from my SM-G960U using The Garage Journal mobile app
C91x
Well-known member
Had a piece of 20 gauge that was bent up from not being stored properly. Tried to beed roll by myself and I bent it up worse but I have a shelf for bigger cut offs under my welding table now. Also put a few dimples in it 
Sent from my SM-G960U using The Garage Journal mobile app
Sent from my SM-G960U using The Garage Journal mobile app
harley jim
Well-known member
I love those Lyon carts they are indestructible wish I had one.Had a lyon tool cart from the 40s or 50s that I got for free. Decided to make one cart big enough for 2 of my 3 welders and the little plasma cutter. Used some 1x1 and 1x2 to basically build a frame around the cart used my lathe to round off some 1/2" nuts to use as inserts for the casters. Also built a hold for the tig torch.... I kept breaking Pyrex cups with the torch dangling
Sent from my SM-G960U using The Garage Journal mobile app
I worked at Lyon in 1976 and they still made those then.
Great welding cart
Sent from my SM-A102U using The Garage Journal mobile app
C91x
Well-known member
I love those Lyon carts they are indestructible wish I had one.
I worked at Lyon in 1976 and they still made those then.
Great welding cart
Sent from my SM-A102U using The Garage Journal mobile app
Thanks. Thats not the actual pic of the one I had since i didn't take any before pics. Also guessing about the year based on the other cabinets I pulled out of the dumpster. Some of our Technical Operations guys were throwing a ton of stuff into a dumpster. All these boxes were used for aviation electric components so there was very little wear. I thought the silver 50's craftsman box was a reproduction based on its conditions. You should have seen the look on their faces when a guy in business attire started going through the dumpster.
I bought a set of mirrors for my Polaris Ranger sxs and when I mounted the first side I couldn't believe how poorly they fit. The mirror was tilted at an angle and the bolt that attached the mirror to the mount interfered with the mount and couldn't be tightened. I preceded to cut part of the mount off, add a small piece of 1/8" plate to space the mirror out so it would clear the mount bolt and also changed the mount plate angle so the mirror wasn't tilted at a funny angle. Not a big job but made a big difference in the final fit up. In the first pic the stock mount is on the left and the modified mount on the right.


harley jim
Well-known member
That cart looks green, all of the old stuff was almost army od green. They switched to dove gray in the late 60, early 70 I'm not sure of the exact year, I should have said that in my first post. Great cart though.Thanks. Thats not the actual pic of the one I had since i didn't take any before pics. Also guessing about the year based on the other cabinets I pulled out of the dumpster. Some of our Technical Operations guys were throwing a ton of stuff into a dumpster. All these boxes were used for aviation electric components so there was very little wear. I thought the silver 50's craftsman box was a reproduction based on its conditions. You should have seen the look on their faces when a guy in business attire started going through the dumpster.
I have a couple of there workbenches one I repurpose as my lathe table it also has a Lyon metal drawer.

Sent from my SM-A102U using The Garage Journal mobile app
BlueBomber
Well-known member
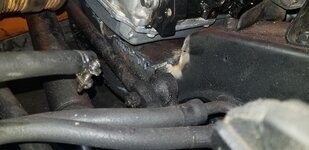
Notched the crossmember on my 1960 Impala to clear the oil pan on the 6.0 LS engine swap underway. Despite getting a Camaro oil pan, which is very shallow up front, the pan rested on the crossmember before the motor mounts hit the perches. Rather than hunt for yet another oil pan, I cut the crossmember saddle front edge and sides, like a box lid flap, with the plasma torch, then took an inch out of the front vertical rise. I banged the "flap" down with a BFH, trimmed the edges and then filled in all gaps with patches.
Not my best work, but certainly functional, and it'll be hidden by the engine anyway. After the last pic, I ground all the welds flat and then sprayed it with undercoating paint.
"A little bit of grinding and a little bit of paint...".[emoji38]


Sent from my SM-G950U using Tapatalk
Not my best work, but certainly functional, and it'll be hidden by the engine anyway. After the last pic, I ground all the welds flat and then sprayed it with undercoating paint.
"A little bit of grinding and a little bit of paint...".[emoji38]
Sent from my SM-G950U using Tapatalk
Attachments


Last edited:
TTA89
Well-known member


E.rodz
Well-known member
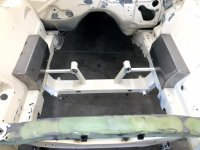
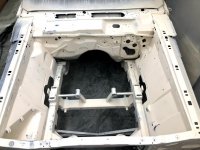
about 5 miles of welding and fab work on my 1970 Chevelle to make a 335 tire fit in the wheel well.
View media item 100709
View media item 100709
My new 2'x4' 5/8" table top that I had water jetted. 5/8" holes on 4" centers. Originally had it drawn up for 2" centers but was going to take over 3.5 hours to cut so I knocked it down so my machinist didn't have to baby sit it so long.
Gonna be a bit before I can get the frame built but couldn't wait to show it off!
Progress pics!
Attachments


harley jim
Well-known member
Handrails for the house
Cut all the parts for the first section. Squared the rails and tack the first picket.

Made a gauge to space the remaining pickets

Tack and move down the line

Flip and tack the back. Test fit fine tune then fully weld and add mounting tabs.
Sent from my SM-A102U using The Garage Journal mobile app
Cut all the parts for the first section. Squared the rails and tack the first picket.
Made a gauge to space the remaining pickets
Tack and move down the line
Flip and tack the back. Test fit fine tune then fully weld and add mounting tabs.
Sent from my SM-A102U using The Garage Journal mobile app
fred d
Well-known member
Due to social distancing and the lack of workout space for my 15-year-old football player
I traded for a bench press, plate weights bar and a few other weightlifting items.
He and I spent plenty of time cleaning them up and putting clear on them to make them a little more presentable. But we had no way to store all of the plates, and I hated that they were laying all over the floor in the area where someone could be injured
So I decided to work on my welding skills and build this weight rack
Attachments


smalltown
Well-known member
topcok88 what size is that Trex ? From the photo they look like 2x6, but I didn't think they made Trex that big.
Due to social distancing and the lack of workout space for my 15-year-old football player
I traded for a bench press, plate weights bar and a few other weightlifting items.
He and I spent plenty of time cleaning them up and putting clear on them to make them a little more presentable. But we had no way to store all of the plates, and I hated that they were laying all over the floor in the area where someone could be injured
So I decided to work on my welding skills and build this weight rack
Nice job on the weight tree.
I cheated on mine. I drilled 2” holes to insert a length of tube directly through.
This necessitated only a tiny recessed tack on the underside.
topcok88 what size is that Trex ? From the photo they look like 2x6, but I didn't think they made Trex that big.
It is Trex Transcend dimensional lumber so it is 2x6 material.
Sent from my iPhone using Tapatalk
Magneto
Well-known member
Finished putting up the Trex on the steel pergola build. Just need to get the brackets for the privacy screens up now. Really happy to finishing this project up.
Sent from my iPhone using Tapatalk

 TOP NOTCH JOB!
Attachments

aka Larry
Well-known member
Finished putting up the Trex on the steel pergola build. Just need to get the brackets for the privacy screens up now. Really happy to finishing this project up.
Sent from my iPhone using Tapatalk

Looks great, but I think you're going to have a leak.

fred d
Well-known member
Nice job on the weight tree.
I cheated on mine. I drilled 2” holes to insert a length of tube directly through.
This necessitated only a tiny recessed tack on the underside.
I did the same. But since I was working on my welding skills I went all the way around
Slednut
Well-known member
about 5 miles of welding and fab work on my 1970 Chevelle to make a 335 tire fit in the wheel well.
That is really nice, I always do Fords and am really jealous of the guys that do Chevy's and have actual frames to work with. Did you make the 4 link or is that a kit?

welder4956
Well-known member

shortykorte
Well-known member
Jhmt, beautiful smoker.
the legs on left side would be great table legs. How did you make them?
Sent from my iPhone using Garage Journal
the legs on left side would be great table legs. How did you make them?
Sent from my iPhone using Garage Journal
LeeG
Well-known member
Edit the url link and change the https to http.
Very nice build. Are the hinges brass?
Very nice build. Are the hinges brass?