Boosted1
Well-known member
Trailing arms look good. Looks like a lot of work went into those.Finished welding up my trailing arms today for my 1968 Ford Prerunner.


Trailing arms look good. Looks like a lot of work went into those.Finished welding up my trailing arms today for my 1968 Ford Prerunner.
Yeah luckily they are all designed in solidworks and I get the laser cut and CNC bent so they go together fairly easy just a bit of welding. I can build a pair of them in about 10 hours.Trailing arms look good. Looks like a lot of work went into those.

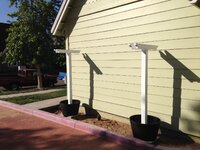
On the last part of the Car trailer project. The trailer took about three times as long as I thought it would to build, but I learned a lot in the process and didn't have to redo much. Mocking up the removable fender for the drivers side. After that's finish welded still have wiring and paint, but paint will not happen until spring. Its too cold out there now. I will just primer all the not galvanized areas and it should be fine for 4 months.
That looks great, the GTC has to have a low front end. Keep the posts coming.On the last part of the Car trailer project. The trailer took about three times as long as I thought it would to build, but I learned a lot in the process and didn't have to redo much. Mocking up the removable fender for the drivers side. After that's finish welded still have wiring and paint, but paint will not happen until spring. Its too cold out there now. I will just primer all the not galvanized areas and it should be fine for 4 months.
The floor is galvanized motorcycle ramps from harbor freight. I used the 20% off coupons every few days when they went on sale. Back when they did that. They are welded together with cross bracing under them every 2 feet. The tubing was galvanized 2x4 3/16 wall used for building NFL stadiums. I got a great deal on it as the company is going bankrupt because of all the stupid virus/government regulations. If anyone is in south Oregon and wants some its on craigslist as the company is still liquidating.Did the plank grating come from the same source as the galvanized steel box tube? I managed to get about 60' from a friend that used to do billboards and turned it into heavy shelving in the garage and would love to find more. It's very expensive new, and I never seem to see the stuff come up second hand. Good use for it on a trailer like that.
I looked it up, very same top side profile, but not quite as deep as the stuff I used for shelving, but that could be a solution. Interesting, thank you.The floor is galvanized motorcycle ramps from harbor freight. I used the 20% off coupons every few days when they went on sale. Back when they did that. They are welded together with cross bracing under them every 2 feet. The tubing was galvanized 2x4 3/16 wall used for building NFL stadiums. I got a great deal on it as the company is going bankrupt because of all the stupid virus/government regulations. If anyone is in south Oregon and wants some its on craigslist as the company is still liquidating.

Ever get sunburn welding with short sleeves? Arc welding puts out uv rays.Nice nice nice, i like the way this is going.
Nue: I agree with you with the light, i have to weld in the middle of the day or else i cant weld worth a damn. funny you mentioned that. The HF machine isnt a bad little machine though, it seems.
And i usually wear short sleeve shirt while welding, and depending on what im welding, ill wear welding gloves or not. I couldnt possibly hold a torch with one hand, im far too shaky. Normally if im standing, gun is in right hand, with my left hand holding my right from the top, with a little downward pressure.
In AZ I wear a long sleeve "t shirt" when it's cold and I'm welding.I wear a long sleeve "t shirt" when its hot and I'm welding.


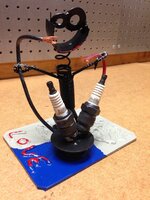
Tig brazed?My last artwork job:

Yup! Some stuff welded early on, then I go over most everything else w/ silicon bronzeTig brazed?
Nice Duker, but what is a tire hammer? I'm dabbling in blksmithing too.
How did you make the hardy hole?
Did you add those pipe vise jaws? Never seen a post vise with them before.
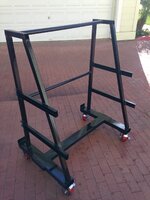
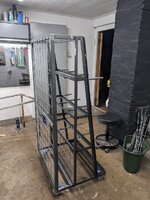
I have a very small garage so had to make my set up on wheels so I can move it out to the driveway to work. This is what I ended up with:
I'm finding out now that it's almost futile thinking I can have everything all combined on one "cart". You need a big area and a lot of tooling but this is working for me in the meantime.


I work part time for my buddy who owns a concrete business. I convinced him to buy a new rebar bender and I was tired of using the old one on the floor so I built a stand/table for it. It just needs a sheet of plywood to finish off the top. It's already much nicer to work standing up!


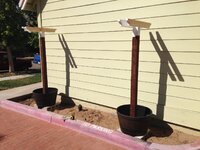


I want one of these so bad!An older BBQ project I was commissioned to make. Santa Maria style BBQ w/ floating stainless steel grill rods w/ rotisserie holder and adjustable mount.
I designed it myself. I've made a few different styles of bbq pits. This one was an insert into an existing pit opening. I'd recommend using the floating grill rods verses the expanded metal, It is easier to clean and allows for expansion when subjected to heat.I want one of these so bad!
Did you get the plans from somewhere or just make it? Any tips?