
You are using an out of date browser. It may not display this or other websites correctly.
You should upgrade or use an alternative browser.
You should upgrade or use an alternative browser.
Show us your welding projects
- Thread starter neonnblack
- Start date

selectedgrub
Well-known member
- Joined
- Aug 26, 2021
- Messages
- 53
Detail of a fish


Ok that’s gotta have a story, spit it out
")
harley jim
Well-known member
 what he said
Old Man Roger
Well-known member
Dammit the picture won’t load for me.
There’s nothing to see omr. Once you get past the blood / gore / carnage and obvious disastrous ending. It’s just a little welding.Dammit the picture won’t load for me.

GreenIron
Well-known member
Mc8541ss, this is nice.

Old Man Roger
Well-known member
Ahh it’s showing now. Maybe some rust repair?There’s nothing to see omr. Once you get past the blood / gore / carnage and obvious disastrous ending. It’s just a little welding.
Damn the bad luck, wanted to keep you hanging.Ahh it’s showing now. Maybe some rust repair?
Old Man Roger
Well-known member
It would have bugged the **** out of me too..lolDamn the bad luck, wanted to keep you hanging.
wrenchguy
Well-known member
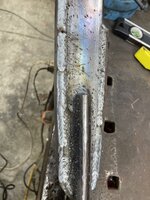
Anyone know what's going on with this piece I fabricated about 4 years ago? It's 18 ga.304 stainless tig welded with .045 s/s wire filler added. Then excess bead removed and burnished then buffed. It only happens on the curve of the part. It's a boat part with the boat remaining in the water the all season long. It seems rusting inside the hair line cracks and starting to pit on the inside and outside of the part. Rust removed on 1 side of the part. Why the cracking? Thanks for any help.


Again, only in the curve area. No cracking within 6" of the end. This photo was taken when first installed.

Again, only in the curve area. No cracking within 6" of the end. This photo was taken when first installed.
txvwnut
Well-known member
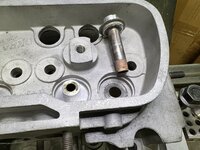
While clearancing guide bosses for dual springs one of the bosses broke off. I believe this was due to some ham fisted “machinist” putting guides in these heads years ago. When I cleaned the area up you could tell it had been cracked for some time as the it was rather dark in the break.
Attachments


PugetDude
ALLIANCE MEMBER
Contaminated grinding wheel?Anyone know what's going on with this piece I fabricated about 4 years ago? It's 18 ga.304 stainless tig welded with .045 s/s wire filler added. Then excess bead removed and burnished then buffed. It only happens on the curve of the part. It's a boat part with the boat remaining in the water the all season long. It seems rusting inside the hair line cracks and starting to pit on the inside and outside of the part. Rust removed on 1 side of the part. Why the cracking? Thanks for any help.
Again, only in the curve area. No cracking within 6" of the end. This photo was taken when first installed.
welder4956
Well-known member
Looks like stress corrosion cracking to me. 321 or 347 would have been a better choice than 304 for marine service.Anyone know what's going on with this piece I fabricated about 4 years ago? It's 18 ga.304 stainless tig welded with .045 s/s wire filler added. Then excess bead removed and burnished then buffed. It only happens on the curve of the part. It's a boat part with the boat remaining in the water the all season long. It seems rusting inside the hair line cracks and starting to pit on the inside and outside of the part. Rust removed on 1 side of the part. Why the cracking? Thanks for any help.
Again, only in the curve area. No cracking within 6" of the end. This photo was taken when first installed.
wrenchguy
Well-known member
Let me digest these comments. In over 40 years making these parts never had this issue. thank you.
Honch
Well-known member
Anyone know what's going on with this piece I fabricated about 4 years ago? It's 18 ga.304 stainless tig welded with .045 s/s wire filler added. Then excess bead removed and burnished then buffed. It only happens on the curve of the part. It's a boat part with the boat remaining in the water the all season long. It seems rusting inside the hair line cracks and starting to pit on the inside and outside of the part. Rust removed on 1 side of the part. Why the cracking? Thanks for any help.
Again, only in the curve area. No cracking within 6" of the end. This photo was taken when first installed.
One possibility:
SSC (Stress Corrosion Cracking)
old_smokey
Well-known member
Salvaged some scrap bed rails and a bunch of steel I found at the local landfill (???), supplemented with some square tubing and I made these two items for my shop. Did it all TIG to get some practice in. I bought a Primeweld 225 ten months ago and have been sneaking jobs in here and there. I'm starting to get the feel of it now, but have much to learn still.
Attachments


y'sguy
Well-known member
Just looking in here to learn about the issue on the stainless bow guard or whatever it's called.
I'm a beginner welder and am curious about it.
Could it be that impurities were introduced during welding materials or even when polishing, seems to me? Also wanted to add that it's not the first time I've seen stainless rust or corrode, especially under those conditions. I would even ask if introducing heat in the process of welding possibly changes the chemistry of that particular material. Just wondering, I'm way past my knowledge base! Hope you get the right answer and can share with us.
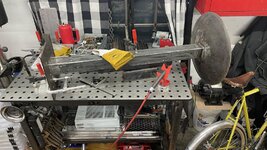
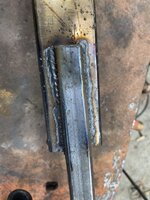
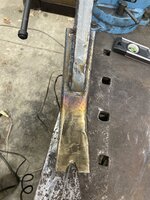
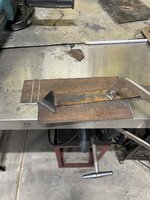
I made a Burke Bar last week; ever since seeing Scott at YT Essential Craftsman build one years ago, I finally decided I "needed" one.
Start with a 12" long +/- 5/8" thick truck leaf spring, heat it and forge it into the correct shape and angle - both of which I had to guess since Scott didn't give any dimensions. Shouldn't matter since it's just a glorified pry bar.
Once forged to shape and angle and normalized it (i.e. left it in the coal fire, heated to dull red, then shut the air off), cut the "nail puller", which I screwed up, oh well. Clean and polish the pry end with a 120 grit flap wheel, get all the forging marks out. Find a 52" length of 1x2x.120" tubing and cut to length. Cut out a slot on one end for the head, about 4" or so in length. Fit the pry end to the bar for a close-ish fitting. Pre-heat the pry end to 450-500 degrees, fit it to the handle and weld up. Add 1x1/8" flat bar to the handle for strength.
Weld it up, then clean up all the dang $#%^#$#@@!!! splatter that was left from the welding job.
Now, go figure out what I'm gonna pry with this thing!
Thanks for looking!
Start with a 12" long +/- 5/8" thick truck leaf spring, heat it and forge it into the correct shape and angle - both of which I had to guess since Scott didn't give any dimensions. Shouldn't matter since it's just a glorified pry bar.
Once forged to shape and angle and normalized it (i.e. left it in the coal fire, heated to dull red, then shut the air off), cut the "nail puller", which I screwed up, oh well.
Clean and polish the pry end with a 120 grit flap wheel, get all the forging marks out. Find a 52" length of 1x2x.120" tubing and cut to length. Cut out a slot on one end for the head, about 4" or so in length. Fit the pry end to the bar for a close-ish fitting. Pre-heat the pry end to 450-500 degrees, fit it to the handle and weld up. Add 1x1/8" flat bar to the handle for strength.Weld it up, then clean up all the dang $#%^#$#@@!!! splatter that was left from the welding job.
Now, go figure out what I'm gonna pry with this thing!
Thanks for looking!
Attachments
-
 IMG_1895 (Large).jpeg425.3 KB · Views: 260
 -
 IMG_1900 (Large).jpeg303.7 KB · Views: 179
 -
 IMG_1907 (Large).jpeg376.5 KB · Views: 155
 -
 IMG_1908 (Large).jpeg387.7 KB · Views: 149
 -
 IMG_1909 (Large).jpeg441.6 KB · Views: 143
 -
 IMG_1910 (Large).jpeg181.6 KB · Views: 138
 -
 IMG_1913 (Large).jpeg287.6 KB · Views: 133
 -
 IMG_1914 (Large).jpeg330.8 KB · Views: 137
 -
 IMG_1915 (Large).jpeg365.8 KB · Views: 139
 -
 IMG_1916 (Large).jpeg318.7 KB · Views: 142
IRQVET
Well-known member
Can’t remember if I ever shared a pic of my 49 Willys when I was cutting out rusted panels and welding in new sheet metal. Any bondo I found was painstakingly removed, and new sheet metal was welded into place. Bubba at some point made the entire cab corner in Bondo! So I did my best to fabricate the corner out of solid sheet metal. It was tricky as I am not a professional fabricator.


Last edited:
slowtwitch73
Well-known member
That ss prob needed to be passivated.
harley jim
Well-known member
I thought that too. Heat may have altered it.That ss prob needed to be passivated.
PugetDude
ALLIANCE MEMBER
Oakite, not sure if you can find it in small quantities. It's what we used on SS nuclear waste containment vessels.That ss prob needed to be passivated.
silentpoet
Well-known member
- Joined
- Apr 21, 2011
- Messages
- 795
Did you have a good purge on the backside? Any sugaring?
wrenchguy
Well-known member
No purging with alot of sugar. Is this the reason for the cracks?
Looks like it might have work hardened.No purging with alot of sugar. Is this the reason for the cracks?
joe49
Well-known member
Rust is likely contamination from using a non SS brush or grinding disc that were used on steel.
Winter's coming. Bought two Meyers plow setups for $150 (only needed one) and a Titan Attachments 3/8" SSQA Plate. This will mount to the front of my tractor. I'm still quasi new under the hood, but been trying every chance I get. Sometimes I get impatient and rush, but welding has taught met to slow down.
Lincoln 210MP with .030 wire. I need to order some .035 wire, just haven't gotten to it yet. I need to move the chain to the flat stock over the pin for the swivel of the plow and build some shoes for my mostly gravel / some asphalt driveway.
Let me know how I did.


Lincoln 210MP with .030 wire. I need to order some .035 wire, just haven't gotten to it yet. I need to move the chain to the flat stock over the pin for the swivel of the plow and build some shoes for my mostly gravel / some asphalt driveway.
Let me know how I did.
I made this a little over a week or two ago. I got tired of storing my angle grinders in a tool box. The drawer was on the small size for all the grinders. It made it difficult at times to open and close. I found inspiration on Pinterest. I have plenty of scrapmetal laying around.
Attachments


stinkity stoink
Well-known member
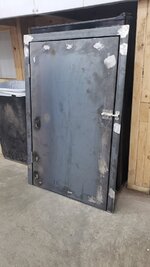
The door is great. I’m just curious if you will insulate it somehow ? I have to build one for my house and the last one I did was wood with insulation sandwiched in between. Steel is mor fun .. lol
thats nice! I wish i could get steal at my place cheaper but for now im holding offI built a crawl space door for my upstairs kneewall
PugetDude
ALLIANCE MEMBER
Good call holding off on the steal, Geo.thats nice! I wish i could get steal at my place cheaper but for now im holding off
Thanks! And I'm not going to insulate it just because we have spray foam insulation so the crawl spaces are at the same temp as the interior. I did add some weatherstripping on the gaps to prevent any drafts from passing through but I don't anticipate heat being an issueThe door is great. I’m just curious if you will insulate it somehow ? I have to build one for my house and the last one I did was wood with insulation sandwiched in between. Steel is mor fun .. lol

I have been working on a car trailer project off and on for the past few weeks. The steel was from a contractor that used to build NFL stadium VIP boxes. The virus put them out of business and I was able to pick up some 2x4 3/16 wall tube for a fair price. Its hot dipped galvanized. I learned to grind then grind some more to get the zinc off for welding. Every once in a while I find a pocket of crud and it makes a mess. Not sure if I would buy the stuff again but I am getting close to the end. I have been wanting to build an open trailer for a long time. I finally got around to it. https://www.garagejournal.com/forum/threads/lightweight-car-trailers.264215/

PugetDude
ALLIANCE MEMBER
Great project! Be careful with that tubing, burning zinc will give you a helluva headache if you aren’t careful.I have been working on a car trailer project off and on for the past few weeks. The steel was from a contractor that used to build NFL stadium VIP boxes. The virus put them out of business and I was able to pick up some 2x4 3/16 wall tube for a fair price. Its hot dipped galvanized. I learned to grind then grind some more to get the zinc off for welding. Every once in a while I find a pocket of crud and it makes a mess. Not sure if I would buy the stuff again but I am getting close to the end. I have been wanting to build an open trailer for a long time. I finally got around to it. https://www.garagejournal.com/forum/threads/lightweight-car-trailers.264215/
Grinding off the zinc makes a big difference in fumes and the quality of the weld. I can always tell when I didn't grind enough, the weld turns to crud and massive amounts of smoke.Great project! Be careful with that tubing, burning zinc will give you a helluva headache if you aren’t careful.
Old Man Roger
Well-known member
That smoke is really really bad for you.